Over the last year or two, as many visitors to my blog and Twitter will know, I’ve been spending significant time and effort advocating approaches that allow a codebase and architecture to be “best fit” for its stage in the development lifecycle while being able to evolve as your product, systems and customers evolve.
As an example for early stage projects this is often about building a modular monolith that can be evolved into micro-services as market fit is achieved, the customer base grows, and both the systems and development teams need to scale.
The underlying principals with which I approach this are both organisational and technical.
On the technical side the core of the approach is to express operations as state and execute them through a mediator rather than, as in a more traditional (layered) architecture, through direct compile time interfaces and implementations. In other words I dispatch commands and queries as POCOs rather than calling methods on an interface. These operations are then executed somewhere, somehow, by a command handler.
One of the many advantages of this approach is that you can configure the mediator to behave in different ways based on the type of the command – you might choose to execute a command immediately in memory or you might dispatch it to a queue and execute it asynchronously somewhere else. And you can do this without changing any of your business logic.
It’s really what my command mediator framework is all about and at this point its getting pretty mature with a solid core and a growing number of extensions. For a broader introduction to this architectural pattern I have a series on this blog which covers moving from a, perhaps more familiar to many, “layered” approach to one based around a mediator.
However as I used this approach over a number of projects I still found myself writing very similar ASP.Net Core code time and time again to support a REST API. Nothing complicated but it was still repetitive, still onerous, and still error prone.
What I was doing, directly or otherwise, was exposing the commands on HTTP endpoints. Which makes sense – in a system built around operations expressed as commands then a subset of those commands are likely to need to be invoked via a REST API. However the payload didn’t always come exclusively from the endpoint payload (be that a request body or route parameters) – sometimes properties were sourced from claims.
It struck me that given this I had all the information I needed to generate a REST API based on the command definitions themselves and some basic configuration and so invested some time in building a new extension package for my framework: AzureFromTheTrenches.Commanding.AspNetCore.
This allows you to take a completely “code free” (ASP.Net code) approach to exposing a command based system as a set of REST APIs simply by supplying some basic configuration. An example configuration based on a typical ASP.Net startup block is shown below:
public void ConfigureServices(IServiceCollection services)
{
    // Configure a dependency resolver adapter around IServiceCollection and add the commanding
    // system to the service collection
    ICommandingDependencyResolverAdapter commandingAdapter =
        new CommandingDependencyResolverAdapter(
            (fromType,toInstance) => services.AddSingleton(fromType, toInstance),
            (fromType,toType) => services.AddTransient(fromType, toType),
            (resolveType) => ServiceProvider.GetService(resolveType)
        );
    // Add the core commanding framework and discover our command handlers
    commandingAdapter.AddCommanding().Discover<Startup>();

    // Add MVC to our dependencies and then configure our REST API
    services
        .AddMvc()
        .AddAspNetCoreCommanding(cfg => cfg
            // configure our controller and actions
            .Controller("Posts", controller => controller
                .Action<GetPostQuery>(HttpMethod.Get, "{Id}")
                .Action<GetPostsQuery,FromQueryAttribute>(HttpMethod.Get)
                .Action<CreatePostCommand>(HttpMethod.Post)
            )
        );
}
If we enable Swagger too then that gives us an API that looks like this:

There is, quite literally, no other ASP.Net code involved – there are no controllers to write.
So how does it work? Essentially by writing and compiling the controllers for you using Roslyn and adding a couple of pieces of ASP.Net Core plumbing (but nothing that interferes with the broader running of ASP.Net – you can mix and match command based controllers with hand written controllers) as shown in the diagram below:
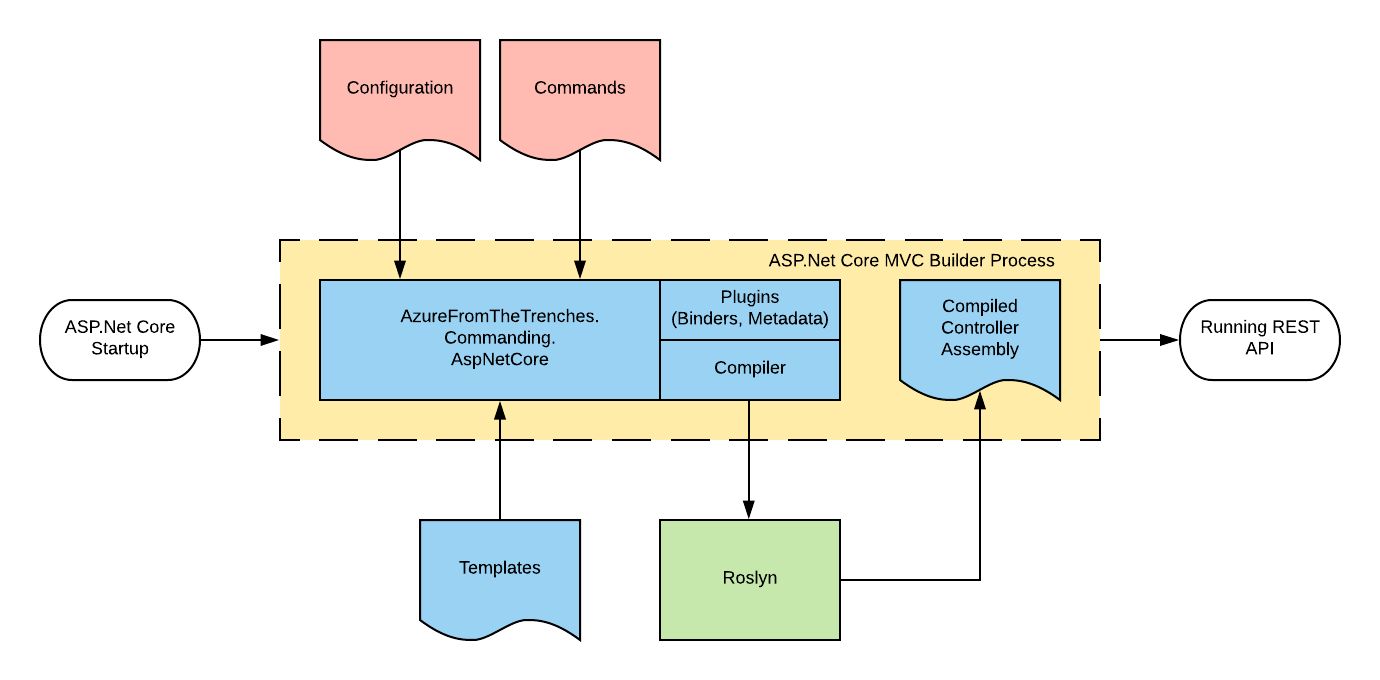
Essentially you bring along the configuration block (as shown in the code sample earlier) and your commands and the framework will do the rest.
I have a quickstart and detailed documentation available on the frameworks documentation site but I’m going to take a different perspective on this here and break down a more complex configuration block than that I showed above:
// This method gets called by the runtime. Use this method to add services to the container.
public void ConfigureServices(IServiceCollection services)
{
    ICommandingDependencyResolverAdapter commandingAdapter =
        new CommandingDependencyResolverAdapter(
            (fromType,toInstance) => services.AddSingleton(fromType, toInstance),
            (fromType,toType) => services.AddTransient(fromType, toType),
            (resolveType) => ServiceProvider.GetService(resolveType)
        );
    ICommandRegistry commandRegistry = commandingAdapter.AddCommanding().Discover<Startup>();

    services
        .Replace(new ServiceDescriptor(typeof(ICommandDispatcher), typeof(ApplicationErrorAwareCommandDispatcher), ServiceLifetime.Transient))
        .AddMvc(mvc => mvc.Filters.Add(new FakeClaimsProvider()))
        .AddAspNetCoreCommanding(cfg => cfg
            .DefaultControllerRoute("/api/v1/[controller]")
            .Controller("Posts", controller => controller
                .Action<GetPostQuery>(HttpMethod.Get, "{Id}")
                .Action<GetPostsQuery,FromQueryAttribute>(HttpMethod.Get)
                .Action<CreatePostCommand>(HttpMethod.Post)
            )
            .Claims(mapping => mapping.MapClaimToPropertyName("UserId", "AuthenticatedUserId"))
        )
        .AddFluentValidation();

    services.AddSwaggerGen(c =>
    {
        c.SwaggerDoc("v1", new Info { Title = "Headless Blog API", Version = "v1" });
        c.AddAspNetCoreCommanding();
    });

}
Firstly we register the commanding framework:
ICommandingDependencyResolverAdapter commandingAdapter =
    new CommandingDependencyResolverAdapter(
        (fromType,toInstance) => services.AddSingleton(fromType, toInstance),
        (fromType,toType) => services.AddTransient(fromType, toType),
        (resolveType) => ServiceProvider.GetService(resolveType)
    );
ICommandRegistry commandRegistry = commandingAdapter.AddCommanding().Discover<Startup>();
If you’ve used this framework below then this will be quite familiar code – we create an adapter for our IoC container (the framework itself is agnostic of IoC container and uses an adapter to work with any IoC framework of your choice) and then register the commanding infrastructure with it and finally we use the .Discover method to search for and register command handlers in the same assembly as our Startup class.
Next we begin to register our other services, including MVC, with our IoC container:
services
    .Replace(new ServiceDescriptor(typeof(ICommandDispatcher), typeof(ApplicationErrorAwareCommandDispatcher), ServiceLifetime.Transient))
The first service we register is a command dispatcher – as we’ll see shortly this is a decorator for the framework provided dispatcher. This is entirely optional but its quite common to want to apply cross cutting concerns to every operation and implementing a decorator like this is an excellent place to do so. In our example we want to translate application errors that occur during command handling into appropriate HTTP responses. The code for this decorator is shown below:
public class ApplicationErrorAwareCommandDispatcher : ICommandDispatcher
{
    private readonly IFrameworkCommandDispatcher _underlyingCommandDispatcher;

    public ApplicationErrorAwareCommandDispatcher(IFrameworkCommandDispatcher underlyingCommandDispatcher)
    {
        _underlyingCommandDispatcher = underlyingCommandDispatcher;
    }

    public async Task<CommandResult<TResult>> DispatchAsync<TResult>(ICommand<TResult> command, CancellationToken cancellationToken = new CancellationToken())
    {
        try
        {
            CommandResult<TResult> result = await _underlyingCommandDispatcher.DispatchAsync(command, cancellationToken);
            if (result.Result == null)
            {
                throw new RestApiException(HttpStatusCode.NotFound);
            }
            return result;
        }
        catch (CommandModelException ex)
        {
            ModelStateDictionary modelStateDictionary = new ModelStateDictionary();
            modelStateDictionary.AddModelError(ex.Property, ex.Message);
            throw new RestApiException(HttpStatusCode.BadRequest, modelStateDictionary);
        }
    }

    public Task<CommandResult> DispatchAsync(ICommand command, CancellationToken cancellationToken = new CancellationToken())
    {
        return _underlyingCommandDispatcher.DispatchAsync(command, cancellationToken);
    }

    public ICommandExecuter AssociatedExecuter { get; } = null;
}
Essentially this traps a specific exception raised from our handlers (CommandModelException) and translates it into model state information and rethrows that as a RestApiException. The RestApiException is an exception defined by the framework that our configuration based controllers expect to handle and will catch and translate into the appropraite HTTP result. In our case a BadRequest with the model state as the response.
This is a good example of the sort of code that, if you write controllers by hand, you tend to find yourself writing time and time again – and even if you write a base class and helpers you still need to write the code that invokes them for each action in each controller and its not uncommon to find inconsistencies creeping in over time or things being outright missed.
Returning to our configuration block the next thing we add to the service collection is ASP.Net Core MVC:
.AddMvc(mvc => mvc.Filters.Add(new FakeClaimsProvider()))
In the example I’m basing this on I want to demonstrate the claims support without having to have everybody set up a real identity provider and so I also add a global resource filter that simply adds some fake claims to our identity model.
AddMvc returns an IMvcBuilder interface that can be used to provide additional configuration and this is what the REST commanding framework configures in order to expose commands as REST endpoints and so the next line adds our framework components to MVC and then supplies a builder of its own for configuring our endpoints and other behaviours:
.AddAspNetCoreCommanding(cfg => cfg
On the next line we use of the configurations options exposed by the framework to replace the default controller route prefix with a versioned one:
.DefaultControllerRoute("/api/v1/[controller]")
This is entirely optional and if not specified the framework will simply to default to the same convention used by ASP.Net Core (/api/[controller]).
Next we have a simple repition of the block we looked at earlier:
        .Controller("Posts", controller => controller
                .Action<GetPostQuery>(HttpMethod.Get, "{Id}")
                .Action<GetPostsQuery,FromQueryAttribute>(HttpMethod.Get)
                .Action<CreatePostCommand>(HttpMethod.Post)
            )
This defines a controller called Posts (the generated class name will be PostsController) and then assigns 3 actions to it to give us endpoints we saw in the Swagger definition:
- GET: /api/v1/Posts/{Id}
- GET: /api/v1/Posts
- POST: /api/v1/Posts
For more information on how actions can be configured take a look at this here.
Next we instruct the framework to map the claim named UserId onto any command property called AuthenticatedUserId:
.Claims(mapping => mapping.MapClaimToPropertyName("UserId", "AuthenticatedUserId"))
Their is another variant of the claims mapper declaration that allows properties to be configured on a per command basis though if you are starting with a greenfield solution taking a consistent approach to naming can simplify things.
Data sourced from claims is generally not something you want a user to be able to supply – for example if they can supply a different user ID in our example here then that might lead to a data breach with users being able to access inappropriate data. In order to ensure this cannot happen the framework supplies an attribute, SecurityPropertyAttribute, that enables properties to be marked as sensitive. For example here’s the CreatePostCommand from the example we are looking at:
public class CreatePostCommand : ICommand<PublishedPost>
{
    // Marking this property with the SecurityProperty attribute means that the ASP.Net Core Commanding
    // framework will not allow binding to the property except by the claims mapper
    [SecurityProperty]
    public Guid AuthenticatedUserId { get; set; }

    public string Title { get; set; }

    public string Body { get; set; }
}
The framework installs extensions into ASP.Net Core that adjust model metadata and binding (including from request bodies – that ASP.Net Core behaves somewhat inconsistently with) to ensure that they cannot be written to from an endpoint and, as we’ll see shortly, are hidden from Swagger.
The final line of our MVC builder extensions replaces the built in validation with Fluent Validation:
.AddFluentValidation();
This is optional and you can use the attribute based validation model (or any other validation model) with the command framework however if you do so you’re baking validation data into your commands and this can be limiting: for example you may want to apply different validations based on context (queue vs. REST API). It’s important to note that validation, and all other ASP.Net Core functionality, will be applied to the commands as they pass through its pipeline – their is nothing special about them at all other than what I outlined above in terms of sensitive properties. This framework really does just build on ASP.Net Core – it doesn’t subvert it or twist it in some abominable way.
Then finally we add a Swagger endpoint using Swashbuckle:
services.AddSwaggerGen(c =>
    {
        c.SwaggerDoc("v1", new Info { Title = "Headless Blog API", Version = "v1" });
        c.AddAspNetCoreCommanding();
    });
The call to AddAspNetCoreCommanding here adds schema filters into Swagger that understand how to interpret the SecurityPropertyAttribute attribute and will prevent those properties from appearing in the Swagger document.
Conclusions
By taking the approach outlined in this post we’ve greatly reduced the amount of code we need to write eliminating all the boilerplate normally associated with writing a REST API in ASP.Net Core and we’ve completely decoupled our application logic from communication protocols, runtime model and host.
Simplistically less code gives us less to test, less to review, lower maintenance, improved consistency and fewer defects.
And we’ve gained a massive amount of flexibility in our application architecture that allows us to tailor our approach to best fit our project at a given point in time / stage of development lifecycle and more easily take advantage of new technologies.
To give a flavour of the latter, support for Azure Functions is currently under development allowing for the same API and underlying implementation to be expressed in a serverless model simply by adopting a new NuGet package and changing the configuration to the below (please bear in mind this comes from the early, but functional, work in progress and so is liable to change):
public class FunctionAppConfiguration : IFunctionAppConfiguration
{
    public void Build(IFunctionHostBuilder builder)
    {
        builder
            // register services and commands
            .Setup((services, commandRegistry) => commandRegistry.Discover<FunctionAppConfiguration>())
            // register functions - by default the functions will be given the name of the command minus the postfix Command and use the GET verb
            .Functions(functions => functions
                    .HttpFunction<GetPostsQuery>()
                    .HttpFunction<GetPostQuery>()
                    .HttpFunction<CreatePostCommand>(function => function.AddVerb(HttpMethod.Post))
            );
    }
}
In addition to bringing the same benefits to Functions as the approach above does to ASP.Net Core this also provides, to my eyes, a cleaner approach for expressing Function triggers and provides structure for things like an IoC container.

Recent Comments