The latest release of Asp.Net introduces some fundamental architectural changes that have a significant effect on frameworks such as MVC and Web API as Asp.Net now sits on top of the OWIN stack.
As part of this change Microsoft have yet again changed the authentication and authorisation model. Yes you still use the Authorize attribute within your MVC and Web API controllers but the workflow around authentication has been rejigged considerably.
If, like me, you have a penchant for writing mobile apps that consume Web API based services hosted in Azure chances are you’ll want to register and authenticate with your services from the device. This is really simple to achieve with Web API 2 and OWIN, in fact it’s all in place out of the box, but the trouble is that it’s barely documented.
Having spent a morning going through significant pain figuring this out I’ve put this How To guide together to show how to do this. For added fun I’ve built the client in Xamarin as an iOS application but the approach will work on any platform including from Windows 8, JavaScript, whatever you like. In fact the C# code that I outline below can be lifted straight from the Xamarin project and dropped into any other C# application. If you want to skip ahead to the example code it can be found on GitHub.
We’ll get started by creating a Web API project. In Visual Studio create a new solution and pick ASP.Net Web Application. On the ASP.Net project type page select the Web API template and change the authentication type to Individual User Accounts:

Inside this project will be a API controller called ValuesController – this is the normal Web API sample. You’ll notice the class has an Authorize attribute which will protect it from anonymous access. Your exact URL will vary depending on what port IIS Express has been set up with but enter the URL to get the values from the controller (in my case http://localhost:5287/api/Values) and you should see some XML (I’m using Chrome):
<Error>
<Message>Authorization has been denied for this request.</Message>
</Error>
So far so good – we need to be logged in to access the API which is what we want. In order to login first we’re going to need to register a user.
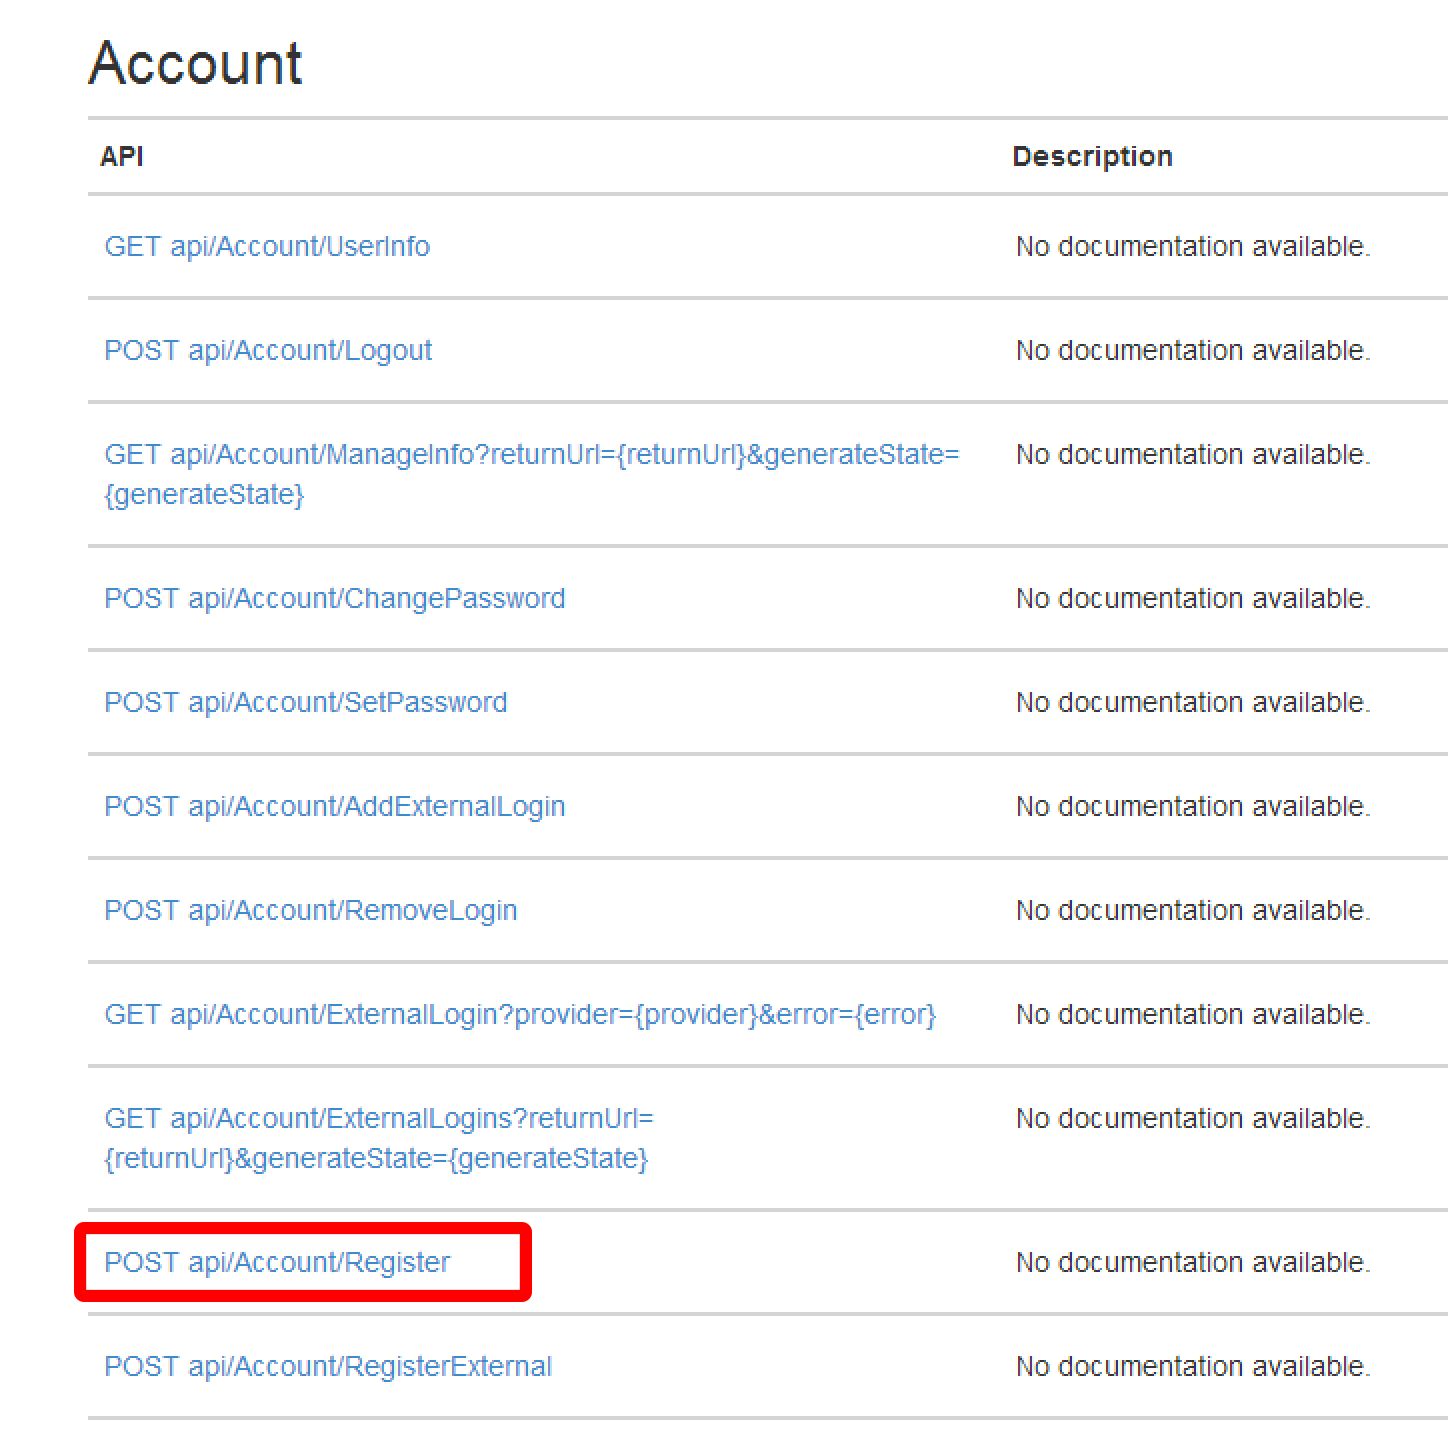
If you visit the help page for the API (for example http://localhost:5287/Help) you’ll see that there is an Account API that fronts lots of interesting methods – one of which is Register:
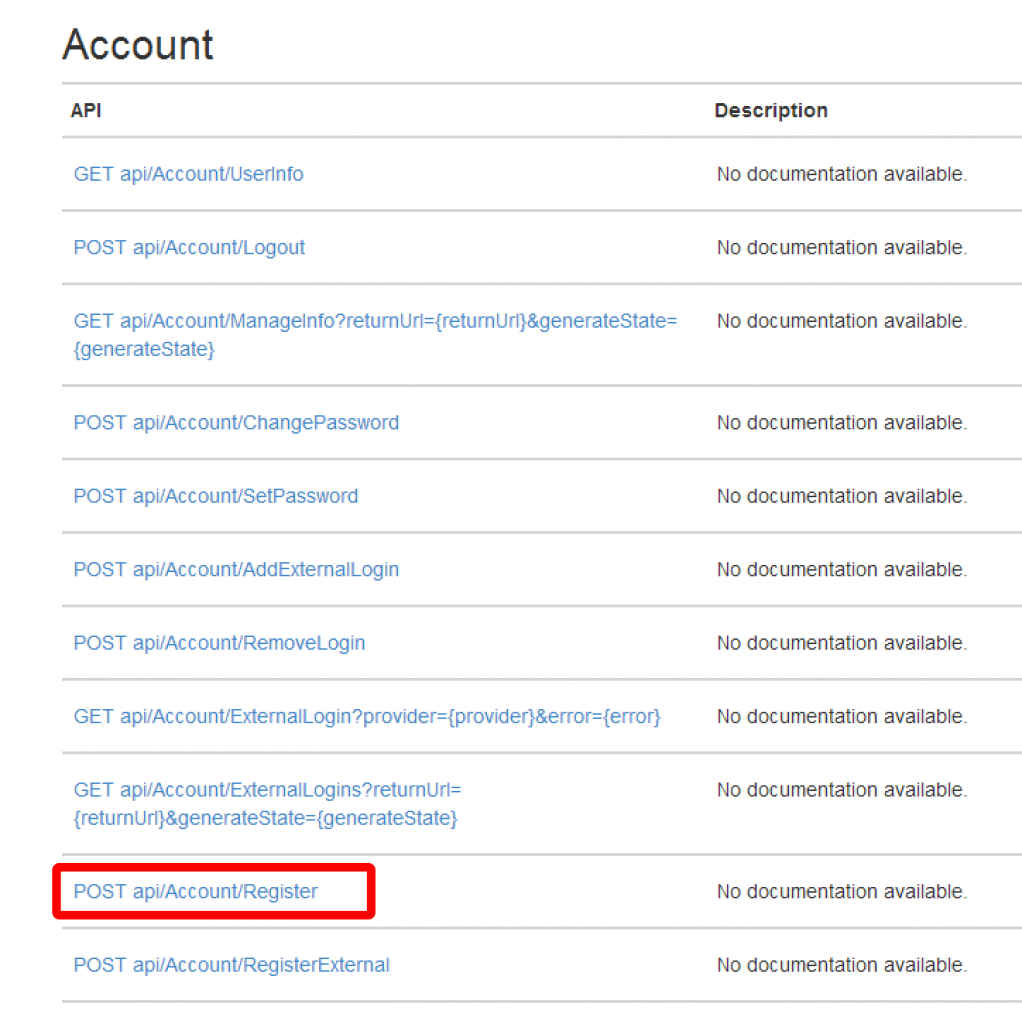
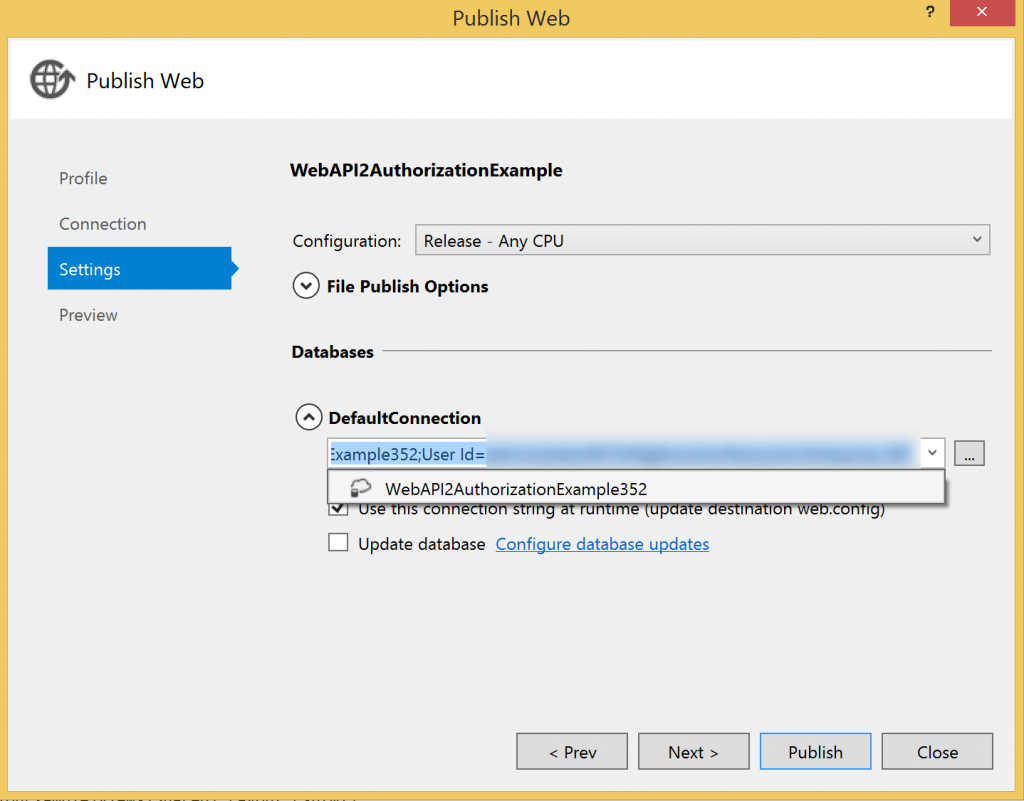
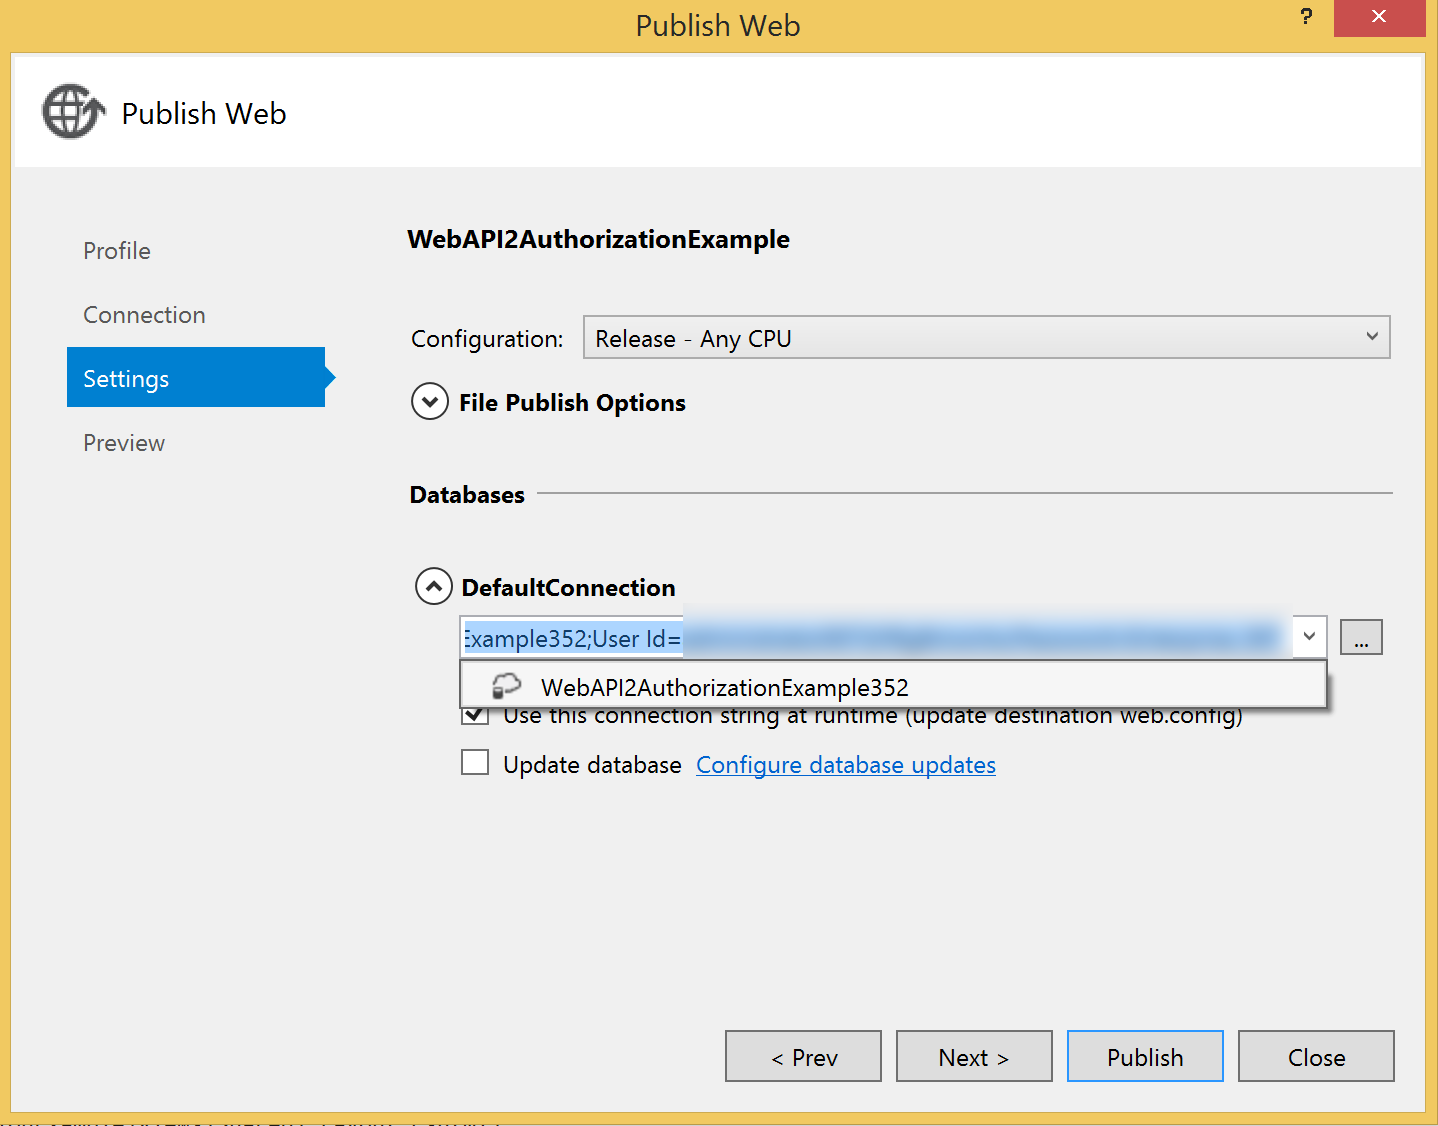
So if we post the right data to that action we should be able to register an account and believe it or not we’re done with the website so publish it to a free website in Azure and take note of the URL you’ve dropped it on. I recommend using VS2013 and the latest version of the Azure SDK (2.2 at the time of writing) as the tools make this really simple. The only real gotcha to watch out for is to point your website at a SQL Database rather than the local file approach that will be configured within your website. To point to a real database just make sure that you pick, or create as in the example below, a real database server:

And then make sure that the DefaultConnection is updated:
With the website deployed and ready it’s time to create an iOS application. You can use either Xamarin Studio or the Visual Studio plugin. I used the Hello World template for my application and targetted iOS 7 which I then reworked to give me the user interface below:
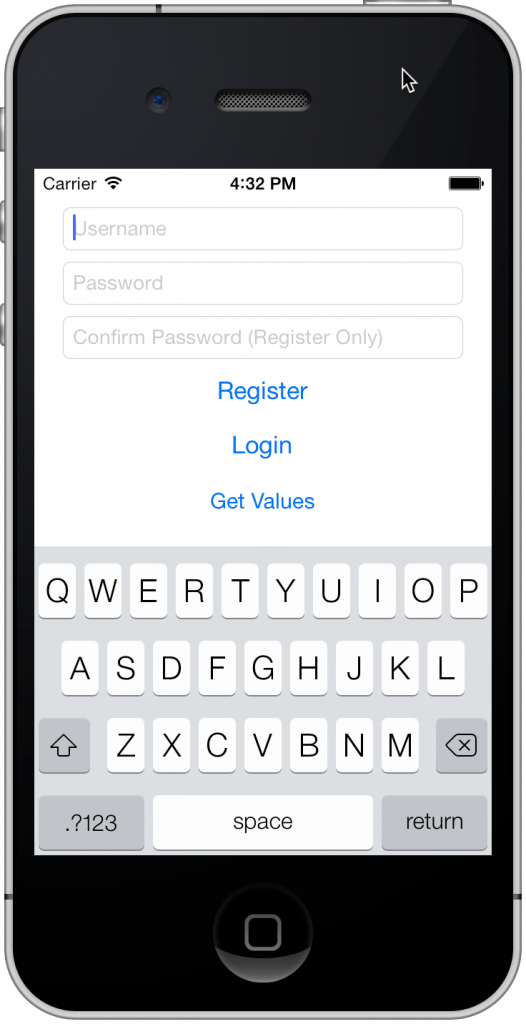
I’m not going to spend too much time talking about the user interface of the Xamarin application (it’s not really the focus of this How To) but all I really did was update it with the user interface above and added the Json.Net component from the Xamarin Component Store (if you’re from the .Net world – think NuGet, looking forward to a PCL version of Json.Net!). None of the connectivity code was Xamarin specific.
For the application to register a user it needs to send the right model to the Register action we located earlier. The website contains a class called RegisterBindingModel which we’re going to replicate in our Xamarin application (in a production application I recommend pulling these models out into a Portable Class Library rather than copying and pasting code) in a class called RegisterModel:
class RegisterModel
{
    public string UserName { get; set; }
    public string Password { get; set; }
    public string ConfirmPassword { get; set; }
} |
class RegisterModel
{
public string UserName { get; set; }
public string Password { get; set; }
public string ConfirmPassword { get; set; }
}
We’re going to form up a HttpWebRequest with the registration information and send it to the controller. As long as we don’t get a HTTP error then registration has been successful. I’ve wrapped this in a class called RegisterServiceClient:
class RegisterService
{
    public async Task Register(string username, string password, string confirmPassword)
    {
        RegisterModel model = new RegisterModel
        {
            ConfirmPassword = confirmPassword,
            Password = password,
            UserName = username
        };

        HttpWebRequest request = new HttpWebRequest(new Uri(String.Format("{0}api/Account/Register", Constants.BaseAddress)));
        request.Method = "POST";
        request.ContentType = "application/json";
        request.Accept = "application/json";
        string json = JsonConvert.SerializeObject(model);
        byte[] bytes = Encoding.UTF8.GetBytes(json);
        using(Stream stream = await request.GetRequestStreamAsync())
        {
            stream.Write(bytes, 0, bytes.Length);
        }

        try
        {
            await request.GetResponseAsync();
            return true;
        }
        catch (Exception ex)
        {
            return false;
        }
    }
} |
class RegisterService
{
public async Task Register(string username, string password, string confirmPassword)
{
RegisterModel model = new RegisterModel
{
ConfirmPassword = confirmPassword,
Password = password,
UserName = username
};
HttpWebRequest request = new HttpWebRequest(new Uri(String.Format("{0}api/Account/Register", Constants.BaseAddress)));
request.Method = "POST";
request.ContentType = "application/json";
request.Accept = "application/json";
string json = JsonConvert.SerializeObject(model);
byte[] bytes = Encoding.UTF8.GetBytes(json);
using(Stream stream = await request.GetRequestStreamAsync())
{
stream.Write(bytes, 0, bytes.Length);
}
try
{
await request.GetResponseAsync();
return true;
}
catch (Exception ex)
{
return false;
}
}
}
That will register user but how do we log in. If we refer back to our websites API help page although there are a lot of interesting looking methods there is no Login method.
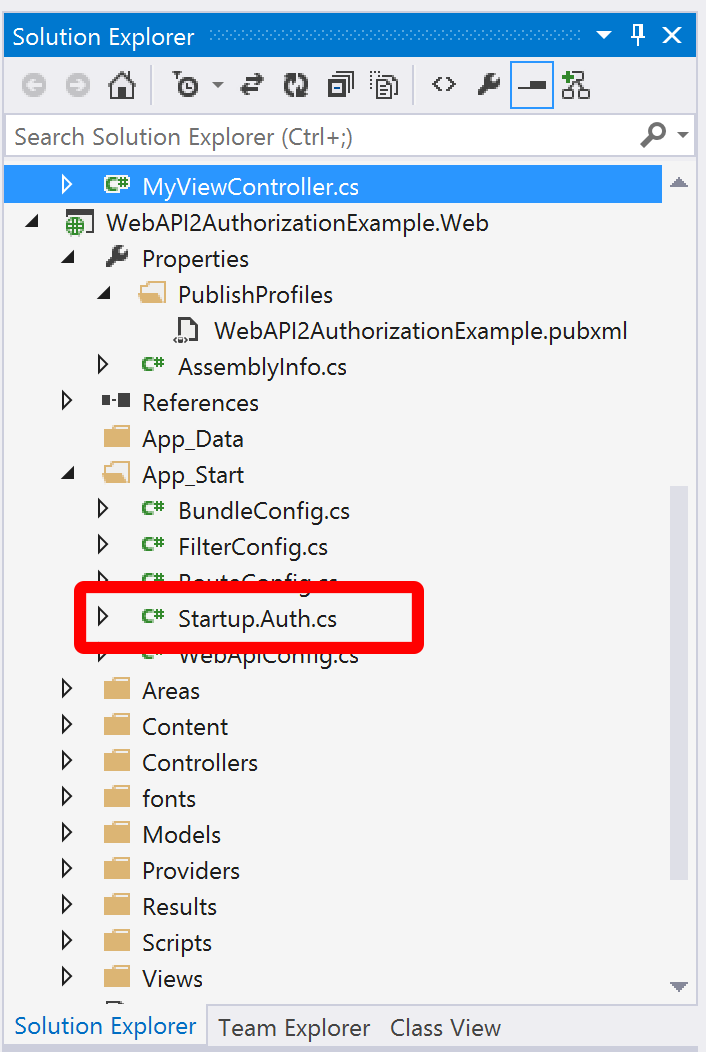
This is where OWIN comes in. If you take a look at the code that was generated for the website you’ll see that in MVC 5 / Web API 2 there is a new file in the solution (compared to MVC 4) called Startup.Auth.cs:

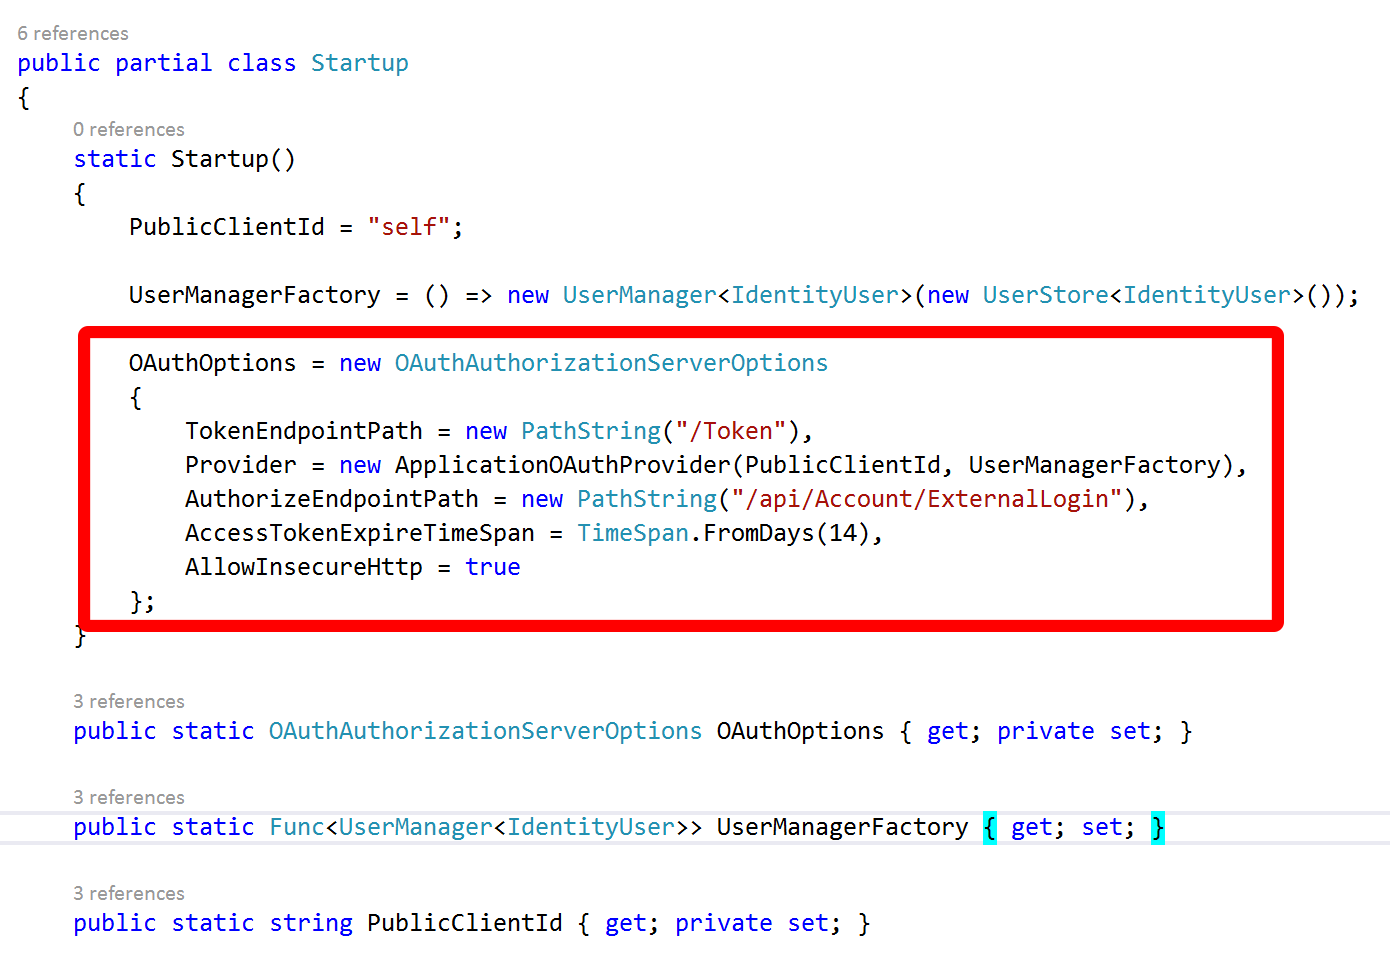
This is where the configuration for authentication and authorization takes place with OWIN and the real interesting bit for us is the section towards the top where OAuthOptions are set:

Essentially OWIN is running an OAuth authentication server within our website and setting up OAuth endpoints for us. I’m not going to dwell on OAuth but essentially to authenticate we need to request a token using our username and password to identify ourselves and then in subsequent service calls supply this token as a HTTP header in the request.
The token end point we need to call can be seen in the image above: it’s /Token. We need to pass it the username and password and also an additional piece of information: the grant type. We need the grant type to be password. The endpoint responds to form data and we make the call as shown below:
class LoginService
{
    public async Task Login(string username, string password)
    {
        HttpWebRequest request = new HttpWebRequest(new Uri(String.Format("{0}Token", Constants.BaseAddress)));
        request.Method = "POST";

        string postString = String.Format("username={0}&password={1}&grant_type=password", HttpUtility.HtmlEncode(username), HttpUtility.HtmlEncode(password));
        byte[] bytes = Encoding.UTF8.GetBytes(postString);
        using (Stream requestStream = await request.GetRequestStreamAsync())
        {
            requestStream.Write(bytes, 0, bytes.Length);
        }

        try
        {
            HttpWebResponse httpResponse =  (HttpWebResponse)(await request.GetResponseAsync());
            string json;
            using (Stream responseStream = httpResponse.GetResponseStream())
            {
                json = new StreamReader(responseStream).ReadToEnd();
            }
            TokenResponseModel tokenResponse = JsonConvert.DeserializeObject(json);
            return tokenResponse.AccessToken;
        }
        catch (Exception ex)
        {
            throw new SecurityException("Bad credentials", ex);
        }
    }
} |
class LoginService
{
public async Task Login(string username, string password)
{
HttpWebRequest request = new HttpWebRequest(new Uri(String.Format("{0}Token", Constants.BaseAddress)));
request.Method = "POST";
string postString = String.Format("username={0}&password={1}&grant_type=password", HttpUtility.HtmlEncode(username), HttpUtility.HtmlEncode(password));
byte[] bytes = Encoding.UTF8.GetBytes(postString);
using (Stream requestStream = await request.GetRequestStreamAsync())
{
requestStream.Write(bytes, 0, bytes.Length);
}
try
{
HttpWebResponse httpResponse = (HttpWebResponse)(await request.GetResponseAsync());
string json;
using (Stream responseStream = httpResponse.GetResponseStream())
{
json = new StreamReader(responseStream).ReadToEnd();
}
TokenResponseModel tokenResponse = JsonConvert.DeserializeObject(json);
return tokenResponse.AccessToken;
}
catch (Exception ex)
{
throw new SecurityException("Bad credentials", ex);
}
}
}
In response to a successful call on the Token endpoint the OAuth server will return us JSON data that includes the access token and some additional information, I’m deserializing it into a class called TokenResponseModel but the thing we’re really interested in is the access token. The full response is modelled like this:
class TokenResponseModel
{
    [JsonProperty("access_token")]
    public string AccessToken { get; set; }

    [JsonProperty("token_type")]
    public string TokenType { get; set; }

    [JsonProperty("expires_in")]
    public int ExpiresIn { get; set; }

    [JsonProperty("userName")]
    public string Username { get; set; }

    [JsonProperty(".issued")]
    public string IssuedAt { get; set; }

    [JsonProperty(".expires")]
    public string ExpiresAt { get; set; }
} |
class TokenResponseModel
{
[JsonProperty("access_token")]
public string AccessToken { get; set; }
[JsonProperty("token_type")]
public string TokenType { get; set; }
[JsonProperty("expires_in")]
public int ExpiresIn { get; set; }
[JsonProperty("userName")]
public string Username { get; set; }
[JsonProperty(".issued")]
public string IssuedAt { get; set; }
[JsonProperty(".expires")]
public string ExpiresAt { get; set; }
}
Now we’ve got that access token we can use it against any future requests that require authentication and authorization – so finally we can return to our attempt to access the ValuesController. We need to supply the access token in a HTTP header called Authorization and the value for the header must have the format “Bearer {token}”, the space between Bearer and the token is significant – if you miss it authorization will fail. Here’s how we use the token to retrieve the list of values from the controller:
class ValuesService
{
    public async Task<IEnumerable> GetValues(string accessToken)
    {
        HttpWebRequest request = new HttpWebRequest(new Uri(String.Format("{0}api/Values", Constants.BaseAddress)));
        request.Method = "GET";
        request.Accept = "application/json";
        request.Headers.Add("Authorization", String.Format("Bearer {0}", accessToken));

        try
        {
            HttpWebResponse httpResponse = (HttpWebResponse)(await request.GetResponseAsync());
            string json;
            using (Stream responseStream = httpResponse.GetResponseStream())
            {
                json = new StreamReader(responseStream).ReadToEnd();
            }
            List values = JsonConvert.DeserializeObject<List>(json);
            return values;
        }
        catch (Exception ex)
        {
            throw new SecurityException("Bad credentials", ex);
        }
    }
} |
class ValuesService
{
public async Task<IEnumerable> GetValues(string accessToken)
{
HttpWebRequest request = new HttpWebRequest(new Uri(String.Format("{0}api/Values", Constants.BaseAddress)));
request.Method = "GET";
request.Accept = "application/json";
request.Headers.Add("Authorization", String.Format("Bearer {0}", accessToken));
try
{
HttpWebResponse httpResponse = (HttpWebResponse)(await request.GetResponseAsync());
string json;
using (Stream responseStream = httpResponse.GetResponseStream())
{
json = new StreamReader(responseStream).ReadToEnd();
}
List values = JsonConvert.DeserializeObject<List>(json);
return values;
}
catch (Exception ex)
{
throw new SecurityException("Bad credentials", ex);
}
}
}
Obviously I’ve cut out a lot of error handling and have taken some short cuts to stay focussed on the topic but really it’s quite simple, just appallingly documented at the moment.
You can find the full code on GitHub.


Recent Comments