Category: Web API

Lean Configuration Based ASP.Net Core REST APIs

Over the last year or two, as many visitors to my blog and Twitter will know, I’ve been spending significant time and effort advocating approaches that allow a codebase and architecture to be “best fit” for its stage in the development lifecycle while being able to evolve as your product, systems and customers evolve.

As an example for early stage projects this is often about building a modular monolith that can be evolved into micro-services as market fit is achieved, the customer base grows, and both the systems and development teams need to scale.

The underlying principals with which I approach this are both organisational and technical.

On the technical side the core of the approach is to express operations as state and execute them through a mediator rather than, as in a more traditional (layered) architecture, through direct compile time interfaces and implementations. In other words I dispatch commands and queries as POCOs rather than calling methods on an interface. These operations are then executed somewhere, somehow, by a command handler.

One of the many advantages of this approach is that you can configure the mediator to behave in different ways based on the type of the command – you might choose to execute a command immediately in memory or you might dispatch it to a queue and execute it asynchronously somewhere else. And you can do this without changing any of your business logic.

It’s really what my command mediator framework is all about and at this point its getting pretty mature with a solid core and a growing number of extensions. For a broader introduction to this architectural pattern I have a series on this blog which covers moving from a, perhaps more familiar to many, “layered” approach to one based around a mediator.

However as I used this approach over a number of projects I still found myself writing very similar ASP.Net Core code time and time again to support a REST API. Nothing complicated but it was still repetitive, still onerous, and still error prone.

What I was doing, directly or otherwise, was exposing the commands on HTTP endpoints. Which makes sense – in a system built around operations expressed as commands then a subset of those commands are likely to need to be invoked via a REST API. However the payload didn’t always come exclusively from the endpoint payload (be that a  request body or route parameters) – sometimes properties were sourced from claims.

It struck me that given this I had all the information I needed to generate a REST API based on the command definitions themselves and some basic configuration and so invested some time in building a new extension package for my framework: AzureFromTheTrenches.Commanding.AspNetCore.

This allows you to take a completely “code free” (ASP.Net code) approach to exposing a command based system as a set of REST APIs simply by supplying some basic configuration. An example configuration based on a typical ASP.Net startup block  is shown below:

public void ConfigureServices(IServiceCollection services)
{
    // Configure a dependency resolver adapter around IServiceCollection and add the commanding
    // system to the service collection
    ICommandingDependencyResolverAdapter commandingAdapter =
        new CommandingDependencyResolverAdapter(
            (fromType,toInstance) => services.AddSingleton(fromType, toInstance),
            (fromType,toType) => services.AddTransient(fromType, toType),
            (resolveType) => ServiceProvider.GetService(resolveType)
        );
    // Add the core commanding framework and discover our command handlers
    commandingAdapter.AddCommanding().Discover<Startup>();

    // Add MVC to our dependencies and then configure our REST API
    services
        .AddMvc()
        .AddAspNetCoreCommanding(cfg => cfg
            // configure our controller and actions
            .Controller("Posts", controller => controller
                .Action<GetPostQuery>(HttpMethod.Get, "{Id}")
                .Action<GetPostsQuery,FromQueryAttribute>(HttpMethod.Get)
                .Action<CreatePostCommand>(HttpMethod.Post)
            )
        );                
}

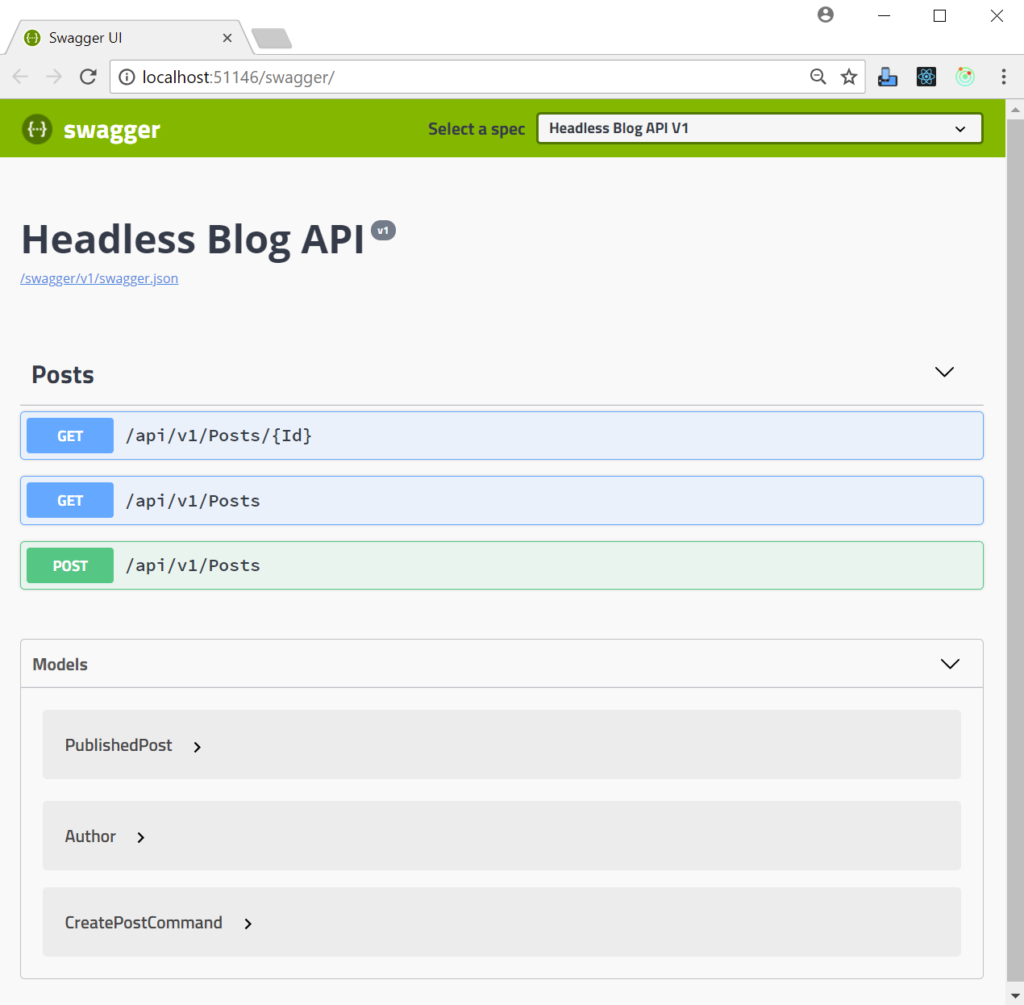
If we enable Swagger too then that gives us an API that looks like this:

There is, quite literally, no other ASP.Net code involved – there are no controllers to write.

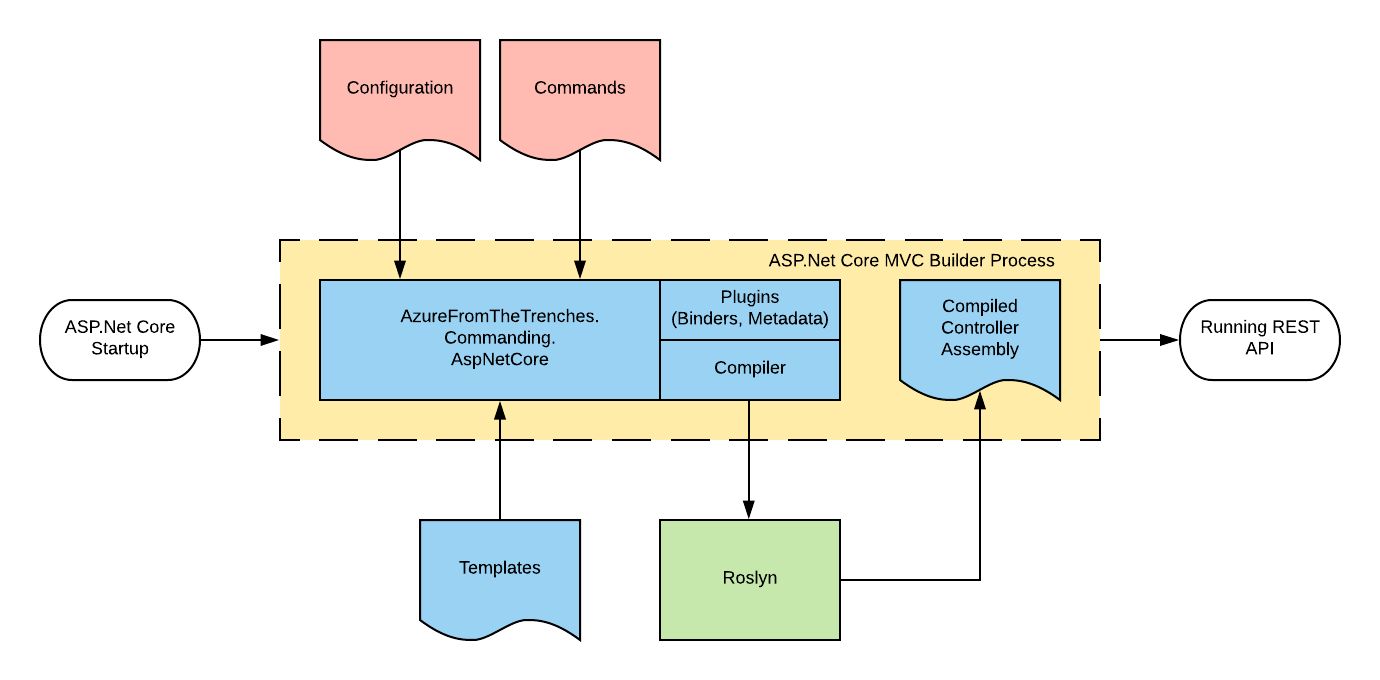
So how does it work? Essentially by writing and compiling the controllers for you using Roslyn and adding a couple of pieces of ASP.Net Core plumbing (but nothing that interferes with the broader running of ASP.Net – you can mix and match command based controllers with hand written controllers) as shown in the diagram below:

Essentially you bring along the configuration block (as shown in the code sample earlier) and your commands and the framework will do the rest.

I have a quickstart and detailed documentation available on the frameworks documentation site but I’m going to take a different perspective on this here and break down a more complex configuration block than that I showed above:

// This method gets called by the runtime. Use this method to add services to the container.
public void ConfigureServices(IServiceCollection services)
{
    ICommandingDependencyResolverAdapter commandingAdapter =
        new CommandingDependencyResolverAdapter(
            (fromType,toInstance) => services.AddSingleton(fromType, toInstance),
            (fromType,toType) => services.AddTransient(fromType, toType),
            (resolveType) => ServiceProvider.GetService(resolveType)
        );
    ICommandRegistry commandRegistry = commandingAdapter.AddCommanding().Discover<Startup>();

    services
        .Replace(new ServiceDescriptor(typeof(ICommandDispatcher), typeof(ApplicationErrorAwareCommandDispatcher), ServiceLifetime.Transient))
        .AddMvc(mvc => mvc.Filters.Add(new FakeClaimsProvider()))
        .AddAspNetCoreCommanding(cfg => cfg
            .DefaultControllerRoute("/api/v1/[controller]")
            .Controller("Posts", controller => controller
                .Action<GetPostQuery>(HttpMethod.Get, "{Id}")
                .Action<GetPostsQuery,FromQueryAttribute>(HttpMethod.Get)
                .Action<CreatePostCommand>(HttpMethod.Post)
            )
            .Claims(mapping => mapping.MapClaimToPropertyName("UserId", "AuthenticatedUserId"))
        )
        .AddFluentValidation();

    services.AddSwaggerGen(c =>
    {
        c.SwaggerDoc("v1", new Info { Title = "Headless Blog API", Version = "v1" });
        c.AddAspNetCoreCommanding();
    });

}

Firstly we register the commanding framework:

ICommandingDependencyResolverAdapter commandingAdapter =
    new CommandingDependencyResolverAdapter(
        (fromType,toInstance) => services.AddSingleton(fromType, toInstance),
        (fromType,toType) => services.AddTransient(fromType, toType),
        (resolveType) => ServiceProvider.GetService(resolveType)
    );
ICommandRegistry commandRegistry = commandingAdapter.AddCommanding().Discover<Startup>();

If you’ve used this framework below then this will be quite familiar code – we create an adapter for our IoC container (the framework itself is agnostic of IoC container and uses an adapter to work with any IoC framework of your choice) and then register the commanding infrastructure with it and finally we use the .Discover method to search for and register command handlers in the same assembly as our Startup class.

Next we begin to register our other services, including MVC, with our IoC container:

services
    .Replace(new ServiceDescriptor(typeof(ICommandDispatcher), typeof(ApplicationErrorAwareCommandDispatcher), ServiceLifetime.Transient))

The first service we register is a command dispatcher – as we’ll see shortly this is a decorator for the framework provided dispatcher. This is entirely optional but its quite common to want to apply cross cutting concerns to every operation and implementing a decorator like this is an excellent place to do so. In our example we want to translate application errors that occur during command handling into appropriate HTTP responses. The code for this decorator is shown below:

public class ApplicationErrorAwareCommandDispatcher : ICommandDispatcher
{
    private readonly IFrameworkCommandDispatcher _underlyingCommandDispatcher;

    public ApplicationErrorAwareCommandDispatcher(IFrameworkCommandDispatcher underlyingCommandDispatcher)
    {
        _underlyingCommandDispatcher = underlyingCommandDispatcher;
    }

    public async Task<CommandResult<TResult>> DispatchAsync<TResult>(ICommand<TResult> command, CancellationToken cancellationToken = new CancellationToken())
    {
        try
        {
            CommandResult<TResult> result = await _underlyingCommandDispatcher.DispatchAsync(command, cancellationToken);
            if (result.Result == null)
            {
                throw new RestApiException(HttpStatusCode.NotFound);
            }
            return result;
        }
        catch (CommandModelException ex)
        {
            ModelStateDictionary modelStateDictionary = new ModelStateDictionary();
            modelStateDictionary.AddModelError(ex.Property, ex.Message);
            throw new RestApiException(HttpStatusCode.BadRequest, modelStateDictionary);
        }
    }

    public Task<CommandResult> DispatchAsync(ICommand command, CancellationToken cancellationToken = new CancellationToken())
    {
        return _underlyingCommandDispatcher.DispatchAsync(command, cancellationToken);
    }

    public ICommandExecuter AssociatedExecuter { get; } = null;
}

Essentially this traps a specific exception raised from our handlers (CommandModelException) and translates it into model state information and rethrows that as a RestApiException. The RestApiException is an exception defined by the framework that our configuration based controllers expect to handle and will catch and translate into the appropraite HTTP result. In our case a BadRequest with the model state as the response.

This is a good example of the sort of code that, if you write controllers by hand, you tend to find yourself writing time and time again – and even if you write a base class and helpers you still need to write the code that invokes them for each action in each controller and its not uncommon to find inconsistencies creeping in over time or things being outright missed.

Returning to our configuration block the next thing we add to the service collection is ASP.Net Core MVC:

    .AddMvc(mvc => mvc.Filters.Add(new FakeClaimsProvider()))

In the example I’m basing this on I want to demonstrate the claims support without having to have everybody set up a real identity provider and so I also add a global resource filter that simply adds some fake claims to our identity model.

AddMvc returns an IMvcBuilder interface that can be used to provide additional configuration and this is what the REST commanding framework configures in order to expose commands as REST endpoints and so the next line adds our framework components to MVC and then supplies a builder of its own for configuring our endpoints and other behaviours:

    .AddAspNetCoreCommanding(cfg => cfg

On the next line we use of the configurations options exposed by the framework to replace the default controller route prefix with a versioned one:

        .DefaultControllerRoute("/api/v1/[controller]")

This is entirely optional and if not specified the framework will simply to default to the same convention used by ASP.Net Core (/api/[controller]).

Next we have a simple repition of the block we looked at earlier:

        .Controller("Posts", controller => controller
                .Action<GetPostQuery>(HttpMethod.Get, "{Id}")
                .Action<GetPostsQuery,FromQueryAttribute>(HttpMethod.Get)
                .Action<CreatePostCommand>(HttpMethod.Post)
            )

This defines a controller called Posts (the generated class name will be PostsController) and then assigns 3 actions to it to give us endpoints we saw in the Swagger definition:

  1. GET: /api/v1/Posts/{Id}
  2. GET: /api/v1/Posts
  3. POST: /api/v1/Posts

For more information on how actions can be configured take a look at this here.

Next we instruct the framework to map the claim named UserId onto any command property called AuthenticatedUserId:

        .Claims(mapping => mapping.MapClaimToPropertyName("UserId", "AuthenticatedUserId"))

Their is another variant of the claims mapper declaration that allows properties to be configured on a per command basis though if you are starting with a greenfield solution taking a consistent approach to naming can simplify things.

Data sourced from claims is generally not something you want a user to be able to supply – for example if they can supply a different user ID in our example here then that might lead to a data breach with users being able to access inappropriate data. In order to ensure this cannot happen the framework supplies an attribute, SecurityPropertyAttribute, that enables properties to be marked as sensitive. For example here’s the CreatePostCommand from the example we are looking at:

public class CreatePostCommand : ICommand<PublishedPost>
{
    // Marking this property with the SecurityProperty attribute means that the ASP.Net Core Commanding
    // framework will not allow binding to the property except by the claims mapper
    [SecurityProperty]
    public Guid AuthenticatedUserId { get; set; }

    public string Title { get; set; }

    public string Body { get; set; }
}

The framework installs extensions into ASP.Net Core that adjust model metadata and binding (including from request bodies – that ASP.Net Core behaves somewhat inconsistently with) to ensure that they cannot be written to from an endpoint and, as we’ll see shortly, are hidden from Swagger.

The final line of our MVC builder extensions replaces the built in validation with Fluent Validation:

        .AddFluentValidation();

This is optional and you can use the attribute based validation model (or any other validation model) with the command framework however if you do so you’re baking validation data into your commands and this can be limiting: for example you may want to apply different validations based on context (queue vs. REST API). It’s important to note that validation, and all other ASP.Net Core functionality, will be applied to the commands as they pass through its pipeline – their is nothing special about them at all other than what I outlined above in terms of sensitive properties. This framework really does just build on ASP.Net Core – it doesn’t subvert it or twist it in some abominable way.

Then finally we add a Swagger endpoint using Swashbuckle:

services.AddSwaggerGen(c =>
    {
        c.SwaggerDoc("v1", new Info { Title = "Headless Blog API", Version = "v1" });
        c.AddAspNetCoreCommanding();
    });

The call to AddAspNetCoreCommanding here adds schema filters into Swagger that understand how to interpret the SecurityPropertyAttribute attribute and will prevent those properties from appearing in the Swagger document.

Conclusions

By taking the approach outlined in this post we’ve greatly reduced the amount of code we need to write eliminating all the boilerplate normally associated with writing a REST API in ASP.Net Core and we’ve completely decoupled our application logic from communication protocols, runtime model and host.

Simplistically less code gives us less to test, less to review, lower maintenance, improved consistency and fewer defects.

And we’ve gained a massive amount of flexibility in our application architecture that allows us to tailor our approach to best fit our project at a given point in time / stage of development lifecycle and more easily take advantage of new technologies.

To give a flavour of the latter, support for Azure Functions is currently under development allowing for the same API and underlying implementation to be expressed in a serverless model simply by adopting a new NuGet package and changing the configuration to the below (please bear in mind this comes from the early, but functional, work in progress and so is liable to change):

public class FunctionAppConfiguration : IFunctionAppConfiguration
{
    public void Build(IFunctionHostBuilder builder)
    {
        builder
            // register services and commands
            .Setup((services, commandRegistry) => commandRegistry.Discover<FunctionAppConfiguration>())
            // register functions - by default the functions will be given the name of the command minus the postfix Command and use the GET verb
            .Functions(functions => functions
                    .HttpFunction<GetPostsQuery>()
                    .HttpFunction<GetPostQuery>()
                    .HttpFunction<CreatePostCommand>(function => function.AddVerb(HttpMethod.Post))
            );
    }
}

In addition to bringing the same benefits to Functions as the approach above does to ASP.Net Core this also provides, to my eyes, a cleaner approach for expressing Function triggers and provides structure for things like an IoC container.
 

Capturing and Tracing All HTTP Requests in C# and .Net

Modern applications are complex and often rely on a large number of external resources increasingly accessed using HTTP – for example most Azure services are interacted with using the HTTP protocol.

That being the case it can be useful to get a view of the requests your application is making and while this can be done with a tool like Fiddler that’s not always convenient in a production environment.

If you’re using the HttpClient class another option is to pass a custom message handler to it’s constructor but this relies on you being in direct control of all the code making HTTP requests and that’s unlikely.

A simple way of capturing this information without getting into all the unpleasantness of writing a TCP listener or HTTP proxy is to use the System.Diagnostics namespace. From .net 4.5 onwards the framework has been writing HTTP events to the System.Diagnostics.Eventing.FrameworkEventSource source. This isn’t well documented and I found the easiest way to figure out what events are available, and their Event IDs, is to read the source.

Once you’ve found the HTTP events it’s quite straightforward to write an event listener that listens to this source. The below class will do this and output the details to the trace writer (so you can view it in the Visual Studio Debug Output window) but you can easily output it to a file, table storage, or any other output format of your choosing.

To set it running all you need to do is instantiate the class.

If you’d like to see this kind of data and much more, collected, correlated and analysed then you might want to check out my project Hub Analytics that is currently running a free beta.

Signalling API Unavailability

When doing upgrades of websites it’s often useful to be able to signal to users that your service is offline for maintenance either in part or in entirety which is quite straightforward to implement unless you’ve got something like an AngularJS or React app, that could well be cached in the browser, and that actually wants to respond to 503 status calls returned from a web based API. Then CORS has a habit of getting in the way.

To help with that I’ve just pushed this super simple and lightweight ASP.Net website to GitHub that will respond with a 503 status code to any request made of it while ensuring that the CORS protocol will succeed meaning that the 503 status code will make its way through to your own error handling.

It’s ideal for hosting in an Azure deployment slot during upgrades that swap slots.

Note: an alternative approach would be to use the URL rewriter in web.config. It’s not particularly intuitive or, to my taste, readable but I believe can be configured to perform the same task.

CORS with Owin

In a recent post I’d written about my struggles with the Web API CORS support and in the comments Taiseer suggested looking at accomplishing it through OWIN. I needed to create a new Web API project this week and so tried out this approach – the short version is it was utterly painless.

This project is (sorry!) closed source / commercial so I can’t share the source directly however it was an easy set of steps to enable CORS support through OWIN on my Web API project.

1. Either through the Package Manager GUI or console install the package Microsoft.Owin.Cors into your Web API project.

2. Within one of your startup files (easiest one out the box is Startup.Auth.cs and that seemed to be a reasonable place for enabling CORS) just add the line:

app.UseCors(CorsOptions.AllowAll);

And that’s it.

If you want finer grain support over what domains and verbs are allowed you can supply detailed configuration via a the CorsOptions class.

12 Hour Coding Challenge – AngularJS and Azure

This last weekend I set myself a challenge to build and ship a web application in under 12 hours and in the process learn something about AngularJS – a framework I’ve been itching to try for some time. I also wanted to build something that would serve as a basis for a small iOS application written in Swift (to learn a little about that) and that might allow for extension opportunities in iOS8.

The good news is I succeeded in my challenge and you can find the website here and the source code on GitHub. I’ll post more details on how to build, configure and deploy this application shortly.

Without further ado – this is how my day went.

Hour 1 – Idea, Technology Choices, System Architecture

With only 12 hours and some learning to do I needed something I could pair back to a useful absolute minimum but that I could evolve additional features on top of easily in the future. I used to be a big user of delicious but gave up on it while it was under Yahoo’s tenure. I have tonnes of different devices, on different platforms (so for example iCloud syncing of bookmarks isn’t enough for me iPhone and iPad yes but what about my Surface?) so thought I’d have a bash at a simple online bookmark site. I paired things back to a handful of requirements I thought I could achieve:

  • Signup and sign-in (in a way that I could expand to include social account sign in in a later version)
  • View links in descending order they were saved
  • Save links in the website
  • Save links from a bookmarklet (button on your browsers toolbar)
  • Tag links
  • View links in tags in descending order they were saved

As both AngularJS is new to me, and Swift also when I get rount to that, I wanted to build everything else on a solid well understood foundation and so for the backend picked:

  • C# and .Net 4.5.1 – I’m hankering to experiment with Go but if I added that to everything else there’s no way I’d finish in 12 hours so I stuck to C#.·
  • Azure – table storage, web sites and a worker role. I plumped for table storage rather than SQL as I want this to scale easily and be super cheap to run – I’m paying for it myself and am willing to sacrifice features and some development complexity for a lower monthly bill.
  • Asp.Net Web API – I know this really well now so an obvious choice for the web service layer given I was using C#.
  • My open source Azure application framework, it wraps up most common operations you’d undertake against the core of Azure in a testable fashion and makes deployment and configuration easy.
  • My open source ASP.Net Identity 2.0 table storage provider.
  • The Bootstrap CSS template for the UI. Looks ok out the box and I can apply an off the shelf theme easily later (or tinker with it myself).

Most of the above took place in my head with a handful of notes.

Hour 2 – AngularJS Research

I didn’t expect this to hold too many surprises in terms of the overall system architecture as I’m pretty familiar with rich browser application development in jQuery and have some experience in backbone and Knockout but I didn’t know how to structure an application properly in AngularJS.

All I’d done with this previously was really an equivalent of the sample on the home page tucked away inside another website but it looked to be a super useful and comprehensive single page application framework that could provide a really clean MVC structure for a JavaScript client. I basically went through the developer guide at quite a clip and looked at the structure of a couple of non-trivial apps.

I was no expert after an hour, and didn’t expect to be, but I felt I could build the backend and not get surprised by the front end to a degree that would cause me to uproot the system architecture. Importantly I learned how I could integrate the client with the authentication endpoint via a helpful blog post (thank you!) which also introduced me to interceptors – most handy.

Hours 3 to 6 – Build the Backend

The storage model fell pretty trivially out of the requirements and came together quickly. I used the Chrome plugin Postman to test my REST interface without needing to write further code. I used my standard approach to this sort of thing in terms of project structure.

Nothing really new at all so largely just predictable legwork and at the end of the period I had a clean back end following a fairly pure REST model that I was fairly sure would work for the UI and I could deploy into Azure. So I did just that.

Hours 6 to 12

Best summarised as grappling with AngularJS with lots of Googling and referring to the documentation!

Actually to be fair other than a couple of pain points it was rather simple and I’m pretty sold on AngularJS as a framework for single page applications, I will certainly be using it on future projects.

I basically copied the application folder structure I would use if I was building a traditional server page request website in ASP.Net MVC and that I’d seen used in a couple of other apps that worked out really well with controllers, views and services separated by folders. I added a service layer that used the $http angular module to talk to my Web API and kept the http grub out of the controllers.

I managed to avoid the temptation to fall back to old patterns and stuck as far as I could to straight AngularJS, for example it was tempting to start inserting jQuery all over the place to show and hide things whereas I really wanted to do this in a clean and declarative fashion using Angular.

I had to refactor things a couple of times but nothing major – it came together quite easily. The last hour was putting a front page on it and dealing with something I hadn’t considered – as a new user when I went to the bookmark feed there is no real clue as to what to do next so I added a quick “if there are no links welcome page”. By the time I’d begun the UI work my own test account was littered with links!

The things that caused me most pain:

  • CORS support. My client website was running in a different domain (localhost in development) to my Web API and would in production (it’s static HTML so why waste expensive Asp.Net server resource!) and this meant I needed to use the CORS protocol (Cross Origin Resource Sharing) to access the Web API from JavaScript. Except…. it didn’t work. After much teeth gnashing it turned out that there were issues with the Web API 2.0 binaries and accompanying Web API 2.0 CORS package and I would need to upgrade to 2.2. I did this but in Microsoft’s recent “fun” fashion that included breaking changes on a point release. Fortunately simple to fix and then everything worked fine.
  • Infinite scrolling. I wanted to take an infinite scrolling approach to the bookmark list. You’ll have seen this if you’ve use things like Facebook or Twitter in a web browser – there are no “next page” and “previous page” buttons you simply scroll towards the end of the page and the next page is fetched in the background and added to the bottom. There is an AngularJS module that purports to assist with this however it had a number of bugs (must do a pull request) and so I spent 30 minutes learning the code and fixing them. Fortunately it was only 100 lines of code to deal with and still was a net win in terms of time. Maybe I’ve just missed something in terms of library dependencies.

Lessons Learned

  • AngularJS is pretty cool! Easy to use, well considered, and provides excellent structure. My only concern is that while digging around for answers to common problems it seems to be evolving very quickly with not a lot of consideration given to backwards compatibility. Maybe I’m wrong – I’m utterly new to it.
  • By keeping things tightly focussed I had something in the hands of a customer (me!) in 12 hours from start to finish. It doesn’t let me do things I’d eventually want to do (edit links and tags, delete links for example) and has some rough edges but I can already use it and “pilot” it myself in a beta fashion. I shipped as early as I absolutely possibly could.
  • The aggressive timescale meant I couldn’t go off on architectural / development flights of fancy, not that that’s really my thing – see below. I think every line of code I wrote in this system is specific to the business problem in hand. No custom UI components, no custom architecture, no funky “time saving” code / model / blah blah blah generators that are often the symptom of over architected solutions put together by people with too much time on their hands! My first choice was always to go find something off the shelf (hence my infinite scrolling bug fixes – and even factoring that in it was quicker than writing it myself).
  • There are lots of things I’d like a site like this to do (social sharing, editing as above, public / private feeds and links, trending URLs) and while I had those in mind and have rough views of how to build them I did not allow myself to get distracted by them. If I had my 12 hours would have become a week, would have become 2 weeks and so on. Just because they are not in v1 (or v0.1 if you prefer) doesn’t mean they can’t be put into v1.1.
  • You really do need to stand on the shoulders of giants – I can’t emphasise enough how strong my belief is that if the code you are writing is not specific to your particular problem then you’re going wrong: you’re hovering around the ankle while someone else starts at head height!

Next Steps

  • Understand the best way to unit test AngularJS and, errr, write the unit tests.
  • Present a tag list in the UI.
  • Deal with error conditions, particularly http errors, in a consistent way.
  • Beef up validations on both the server and the client.

Uploading an image to a Blob Container via Web API

Handling image (or other binary object) uploads via Web API for storing in Azure blob storage without using the local file system (handy if, for example, you’re using Azure Websites) seems to be a frequently asked question.

I’ve not tested this in anger yet but I’ve posted my own attempt at solving this issue as a gist on GitHub and shown below. It seems to work but as I say I’ve not tested it in anger, only in fairly limited scenarios.

If you use my Azure Application Framework I’ve also added a GetMultipartStreamProvider method to the IAsynchronousBlockBlobRepository interface that provides a pre-configured implementation for a given blob container.
Hope thats helpful.

How To: Using Facebook to Authenticate with Web API 2 in a Native Mobile Application

If you’re developing mobile applications and you’re a .Net developer there’s a fair chance you’re using Web API to present access to server side resources. I’ve already covered how to authenticate using organisational accounts with MVC 5 which is a good choice for many applications, particularly business apps, but if you’re working in the consumer space you may want to allow your users to login using social media identities such as Facebook or Twitter.

There’s a really good tutorial on the ASP.Net web site covering how to do this if you’re working in a browser but it doesn’t, directly at least, cover how to do this from a native mobile application. In this post I’m going to take you through the steps required to do this from an iOS application written using the Xamarin tools (if you’re a C# developer working on mobile they are very much worth checking out). I’m going to focus on Facebook but the same approach works for the other providers supported by Web API 2: Facebook, Twitter, Microsoft Accounts and Google Accounts are all supported straight out of the box.

The below walks through the process of configuring Azure, Facebook, a Web API project and a Xamarin mobile application, you can walk through it for the most part (there is the odd missing step – instance variable declarations for the most part) but really it’s intended as a guide to go along with the source code that is on GitHub here.

We’re going to host our Web API on Azure so begin by going to the Azure management portal and create yourself a free website. Take a note of the URL as you’ll need it later. Also create an empty SQL Database either on a new or existing server and take a note of the credentials, you’ll need this later.

Configuring Facebook

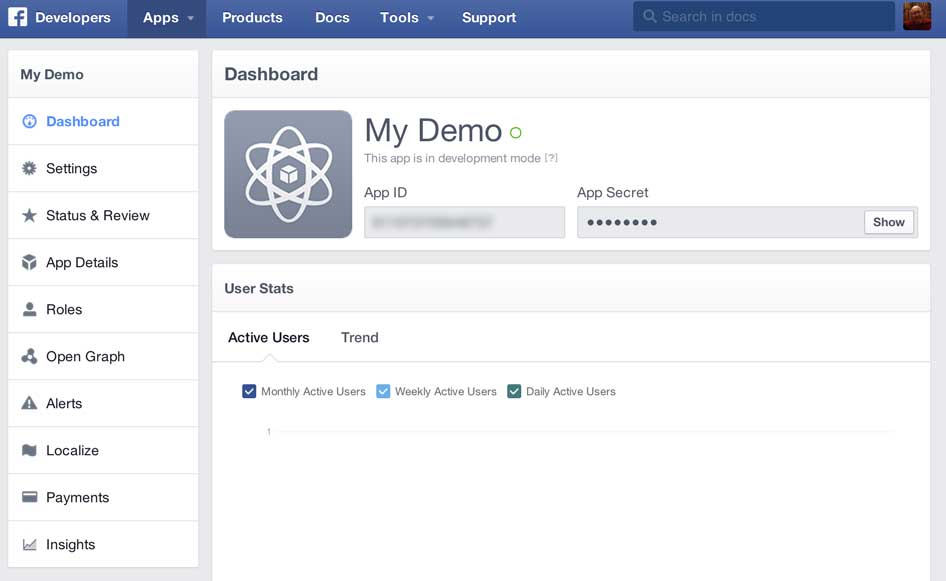
Firstly you need to create a Facebook application in the Facebook developer portal (http://developer.facebook.com). From the developer portal homepage select Apps -> Create a New App and enter the Display Name for your app and the Category applicable to your app and click Create App. At the time of writing there is a bug in the portal and after it finishes whirring away the dialog box stays on the screen, but your app has been created. Refresh the browser and select the Apps menu again and click the name of your app (that you should now see there). You should see a screen like this:

external1

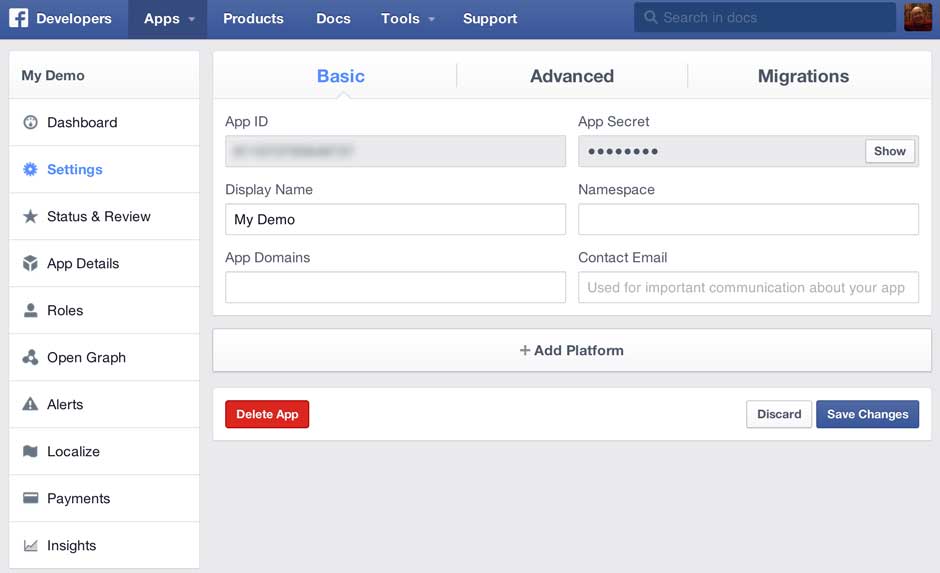
Take a note of the App ID and the App Secret as you’ll need them later (click the show button to see the App Secret) and then click the Settings option on the left to show the settings screen for your app:

external2

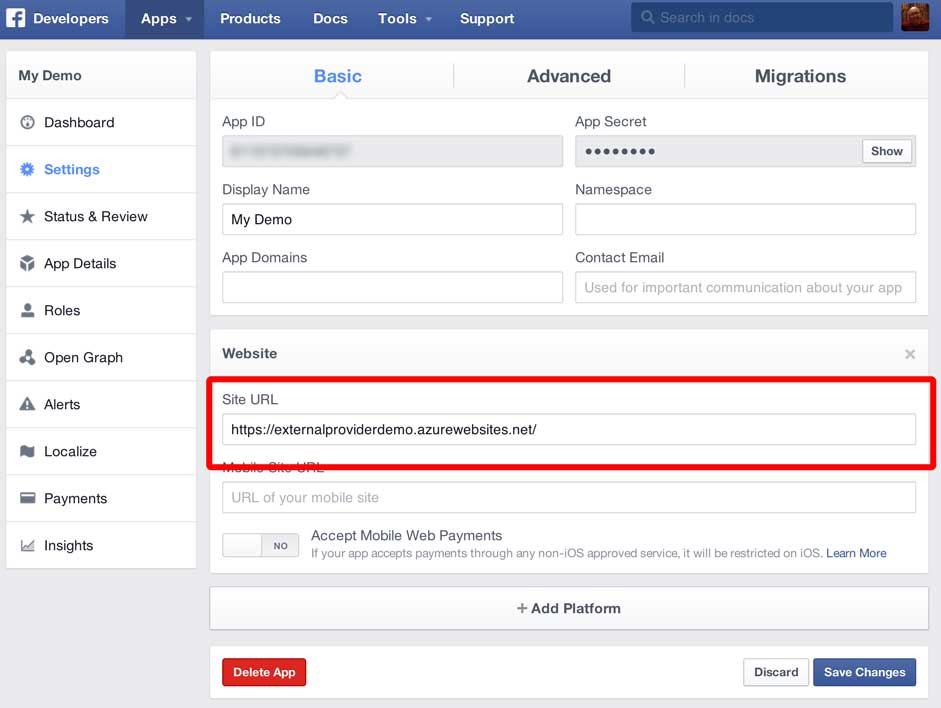
Now click the Add Platform button and choose Website. In the Site URL text box enter the URL you noted earlier from Azure and click Save Changes:

external3

That’s Facebook configured to allow your application to logon so now we’ll go and create our Web API project and wire it up to Facebook.

Web API / Visual Studio

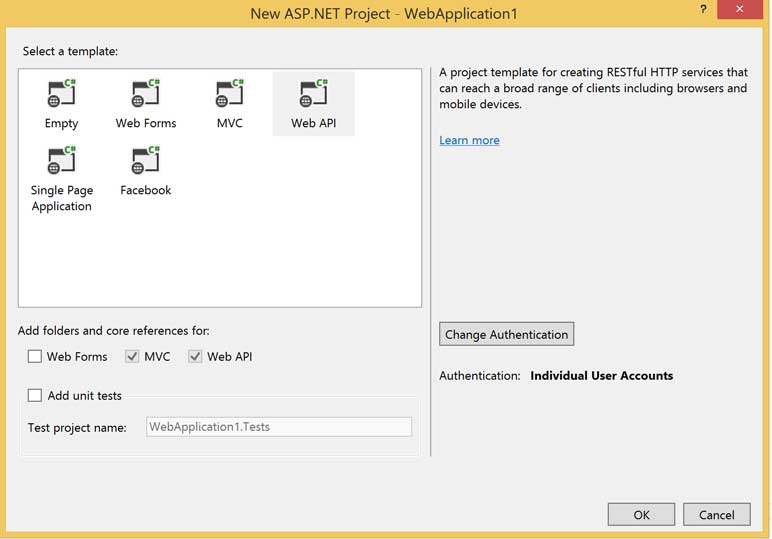
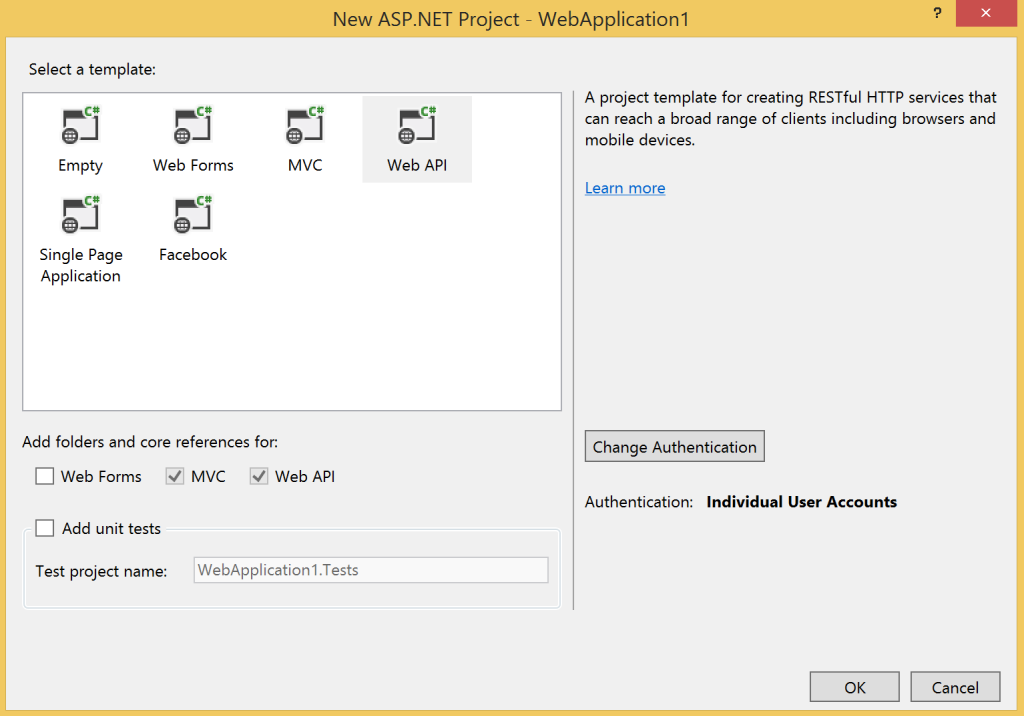
In Visual Studio 2013 create a New Solution and select a project type of ASP.Net Web Application for .Net 4.5.1. On the configuration dialog that appears select Web API and then click the Change Authentication button. Select an authentication type of Individual User Accounts. Your project configuration should now look like this:

external4

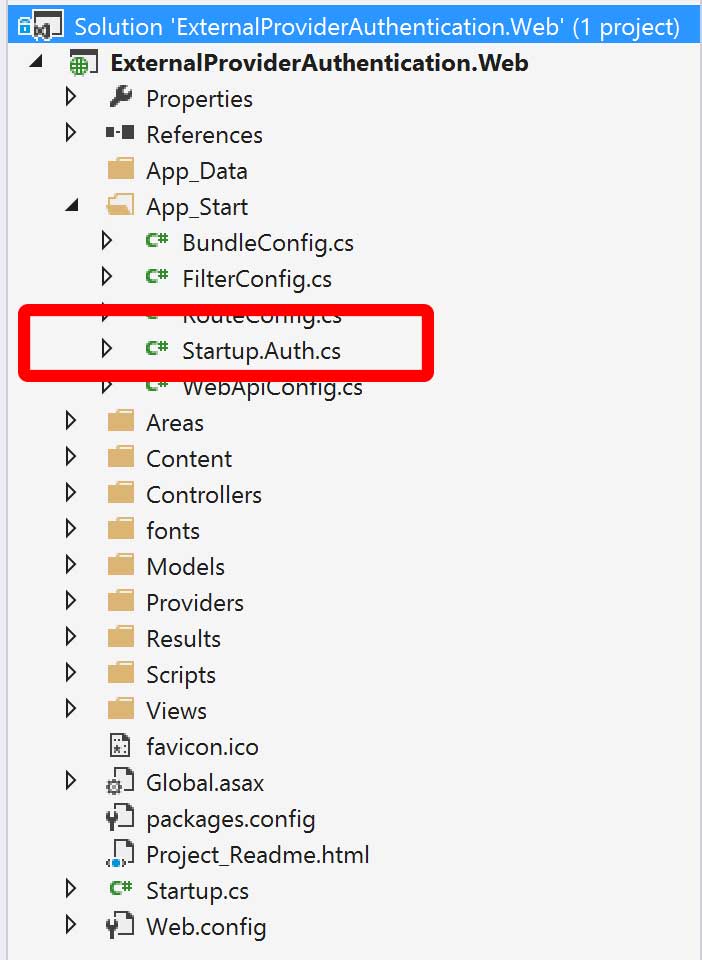
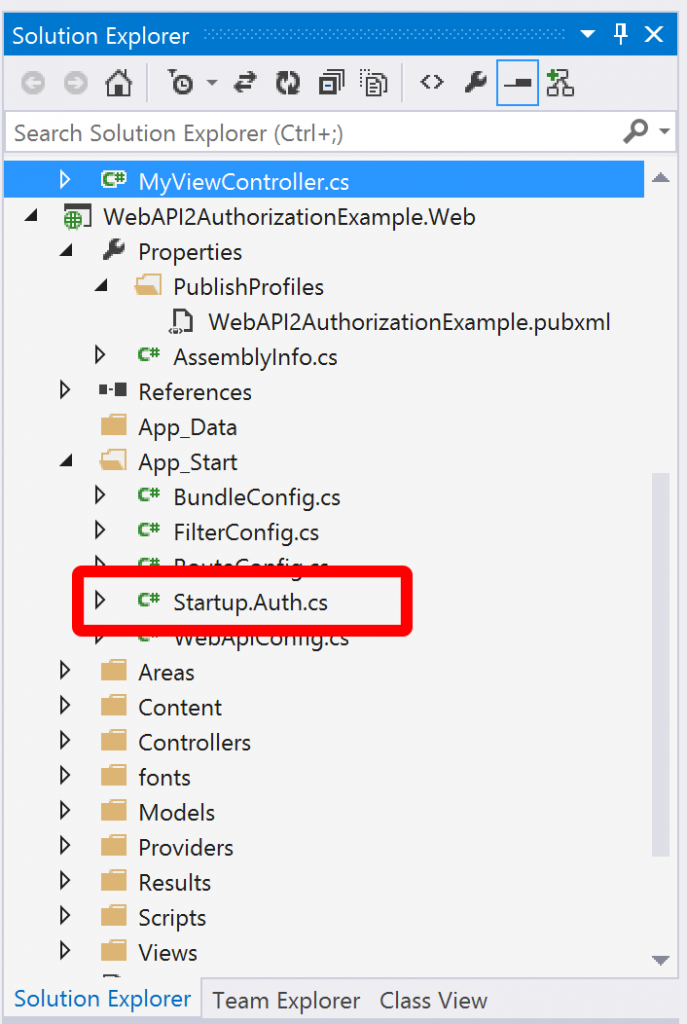
Click OK and your solution will be created with the familiar MVC structure. Open the App_Start folder and open the Startup.Auth.cs file for editing:

external5

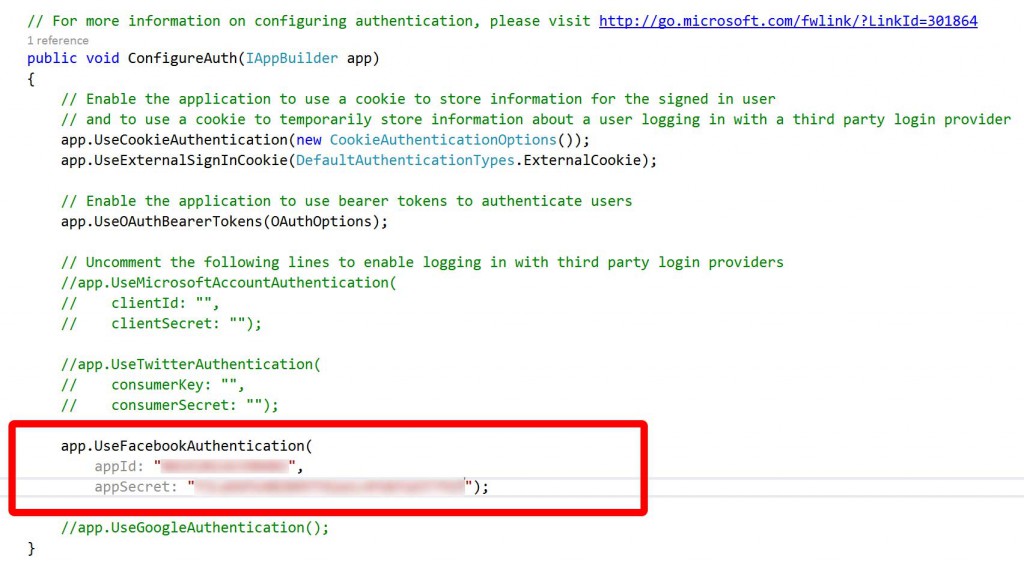
It’s the code in this class and file that configures how Web API will authenticate. By default it’s setup for local accounts – accounts and passwords that are stored in a SQL database that goes along with your app. To add an external identity provider you need to scroll to the bottom of the file and uncomment the appropriate lines for the provider you want.

In this case as we’re authenticating with Facebook we’re going to uncomment those lines and add the App ID and App Secret that we obtained earlier from the Facebook portal:

external6

We’ve got one last step to perform – point the web site at the SQL Database we created earlier by updating the web.config file as shown below:

external8

Believe it or not in terms of code changes that’s it – we’re done. Build and publish the project to the Azure website we created earlier.

Mobile Application

This isn’t really intended as an iOS or Xamarin tutorial so I’m largely going to gloss over the steps that aren’t specifically about the authentication process – if you get stuck post a comment and I’ll reply when I get a chance. Not everybody has the Visual Studio plugin so I’m going to use Xamarin Studio to do this.

To authenticate from the mobile device we need to go through the following high level flow:

  1. Request a list of external providers and authentication end points from the server.
  2. Send a get request, from a web browser, to the end point for the provider the user wants to log in with.
  3. At the end of the process extract the access token from the URL of the page that is showing in the browser.
  4. Establish if the user is already registered with the server and if not create a user mapped to the external login and then call the authentication end point again.

In practice it’s simpler than it sounds. The key thing is that the authentication process must take place through a web browser, you can’t do this using a native approach. Although you can use something like the Facebook SDK to log in locally against Facebook and then use Facebook that doesn’t result in authentication against your server and web services.

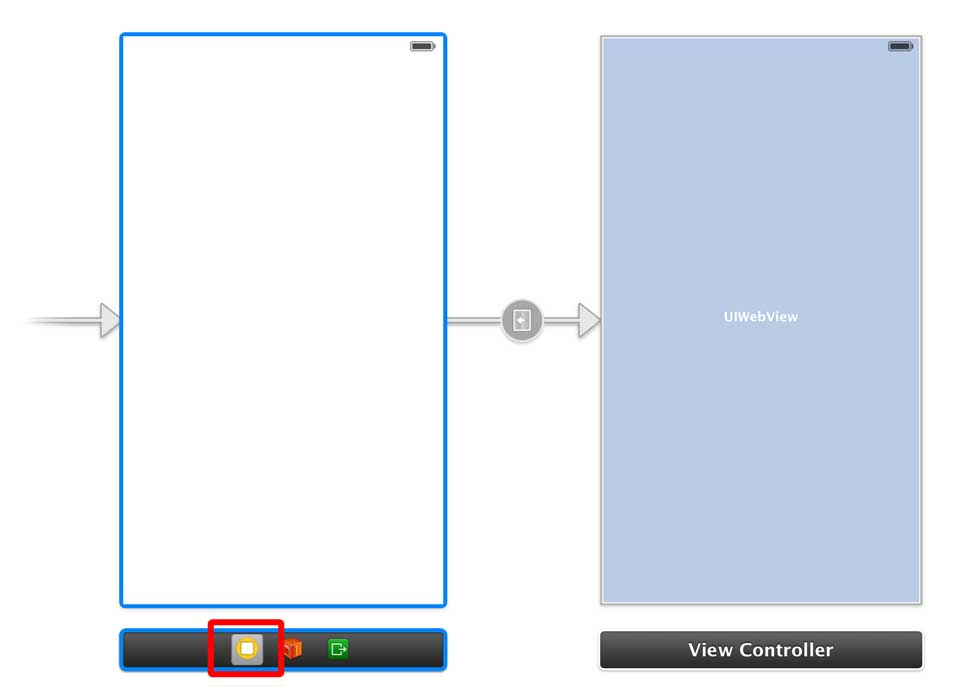
Begin by creating a new iPhone Storyboard project with an application type of Single View Application. Then open the storyboard in the created project and add a second view controller that hosts a UIWebView control. You don’t have anything to create the Segue from as we’re going to drop buttons on programattically and trigger the segue in code so we need to create an segue from the view controller and give it a name – this trips a lot of people up! Basically control click the icon I have highlighted below and drag it to the second view controller. Then click the segue and give it an identifier.

external7

To communicate with the Web API you’re going to need access to some of the models that go with the AccountController – specifcally ExternalLoginViewModel and RegisterExternalBindingModel. In a real application my preference is to extract these models from the Web API project and place them in a portable class library, that way your mobile code and your web code can all use the same models with no code duplication. For the sake of this example copy and paste these classes to your Xamarin project.

We’re going to want to process some JSON so using the Xamarin Component Store add the Json.NET component to your project.

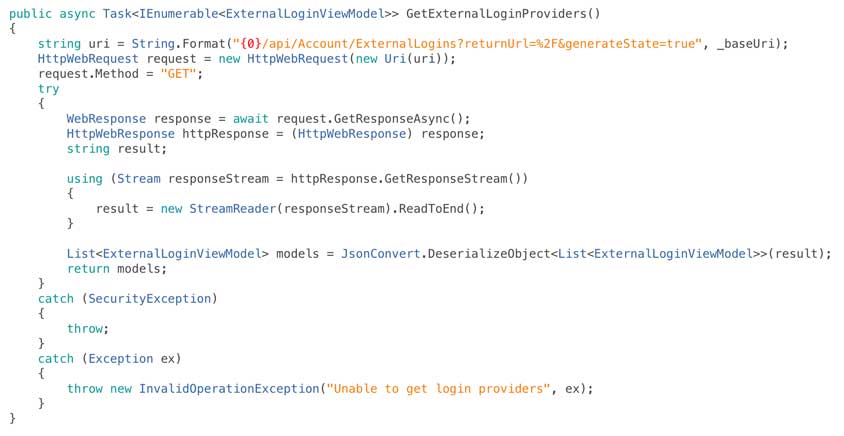
Now we’ve done all that we’re going to add a class called AuthenticationServices within which we’re going to wrap the calls we need to make to Web API directly. To begin with we need a method to let us get the external providers registered with Web API:

external10

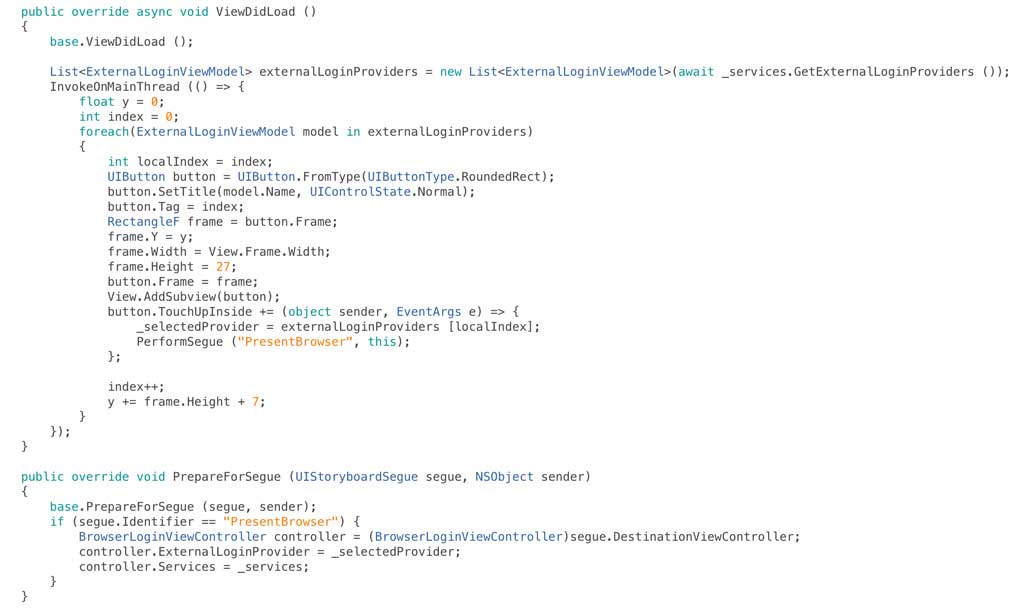
We now need to edit our root view controller so that when the view loads we retrieve the external providers and when one of the buttons is tapped we run the segue to load our second view controller and display the browser, I’ve done this in a slightly hokey way as it just leads to a simpler example than a table view or collection view:

external9

At this point we have a tremendously exciting app that is displaying a Facebook button which when tapped launches the web browser but not much more happens:

external11

To complete the login process we need to do work on the view controller that is hosting the web browser. When the view is loaded we’ll get the URL that has been returned from the server and load it in the browser:

external12

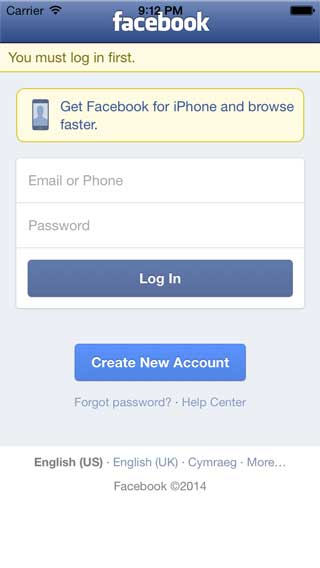
This will present the Facebook login page as shown below:

external13

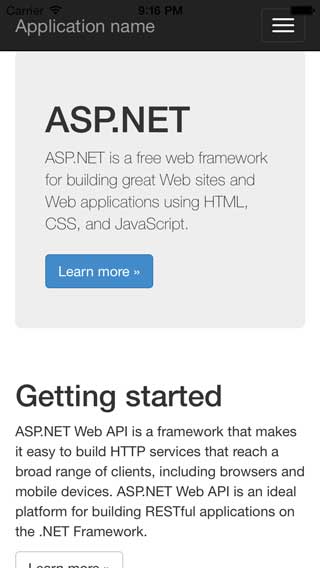
If you enter valid credentials then you’ll find that eventually you end up back at your web sites home page:

external14

If you look at the URL (which will have been output to Xamarin Studio’s Application Output window) you’ll see it includes the access_token as a parameter. This is the bearer token that I’ve discussed in a previous post and which you need to pass as a header to Web API for future authenticated requests.

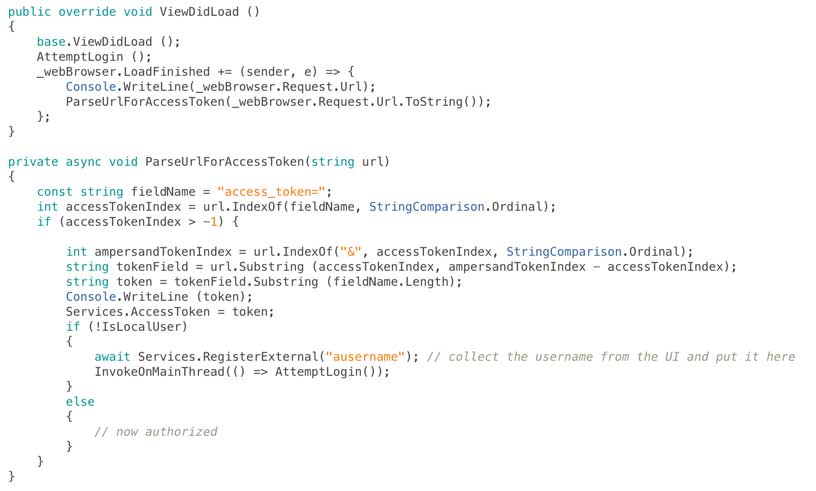
Having got this far we now need to check and see if the Facebook user has a registered account with our web services and if not create one. There are two ways you can find this out – you can either ask Web API the question on the endpoint /api/Account/UserInfo or take a shortcut and look at the cookies that have been set. In this example we’re going to do the latter.

In external identity provider scenarios ASP.Net makes use of two cookies, one is called .AspNet.ExternalCookie and the other is called .AspNet.Cookies. When a user has logged in with an external identity provider but doesn’t yet have an account with our web service then the .AspNet.Cookies cookie will not be set. So to find out if this is the case we’re going to have a look in the applications cookie store:

external15

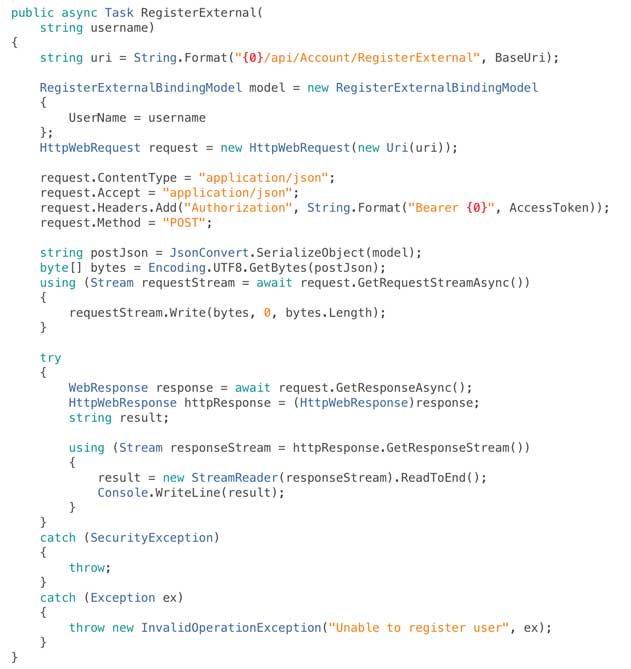
We also need to add some code to actually call Web API’s external account registration method into our AuthenticationServices class, in the example below I’m supplying a hard coded username but in reality you would collect this from the user:

external16

And finally we need to look for the access token in the URLs that appear in the web browser as the authentication process takes place and react to them appropriately (gather the access token, look for an account, register if necessary, then move on):

external17

In production code it’s definitely worth also verifying that the access token is on a URL that maps to your domain.

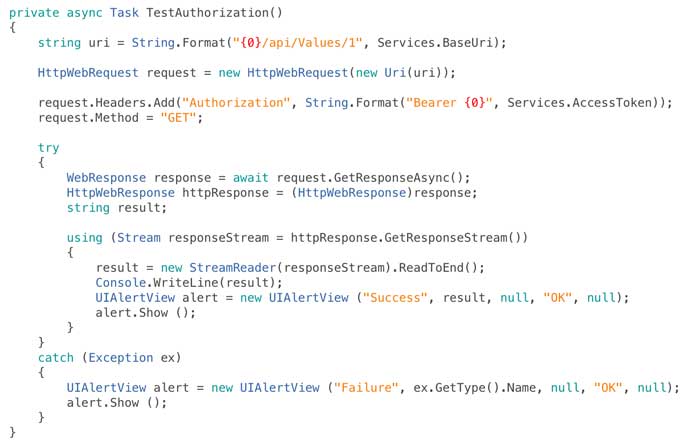
If you run the app at this point the full authentication chain will work but we’re not actually doing anything to prove that. So finally lets add a step to call the default get handler on the sample ValuesController that Visual Studio included in our Web API project and call it on a successful login / registration:

external18

At this point we’re done – we’ve secured our web services with a Facebook login and you can easily extend this to Twitter, Microsoft Accounts or Google by uncommenting the other lines of code in Startup.Auth.cs. Behind the scenes if you look into the SQL database that the ASP.Net authentication system will have created you’ll see a user in the users table and a login for the Facebook provider in the logins table.

If you’d rather use table storage for your user data you can use my alternative ASP.Net user store provider that I outlined here.

The account controller contains other methods to support logout and get information about users but it’s all pretty straightforward once you understand the workflow to login and register.

Hope that’s useful, if you spot any problems let me know in the comments.

Full source code can be found on GitHub here.

How To: Use Azure Table Storage as an OAuth Identity Store with Web API 2

In my previous post I looked at how to register, login and authenticate using the new OWIN based ASP.Net architecture underpinning MVC 5 and Web API 2. The default website provided was configured to use SQL database which is why we needed to configure a SQL Database within Azure as we deployed our website.

There’s a fair chance, if you’re experienced with Azure, that you’re wondering if you can swap that out and use Table Storage, fortunately one of the improvements in this latest version of ASP.Net is to better abstract storage away from management.

There is however a fair bit of leg work to doing so. I’m going to firstly touch on how you go about this, then look at the NuGet package I’ve put online (source code in GitHub) that means you don’t have to do this leg work!, and finally we’ll look at the changes you would need to make in the Web API 2 sample project we introduced in the previous post. I’m going to make reference to that code so you can quickly grab it from GitHub if that’s useful.

1) Implementing a New Identity Store

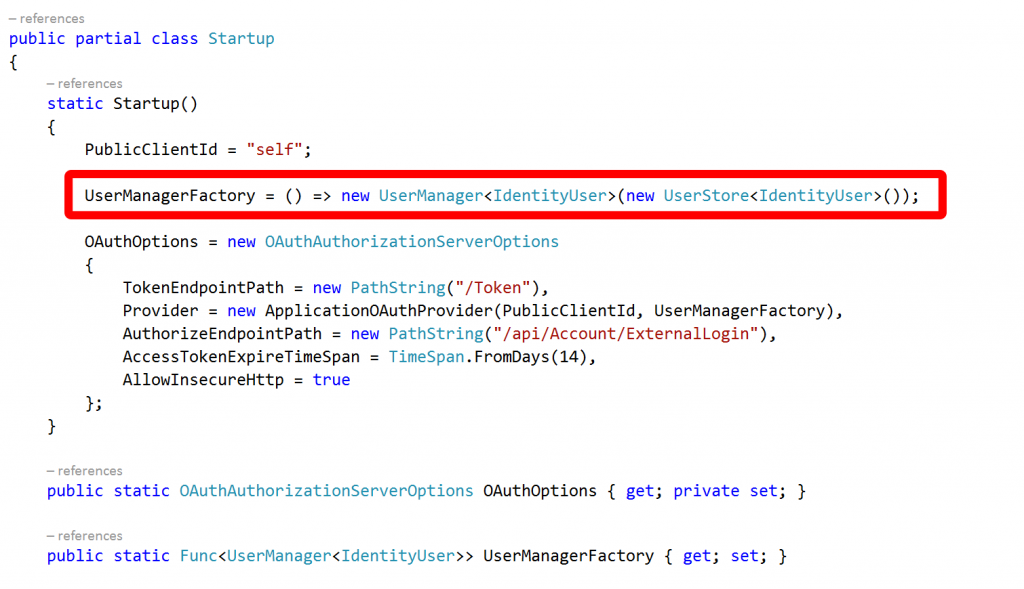
The clue to how to go about this can, again, be found at the top of the Startup.Auth.cs file in the App_Start folder:

Step1

A factory function is assigned and asked to return a user manager and a user store.

The UserManager is a core class of the identity framework (Microsoft.AspNet.Identity.Core) and works with classes that describe users through the IUser interface (another core class) and persists them with implementations of the IUserStore interface.

The core identity framework provides no storage implementation and the UserStore class that is being instantiated here is provided by Microsoft.AspNet.Identity.EntityFramework as is the IdentityUser class.

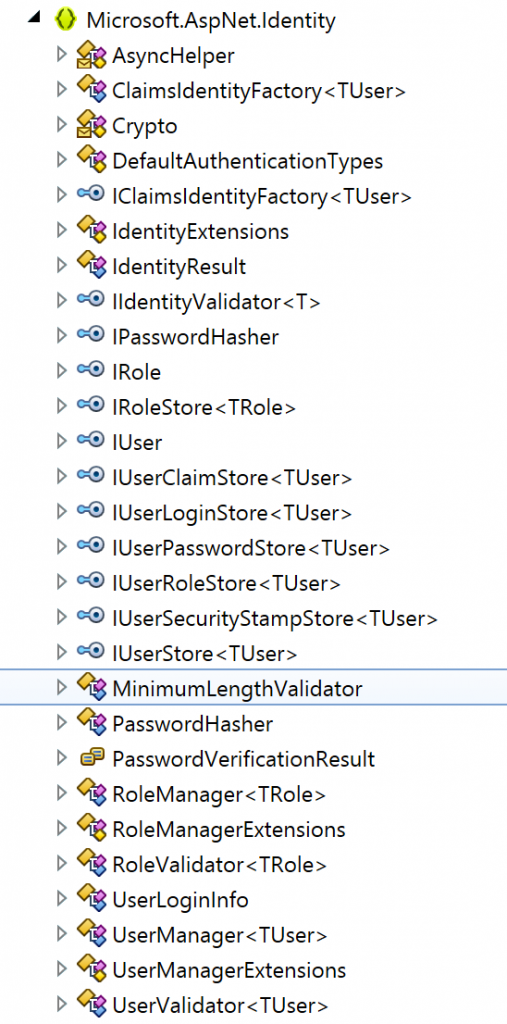
In fact if we look at the Microsoft.AspNet.Identity.Core assembly we can see it’s really very focussed on managing abstract interfaces:

Step2

It’s not difficult to see where we’re going at this point – to implement our own store we need to provide implementations for a number of interfaces. If we want to replicate full local identity management in the same way as the Entity Framework supplied implementation then realistically we need to implement most of the interfaces shown above – IRole, IRoleStore, IUser, IUserClaimStore, IUserLoginStore, IUserPasswordStore, IUserRoleStore, IUserSecurityStampStore and IUserStore.

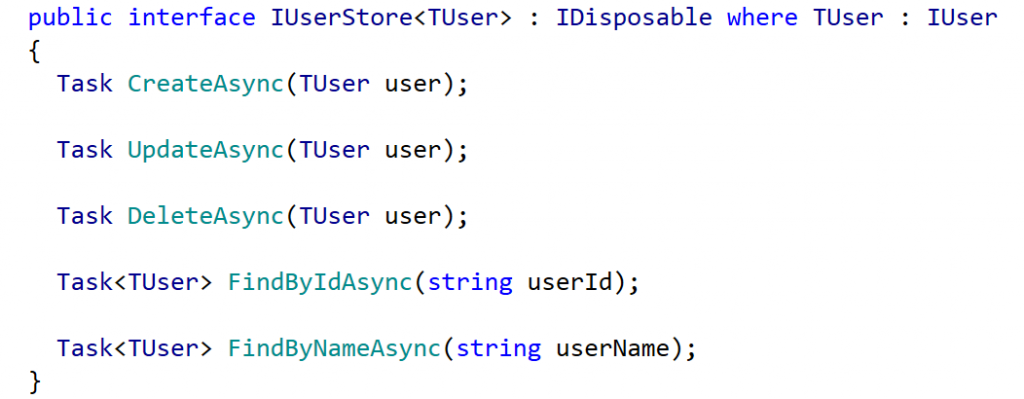
That’s not as daunting as it sounds as most of the interfaces are quite simple, for example IUserStore:

Step3

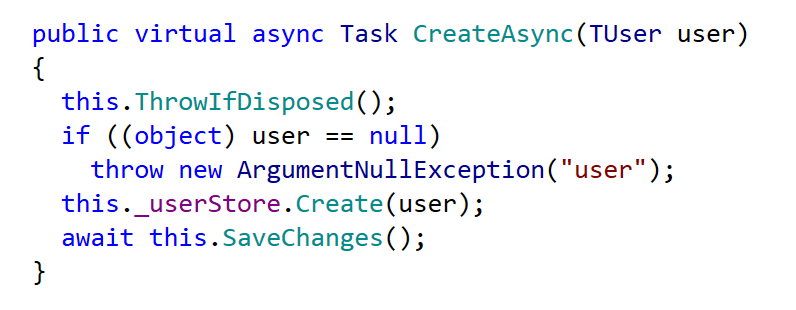
The remaining interfaces also follow this asynchronous CRUD pattern and are fairly simple to implement, here’s the Entity Framework implementation for CreateAsync:

Step4

And by way of contrast here’s a Table Storage implementation:

Step5

Pretty much the same I think you’ll agree, however it’s still a lot of boilerplate code to write so I’ve wrapped it into a NuGet package called AccidentalFish.AspNet.Identity.Azure which can also be found on GitHub.

2) Using AccidentalFish.AspNet.Identity.Azure

To get started either download the package from NuGet using the package manager in Visual Studio or download the source from GitHub and attach the project to your solution. The NuGet package manager console to install the package is:

Install-Package accidentalfish.aspnet.identity.azure

You can use the package in commercial or open source projects as it’s published under the permissive MIT license though as ever I do appreciate an email or GitHub star if it’s useful to you – yes I’m that vain (and I like to hear about my code being used).

Once you’ve got the package installed you’ll find there is still a little work to do to integrate it into your Web API 2 project as although the Microsoft.AspNet.Identity framework is nice and clean it seems that whoever put the Web API 2 project template didn’t think it made sense to keep a nice level of abstraction and have tied it tightly to the Entity Framework implementation in a few places.

However it’s not too onerous (just a couple of steps) and I’ve built the package with replacement in mind. To help I’ve included the Web API 2 project from my previous post and commented out the old Entity Framework code that bleeds into the MVC host site. I’ll walk through these changes below.

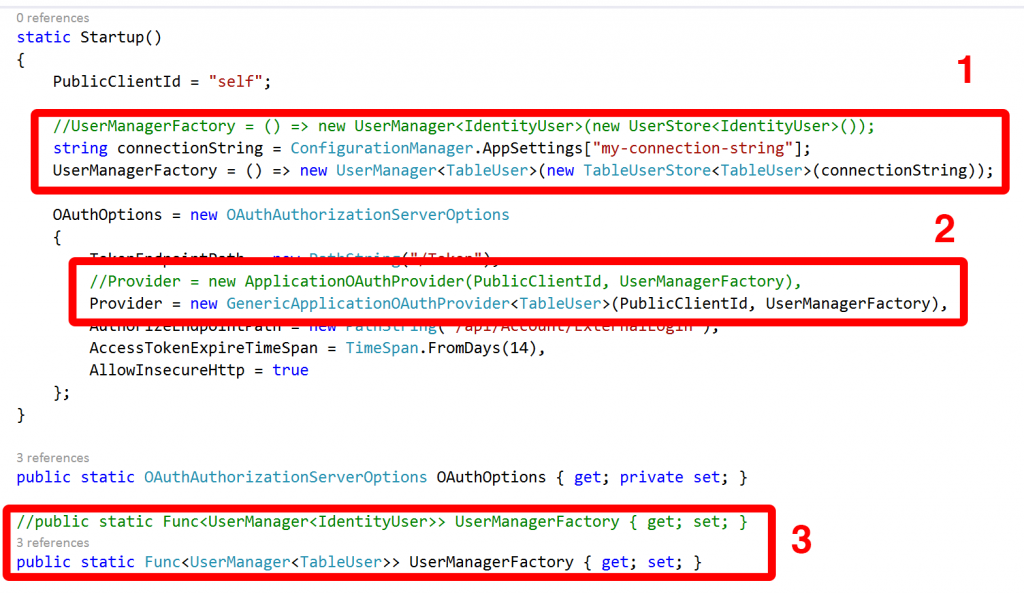
Firstly we need to visit the Startup.Auth.cs file and make three changes at the start:

Step6

1) Update the factory assignment to return a UserManager that manipulates users of type TableUser and users a data store of type TableUserStore. Pass it your Azure connection string. The constructor is overloaded with parameters for table names and whether or not to create them if they don’t exist – by default it will.

2) Replace the ApplicationOAuthProvider with a generic version of it contained within the package. This code is exactly the same but replaces the fixed IdentityUser types with a generic (you can see what I was referring to in regard to the template – this ought to have been this way out of the box).

3) Update the declaration for the factory to return a UserManager manipulating users of type TableUser.

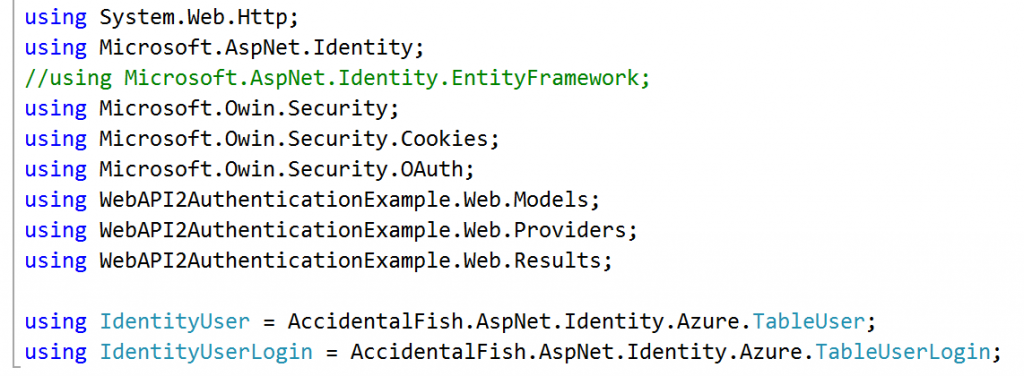
At this point we’ve done the bulk of the OAuth work but unfortunately the MVC AccountController also has a, needless, hard dependency on the Entity Framework library so we need to sort that out. To do this either go through the class and replace the type declarations of IdentityUser and IdentityUserLogin with TableUser and TableUserLogin respectively. Alternatively you can “cheat” and remove the Microsoft.AspNet.Identity.EntityFramework using reference and add a pair of aliases:

Step7

That’s it you’re done. Identity information should now be persisted in Azure Table Storage.

I’ll be doing some more work on this package in the coming weeks – I want to test it at scale and I know I need to build at least one index for one of the IUserStore calls which queries in the reverse way to which the partition and row key are set up: I’ve tried to set up the partition and row keys for the most commonly used methods.

If you find any problems or have any feedback then please let me know.


How To: Register and Authenticate with Web API 2, OAuth and OWIN

The latest release of Asp.Net introduces some fundamental architectural changes that have a significant effect on frameworks such as MVC and Web API as Asp.Net now sits on top of the OWIN stack.

As part of this change Microsoft have yet again changed the authentication and authorisation model. Yes you still use the Authorize attribute within your MVC and Web API controllers but the workflow around authentication has been rejigged considerably.

If, like me, you have a penchant for writing mobile apps that consume Web API based services hosted in Azure chances are you’ll want to register and authenticate with your services from the device. This is really simple to achieve with Web API 2 and OWIN, in fact it’s all in place out of the box, but the trouble is that it’s barely documented.

Having spent a morning going through significant pain figuring this out I’ve put this How To guide together to show how to do this. For added fun I’ve built the client in Xamarin as an iOS application but the approach will work on any platform including from Windows 8, JavaScript, whatever you like. In fact the C# code that I outline below can be lifted straight from the Xamarin project and dropped into any other C# application. If you want to skip ahead to the example code it can be found on GitHub.

We’ll get started by creating a Web API project. In Visual Studio create a new solution and pick ASP.Net Web Application. On the ASP.Net project type page select the Web API template and change the authentication type to Individual User Accounts:

Step1

Inside this project will be a API controller called ValuesController – this is the normal Web API sample. You’ll notice the class has an Authorize attribute which will protect it from anonymous access. Your exact URL will vary depending on what port IIS Express has been set up with but enter the URL to get the values from the controller (in my case http://localhost:5287/api/Values) and you should see some XML (I’m using Chrome):

<Error>
<Message>Authorization has been denied for this request.</Message>
</Error>

So far so good – we need to be logged in to access the API which is what we want. In order to login first we’re going to need to register a user.

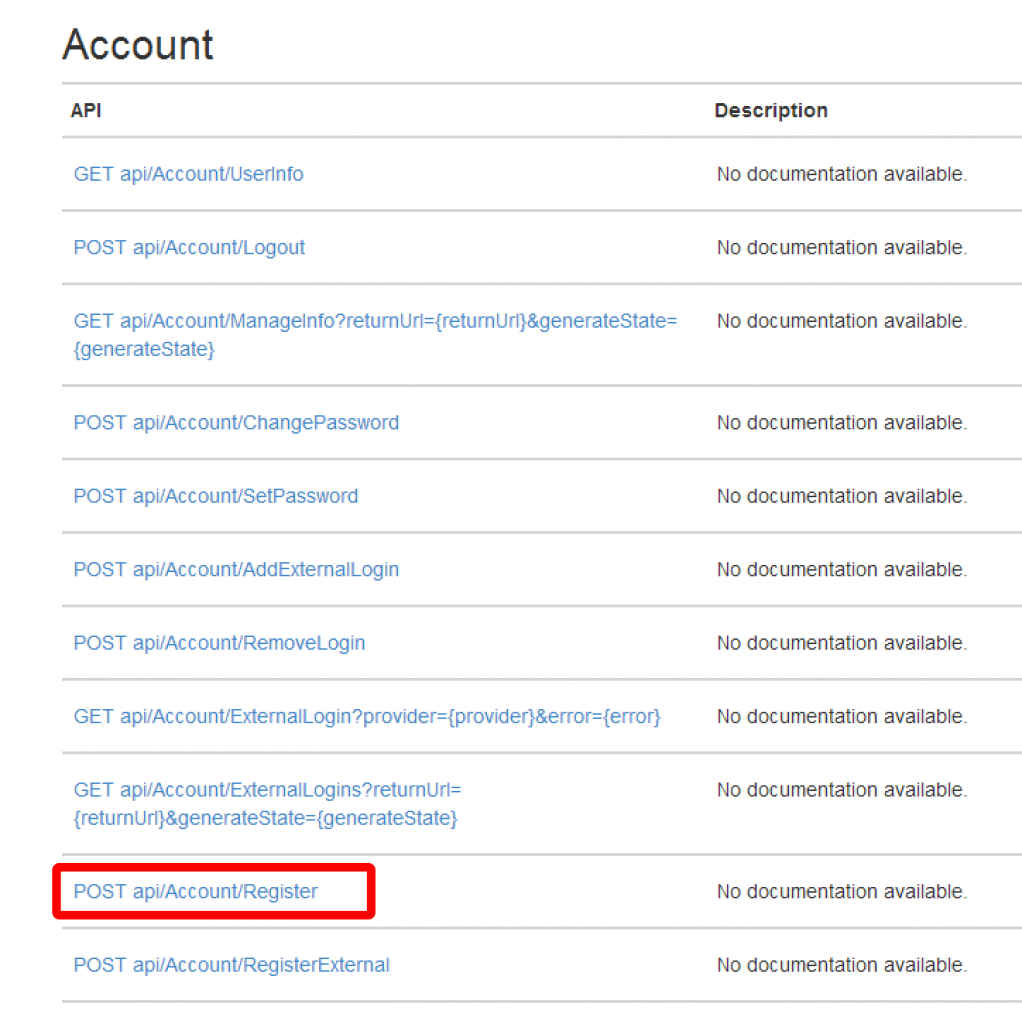
If you visit the help page for the API (for example http://localhost:5287/Help) you’ll see that there is an Account API that fronts lots of interesting methods – one of which is Register:

Step2

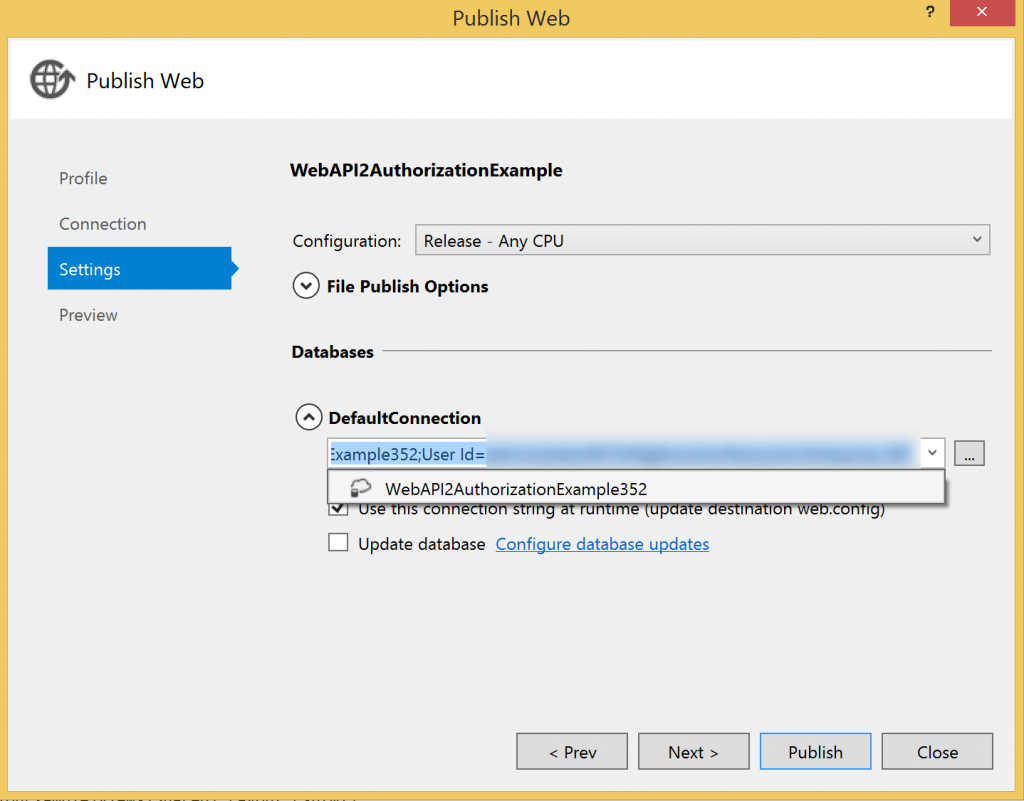
So if we post the right data to that action we should be able to register an account and believe it or not we’re done with the website so publish it to a free website in Azure and take note of the URL you’ve dropped it on. I recommend using VS2013 and the latest version of the Azure SDK (2.2 at the time of writing) as the tools make this really simple. The only real gotcha to watch out for is to point your website at a SQL Database rather than the local file approach that will be configured within your website. To point to a real database just make sure that you pick, or create as in the example below, a real database server:

Step4

And then make sure that the DefaultConnection is updated:

Step5

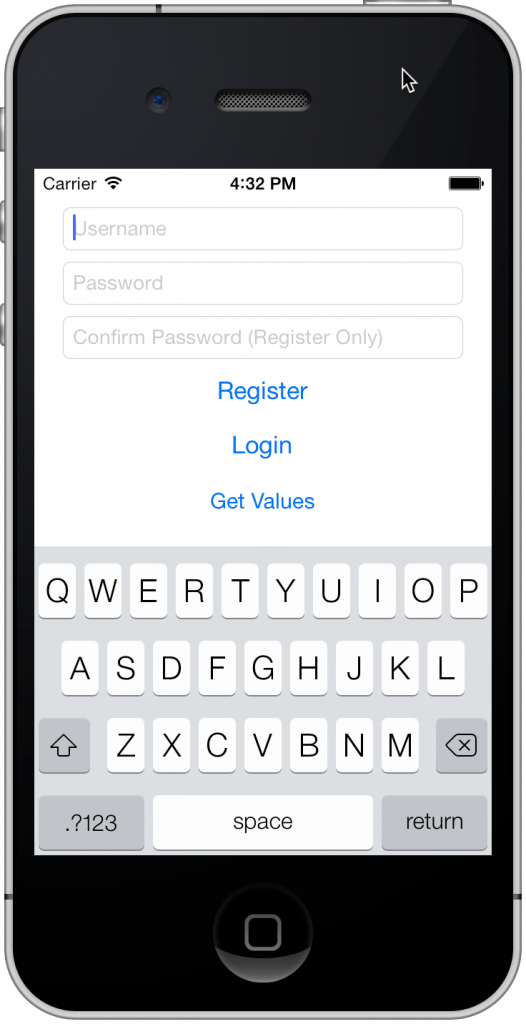
With the website deployed and ready it’s time to create an iOS application. You can use either Xamarin Studio or the Visual Studio plugin. I used the Hello World template for my application and targetted iOS 7 which I then reworked to give me the user interface below:

ReworkedUI

I’m not going to spend too much time talking about the user interface of the Xamarin application (it’s not really the focus of this How To) but all I really did was update it with the user interface above and added the Json.Net component from the Xamarin Component Store (if you’re from the .Net world – think NuGet, looking forward to a PCL version of Json.Net!). None of the connectivity code was Xamarin specific.

For the  application to register a user it needs to send the right model to the Register action we located earlier. The website contains a class called RegisterBindingModel which we’re going to replicate in our Xamarin application (in a production application I recommend pulling these models out into a Portable Class Library rather than copying and pasting code) in a class called RegisterModel:

class RegisterModel
{
    public string UserName { get; set; }
    public string Password { get; set; }
    public string ConfirmPassword { get; set; }
}

We’re going to form up a HttpWebRequest with the registration information and send it to the controller. As long as we don’t get a HTTP error then registration has been successful. I’ve wrapped this in a class called RegisterServiceClient:

class RegisterService
{
    public async Task Register(string username, string password, string confirmPassword)
    {
        RegisterModel model = new RegisterModel
        {
            ConfirmPassword = confirmPassword,
            Password = password,
            UserName = username
        };
 
        HttpWebRequest request = new HttpWebRequest(new Uri(String.Format("{0}api/Account/Register", Constants.BaseAddress)));
        request.Method = "POST";
        request.ContentType = "application/json";
        request.Accept = "application/json";
        string json = JsonConvert.SerializeObject(model);
        byte[] bytes = Encoding.UTF8.GetBytes(json);
        using(Stream stream = await request.GetRequestStreamAsync())
        {
            stream.Write(bytes, 0, bytes.Length);
        }
 
        try
        {
            await request.GetResponseAsync();
            return true;
        }
        catch (Exception ex)
        {
            return false;
        }
    }
}

That will register user but how do we log in. If we refer back to our websites API help page although there are a lot of interesting looking methods there is no Login method.

This is where OWIN comes in. If you take a look at the code that was generated for the website you’ll see that in MVC 5 / Web API 2 there is a new file in the solution (compared to MVC 4) called Startup.Auth.cs:

Step7

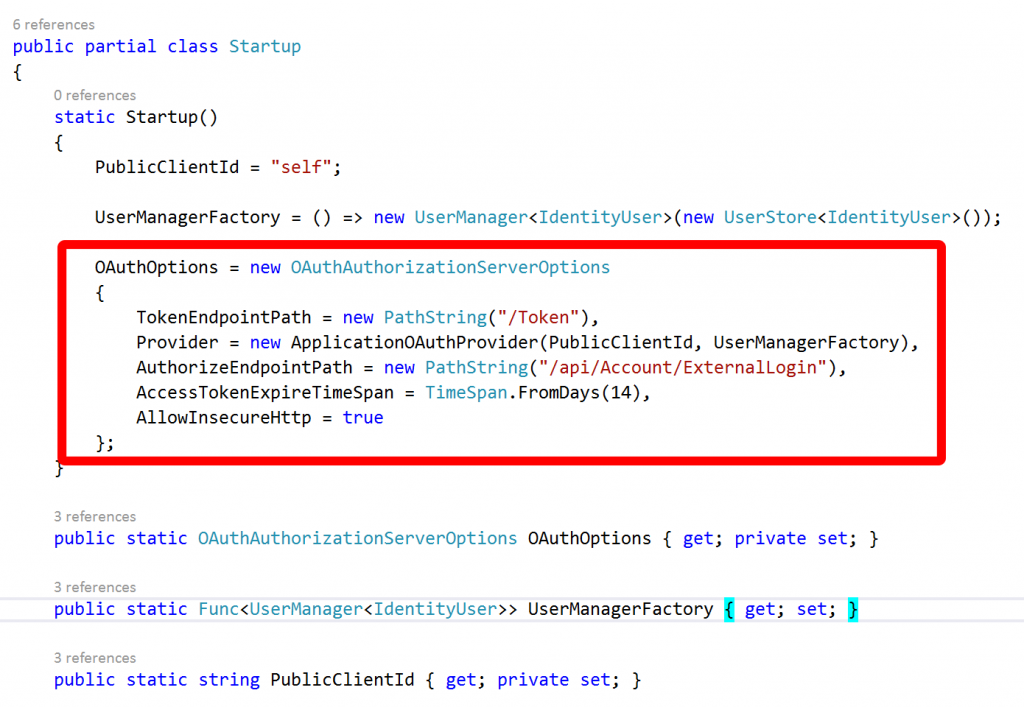
This is where the configuration for authentication and authorization takes place with OWIN and the real interesting bit for us is the section towards the top where OAuthOptions are set:

Step8

Essentially OWIN is running an OAuth authentication server within our website and setting up OAuth endpoints for us. I’m not going to dwell on OAuth but essentially to authenticate we need to request a token using our username and password to identify ourselves and then in subsequent service calls supply this token as a HTTP header in the request.

The token end point we need to call can be seen in the image above: it’s /Token. We need to pass it the username and password and also an additional piece of information: the grant type. We need the grant type to be password. The endpoint responds to form data and we make the call as shown below:

class LoginService
{
    public async Task Login(string username, string password)
    {
        HttpWebRequest request = new HttpWebRequest(new Uri(String.Format("{0}Token", Constants.BaseAddress)));
        request.Method = "POST";
 
        string postString = String.Format("username={0}&amp;password={1}&amp;grant_type=password", HttpUtility.HtmlEncode(username), HttpUtility.HtmlEncode(password));
        byte[] bytes = Encoding.UTF8.GetBytes(postString);
        using (Stream requestStream = await request.GetRequestStreamAsync())
        {
            requestStream.Write(bytes, 0, bytes.Length);
        }
 
        try
        {
            HttpWebResponse httpResponse =  (HttpWebResponse)(await request.GetResponseAsync());
            string json;
            using (Stream responseStream = httpResponse.GetResponseStream())
            {
                json = new StreamReader(responseStream).ReadToEnd();
            }
            TokenResponseModel tokenResponse = JsonConvert.DeserializeObject(json);
            return tokenResponse.AccessToken;
        }
        catch (Exception ex)
        {
            throw new SecurityException("Bad credentials", ex);
        }
    }
}

In response to a successful call on the Token endpoint the OAuth server will return us JSON data that includes the access token and some additional information, I’m deserializing it into a class called TokenResponseModel but the thing we’re really interested in is the access token. The full response is modelled like this:

class TokenResponseModel
{
    [JsonProperty("access_token")]
    public string AccessToken { get; set; }
 
    [JsonProperty("token_type")]
    public string TokenType { get; set; }
 
    [JsonProperty("expires_in")]
    public int ExpiresIn { get; set; }
 
    [JsonProperty("userName")]
    public string Username { get; set; }
 
    [JsonProperty(".issued")]
    public string IssuedAt { get; set; }
 
    [JsonProperty(".expires")]
    public string ExpiresAt { get; set; }
}

Now we’ve got that access token we can use it against any future requests that require authentication and authorization – so finally we can return to our attempt to access the ValuesController. We need to supply the access token in a HTTP header called Authorization and the value for the header must have the format “Bearer {token}”, the space between Bearer and the token is significant – if you miss it authorization will fail. Here’s how we use the token to retrieve the list of values from the controller:

class ValuesService
{
    public async Task&lt;IEnumerable&gt; GetValues(string accessToken)
    {
        HttpWebRequest request = new HttpWebRequest(new Uri(String.Format("{0}api/Values", Constants.BaseAddress)));
        request.Method = "GET";
        request.Accept = "application/json";
        request.Headers.Add("Authorization", String.Format("Bearer {0}", accessToken));
 
        try
        {
            HttpWebResponse httpResponse = (HttpWebResponse)(await request.GetResponseAsync());
            string json;
            using (Stream responseStream = httpResponse.GetResponseStream())
            {
                json = new StreamReader(responseStream).ReadToEnd();
            }
            List values = JsonConvert.DeserializeObject&lt;List&gt;(json);
            return values;
        }
        catch (Exception ex)
        {
            throw new SecurityException("Bad credentials", ex);
        }
    }
}

Obviously I’ve cut out a lot of error handling and have taken some short cuts to stay focussed on the topic but really it’s quite simple, just appallingly documented at the moment.

You can find the full code on GitHub.

Contact

  • If you're looking for help with C#, .NET, Azure, Architecture, or would simply value an independent opinion then please get in touch here or over on Twitter.

Recent Posts

Recent Tweets

Invalid or expired token.

Recent Comments

Archives

Categories

Meta

GiottoPress by Enrique Chavez