Author: James

Requiring the use of https on an AngularJS application hosted in an Azure Website

As I was reaching the tail end of my AngularJS coding challenge one of the tasks I had outstanding was to enforce the use of https across the site, even if a visitor accessed it via a http prefixed link.

For the last few years I’ve mostly been working in MVC and have done this selectively at the filter level (RequireHttps) but my Angular site was just a collection of client side files with no server component – that was hosted off in a second site that fronted up only a restful web API.

I’m familiar with the concept of URL rewriting from ages back but hadn’t used it (ever? or at least for as long as I can remember) on IIS / ASP.Net. Turns out it’s pretty simple to do, all I had to do was drop the block below into my sites web.config file:

1
2
3
4
5
6
7
8
9
10
11
12
13
14
15
16
17
18
19
20
<configuration>
  <system.web>
    <compilation debug="true" targetFramework="4.5.1" />
    <httpRuntime targetFramework="4.5.1" />
  </system.web>
  <system.webServer>
    <rewrite>
      <rules>
        <clear />
        <rule name="Redirect to https" stopProcessing="true">
          <match url="(.*)" />
          <conditions>
            <add input="{HTTPS}" pattern="off" ignoreCase="true" />
          </conditions>
          <action type="Redirect" url="https://{HTTP_HOST}{REQUEST_URI}" redirectType="Permanent" appendQueryString="false" />
        </rule>
      </rules>
    </rewrite>
  </system.webServer>
</configuration>

Handy to know if you’re deploying an AngularJS site to an Azure website or IIS.

CORS with Owin

In a recent post I’d written about my struggles with the Web API CORS support and in the comments Taiseer suggested looking at accomplishing it through OWIN. I needed to create a new Web API project this week and so tried out this approach – the short version is it was utterly painless.

This project is (sorry!) closed source / commercial so I can’t share the source directly however it was an easy set of steps to enable CORS support through OWIN on my Web API project.

1. Either through the Package Manager GUI or console install the package Microsoft.Owin.Cors into your Web API project.

2. Within one of your startup files (easiest one out the box is Startup.Auth.cs and that seemed to be a reasonable place for enabling CORS) just add the line:

app.UseCors(CorsOptions.AllowAll);

And that’s it.

If you want finer grain support over what domains and verbs are allowed you can supply detailed configuration via a the CorsOptions class.

Angular JS Pack

I’ve spent some time over the weekend and last week tidying up my initial AngularJS code and learning about some more advanced topics in order to reduce code repetition and standardise my approach to handling success and failure around $http calls to Web API.

Not being someone who is shy of creating new public GitHub repositories I’ve spun what I’ve written out into an open source (MIT License) Accidental Fish AngularJS Pack (how grand!) and written some documentation for it. You can find it over at GitHub.

It contains some element level directives for Bootstrap 3 boilerplate and some wrappers for communicating with Web API responses.

Code quality should improve over time as I learn more about AngularJS – I’m really only a beginner.

12 Hour Coding Challenge – AngularJS and Azure

This last weekend I set myself a challenge to build and ship a web application in under 12 hours and in the process learn something about AngularJS – a framework I’ve been itching to try for some time. I also wanted to build something that would serve as a basis for a small iOS application written in Swift (to learn a little about that) and that might allow for extension opportunities in iOS8.

The good news is I succeeded in my challenge and you can find the website here and the source code on GitHub. I’ll post more details on how to build, configure and deploy this application shortly.

Without further ado – this is how my day went.

Hour 1 – Idea, Technology Choices, System Architecture

With only 12 hours and some learning to do I needed something I could pair back to a useful absolute minimum but that I could evolve additional features on top of easily in the future. I used to be a big user of delicious but gave up on it while it was under Yahoo’s tenure. I have tonnes of different devices, on different platforms (so for example iCloud syncing of bookmarks isn’t enough for me iPhone and iPad yes but what about my Surface?) so thought I’d have a bash at a simple online bookmark site. I paired things back to a handful of requirements I thought I could achieve:

  • Signup and sign-in (in a way that I could expand to include social account sign in in a later version)
  • View links in descending order they were saved
  • Save links in the website
  • Save links from a bookmarklet (button on your browsers toolbar)
  • Tag links
  • View links in tags in descending order they were saved

As both AngularJS is new to me, and Swift also when I get rount to that, I wanted to build everything else on a solid well understood foundation and so for the backend picked:

  • C# and .Net 4.5.1 – I’m hankering to experiment with Go but if I added that to everything else there’s no way I’d finish in 12 hours so I stuck to C#.·
  • Azure – table storage, web sites and a worker role. I plumped for table storage rather than SQL as I want this to scale easily and be super cheap to run – I’m paying for it myself and am willing to sacrifice features and some development complexity for a lower monthly bill.
  • Asp.Net Web API – I know this really well now so an obvious choice for the web service layer given I was using C#.
  • My open source Azure application framework, it wraps up most common operations you’d undertake against the core of Azure in a testable fashion and makes deployment and configuration easy.
  • My open source ASP.Net Identity 2.0 table storage provider.
  • The Bootstrap CSS template for the UI. Looks ok out the box and I can apply an off the shelf theme easily later (or tinker with it myself).

Most of the above took place in my head with a handful of notes.

Hour 2 – AngularJS Research

I didn’t expect this to hold too many surprises in terms of the overall system architecture as I’m pretty familiar with rich browser application development in jQuery and have some experience in backbone and Knockout but I didn’t know how to structure an application properly in AngularJS.

All I’d done with this previously was really an equivalent of the sample on the home page tucked away inside another website but it looked to be a super useful and comprehensive single page application framework that could provide a really clean MVC structure for a JavaScript client. I basically went through the developer guide at quite a clip and looked at the structure of a couple of non-trivial apps.

I was no expert after an hour, and didn’t expect to be, but I felt I could build the backend and not get surprised by the front end to a degree that would cause me to uproot the system architecture. Importantly I learned how I could integrate the client with the authentication endpoint via a helpful blog post (thank you!) which also introduced me to interceptors – most handy.

Hours 3 to 6 – Build the Backend

The storage model fell pretty trivially out of the requirements and came together quickly. I used the Chrome plugin Postman to test my REST interface without needing to write further code. I used my standard approach to this sort of thing in terms of project structure.

Nothing really new at all so largely just predictable legwork and at the end of the period I had a clean back end following a fairly pure REST model that I was fairly sure would work for the UI and I could deploy into Azure. So I did just that.

Hours 6 to 12

Best summarised as grappling with AngularJS with lots of Googling and referring to the documentation!

Actually to be fair other than a couple of pain points it was rather simple and I’m pretty sold on AngularJS as a framework for single page applications, I will certainly be using it on future projects.

I basically copied the application folder structure I would use if I was building a traditional server page request website in ASP.Net MVC and that I’d seen used in a couple of other apps that worked out really well with controllers, views and services separated by folders. I added a service layer that used the $http angular module to talk to my Web API and kept the http grub out of the controllers.

I managed to avoid the temptation to fall back to old patterns and stuck as far as I could to straight AngularJS, for example it was tempting to start inserting jQuery all over the place to show and hide things whereas I really wanted to do this in a clean and declarative fashion using Angular.

I had to refactor things a couple of times but nothing major – it came together quite easily. The last hour was putting a front page on it and dealing with something I hadn’t considered – as a new user when I went to the bookmark feed there is no real clue as to what to do next so I added a quick “if there are no links welcome page”. By the time I’d begun the UI work my own test account was littered with links!

The things that caused me most pain:

  • CORS support. My client website was running in a different domain (localhost in development) to my Web API and would in production (it’s static HTML so why waste expensive Asp.Net server resource!) and this meant I needed to use the CORS protocol (Cross Origin Resource Sharing) to access the Web API from JavaScript. Except…. it didn’t work. After much teeth gnashing it turned out that there were issues with the Web API 2.0 binaries and accompanying Web API 2.0 CORS package and I would need to upgrade to 2.2. I did this but in Microsoft’s recent “fun” fashion that included breaking changes on a point release. Fortunately simple to fix and then everything worked fine.
  • Infinite scrolling. I wanted to take an infinite scrolling approach to the bookmark list. You’ll have seen this if you’ve use things like Facebook or Twitter in a web browser – there are no “next page” and “previous page” buttons you simply scroll towards the end of the page and the next page is fetched in the background and added to the bottom. There is an AngularJS module that purports to assist with this however it had a number of bugs (must do a pull request) and so I spent 30 minutes learning the code and fixing them. Fortunately it was only 100 lines of code to deal with and still was a net win in terms of time. Maybe I’ve just missed something in terms of library dependencies.

Lessons Learned

  • AngularJS is pretty cool! Easy to use, well considered, and provides excellent structure. My only concern is that while digging around for answers to common problems it seems to be evolving very quickly with not a lot of consideration given to backwards compatibility. Maybe I’m wrong – I’m utterly new to it.
  • By keeping things tightly focussed I had something in the hands of a customer (me!) in 12 hours from start to finish. It doesn’t let me do things I’d eventually want to do (edit links and tags, delete links for example) and has some rough edges but I can already use it and “pilot” it myself in a beta fashion. I shipped as early as I absolutely possibly could.
  • The aggressive timescale meant I couldn’t go off on architectural / development flights of fancy, not that that’s really my thing – see below. I think every line of code I wrote in this system is specific to the business problem in hand. No custom UI components, no custom architecture, no funky “time saving” code / model / blah blah blah generators that are often the symptom of over architected solutions put together by people with too much time on their hands! My first choice was always to go find something off the shelf (hence my infinite scrolling bug fixes – and even factoring that in it was quicker than writing it myself).
  • There are lots of things I’d like a site like this to do (social sharing, editing as above, public / private feeds and links, trending URLs) and while I had those in mind and have rough views of how to build them I did not allow myself to get distracted by them. If I had my 12 hours would have become a week, would have become 2 weeks and so on. Just because they are not in v1 (or v0.1 if you prefer) doesn’t mean they can’t be put into v1.1.
  • You really do need to stand on the shoulders of giants – I can’t emphasise enough how strong my belief is that if the code you are writing is not specific to your particular problem then you’re going wrong: you’re hovering around the ankle while someone else starts at head height!

Next Steps

  • Understand the best way to unit test AngularJS and, errr, write the unit tests.
  • Present a tag list in the UI.
  • Deal with error conditions, particularly http errors, in a consistent way.
  • Beef up validations on both the server and the client.

Uploading an image to a Blob Container via Web API

Handling image (or other binary object) uploads via Web API for storing in Azure blob storage without using the local file system (handy if, for example, you’re using Azure Websites) seems to be a frequently asked question.

I’ve not tested this in anger yet but I’ve posted my own attempt at solving this issue as a gist on GitHub and shown below. It seems to work but as I say I’ve not tested it in anger, only in fairly limited scenarios.

If you use my Azure Application Framework I’ve also added a GetMultipartStreamProvider method to the IAsynchronousBlockBlobRepository interface that provides a pre-configured implementation for a given blob container.

Hope thats helpful.

ASP.Net Identity Provider 2.0 and Table Storage

I’ve started to implement the new storage interfaces in AccidentalFish.AspNet.Identity.Azure so you should be able to use the new features of Identity Provider 2.0 with table storage.

I’ve added an MVC5 project that shows how to configure the provider.

It’s not fully tested yet but if you come across any bugs please log them on GitHub and I’ll get right on it. Once complete I’ll publish the new version on NuGet.

Azure by Default

When I first started with Azure it only existed in PaaS form and had a very limited set of services compared to the rich variety available now. Adopting Azure at the time was seen as something as a risk, even within a heavy C# / .Net shop, and my first use of it was on a carefully targeted project – one on which I wasn’t betting the bank so to speak.

Over the last few years the platform has matured significantly adding additional PaaS features and IaaS features along the way and proven to be robust, reliable, cost effective and flexible in the development and operation of real systems running real customers. It’s done what it says on the tin and the people I have worked with who also have significant Azure experience largely say the same.

As such it’s been interesting to observe my own corresponding shift in behaviour over the last 12 months and throughout 2014 in particular. When I started on this journey back in 2011 I would have spoken of it in terms of interest and caution. Throughout late 2012 and 2013 I would have spoken of it as being an excellent option to be considered for many systems. Finally leading me to today where in the last few weeks I have found myself recommending it as the “default choice”.

By this I don’t mean it’s the only tool for every job but it’s the platform I now look to first for greenfield development and then look for reasons as to why it might not be a good fit, drilling into those reasons hard as the benefits of the platform are so great. The kind of thing that can make me look elsewhere are regulatory or compliance considerations, or a peculiar or edge case technical requirement.

It’s been a fascinating journey and still is, at this point I consider Azure to be amongst the best things Microsoft have done, right up there with C#, it’s a massively enabling technology. If you’ve not looked at it yet, and particularly if you’re a .Net / Microsoft developer, you really should.

Thanks, and a tip for people looking for help

Firstly let me just thank those who have taken the time to contribute to these projects on GitHub and also to those who have participated in discussions here. I really appreciate it.

And a quick tip for those looking to get help on any of the open source code related to this blog: best thing is to log a ticket on GitHub. That’s more likely to get my attention but also there are others chipping in on GitHub with help and advice and posting fixes and upgrades to the code in response.

I’ll keep checking here but I have an approval process in place due to spam and if I go on holiday (as I just did!) that can lead to lengthy delays.

Hope that helps and thanks again – really appreciate the support, help and interest.


Using Blob Leases to Manage Concurrency with Table Storage

Azure’s table storage service allows for highly scalable and reliable access to large quantities of data but if you come from a SQL background it can seem very primitive – there is essentially no support for transactions (ok so you can transact a batch but that’s not often that useful) and only support for optimistic concurrency within the Table Storage itself. You can’t do much about the former, though there are some strategies you can adopt that help – future blog post, but their is a technique you can use if optimistic concurrency isn’t good enough and you want exclusive access to table storage resources for a period of time – essentially obtaining a lock.

The trick is in coupling table storage with blob storage to take advantage of the leasing functionality available on blobs. I frequently use this technique when I want to access or perform an update on data across multiple tables and be certain the data is going to be consistent.

There is a simple example hosted on GitHub here from which I’m going to highlight some of the code to illustrate how this approach works in practice.

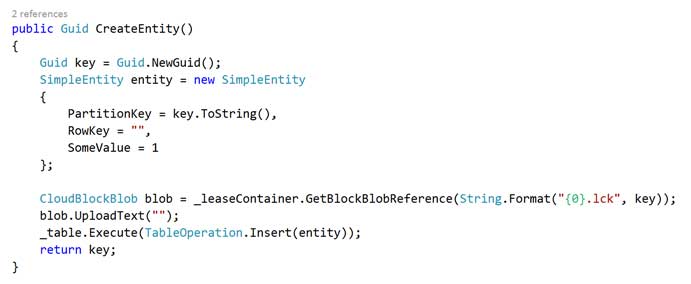
Firstly we need to create a table entry and a blob to go with it:

lease1

You can see that this is fairly standard code for uploading a blob and inserting an entity however note that we’ve given the blob a name that matches up with the key of our table entity. We have no row key but if you did you’d form the blob from the composite of the key (unless you were interested in locking a range).

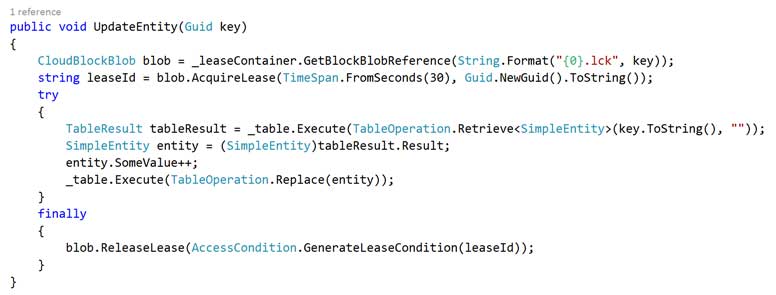
Now lets look at the code for a lease protected table access:

lease2

The code inside the try block is the fairly familiar looking code for accessing and updating entities for table storage however before we access table storage you can see that we get a reference to our blob using the entities key as a name again and then we call AcquireLease on the blob.

Importantly we do this with a timespan. It’s possible to indefinitely acquire a lease on a blob but this is not usually a good idea: if you suffer a crash (either your code or an Azure failure) you’re going to have a real problem on your hands as the blob will be leased by something that no longer exists.

It’s important to consider how long you want the lease for – thinking hard about retry policies and how long a series of operations could theoretically take. This is an extremely simple example but lets assume you were updating two tables – how long could that take? Well normally milliseconds assuming you’ve keyed your tables well. But let’s assume both operations require a significant retry period. The default retry policy for the storage client (on version 2 through to 3.0.3.0) has a maximum duration of 120 seconds. So if all your operations (read table 1, read table 2, write table 1, write table 2) succeed but are at the upper range of this threshold then you are looking at around 480 seconds for it to fully complete. In my experience this is unlikely – but it does happen.

So to cover this lets say you set your leases timespan to 490 seconds – it will cover the total possible operation time but if there is an issue and your lease doesn’t get released due to an application crash (or Azure issue) then the entity you are attempting to lock cannot be updated again until the full 490 seconds have passed. You can mitigate this from an application error with a finally block as in this sample code but that won’t help you if your process dies.

Another option open to you is to renew the lease between operations. Their is a method on the blob called RenewLease that will do exactly what it says on the tin and renew the lease and this can be an effective, if messy looking, solution but it does come with a performance penalty. Just like acquiring a lease in the first place takes time renewing a lease does too – in most cases it is extremely quick but you should be prepared for variance.

There’s no magic answer and, as ever, it’s a series of trade offs and you need to pick the best fit for your use case. It’s so use case specific that it’s difficult to give general advice – however general common sense is reasonable apply and try to cater for the common case and treat exceptional cases as just that: exceptional. As long as you know the fault has happened you can do something about it later – just don’t put your head in the sand and ignore it.

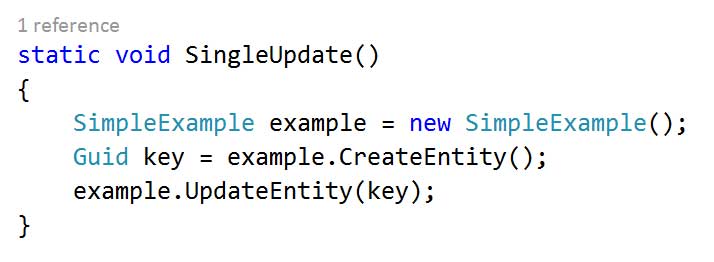
With that aside back to our example. Run the application and have it call the SimpleExample method shown below:

lease3

At the end of this you should see the expected output in the storage emulator – an entry in table storage in the entities table and a blob with a name that matches the partition key in the leaseObjects blob container.

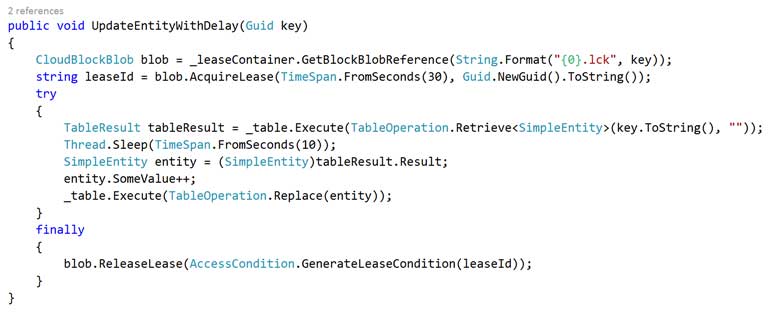
Now lets add a method that adds a delay into the update process so we can see force a collision and see what happens:

lease4

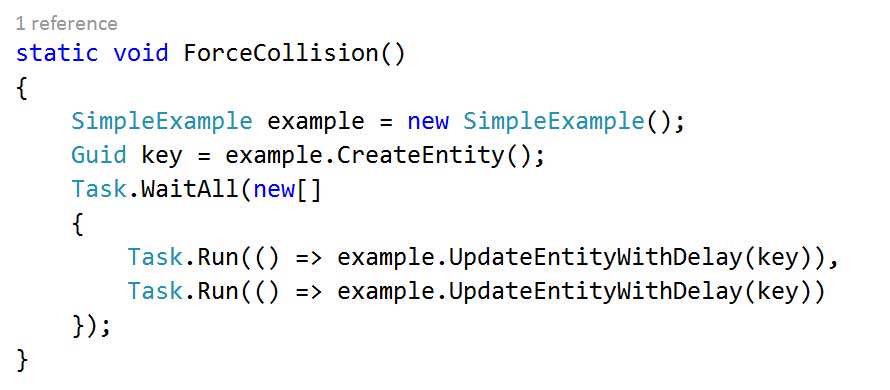
And finally lets use that to run two updates concurrently with the task library:

lease5

You should find that a storage exception is raised on the AcquireLease line with a status code of 409 – conflict. The lease is acquired and so the second attempt to acquire the lease fails. Depending on your use case you may choose to fail the operation entirely or catch the exception and use a backoff policy to retry later.

Obviously the example here is somewhat simplistic and artificial but hopefully it illustrates how you can use this technique in more complex scenarios. And you can of course use the blob lease pattern in other concurrency scenarios.

Finally – the AccidentalFish.ApplicationSupport library on GitHub contains a dependency injectable lease manager you can use to simplify your code.

How To: Using Facebook to Authenticate with Web API 2 in a Native Mobile Application

If you’re developing mobile applications and you’re a .Net developer there’s a fair chance you’re using Web API to present access to server side resources. I’ve already covered how to authenticate using organisational accounts with MVC 5 which is a good choice for many applications, particularly business apps, but if you’re working in the consumer space you may want to allow your users to login using social media identities such as Facebook or Twitter.

There’s a really good tutorial on the ASP.Net web site covering how to do this if you’re working in a browser but it doesn’t, directly at least, cover how to do this from a native mobile application. In this post I’m going to take you through the steps required to do this from an iOS application written using the Xamarin tools (if you’re a C# developer working on mobile they are very much worth checking out). I’m going to focus on Facebook but the same approach works for the other providers supported by Web API 2: Facebook, Twitter, Microsoft Accounts and Google Accounts are all supported straight out of the box.

The below walks through the process of configuring Azure, Facebook, a Web API project and a Xamarin mobile application, you can walk through it for the most part (there is the odd missing step – instance variable declarations for the most part) but really it’s intended as a guide to go along with the source code that is on GitHub here.

We’re going to host our Web API on Azure so begin by going to the Azure management portal and create yourself a free website. Take a note of the URL as you’ll need it later. Also create an empty SQL Database either on a new or existing server and take a note of the credentials, you’ll need this later.

Configuring Facebook

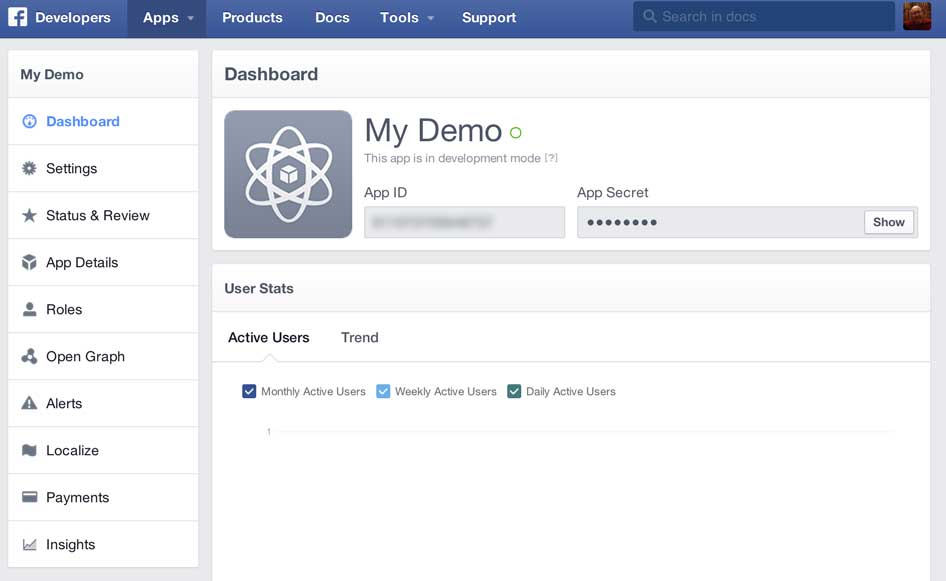
Firstly you need to create a Facebook application in the Facebook developer portal (http://developer.facebook.com). From the developer portal homepage select Apps -> Create a New App and enter the Display Name for your app and the Category applicable to your app and click Create App. At the time of writing there is a bug in the portal and after it finishes whirring away the dialog box stays on the screen, but your app has been created. Refresh the browser and select the Apps menu again and click the name of your app (that you should now see there). You should see a screen like this:
external1

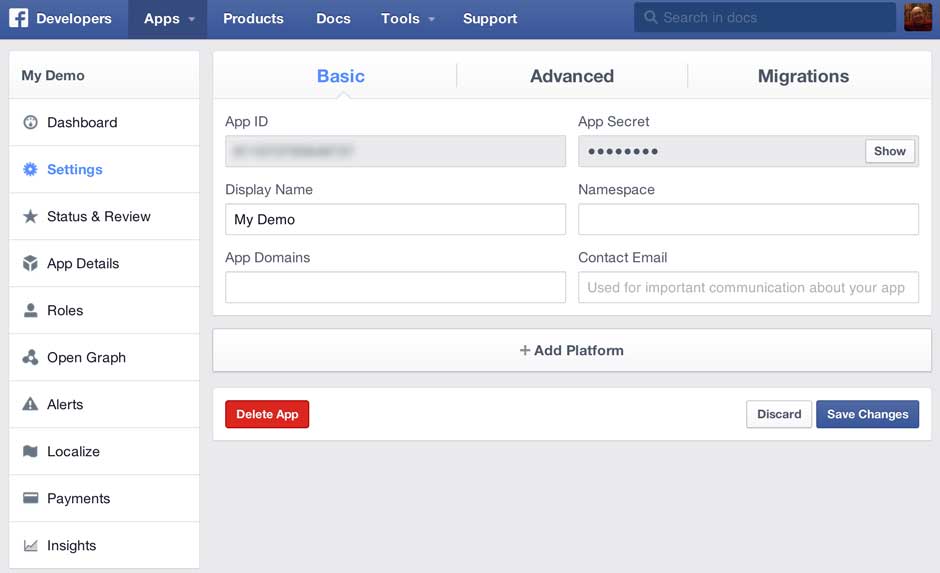
Take a note of the App ID and the App Secret as you’ll need them later (click the show button to see the App Secret) and then click the Settings option on the left to show the settings screen for your app:
external2

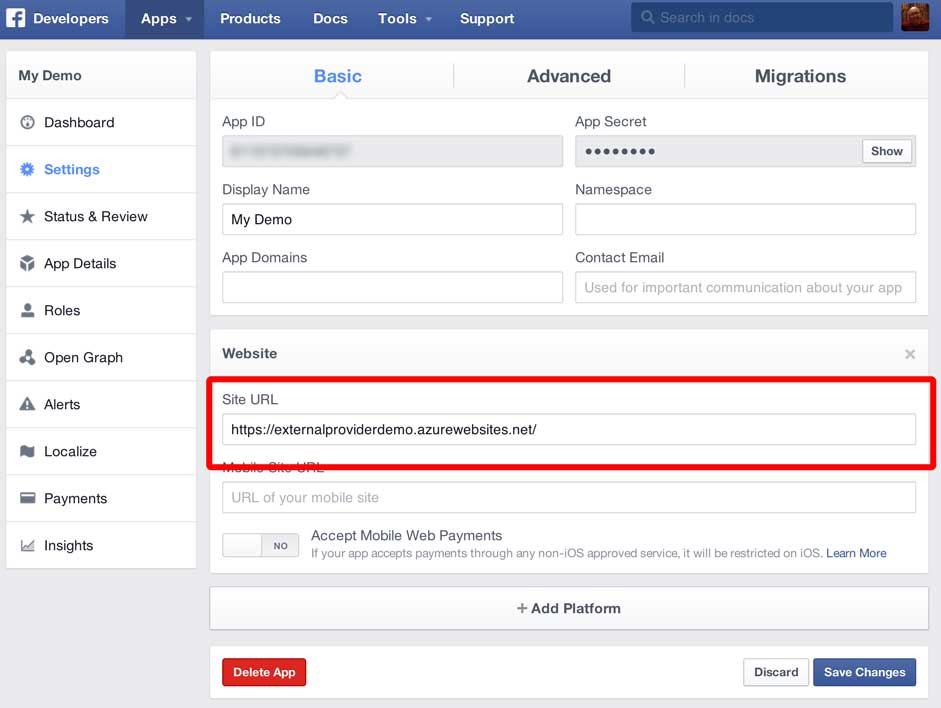
Now click the Add Platform button and choose Website. In the Site URL text box enter the URL you noted earlier from Azure and click Save Changes:
external3

That’s Facebook configured to allow your application to logon so now we’ll go and create our Web API project and wire it up to Facebook.

Web API / Visual Studio

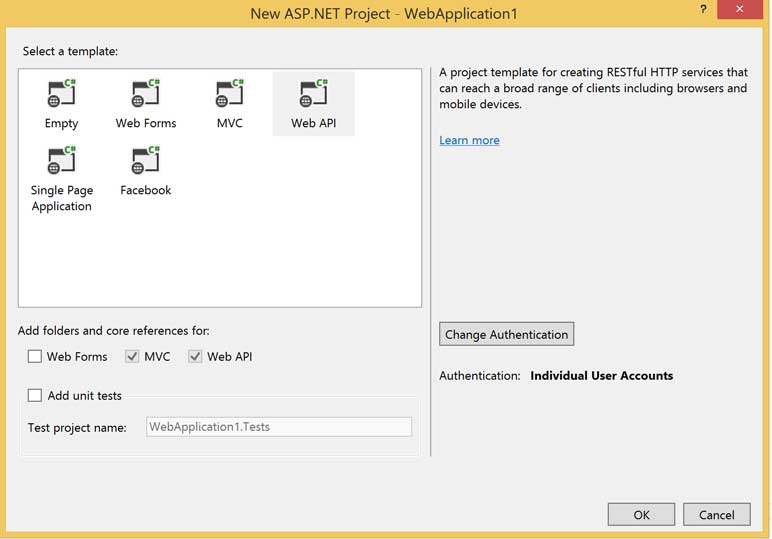
In Visual Studio 2013 create a New Solution and select a project type of ASP.Net Web Application for .Net 4.5.1. On the configuration dialog that appears select Web API and then click the Change Authentication button. Select an authentication type of Individual User Accounts. Your project configuration should now look like this:
external4

Click OK and your solution will be created with the familiar MVC structure. Open the App_Start folder and open the Startup.Auth.cs file for editing:
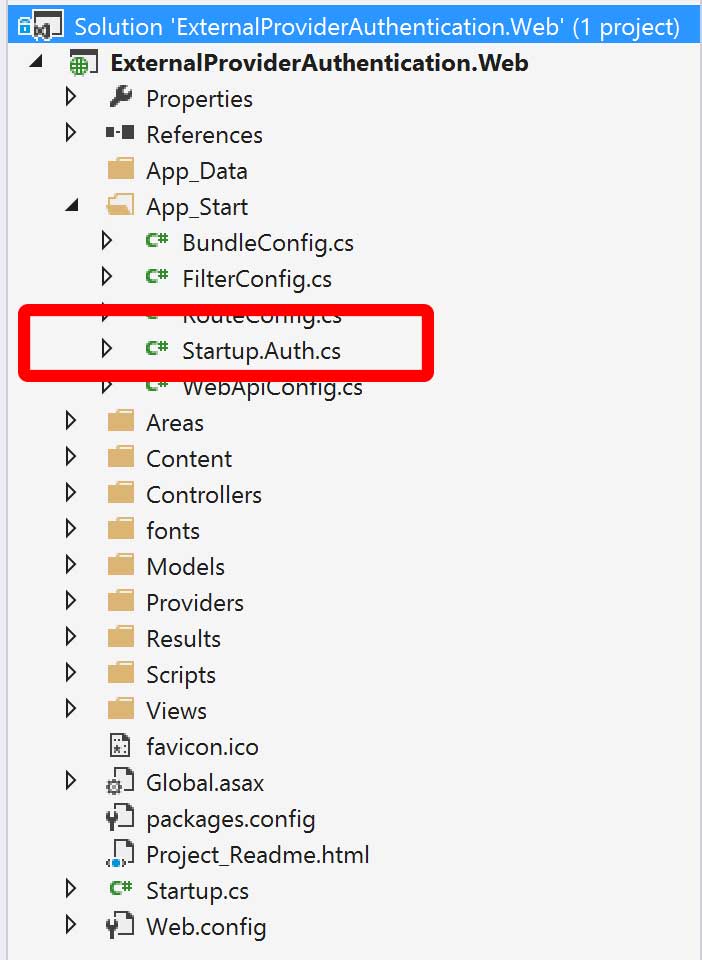
external5

It’s the code in this class and file that configures how Web API will authenticate. By default it’s setup for local accounts – accounts and passwords that are stored in a SQL database that goes along with your app. To add an external identity provider you need to scroll to the bottom of the file and uncomment the appropriate lines for the provider you want.

In this case as we’re authenticating with Facebook we’re going to uncomment those lines and add the App ID and App Secret that we obtained earlier from the Facebook portal:
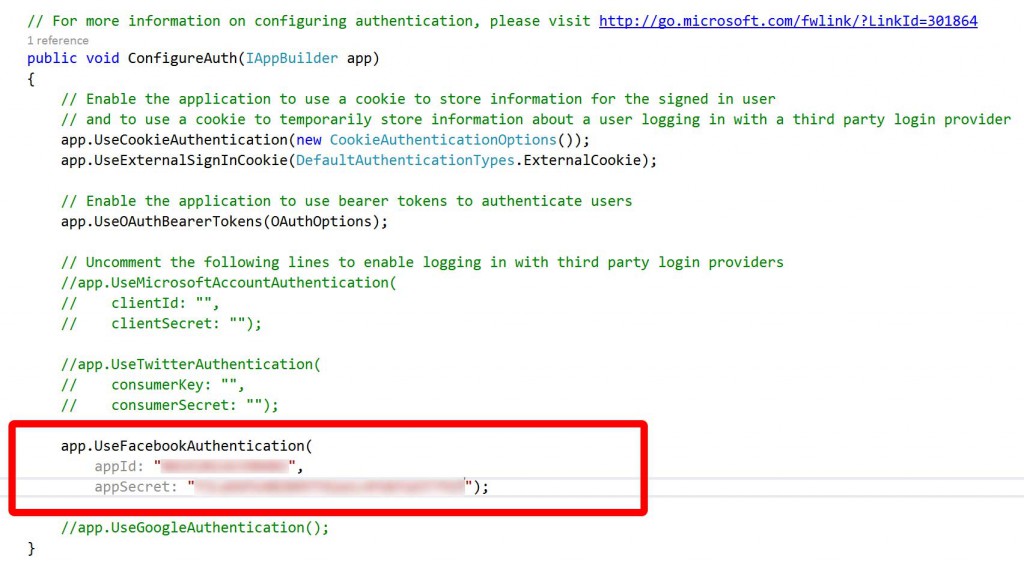
external6

We’ve got one last step to perform – point the web site at the SQL Database we created earlier by updating the web.config file as shown below:

external8

Believe it or not in terms of code changes that’s it – we’re done. Build and publish the project to the Azure website we created earlier.

Mobile Application

This isn’t really intended as an iOS or Xamarin tutorial so I’m largely going to gloss over the steps that aren’t specifically about the authentication process – if you get stuck post a comment and I’ll reply when I get a chance. Not everybody has the Visual Studio plugin so I’m going to use Xamarin Studio to do this.

To authenticate from the mobile device we need to go through the following high level flow:

  1. Request a list of external providers and authentication end points from the server.
  2. Send a get request, from a web browser, to the end point for the provider the user wants to log in with.
  3. At the end of the process extract the access token from the URL of the page that is showing in the browser.
  4. Establish if the user is already registered with the server and if not create a user mapped to the external login and then call the authentication end point again.

In practice it’s simpler than it sounds. The key thing is that the authentication process must take place through a web browser, you can’t do this using a native approach. Although you can use something like the Facebook SDK to log in locally against Facebook and then use Facebook that doesn’t result in authentication against your server and web services.

Begin by creating a new iPhone Storyboard project with an application type of Single View Application. Then open the storyboard in the created project and add a second view controller that hosts a UIWebView control. You don’t have anything to create the Segue from as we’re going to drop buttons on programattically and trigger the segue in code so we need to create an segue from the view controller and give it a name – this trips a lot of people up! Basically control click the icon I have highlighted below and drag it to the second view controller. Then click the segue and give it an identifier.
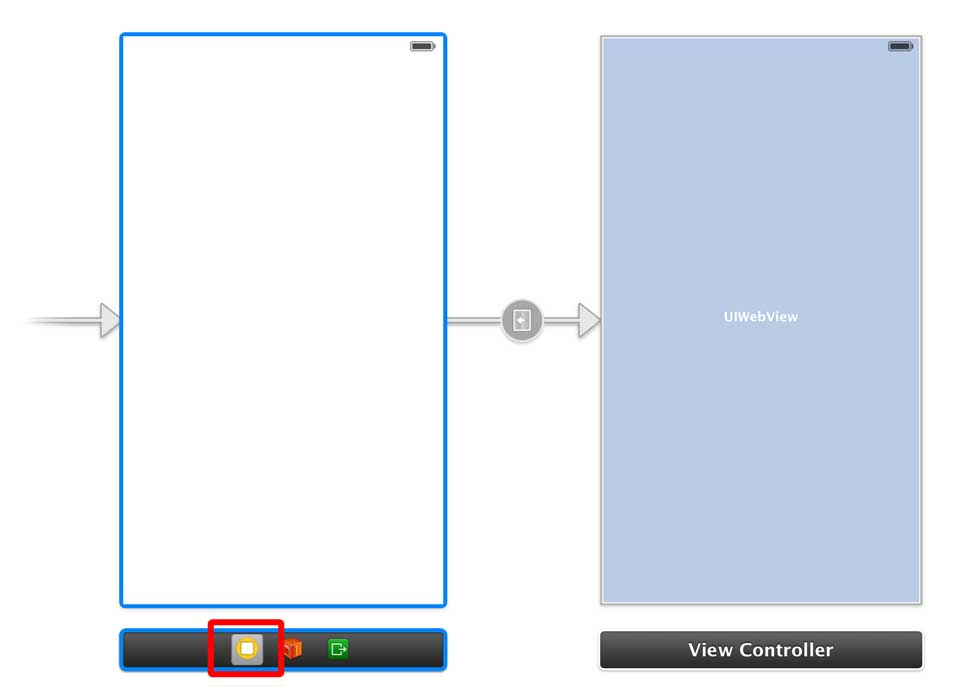
external7

To communicate with the Web API you’re going to need access to some of the models that go with the AccountController – specifcally ExternalLoginViewModel and RegisterExternalBindingModel. In a real application my preference is to extract these models from the Web API project and place them in a portable class library, that way your mobile code and your web code can all use the same models with no code duplication. For the sake of this example copy and paste these classes to your Xamarin project.

We’re going to want to process some JSON so using the Xamarin Component Store add the Json.NET component to your project.

Now we’ve done all that we’re going to add a class called AuthenticationServices within which we’re going to wrap the calls we need to make to Web API directly. To begin with we need a method to let us get the external providers registered with Web API:
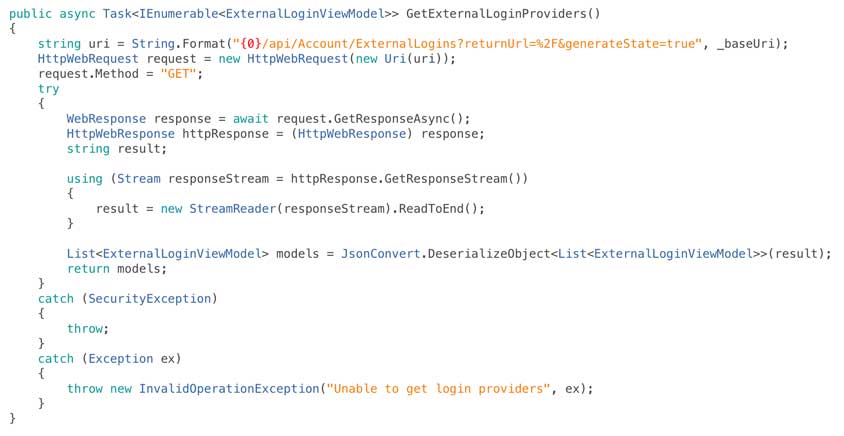
external10

We now need to edit our root view controller so that when the view loads we retrieve the external providers and when one of the buttons is tapped we run the segue to load our second view controller and display the browser, I’ve done this in a slightly hokey way as it just leads to a simpler example than a table view or collection view:
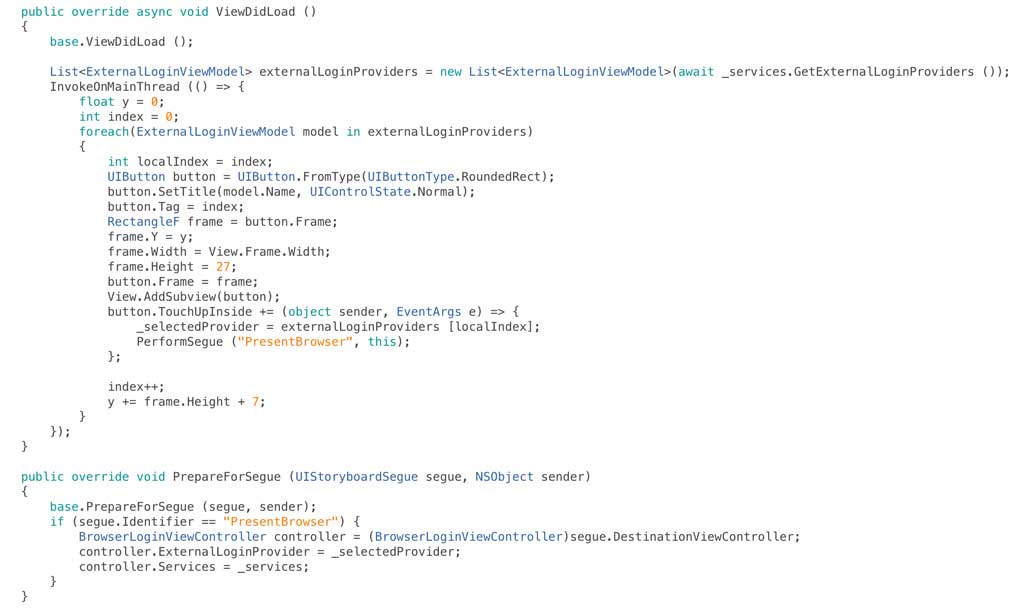
external9

At this point we have a tremendously exciting app that is displaying a Facebook button which when tapped launches the web browser but not much more happens:

external11

To complete the login process we need to do work on the view controller that is hosting the web browser. When the view is loaded we’ll get the URL that has been returned from the server and load it in the browser:

external12

This will present the Facebook login page as shown below:
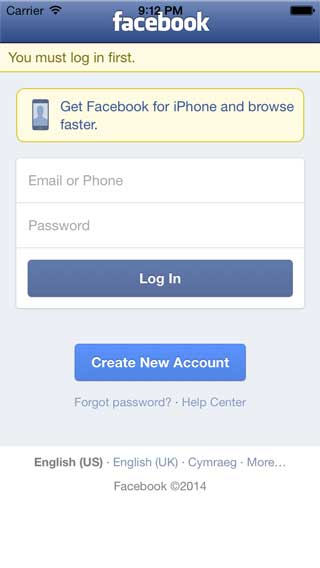
external13

If you enter valid credentials then you’ll find that eventually you end up back at your web sites home page:
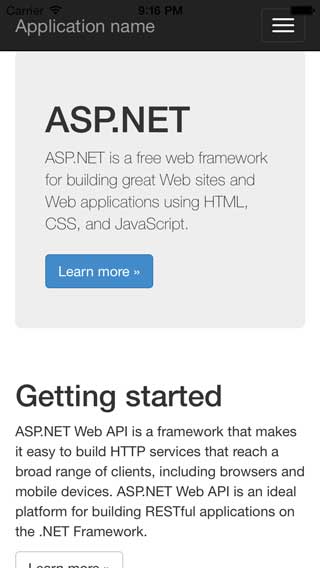
external14

If you look at the URL (which will have been output to Xamarin Studio’s Application Output window) you’ll see it includes the access_token as a parameter. This is the bearer token that I’ve discussed in a previous post and which you need to pass as a header to Web API for future authenticated requests.

Having got this far we now need to check and see if the Facebook user has a registered account with our web services and if not create one. There are two ways you can find this out – you can either ask Web API the question on the endpoint /api/Account/UserInfo or take a shortcut and look at the cookies that have been set. In this example we’re going to do the latter.

In external identity provider scenarios ASP.Net makes use of two cookies, one is called .AspNet.ExternalCookie and the other is called .AspNet.Cookies. When a user has logged in with an external identity provider but doesn’t yet have an account with our web service then the .AspNet.Cookies cookie will not be set. So to find out if this is the case we’re going to have a look in the applications cookie store:

external15

We also need to add some code to actually call Web API’s external account registration method into our AuthenticationServices class, in the example below I’m supplying a hard coded username but in reality you would collect this from the user:
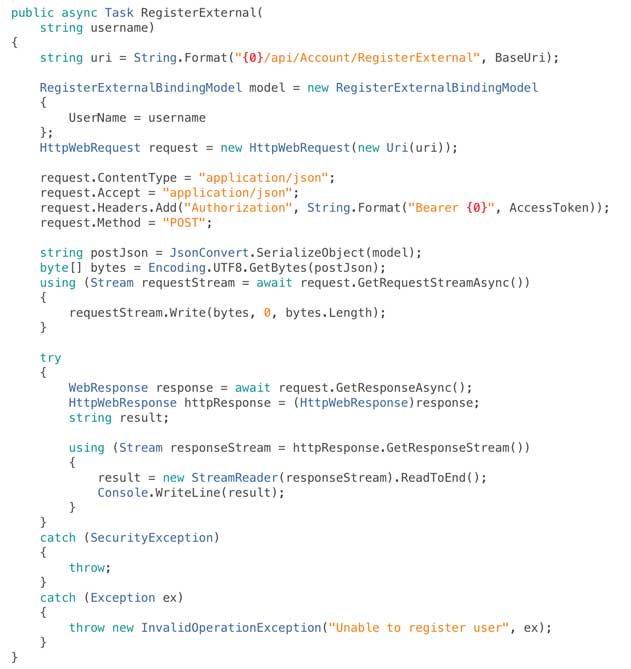
external16

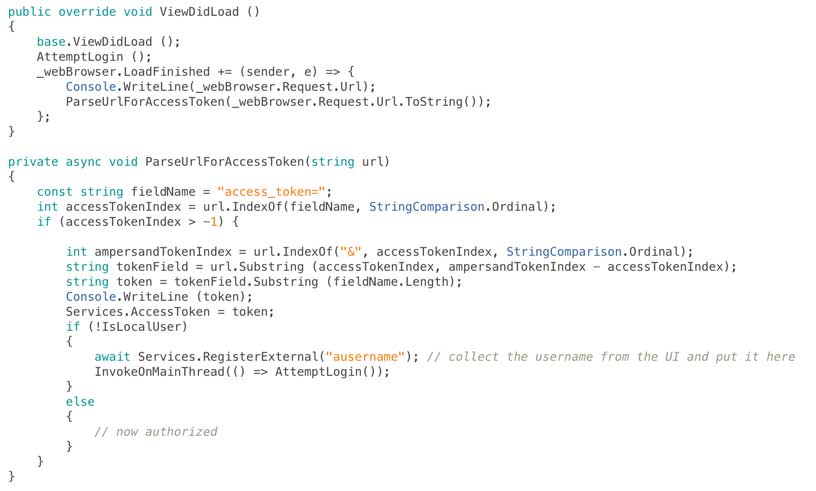
And finally we need to look for the access token in the URLs that appear in the web browser as the authentication process takes place and react to them appropriately (gather the access token, look for an account, register if necessary, then move on):
external17

In production code it’s definitely worth also verifying that the access token is on a URL that maps to your domain.

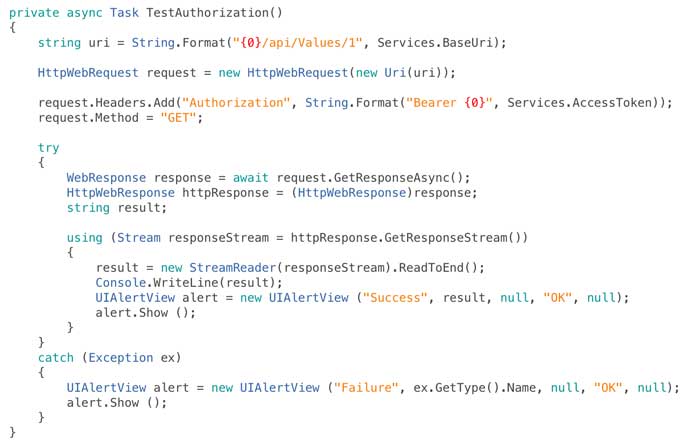
If you run the app at this point the full authentication chain will work but we’re not actually doing anything to prove that. So finally lets add a step to call the default get handler on the sample ValuesController that Visual Studio included in our Web API project and call it on a successful login / registration:
external18

At this point we’re done – we’ve secured our web services with a Facebook login and you can easily extend this to Twitter, Microsoft Accounts or Google by uncommenting the other lines of code in Startup.Auth.cs. Behind the scenes if you look into the SQL database that the ASP.Net authentication system will have created you’ll see a user in the users table and a login for the Facebook provider in the logins table.

If you’d rather use table storage for your user data you can use my alternative ASP.Net user store provider that I outlined here.

The account controller contains other methods to support logout and get information about users but it’s all pretty straightforward once you understand the workflow to login and register.

Hope that’s useful, if you spot any problems let me know in the comments.

Full source code can be found on GitHub here.
Contact

  • If you're looking for help with C#, .NET, Azure, Architecture, or would simply value an independent opinion then please get in touch here or over on Twitter.

Recent Posts

Recent Tweets

Invalid or expired token.

Recent Comments

Archives

Categories

Meta

GiottoPress by Enrique Chavez