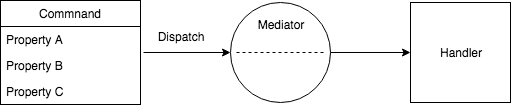
In the last post we added validation to our solution. This time we’re going to clean up our command handlers so that they are focused more on business / domain concerns and we pull out the infrastructural concerns. After that we’ll add some telemetry to the system to further reinforce some of the benefits of the pattern. As the handlers currently stand they mix up logging with their business concerns, for example our add to cart command handler:
public async Task<CommandResponse> ExecuteAsync(AddToCartCommand command, CommandResponse previousResult)
{
Model.ShoppingCart cart = await _repository.GetActualOrDefaultAsync(command.AuthenticatedUserId);
StoreProduct product = (await _dispatcher.DispatchAsync(new GetStoreProductQuery{ProductId = command.ProductId})).Result;
if (product == null)
{
_logger.LogWarning("Product {0} can not be added to cart for user {1} as it does not exist", command.ProductId, command.AuthenticatedUserId);
return CommandResponse.WithError($"Product {command.ProductId} does not exist");
}
List<ShoppingCartItem> cartItems = new List<ShoppingCartItem>(cart.Items);
cartItems.Add(new ShoppingCartItem
{
Product = product,
Quantity = command.Quantity
});
cart.Items = cartItems;
await _repository.UpdateAsync(cart);
_logger.LogInformation("Updated basket for user {0}", command.AuthenticatedUserId);
return CommandResponse.Ok();
}
There are a number of drawbacks with this:
- As the author of a handler you have to remember to add all this logging code, with the best will and review cycle in the world people do forget these things or drop them due to time pressure. In fact, as a case in point, here I’ve missed the entry point logger.
- It’s hard to tell what is exceptional and business as usual – for example the log of a warning is something specific to this business process while the top and tail is not.
- It adds to unit test cost and complexity.
- It’s more code and more code equals more bugs.
- It makes the code more difficult to read.
This is all compounded further if we begin to add additional infrastructural work such as counters and further error handling:
public async Task<CommandResponse> ExecuteAsync(AddToCartCommand command, CommandResponse previousResult)
{
Measure measure = _telemetry.Start<AddToCartCommandHandler>();
try
{
_logger.LogInformation("Updating basket for user {0}", command.AuthenticatedUserId);
Model.ShoppingCart cart = await _repository.GetActualOrDefaultAsync(command.AuthenticatedUserId);
StoreProduct product =
(await _dispatcher.DispatchAsync(new GetStoreProductQuery {ProductId = command.ProductId})).Result;
if (product == null)
{
_logger.LogWarning("Product {0} can not be added to cart for user {1} as it does not exist",
command.ProductId, command.AuthenticatedUserId);
return CommandResponse.WithError($"Product {command.ProductId} does not exist");
}
List<ShoppingCartItem> cartItems = new List<ShoppingCartItem>(cart.Items);
cartItems.Add(new ShoppingCartItem
{
Product = product,
Quantity = command.Quantity
});
cart.Items = cartItems;
await _repository.UpdateAsync(cart);
_logger.LogInformation("Updated basket for user {0}", command.AuthenticatedUserId);
return CommandResponse.Ok();
}
catch(Exception ex)
{
_logger.LogError("Error updating basket for user {0}", command.AuthenticatedUserId, ex);
}
finally
{
measure.Complete();
}
}
This is getting messier and messier but, sadly, it’s not uncommon to see code like this in applications (we’ve all seen it right?) and while the traditional layered architecture can help with sorting this out (it’s common to see per service decorators for example) it tends to lead to code repitition. And if you wanted to add measures like that shown above to our system we have to visit every command handler or service. Essentially you are limited in the degree to which you can tidy this up because you’re dealing with operations expressed and executed using compiled calling semantics.
However now we’ve moved our operations over to being expressed as state and executed through a mediator we have a lot more flexibility in how we can approach this and I’d like to illustrate this through two approaches to the problem. Firstly by using the decorator pattern and then by using a feature of the AzureFromTheTrenches.Commanding framework.
Before we get into the meat of this it’s worth quickly noting that this isn’t the only approach to such a problem. One alternative, for example, is to take a strongly functional approach – something that I may explore in a future post.
Decorator Approach
Before we get started the code for this approach can be found here:
https://github.com/JamesRandall/CommandMessagePatternTutorial/tree/master/Part4-decorator
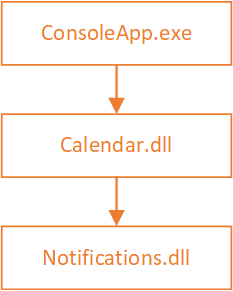
The decorator pattern allow us to add new behaviours to an existing implementation – in the system here all of our controllers make use of the ICommandDispatcher interface to execute commands and queries. For example our shopping cart controller looks like this:
[Route("api/[controller]")]
public class ShoppingCartController : AbstractCommandController
{
public ShoppingCartController(ICommandDispatcher dispatcher) : base(dispatcher)
{
}
[HttpGet]
[ProducesResponseType(typeof(ShoppingCart.Model.ShoppingCart), 200)]
public async Task<IActionResult> Get() => await ExecuteCommand<GetCartQuery, ShoppingCart.Model.ShoppingCart>();
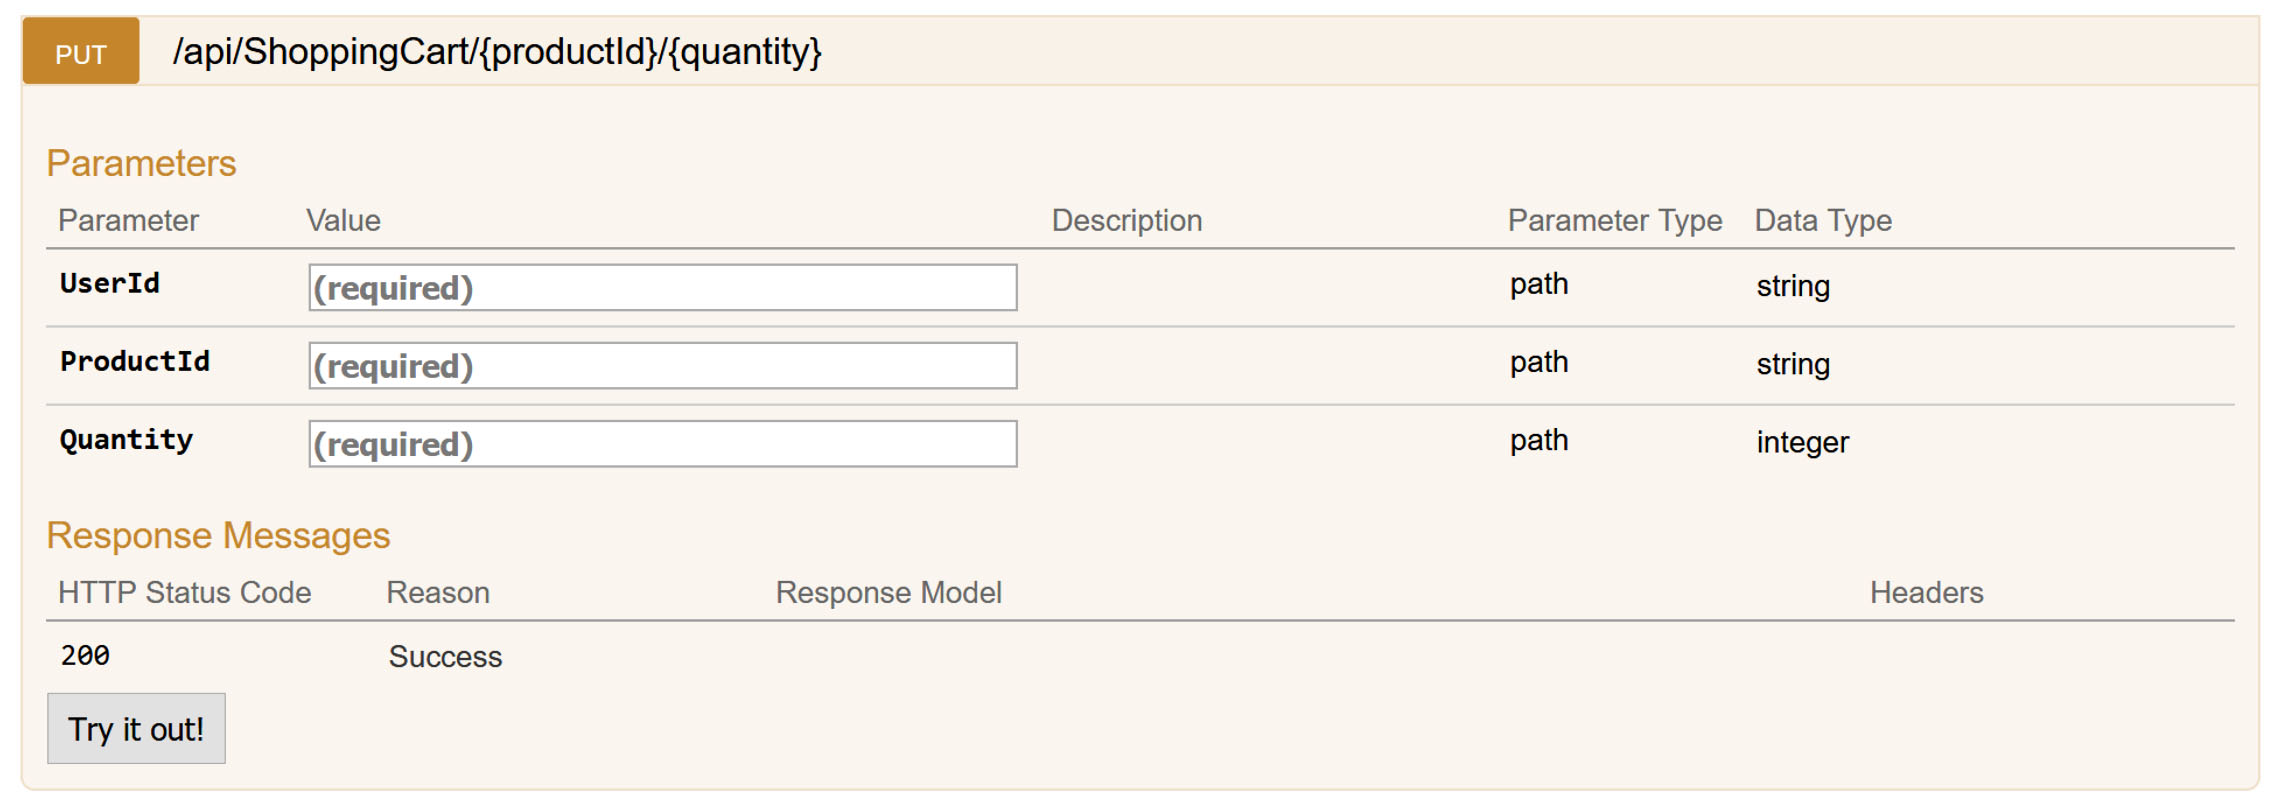
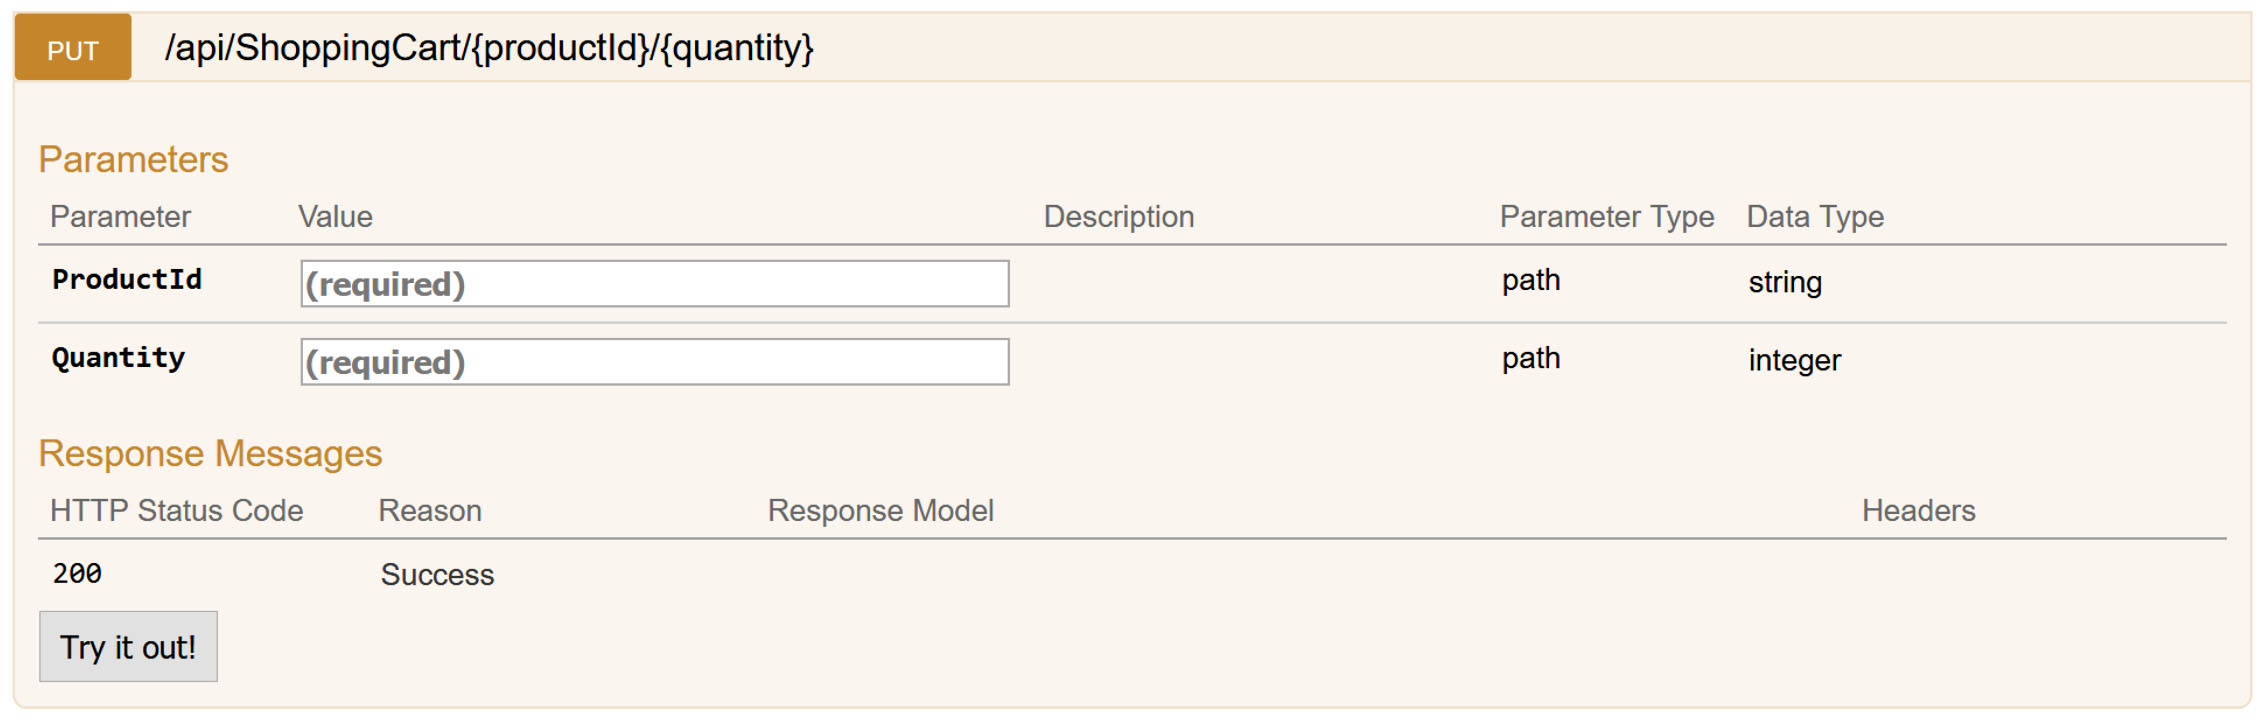
[HttpPut("{productId}/{quantity}")]
public async Task<IActionResult> Put([FromRoute] AddToCartCommand command) => await ExecuteCommand(command);
[HttpDelete]
public async Task<IActionResult> Delete() => await ExecuteCommand<ClearCartCommand>();
}
If we can extend the ICommandDispatcher to handle our logging in a generic sense and replace it’s implementation in the IoC container then we no longer need to handle logging on a per command handler basis. Happily we can! First let’s take a look at the declaration of the interface:
public interface ICommandDispatcher : IFrameworkCommandDispatcher
{
}
Interestingly it doesn’t contain any declarations itself but it does derive from something called IFrameworkCommandDispatcher that does:
public interface IFrameworkCommandDispatcher
{
Task<CommandResult<TResult>> DispatchAsync<TResult>(ICommand<TResult> command, CancellationToken cancellationToken = default(CancellationToken));
Task<CommandResult> DispatchAsync(ICommand command, CancellationToken cancellationToken = default(CancellationToken));
ICommandExecuter AssociatedExecuter { get; }
}
And so to decorate the default implementation of ICommandDispatcher with new behaviour we need to provide an implementation of this interface that adds the new functionality and calls down to the original dispatcher. For example a first cut of this might look like this:
internal class LoggingCommandDispatcher : ICommandDispatcher
{
private readonly ICommandDispatcher _underlyingDispatcher;
private readonly ILogger<LoggingCommandDispatcher> _logger;
public LoggingCommandDispatcher(ICommandDispatcher underlyingDispatcher,
ILoggerFactory loggerFactory)
{
_underlyingDispatcher = underlyingDispatcher;
_logger = loggerFactory.CreateLogger<LoggingCommandDispatcher>();
}
public async Task<CommandResult<TResult>> DispatchAsync<TResult>(ICommand<TResult> command, CancellationToken cancellationToken)
{
try
{
_logger.LogInformation("Executing command {commandType}", command.GetType().Name);
CommandResult<TResult> result = await _underlyingDispatcher.DispatchAsync(command, cancellationToken);
_logger.LogInformation("Successfully executed command {commandType}", command.GetType().Name);
return result;
}
catch (Exception ex)
{
LogFailedPostDispatchMessage(command, ex);
return new CommandResult<TResult>(CommandResponse<TResult>.WithError($"Error occurred performing operation {command.GetType().Name}"), false);
}
}
public Task<CommandResult> DispatchAsync(ICommand command, CancellationToken cancellationToken = new CancellationToken())
{
throw new NotSupportedException("All commands must return a CommandResponse");
}
public ICommandExecuter AssociatedExecuter => _underlyingDispatcher.AssociatedExecuter;
}
We’ve wrapped the underlying dispatch mechanism with loggers and a try catch block that deals with errors and by doing so we no longer have to implement this in each and every command handler. As our pattern and convention approach requires all our command to be declared with a CommandResponse result I’ve also updated the resultless DispatchAsync implementation to throw an exception – it should never be called but if it is we know we’ve missed something on a command.
Before updating all our handlers we need to replace the registration inside our IoC container so that a resolution of ICommandDispatcher will return an instance of our new decorated version. And so in our Startup.cs for the API project we need to add this line to the end of the ConfigureServices method:
services.Replace(
new ServiceDescriptor(typeof(ICommandDispatcher), typeof(LoggingCommandDispatcher),
ServiceLifetime.Transient));
This removes the previous implementation and replaces it with our implementation. However if we try to run this we’ll quickly run into exceptions being thrown as we’ve got a problem – and it’s a fairly common problem that you’ll run across when implementing decorators over interfaces who’s implementation is defined in a third party library. When the IoC container attempts to resolve the ICommandFactory it will correctly locate the LoggingCommandDispatcher class but its constructor expects to be passed, and here’s the problem, an instance of ICommandFactory which will cause the IoC container to attempt to instantiate another instance of LoggingCommandDispatcher and so on. At best this is going to be recognised as a problem by the IoC container and a specific excpetion will be thrown or at worst it’s going to result in a stack overflow exception.
The framework supplied implementation of ICommandDispatcher is an internal class and not something we can get access to and so the question is how do we solve it? We could declare a new interface type derived from ICommandDispatcher for our new class and update all our references but I prefer to keep the references somewhat generic – as the classes making references to ICommandDispatcher aren’t themselves asserting the capabilities they require ICommandDispatcher seems a better fit.
One option is to resolve an instance of ICommandDispatcher before we register our LoggingCommandDispatcher and then use a factory to instantiate our class – or take a similar approach but register the LoggingCommandDispatcher as a singleton. However in either case we’ve forced a lifecycle change on the ICommandDispatcher implementation (in the former example the underlying ICommandDispatcher has been made a singleton and in the latter the LoggingCommandDispatcher) which is a fairly significant change in behaviour. While, as things stand, that would work for now is likely to lead to issues and limitations later on.
We do however have an alternative approach and it’s the reason that the AzureFromTheTrenches.Commanding package defines the interface IFrameworkCommandDispatcher that we saw earlier. It’s not designed to be referenced directly by command disptching code instead its provided to support the exact scenario we have here – decorating an internal class with an IoC container without lifecycle change. The internal implementation of the command dispather is registered against both ICommandDispatcher and IFrameworkCommandDispatcher. We can take advantage of this by updating our decorated dispatcher to accept this interface as a constructor parameter:
internal class LoggingCommandDispatcher : ICommandDispatcher
{
private readonly ICommandDispatcher _underlyingDispatcher;
private readonly ILogger<LoggingCommandDispatcher> _logger;
public LoggingCommandDispatcher(IFrameworkCommandDispatcher underlyingDispatcher,
ILoggerFactory loggerFactory)
{
_underlyingDispatcher = underlyingDispatcher;
_logger = loggerFactory.CreateLogger<LoggingCommandDispatcher>();
}
// ... rest of the code is the same
}
With that taken care of we can revisit our handlers and remove the logging code and so our add to cart command handler, which had become quite bloated, now looks like this:
public async Task<CommandResponse> ExecuteAsync(AddToCartCommand command, CommandResponse previousResult)
{
    Model.ShoppingCart cart = await _repository.GetActualOrDefaultAsync(command.AuthenticatedUserId);

    StoreProduct product = (await _dispatcher.DispatchAsync(new GetStoreProductQuery{ProductId = command.ProductId})).Result;

    if (product == null)
    {
        _logger.LogWarning("Product {0} can not be added to cart for user {1} as it does not exist", command.ProductId, command.AuthenticatedUserId);
        return CommandResponse.WithError($"Product {command.ProductId} does not exist");
    }
    List<ShoppingCartItem> cartItems = new List<ShoppingCartItem>(cart.Items);
    cartItems.Add(new ShoppingCartItem
    {
        Product = product,
        Quantity = command.Quantity
    });
    cart.Items = cartItems;
    await _repository.UpdateAsync(cart);
    return CommandResponse.Ok();
}
As another example the GetCartQueryHandler previously looked like this:
public async Task<CommandResponse<Model.ShoppingCart>> ExecuteAsync(GetCartQuery command, CommandResponse<Model.ShoppingCart> previousResult)
{
    _logger.LogInformation("Getting basket for user {0}", command.AuthenticatedUserId);
    try
    {
        Model.ShoppingCart cart = await _repository.GetActualOrDefaultAsync(command.AuthenticatedUserId);
        _logger.LogInformation("Retrieved cart for user {0} with {1} items", command.AuthenticatedUserId, cart.Items.Count);
        return CommandResponse<Model.ShoppingCart>.Ok(cart);
    }
    catch (Exception e)
    {
        _logger.LogError(e, "Unable to get basket for user {0}", command.AuthenticatedUserId);
        return CommandResponse<Model.ShoppingCart>.WithError("Unable to get basket");
    }
}
And now looks like this:
public async Task<CommandResponse<Model.ShoppingCart>> ExecuteAsync(GetCartQuery command, CommandResponse<Model.ShoppingCart> previousResult)
{
    Model.ShoppingCart cart = await _repository.GetActualOrDefaultAsync(command.AuthenticatedUserId);
    return CommandResponse<Model.ShoppingCart>.Ok(cart);
}
Much cleaner, less code, we can’t forget to do things and its much simpler to test!
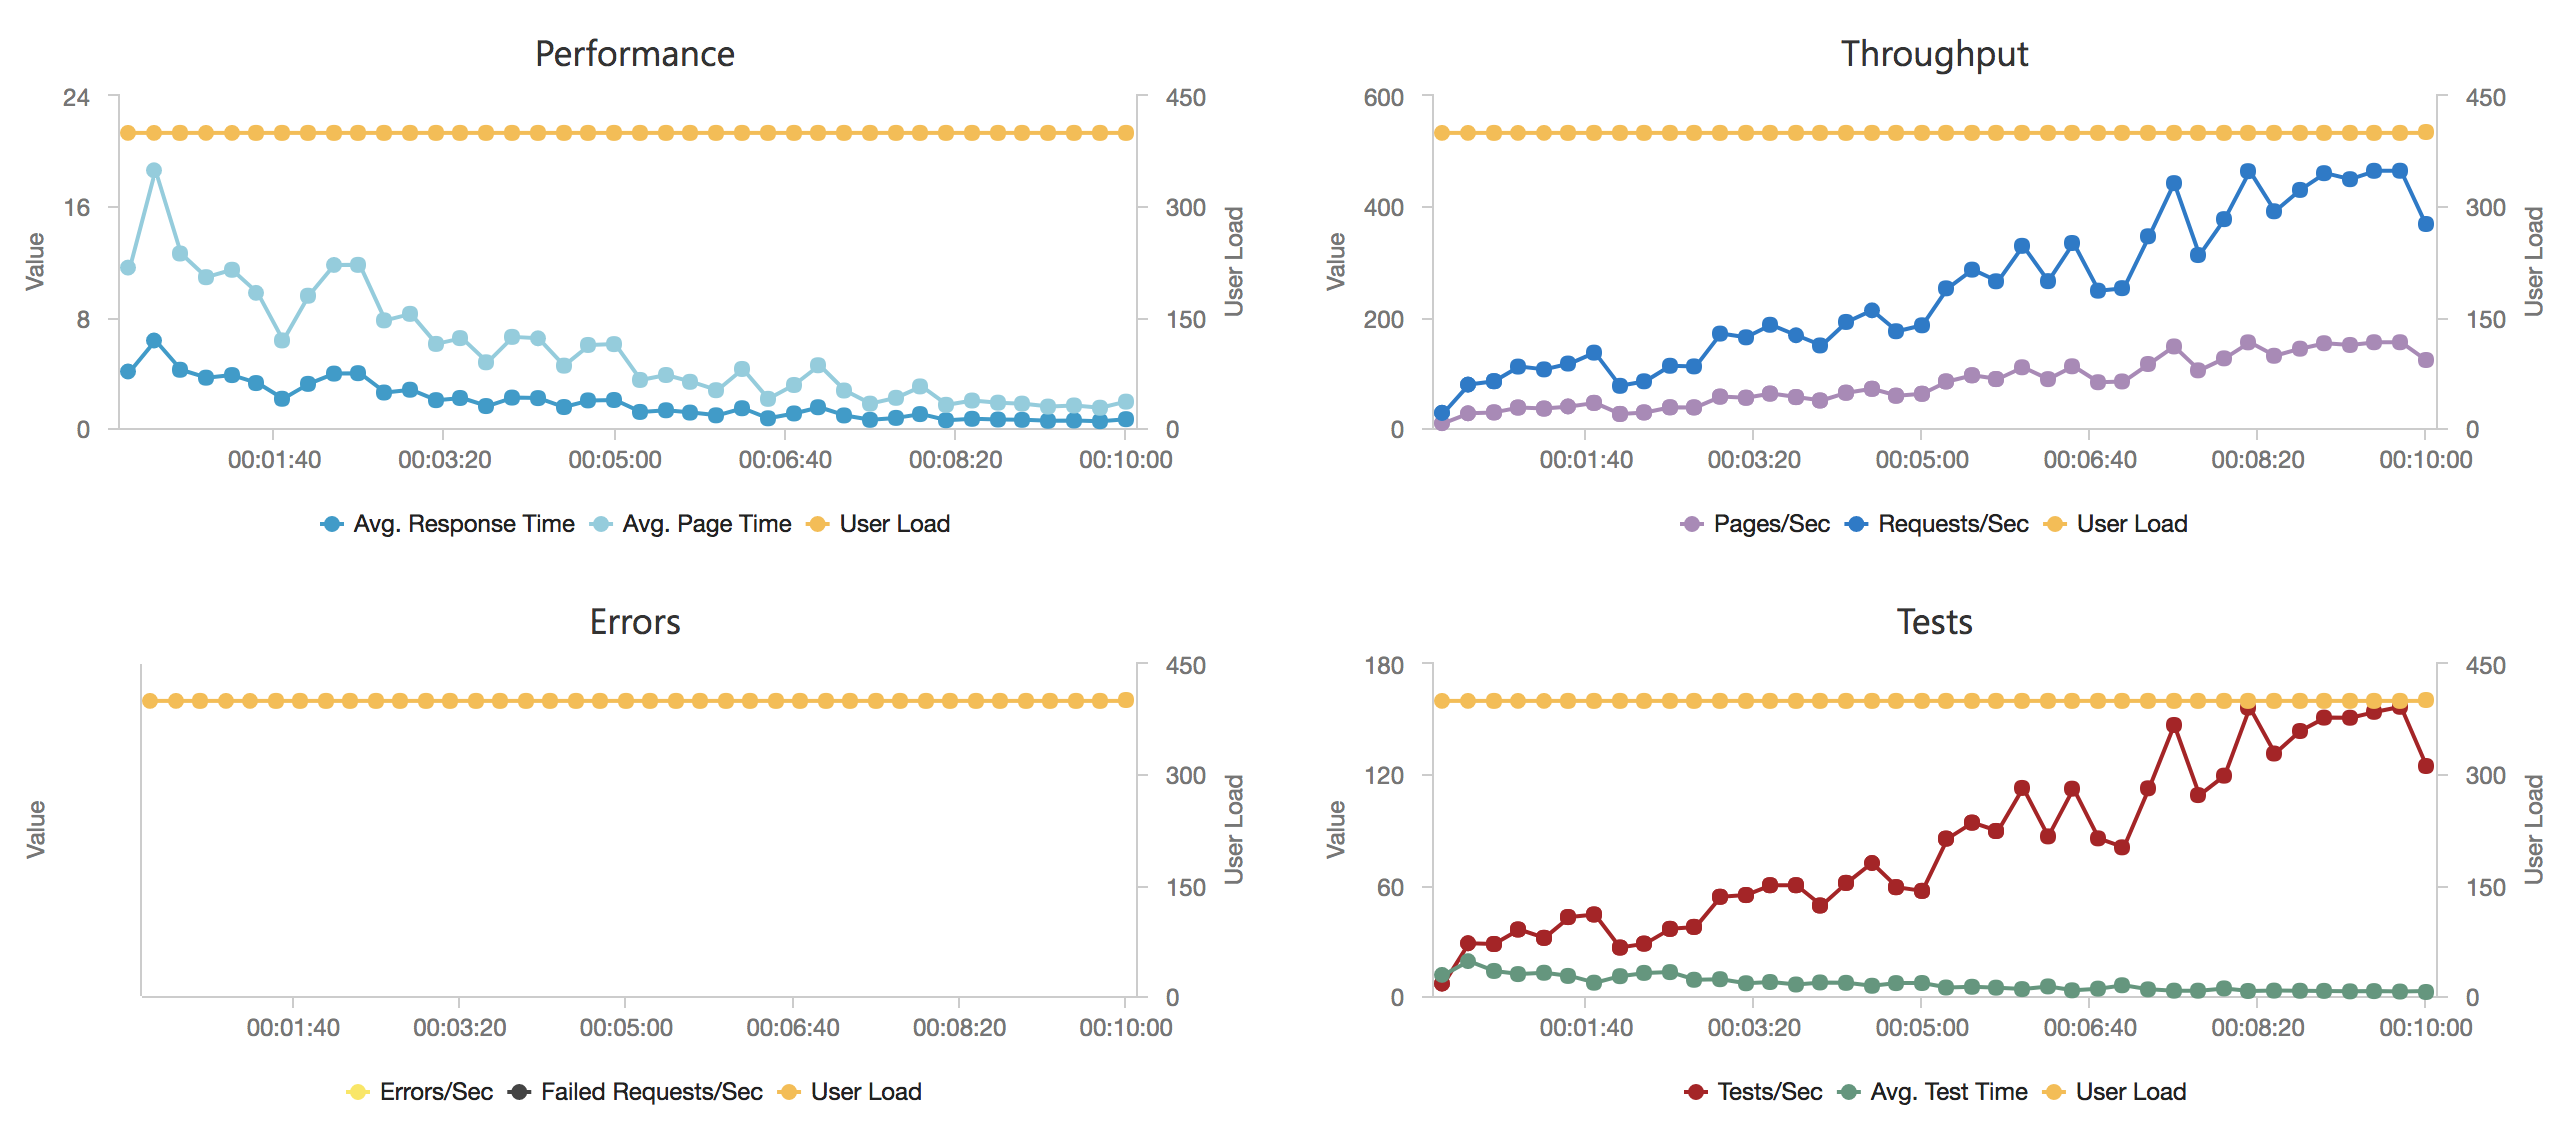
Earlier I mentioned adding some basic telemetry in to track the execution time of our commands. Now we’ve got our decorated command dispatcher in place to add this to all our commands requires just a few lines of code:
public async Task<CommandResult<TResult>> DispatchAsync<TResult>(ICommand<TResult> command, CancellationToken cancellationToken)
{
    IMetricCollector metricCollector = _metricCollectorFactory.Create(command.GetType());
    try
    {
        LogPreDispatchMessage(command);
        CommandResult<TResult> result = await _underlyingDispatcher.DispatchAsync(command, cancellationToken);
        LogSuccessfulPostDispatchMessage(command);
        metricCollector.Complete();
        return result;
    }
    catch (Exception ex)
    {
        LogFailedPostDispatchMessage(command, ex);
        metricCollector.CompleteWithError();
        return new CommandResult<TResult>(CommandResponse<TResult>.WithError($"Error occurred performing operation {command.GetType().Name}"), false);
    }
}
Again by taking this approach we don’t have to revisit each of our handlers, we don’t have to remember to do so in future, our code volume is kept low, and we don’t have to revisit all our handler unit tests.
The collector itself is just a simple wrapper for Application Insights and can be found in the full solution. Additionally in the final solution code I’ve further enhanced the LoggingCommandDispatcher to demonstrate how richer log syntax can still be output – there are a variety of ways this could be done, I’ve picked a simple to implement one here. The code for this approach can be found here:
https://github.com/JamesRandall/CommandMessagePatternTutorial/tree/master/Part4-decorator
The decorator approach is a powerful pattern that can be used to extend functionality of third party components but now we’ll look at using a built-in feature of the commanding framework we’re using to achieve the same results in a different way.
Framework Approach
The code for the below can be found at:
https://github.com/JamesRandall/CommandMessagePatternTutorial/tree/master/Part4-framework
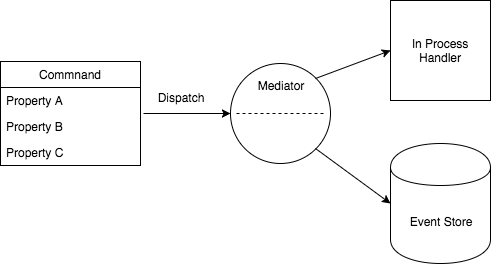
The framework we are using contains functionality designed to support logging and event store type scenarios that we can make use of to record log entries similar to those we recorded using our decorator approach and collect our timing metrics. It does this by allowing us to attach auditor classes to three hook points:
- Pre-dispatch – occurs as soon as a command is received by the framework
- Post-dispatch – occurs once a command has been dispatched, this only really applies when execution happens on the other side of a network or process boundary (we’ll come back to this in the next part)
- Post-execution – occurs once a command has been executed
For the moment we’re only going to make use of the pre-dispatch and post-execution hooks. Auditors need to implement the ICommandAuditor interface as shown in our pre-dispatch auditor below:
internal class LoggingCommandPreDispatchAuditor : ICommandAuditor
{
    private readonly ILogger<LoggingCommandPreDispatchAuditor> _logger;

    public LoggingCommandPreDispatchAuditor(ILogger<LoggingCommandPreDispatchAuditor> logger)
    {
        _logger = logger;
    }

    public Task Audit(AuditItem auditItem, CancellationToken cancellationToken)
    {
        if (auditItem.AdditionalProperties.ContainsKey("UserId"))
        {
            _logger.LogInformation("Executing command {commandType} for user {userId}",
                auditItem.CommandType,
                auditItem.AdditionalProperties["UserId"]);
        }
        else
        {
            _logger.LogInformation("Executing command {commandType}",
                auditItem.CommandType);
        }
        return Task.FromResult(0);
    }
}
The framework constructs them using the IoC container and so dependencies can be injected as appropriate.
The auditors don’t have direct access to commands but in the code above we can see that we are looking at the UserId as part of our logging logic. The framework also provides the ability for audit items to be enriched using an IAuditItemEnricher instance that does have access to the command and so we pull this information out and make it available as a property on the AuditItem using one of these enrichers:
public class AuditItemUserIdEnricher : IAuditItemEnricher
{
    public void Enrich(Dictionary<string, string> properties, ICommand command, ICommandDispatchContext context)
    {
        if (command is IUserContextCommand userContextCommand)
        {
            properties["UserId"] = userContextCommand.AuthenticatedUserId.ToString();
        }
    }
}
It’s also possible to use the same audit class for all three hook types and inspect a property of the AuditItem parameter to determine the stage but I find if that sort of branching is needed it’s often neater to have discrete classes and so I have separated out the logic for the post-execution logic into another auditor class:
internal class LoggingCommandExecutionAuditor : ICommandAuditor
{
    private readonly ILogger<LoggingCommandExecutionAuditor> _logger;
    private readonly IMetricCollector _metricCollector;

    public LoggingCommandExecutionAuditor(ILogger<LoggingCommandExecutionAuditor> logger,
        IMetricCollector metricCollector)
    {
        _logger = logger;
        _metricCollector = metricCollector;
    }

    public Task Audit(AuditItem auditItem, CancellationToken cancellationToken)
    {
        Debug.Assert(auditItem.ExecutedSuccessfully.HasValue);
        Debug.Assert(auditItem.ExecutionTimeMs.HasValue);

        if (auditItem.ExecutedSuccessfully.Value)
        {
            if (auditItem.AdditionalProperties.ContainsKey("UserId"))
            {
                _logger.LogInformation("Successfully executed command {commandType} for user {userId}",
                    auditItem.CommandType,
                    auditItem.AdditionalProperties["UserId"]);
            }
            else
            {
                _logger.LogInformation("Executing command {commandType}",
                    auditItem.CommandType);
            }
            _metricCollector.Record(auditItem.CommandType, auditItem.ExecutionTimeMs.Value);
        }
        else
        {
            if (auditItem.AdditionalProperties.ContainsKey("UserId"))
            {
                _logger.LogInformation("Error executing command {commandType} for user {userId}",
                    auditItem.CommandType,
                    auditItem.AdditionalProperties["UserId"]);
            }
            else
            {
                _logger.LogInformation("Error executing command {commandType}",
                    auditItem.CommandType);
            }
            _metricCollector.RecordWithError(auditItem.CommandType, auditItem.ExecutionTimeMs.Value);
        }

        return Task.FromResult(0);
    }
}
This class also collects the metrics based on the time to execute the command – the framework handily collects these for us as part of its own infrastructure.
At this point we’ve got all the components we need to perform our logging so all that is left is to register the components with the command system which is done in Startup.cs at the end of the ConfigureServices method:
CommandingDependencyResolver
    .UsePreDispatchCommandingAuditor<LoggingCommandPreDispatchAuditor>()
    .UseExecutionCommandingAuditor<LoggingCommandExecutionAuditor>()
    .UseAuditItemEnricher<AuditItemUserIdEnricher>();
Next Steps
With both approaches we’ve cleaned up our command handlers so that all they are concerned with is functional / business requirements and though I’ve presented the above as an either/or choice but it’s quite possible to use a combined approach if neither quite meets your requirements however we’re going to move forward with the framework auditor approach as it will support our next step quite nicely: we’re going to take our GetStoreProductQuery command and essentially turn it into a standalone microservice running as an Azure Function without changing any of the code that uses the command.
Other Parts in the Series
Part 5
Part 3
Part 2
Part 1


Recent Comments