Azure Data Factory – Mapping Bug

This is something to be aware of as its effects can be very very subtle.

As part of a project for a client I have an Azure Data Factory that picks up data from various sources and moves it into a reporting database. Their are various types of copy operation going on but a common one is to take a data source and execute it via a stored procedure passing it in as a table parameter. You set up column mappings from the source to the target. I had this table type defined for a parameter to my ingestion stored procedure:

create type SessionType as table(
    [Id]                uniqueidentifier not null primary key nonclustered,
    [ProgrammeId]       UNIQUEIDENTIFIER not null,
    [StartDateTimeUtc]  datetime2        not null,
    [VolunteerId]       uniqueidentifier not null,
    [SessionCancelled]  bit              not null,
    [LastModified]      binary(8)        not null,
    [VolunteerRating]   int              null,
    [VolunteerComments] nvarchar(1025)   null
)

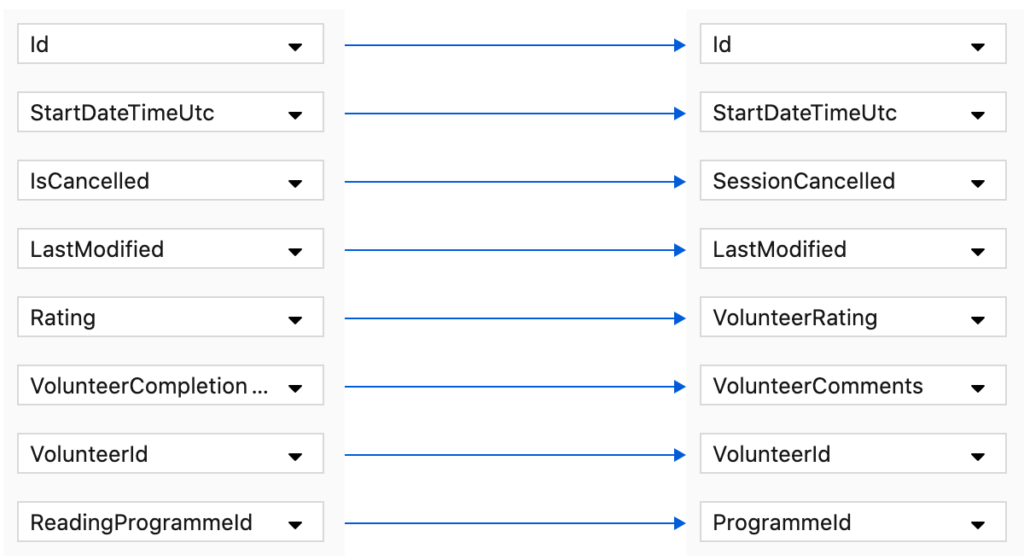
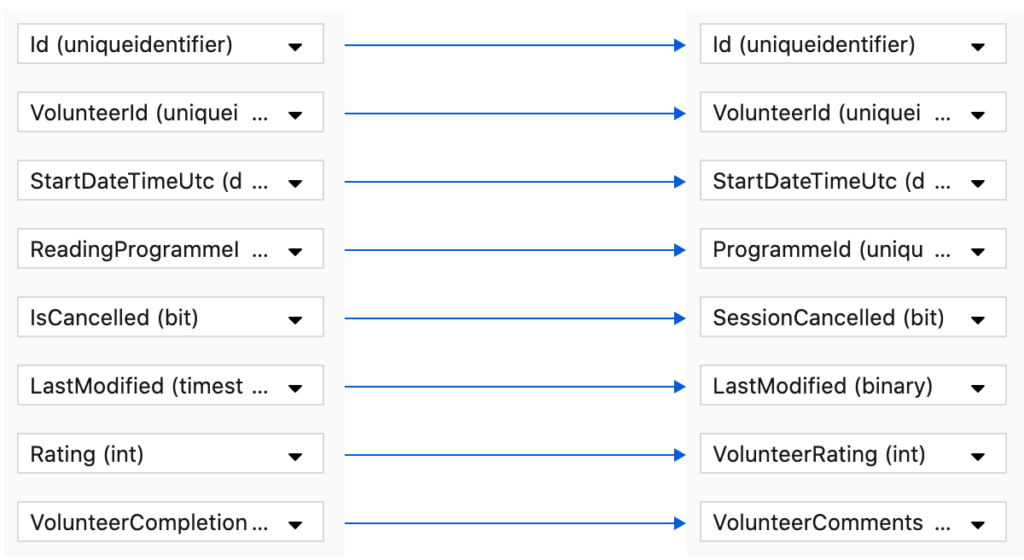
And a mapping set up from the source to this table as follows:

My ingestion procedure ran ok (it does a merge) but I was getting weird downstream results: data didn’t seem to be correlating as we expected. On back and forthing between the data sources I realised that the VolunteerId and the ProgrammeId were switched – the target VolunteerId was getting the source ReadingProgrammeId and the target ProgrammeId was getting the source VolunteerId.

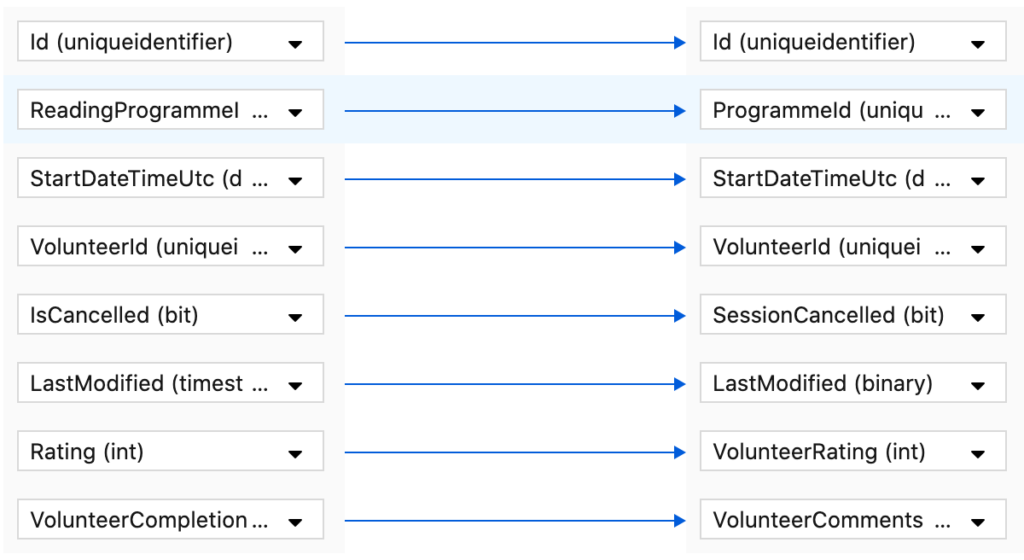
I’d edited this so wandered if their was some weird caching going on or if the publish hadn’t really published so I made a change to try and force things – plus I’d run out of ideas. I couldn’t see a thing wrong with any of the SQL. I removed the two mappings and added them at the end:

On rerunning my data factory I found I now got an error. An issue trying to insert a datetime2 type into a uniqueidentifier column. The penny dropped. Despite the GUI, despite the tooling, despite the ARM definition the data factory is not using the column names – its merrily ignoring them and using order of the columns in the schema table type definition for targets.

I verified this by setting up a mapping based on the order of columns in the table type:

That fixed things and my downstream systems can now make sense of the data.

Hopefully they’ll get this fixed as unless you get a type clash its pretty dangerous.

Function Monkey for F#

Over the last couple of weeks I’ve been working on adapting Function Monkey so that it feels natural to work with in F#. The driver for this is that I find myself writing more and more F# and want to develop the backend for a new app in it and run it on Azure Functions.

I’m not going to pretend its pretty under the covers but its starting to take shape and I’m beginning to use it in my new backend and so now seemed like a good time to write a little about it by walking through putting together a simple ToDo style API that saves data to CosmosDB.

Declaring a Function App

As ever you’ll need to begin by creating a new Azure Function app in the IDE / editor of your choice. Once you’ve got that empty starting point you’ll need to two NuGet package FunctionMonkey.FSharp to the project (either with Paket or Nuget):

FunctionMonkey.FSharp
FunctionMonkey.Compiler

This is currently in alpha and so you’ll need to enable pre-release packages and add the following NuGet repository:

https://www.myget.org/F/functionmonkey-beta/api/v3/index.json

Next by create a new module called EntryPoint that looks like this:

namespace FmFsharpDemo
open AccidentalFish.FSharp.Validation
open System.Security.Claims
open FunctionMonkey.FSharp.Configuration
open FunctionMonkey.FSharp.Models

module EntryPoint =
    exception InvalidTokenException
    
    let validateToken (bearerToken:string) =
        match bearerToken.Length with
        | 0 -> raise InvalidTokenException
        | _ -> new ClaimsPrincipal(new ClaimsIdentity([new Claim("userId", "2FF4D861-F9E3-4694-9553-C49A94D7E665")]))
    
    let isResultValid (result:ValidationState) =
        match result with
        | Ok -> true
        | _ -> false
                                    
    let app = functionApp {
        // authorization
        defaultAuthorizationMode Token
        tokenValidator validateToken
        claimsMappings [
            claimsMapper.shared ("userId", "userId")
        ]
        // validation
        isValid isResultValid
        // functions
        httpRoute "version" [
            azureFunction.http (Handler(getApiVersion), Get)
        ]
    }

Ok. So what’s going on here? We’ll break it down block by block. We’re going to demonstrate authorisation using a (pretend) bearer token and so we begin by creating a function that can validate a token:

exception InvalidTokenException

let validateToken (bearerToken:string) =
    match bearerToken.Length with
    | 0 -> raise InvalidTokenException
    | _ -> new ClaimsPrincipal(new ClaimsIdentity([new Claim("userId", "2FF4D861-F9E3-4694-9553-C49A94D7E665")]))

This is our F# equivalent of the ITokenValidator interface in the C# version. In this case we take valid to mean any string of length in the authorization header and if the token is valid then we return a ClaimsPrincipal. Again here we just return a made up principal. In the case of an invalid token we simply raise an exception – Function Monkey will translate this to a 401 HTTP status.

We’re going to validate the inputs to our functions using my recently released validation framework. Function Monkey for F# supports any validation framework but as such you need to tell it what constitutes a validation failure and so next we create a function that is able to do this:

let isResultValid result = match result with | Ok -> true | _ -> false

Finally we declare our Function App itself:

let app = functionApp {
    // authorization
    defaultAuthorizationMode Token
    tokenValidator validateToken
    claimsMappings [
        claimsMapper.shared ("userId", "userId")
    ]
    // validation
    isValid isResultValid
    // functions
    httpRoute "version" [
        azureFunction.http (Handler(fun () -> "1.0.0"), Get, authorizationMode=Anonymous)
    ]
}

We declare our settings (and optionally functions) inside a functionApp block that we have to assign to a public member on the module so that the Function Monkey compiler can find your declaration.

Within the block we start by setting up our authorisation to use token validation (line 3) and instruct it to use the token validator function we created earlier (line 4). In lines 5 to 7 we then set up a claims mapping which will set userId on any of our record types associated with functions to the value of the userId claim. You can also set mappings to specific command type property like in the C# version.

On line 9 we tell Function Monkey to use our isResultValid function to determine if a validation results constitutes success of failure.

Then finally on line 11 we declare a HTTP route and a function within it. If you’re familiar with the C# version you can see here that we no longer use commands and command handlers – instead we use functions and their input parameter determines the type of the model being passed into the Azure Function and their return value determines the output of the Azure Function. In this case the function has no parameters and returns a string – a simple API version. We set this specific function to not require authorisation.

Finally lets add a host.json file to remove the auto-prefixing of api to routes (this causes problems with things like Open API output):

{
  "version": "2.0",
  "extensions": {
    "http": {
      "routePrefix": ""
    }
  }
}

If we run this now then in PostMan we should be able go call the endpoint http://localhost:7071/version and receive the response “1.0.0”.

Building our ToDo API

If you’re familiar with Function Monkey for C# then at this point you might be wandering where the rest of the functions are. We could declare them all here like we would in C# but the F# version of Function Monkey allows functions to be declared in multiple modules so that the functions can be located close to the domain logic and to avoid a huge function declaration block.

To get started create a new module called ToDo and we’ll begin by creating a type to model our to do items – we’ll also use this type for updating out to do items:

type ToDoItem =
    {
        id: string
        title: string
        complete: bool
    }

Next we’ll declare a type for adding a to do item:

type AddToDoItemCommand =
    {
        userId: string
        title: string
        isComplete: bool
    }

And finally an type that represents querying to find an item:

type GetToDoItemQuery =
    {
        id: string
    }

Next we’ll declare our validations for these models:

let withIdValidations = [
   isNotEmpty
   hasLengthOf 36
]

let withTitleValidations = [
    isNotEmpty
    hasMinLengthOf 1
    hasMaxLengthOf 255
]

let validateGetToDoItemQuery = createValidatorFor<GetToDoItemQuery>() {
    validate (fun q -> q.id) withIdValidations
}
    
let validateAddToDoItemCommand = createValidatorFor<AddToDoItemCommand>() {
    validate (fun c -> c.userId) withIdValidations
    validate (fun c -> c.title) withTitleValidations
}

let validateToDoItem = createValidatorFor<ToDoItem>() {
    validate (fun c -> c.id) withIdValidations
    validate (fun c -> c.title) withTitleValidations
    validate (fun c -> c.owningUserId) withIdValidations
}

Ok. So now we need to create functions for adding an item to the database and another for getting one from it. We’ll use Azure CosmosDB as a data store and I’m going to assume you’ve set one up. Our add function needs to accept a record of type AddToDoItemCommand and return a new record of type ToDoItem assigning properties as appropriate:

let addToDoItem command =
    {
        id = Guid.NewGuid().ToString()
        owningUserId = command.userId
        title = command.title
        isComplete = command.isComplete
    }

The user ID on our command will have been populated by the claims binding. We don’t write the item to Cosmos here, instead we’re going to use an output binding shortly.

Next our function for reading a to do item from Cosmos:

let getToDoItem query =
    CosmosDb.reader<ToDoItem> <| query.id

CosmosDb.reader is a super simple helper function I created:

namespace FmFsharpDemo
open Microsoft.Azure.Cosmos
open System

module CosmosDb =
    let cosmosDatabase = "testdatabase"
    let cosmosCollection = "colToDoItems"
    let cosmosConnectionString = Environment.GetEnvironmentVariable("cosmosConnectionString")
    
    let reader<'t> id =
        async {
            use client = new CosmosClient(cosmosConnectionString)
            let container = client.GetContainer(cosmosDatabase, cosmosCollection)
            let! response = container.ReadItemAsync<'t>(id, new PartitionKey(id)) |> Async.AwaitTask
            return response.Resource
        }
    

If we inspect the signatures for our two functions we’ll find that addToDoItem has a signature of AddToDoItemCommand -> ToDoItem and getToDoItem has a signature of GetToDoItemQuery -> Async<ToDoItem>. One of them is asynchronous and the other is not – Function Monkey for F# supports both forms. We’re not going to create a function for updating an existing item to demonstrate handler-less functions (though as we’ll see we’ll duck a slight issue for the time being!).

There is one last step we’re going to take before we declare our functions and that’s to create a curried output binding function:

let todoDatabase =
    cosmosDb cosmosCollection cosmosDatabase

In the above cosmosDb is a function that is part of the Function Monkey output binding set and it takes three parameters – the collection / container name, the database name and finally the function that the output binding is being applied to. We’re going to use it multiple times so we create this curried function to make our code less repetitive and more readable.

With all that we can now declare our functions block:

let toDoFunctions = functions {
    httpRoute "api/v1/todo" [
        azureFunction.http (AsyncHandler(getToDoItem),
                            verb=Get, subRoute="/{id}",
                            validator=validateGetToDoItemQuery)
        azureFunction.http (Handler(addToDoItem),
                            verb=Post,
                            validator=validateAddToDoItemCommand,
                            returnResponseBodyWithOutputBinding=true)
            |> todoDatabase
        azureFunction.http (NoHandler, verb=Put, validator=validateToDoItem)
            |> todoDatabase
    ]
}

The functions block is a subset of the functionApp block we saw earlier and can only be used to define functions – shared configuration must go in the functionApp block.

Hopefully the first, GET verb, function is reasonably self-explanatory. The AsyncHandler case instructs Function Monkey that this is an async function and we assign a validator with the validator option.

The second function, for our POST verb, introduces a new concept – output bindings. We pipe the output of azureFunction.http to our curried output binding and this will result in a function being created that outputs to Cosmos DB. Because we’re using the Cosmos output binding we also need to add the Microsoft.Azure.WebJobs.Extensions.CosmosDB package to our functional project. We set the option returnResponseBodyWithOutputBinding to true so that as well as sending the output of our function to the output trigger we also return it as part of the HTTP response (this is optional as you can imagine in a more complex scenario that could leak data).

Finally for the third function our PUT verb also uses an output binding but this doesn’t have a handler at all, hence the NoHandler case. In this scenario the command that is passed in, once validated, is simply passed on as the output of the function. And so in this instance we can PUT a to do item to our endpoint and it will update the appropriate entry in Cosmos. (Note that for the moment I have not answered the question as to how to prevent one user from updating another users to do items – our authorisation approach is currently limited and I’ll come back to that in a future post).

Trying It Out

With all that done we can try this function app out in Postman. If we begin by attempting to add an invalid post to our POST endpoint, say with an empty title, we’ll get a 400 status code returned and a response as follows:

{
  "case": "Errors",
  "fields": [
    [
      {
        "message": "Must not be empty",
        "property": "title",
        "errorCode": "isNotEmpty"
      },
      {
        "message": "Must have a length no less than 1",
        "property": "title",
        "errorCode": "hasMinLengthOf"
      }
    ]
  ]
}

Now if we run it with a valid payload we will get:

{
  "id": "09482e8d-41aa-4c25-9552-b7b05bf0a787",
  "owningUserId": "2FF4D861-F9E3-4694-9553-C49A94D7E665",
  "title": "Buy underpants",
  "isComplete": false
}

Next Steps

These are with me really – I need to continue to flesh out the functionality which at this point essentially boils down to expanding out the computation expression and its helpers. I also need to spend some time refactoring aspects of Function Monkey. I’ve had to dig up and change quite a few things so that it can work in this more functional manner as well as continue to support the more typical C# patterns.

Then of course there is documentation!
F# Validation Framework

If you follow me on Twitter you’ll know I’ve been working on a first class F# interface for Function Monkey. I’d got to the point where it made sense to put together a nice little exemplar of how its used and I went looking for a simple, ideally declarative, validation framework. Something akin to Fluent Validation but for F#. As I’d been working with computation expressions to build the Function Monkey DSL they were foremost in my mind as an approach to a clean validation framework.

I had a hunt around but to my surprise couldn’t really find anything. Closest I came was a blog post that built out a validation framework and left things speculating if it would be possible to use a computation expression to clean things up (short version if you read on – yes you can).

Why not use Fluent Validation itself? While you can happily use NuGet packages written in C# within F# their API surface doesn’t feel very functional. Unsurprisingly if they’re written in C# they tend to focus on C# patterns and classes and so consuming them from a functional environment can feel a bit weird and look a bit odd.

As a result I started playing around with a few things and before I knew it I’d written the skeleton of a framework that used a declarative / DSL type approach to validations, it seemed promising and useful so I spent some more time fleshing out.

It’s available on GitHub, along with its documentation, and I’ll spend some time giving an overview of it here.

Simple Validation

First lets consider a very simple model to represent a customer of a store:

type Customer =
    {
        name: string
        dateOfBirth: DateTime
    }

Let’s begin by validating the name (we’ll come back to the date of birth later) to make sure its not empty and has a maximum length of an arbitrary 128 characters. We do this as shown below:

let customerValidator = createValidatorFor<Customer>() {
    validate (fun c -> c.name) [
        isNotEmpty
        hasMaxLengthOf 128
    ]
}

In this code we use the createValidatorFor function to return a validation builder for our type and within the curly braces we can declare our validations.

The validate command is one we’ll use a lot. It’s a function with two parameters – the first takes a lambda that returns the property we wish to validate and the second parameter is an array of our validators. In this case we’re saying the name property of a customer must not be empty and can have a max length of 128 characters.

If we look at customerValidator we’ll find that we’ve been returned a function with the signature Customer -> ValidateState and below is shown an example of calling this and triggering a validation failure:

let outputToConsole state =
    match state with
    | Ok -> printf "No errors\n\n"
    | Errors e -> printf "%O\n\n" e

{ name = "" ; dateOfBirth = DateTime.UtcNow.AddYears(-1) }
|> customerValidator
|> outputToConsole

If we run this we’ll see this output:

[{message = "Must not be empty";
 property = "name";
 errorCode = "isNotEmpty";}]

Complex Models

Lets extend our model to something more complex – an order that references a customer and a collection of ordered items:

type Customer =
    {
        name: string
        dateOfBirth: DateTime
    }

type Product =
    {
        name: string
        price: double
    }

type OrderItem =
    {
        product: Product
        quantity: int
    }

type Order =
    {
        customer: Customer
        items: OrderItem list
    }

We’ll now build a validator that validates:

  • That the customer is valid
  • That the order has at least 1 item
  • That each order item has a quantity of at least 1
  • That each product has a name and that name has maximum length of 128
  • And finally that each product has a price of greater than 0

This is going to introduce the concept of validating collections and we’ll also use deep property paths to validate the product:

let orderValidator = createValidatorFor<Order>() {
    validate (fun o -> o.customer) [
        withValidator customerValidator
    ]
    validate (fun o -> o.items) [
        isNotEmpty
        eachItemWith (createValidatorFor<OrderItem>() {
            validate (fun i -> i.quantity) [
                isGreaterThan 0
            ]
            validate (fun i -> i.product.price) [
                isGreaterThan 0.
            ]
            validate (fun i -> i.product.name) [
                isNotEmpty
                hasMaxLengthOf 128
            ]
        })
    ]
}

To create this validator we’ve introduced three new concepts:

  • Firstly we are referencing the existing customer validator using the withValidator command. This simply takes a validator function.
  • Next we are validating the items in the collection with the eachItemWith command. This also takes a validator function which, in this case, we are creating in line but we could take the same approach as with the customer – declare it separately and simply pass it in here.
  • Finally we are validating the product properties using multi-part property paths e.g. i.product.price. These functions literally are getter functions for our properties – the expressions are evaluated when the property runs and the return type informs what validators can be used.

First lets run this on a valid order:

{
    customer = { name = "Alice" ; dateOfBirth = DateTime.UtcNow.AddYears(-1) }
    items = [
        {
            quantity = 1
            product = { name = "Baked Beans" ; price = 3.50 }
        }
    ]
}
|> orderValidator
|> outputToConsole

This produces the output:

No errors

However lets now give the customer an empty name and set the price of a product to 0:

{
    customer = { name = "" ; dateOfBirth = DateTime.UtcNow.AddYears(-1) }
    items = [
        {
            quantity = 1
            product = { name = "Baked Beans" ; price = 0.0 }
        }
    ]
}
|> orderValidator
|> outputToConsole

When we run this we get the following (I’ve tidied up the standard output slightly for clarity):

[
    {
        message = "Must be greater than 0";
        property = "items.[0].product.price";
        errorCode = "isGreaterThan";
    };
    {
        message = "Must not be empty";
        property = "customer.name";
        errorCode = "isNotEmpty";
    }
]

We can see in the results that the expected validations have failed and that the paths to those properties identify the source of the error including the item index in the collection.

Custom Validators

Lets extend our customer validator to ensure the customer placing the order is over 18. We’ve stored their date of birth and so will need to calculate their age as part of the validation. We can do that by adding a custom validator.

Validators have a signature of string -> ‘propertyType -> ValidationState. The first parameter is the path to the property being validated, the second is the value being validated and the validator must return a ValidationState which is a discriminated union with cases of Ok and Errors.

That being the case our 18 or over validator will look like this:

let is18OrOlder propertyPath (value:DateTime) =
    let today = DateTime.Today
    let age = today.Year - value.Year - (match value.Date > today.Date with | true -> 1 | false -> 0)  
    match age >= 18 with
    | true -> Ok
    | false -> Errors([{ errorCode = "is18OrOlder" ; message="Not 18" ; property = propertyPath }])

And we can use it like any other validator:

let customerValidator = createValidatorFor<Customer>() {
    validate (fun c -> c.name) [
        isNotEmpty
        hasMaxLengthOf 128
    ]
    validate (fun c -> c.dateOfBirth) [
        is18OrOlder
    ]
}

You’ll notice that some validators take parameters – how do we do this? To accomplish that we write a function that accepts our validation parameters and returns the validator function. Lets change our validator to check if someone is over a parameterised age:

let isOverAge age =
    let validator propertyPath (value:DateTime) =
        let today = DateTime.Today
        let age = today.Year - value.Year - (match value.Date > today.Date with | true -> 1 | false -> 0)  
        match age >= age with
        | true -> Ok
        | false -> Errors([{ errorCode = "is18OrOlder" ; message="Not 18" ; property = propertyPath }])
    validator
        
let customerValidator = createValidatorFor<Customer>() {
    validate (fun c -> c.name) [
        isNotEmpty
        hasMaxLengthOf 128
    ]
    validate (fun c -> c.dateOfBirth) [
        isOverAge 18
    ]
}

Conditional Validation

Let’s now expand on our age related validation and rather than say all customers must be 18 or over let’s change the validation to be customers 18 or over cannot buy products with a name of Alcohol. We can use the validateWhen command to introduce this additional logic:

let calculateAge (dateOfBirth:DateTime) =
    let today = DateTime.Today
    let age = today.Year - dateOfBirth.Year - (match dateOfBirth.Date > today.Date with | true -> 1 | false -> 0)
    age
let orderValidator = createValidatorFor<Order>() {
    validate (fun o -> o.customer) [
        withValidator (createValidatorFor<Customer>() {
            validate (fun c -> c.name) [
                isNotEmpty
                hasMaxLengthOf 128
            ]
        })
    ]
    validate (fun o -> o.items) [
        isNotEmpty
        eachItemWith (createValidatorFor<OrderItem>() {
            validate (fun i -> i.quantity) [
                isGreaterThan 0
            ]
            validate (fun i -> i.product.price) [
                isGreaterThan 0.
            ]
            validate (fun i -> i.product.name) [
                isNotEmpty
                hasMaxLengthOf 128
            ]
        })
    ]
    validateWhen (fun o -> (o.customer.dateOfBirth |> calculateAge) < 18) (fun o -> o.items) [
        eachItemWith (createValidatorFor<OrderItem>() {                
            validate (fun i -> i.product.name) [
                isNotEqualTo "Alcohol"
            ]
        })
    ]
}

In this example our existing validations for the collection items will all run but if the customer is under 18 then we will run an additional block of validations. We can see this by running an order through the validator that includes a quantity of an item set to 0 and a product named Alcohol (for a customer younger than 18!):

{
    customer = { name = "Alice" ; dateOfBirth = DateTime.UtcNow.AddYears(-1) }
    items = [
        {
            quantity = 1
            product = { name = "Baked Beans" ; price = 3.50 }
        }
        {
            quantity = 0
            product = { name = "Alcohol" ; price = 10.50 }
        }
    ]
}
|> orderValidator
|> outputToConsole

This produces the following output:

[
    {
        message = "Must not be equal to Alcohol";
        property = "items.[1].product.name";
        errorCode = "isNotEqualTo";
    };
    {
        message = "Must be greater than 0";
        property = "items.[1].quantity";
        errorCode = "isGreaterThan";
    }
]

Correctly running the conditional and non-conditional validations for our younger customer.

Other Features and Finishing Off

The framework includes other features such as support for discriminated unions, lambda validators and additional conditional support which is all documented on the frameworks homepage.

This really was just something that “sprang out” and I’d love to hear your feedback over on Twitter.

Posted in F#

F# from a C# Developers Perspective – Part 4

Below is a random collection of things that have tickled me and/or I’ve greatly appreciated as I’ve started to write more code in F#.

Exceptions

I love how concise it is to declare and use an F# exception:

exception OoopsButterFingers

let catchTheBall () =
    raise OoopsButterFingers

Or to attach some data:

exception GetOffMyLawn of string

let strayOntoLawn () =
    raise (GetOffMyLawn "Oi!")

Single Case Discriminated Unions

Leaving the question of mutability aside I’m sure we’ve all got examples of mis-assigning IDs in models:

class User
{
    public string UserId { get; set; }
}

class Order
{
    public string OrderedByUserId { get; set; }
    public string OrderId { get; set; }
}

User user = getUser();
Order newOrder = new Order {
    OrderedByUserId = "newid",
    OrderId = user.UserId // oops, we've mis-assigned an ID 
};

It’s easily done right? And we could certainly improve that in C# but I love how simple this is in F#:

type UserId = | UserId of string

type OrderId = | OrderId of string

type User =
    {
        userId: UserId
    }
    
type Order =
    {
        orderedByUserId: UserId
        orderId: OrderId
    }
    
let user = { userId = UserId("abc") }

// This won't compile - both assignments will fail with type mismatches 
let newOrder = {
    orderedByUserId = "newId"
    orderId = user.userId
}

Currying is not named after a vindaloo

While explaining the concept of currying to a friend he asked the obvious question “why the heck is it called currying?”. I had no idea and briefly entertained the notion that it had been named in jest after, well, a curry. Which gave me a good chuckle.

However it turns out its named after an American mathematician and logician, one Haskell Curry. And so at the same time I also learned why the language Haskell is called Haskell. One of those things you feel somewhat of an ignorant philistine over not knowing.

And with that I’ll leave you with a photo of a delicious curry.

Photo via Unsplash – unsplash-logoSteven Bennett

Posted in F#

F# from a C# Developers Perspective – Part 3

I’ve been writing a lot of (production) F# since my last post on this topic and while I don’t consider myself an expert (by any means!) I’ve certainly become a lot more familiar with the language and have found myself falling into what Isaac Abraham refers to as “the pit of success”.

It was hard to understand, or at least appreciate, what he meant by this on my first pass through his book (which I recommend by the way – that really helped get me on my way) and I think that’s because F# doesn’t lead you towards success (i.e. bug free code) through any one language feature – but rather how all its features interlock and go together.

It really came together for me when I undertook a significant refactoring of some code and when I had finished and pressed build and it compiled without errors and warnings I realised that I knew what I’d done worked. I didn’t have to test it or try it. I knew it had to work (and there’s no twist in this tale – it did).

Amongst other things I had no mutable state, I’d used single case case discriminated unions to protect against mis-assignments, I’d used the type system to protect against bad data, I’d used the Seq functions almost exclusively to work on collections, I’d favoured matching over if/then/else constructs and had no missing matches, I’d used modules and namespaces to organise my code, and I had no nulls!

In fact as this application comes together, its a mobile app that I am building with the Fabulous framework – and the Model->View->Update architecture is perfect for a functional language, the only thing I really find myself worrying about is does the UI layout correctly.

It’s been a fascinating, and very positive, experience for someone who has been working with C# and JavaScript for so many years. I’d sum it up as this:

F# makes me work a little harder to express concepts in code but once I have I am more confident the result is correct and far less brittle and as a result I am more productive.

It’s not that C# “forces” you to write brittle code – but it makes it far easier to and so in some ways, putting the paradigms to one side and focusing on the un-brittleness of code (and as someone who has used all three languages), I am starting to think of F# being to C# as C# is to C++.

Posted in F#

Writing and Testing Azure Functions with Function Monkey – Part 4

Part 4 of my series on writing Azure Functions with Function Monkey is now available on YouTube:

This part focuses on addressing cross cutting concerns in a DRY manner by implementing a custom command dispatcher.

I’ve also switched over to Rider as my main IDE now and in this video I’m making use of its Presentation Mode. I think it works really well but let me know.

F# from a C# Developers Perspective – Part 2

My customary warning on these posts: I am absolutely not a F# expert – these posts are about things that caught me out or surprised me as I begin to learn F# as an experienced C# developer. You can find part 1 here.

This is something that’s caught me out a lot while picking up F#. A typical function in F# might look like this:

let multiply valueOne =
	let userInput = int(System.Console.ReadLine())
	valueOne * userInput

Now how about a parameterless function, is it this:

let multiply =
	let valueOne = int(System.Console.ReadLine())
	let valueTwo = int(System.Console.ReadLine())
	valueOne * valueTwo

In short: no. This is not a function – the code will execute once and the result be assigned to the immutable constant multiply. To make this a function you need to add parentheses:

let multiply () =
	let valueOne = int(System.Console.ReadLine())
	let valueTwo = int(System.Console.ReadLine())
	valueOne * valueTwo

As both are perfectly valid syntax the compiler will process them without warning, it has no way of divining your intent. In this case you’ll probably notice the issue because of the need for user input but I had a really puzzling situation with the setting of the consoles foreground colour which never seemed to quite do what I expected. Needless to say – I’d made this mistake!

Posted in F#

F# from a C# Developers Perspective – Part 1

Note: for those waiting for me to post more videos about Function Monkey they are on the way, I’m on a working / cycling holiday in Mallorca and don’t really have the setup to record decent audio.

While I’m still a complete beginner with F# and very much in the heavy learning phase I thought it might be interesting to write about some of the things I’ve learned along the way.

I can’t stress enough that I’m a beginner with this stuff – so hopefully while its interesting please don’t treat the examples shown as great usage of F#, rather observations made on my way to gaining a better understanding.

A good place to start might be with writing the F# equivalent of this simple and fairly typical C# construct:

internal class Program
{
    private static int ProcessInput(string input, int state)
    {
        int newState = state;
        switch (input)
        {
            case "A": newState = state + 1;
                break;
            case "M": newState = state * 2;
                break;
        }

        Console.WriteLine(newState);
        return newState;
    }
    
    public static void Main(string[] args)
    {
        bool shouldQuit = false;
        int state = 0;
        
        while (!shouldQuit)
        {
            string input = Console.ReadLine().ToUpper();
            shouldQuit = input == "Q";
            if (!shouldQuit)
            {
                state = ProcessInput(input, state);
            }
        }
    }
}

Essentially keep looping and processing user input until the user signals they’re done. My first attempt at this looked very much like the C# equivalent:

open System

[<EntryPoint>]
let main argv =
    let processInputs value input =
        let newValue = match input with
            | "A" -> value + 1
            | "M" -> value * 2
            | _ -> value
        printf "%d\n" newValue
        newValue
        
    let mutable shouldQuit = false
    let mutable state = 0
    while not shouldQuit do
        let input = System.Console.ReadLine().ToUpper()
        shouldQuit <- input = "Q"
        state <- match shouldQuit with
            | true -> state
            | false -> processInputs state input
            
    0 // return an integer exit code

As you might know, in F# data is immutable by default and use of the mutable keyword is a smell – it may sometimes be necessary but its a good sign you’re going about something in a none F# way.

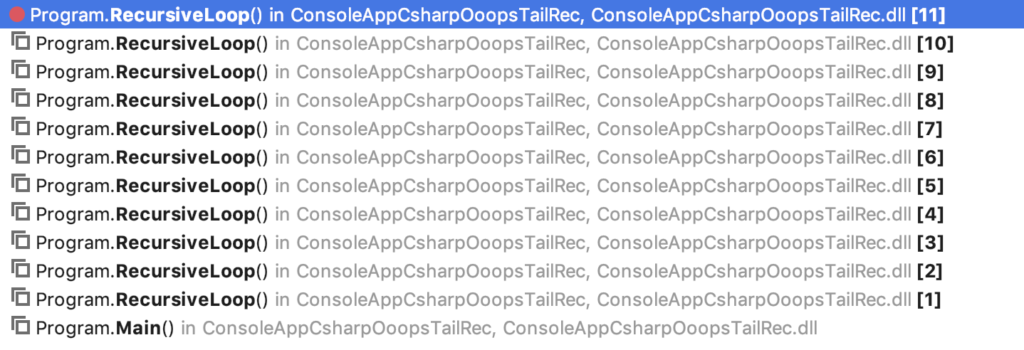
One way to solve this would be to replace the while loop with a recursive function however in this case the recursion is essentially unbounded as it depends on user input. To a C# mindset that is something likely to blow the stack with a good old StackOverflowException. Here’s an example of a recursive approach written in C# and the stack trace that results in the debugger after a few key presses:

class Program
{
    private static int ProcessInput(string input, int state)
    {
        int newState = state;
        switch (input)
        {
            case "A": newState = state + 1;
                break;
            case "M": newState = state * 2;
                break;
        }

        Console.WriteLine(newState);
        return newState;
    }

    private static int RecursiveLoop(int state)
    {
        string input = Console.ReadLine()?.ToUpper();
        if (input == "Q")
        {
            return state;
        }

        return RecursiveLoop(ProcessInput(input, state));
    }
    
    static int Main(string[] args)
    {
        return RecursiveLoop(0);
    }
}

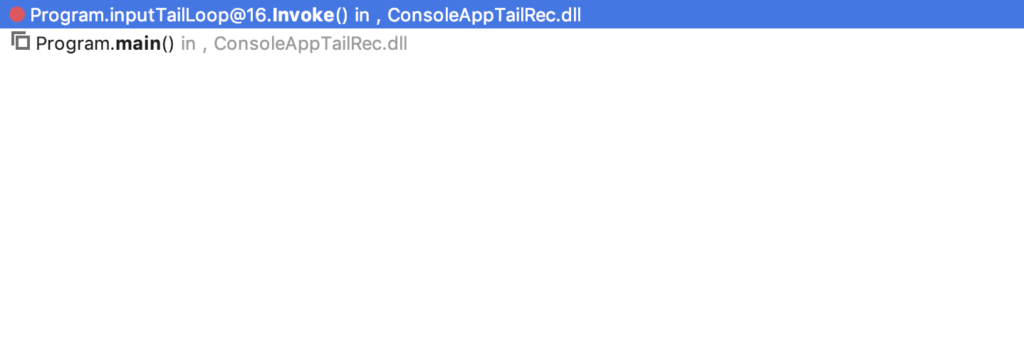
Here’s the same code written in F#, with the mutable keyword eradicated, and the stack trace after a few key presses:

open System

[<EntryPoint>]
let main _ =
    let processInput value input =
        let newValue = match input with
            | "A" -> value + 1
            | "M" -> value * 2
            | _ -> value
        printf "%d\n" newValue
        newValue
        
    let rec inputTailLoop state =
        let input = System.Console.ReadLine().ToUpper()
        match input with
            | "Q" -> state
            | _ -> inputTailLoop (processInput state input)
            
    let startingState = 0
    let finishingState = inputTailLoop startingState
    finishingState

The stack has not grown! So what’s going on?

The recursive functions, in both C# and F#, are examples of something called tail recursion. Tail recursion occurs when the very last operation a function performs is to call itself and when this occurs their is no need to preserve any data on the stack.

The F# compiler, unlike the C# compiler, recognises this and essentially is able to treat the recursive method as an iteration and avoid the stack growth and by doing so it enables us to solve a whole new class of problems without requiring mutable data.

Having posted about this on Twitter this prompted some discussion amongst the F# wizards about how tail recursion is also generally considered an anti-pattern and Isaac Abraham came through with an example as to how this could be solved using F# sequences as shown below (my butchered version of his original!):

open System

[<EntryPoint>]
let main _ =
    let processInput value input =
        let newValue = match input with
            | "A" -> value + 1
            | "M" -> value * 2
            | _ -> value
        printf "%d\n" newValue
        newValue
    
    let inputs = seq {
        while true do
            yield System.Console.ReadLine()
    }
    let startingState = 0
    let finishingState =
        inputs
        |> Seq.map (fun input -> input.ToUpper())
        |> Seq.takeWhile (fun input -> not(input = "Q"))
        |> Seq.fold processInput startingState
    
    finishingState

Essentially what we’ve done here is be explicit about the iteration that was implicit in the tail recursion. I’d used the Seq namespace quite heavily but I’m not sure I’d have made the leap to using the seq { } construct to solve this problem without Isaac’s help (thank you!).

For anyone interested I’m writing a simple version of the classic Star Trek game to teach myself F#. The code is, I’m sure, woeful and it gets refactored massively almost daily at the moment – but you’re welcome to take a look, it’s on GitHub.

Finally I’d like to stress again – I’m an absolute beginner at F# so please, please, don’t use the code above as exemplars but rather curios!

Posted in F#

App Center and React Native Upgrades

I hit a very strange problem recently with Microsoft App Centre which I’ve been happily using to build and distribute a React Native app that was sat at version 0.55.

React Native 0.55 -> 0.56 was quite a big change as it adopted the new Xcode build system and bumped the minimum node version.

I needed to update the app to be compatible with Apple’s requirements and so spent some time moving it along to React Native 0.59. All seemed to be going fine and I was able to run a build through App Centre from my development / feature branch.

I merged this into master, did a diff to ensure my feature and master branches were identical, and pushed it to App Centre. And the build assigned to this branch failed – for some reason it wasn’t selecting the correct node version and I saw this error:

error react-native@0.59.3: The engine "node" is incompatible with this module. Expected version ">=8.3". Got "6.17.0"

The build definitions were identical and the source code was identical, I checked the App Centre agent version and it was the same too. I spent some time with a support team member who was helpful but ultimately as confused as me and attempted to force the node version selection with a post clone script. That didn’t work either but gave me a different error. An error that suggested that the build was now using node 8.

I scratched my head for a while and realised what I’d done. I’d opened the build definition and pressed save after adding the post clone script. You need to do this to get App Centre to see new and updated custom build scripts.

Of course it then dawned on me – App Centre isn’t figuring out the node version to use after cloning – its doing it at the same time it looks for custom build scripts. When you press save on a build definition. And I’d almost certainly inspected the build definition (looking for things I might need to change) on the first branch I tried and hit save.

I removed the post clone script and everything worked as expected.

Well perhaps not as expected – this really isn’t helpful behaviour from App Centre, confusing to both users and support staff, that hopefully they will resolve. You really expect your project to be built based on its assets at the time of build – not part from this and part from what is effectively the result of inspecting an earlier snapshot.

Contact

  • If you're looking for help with C#, .NET, Azure, Architecture, or would simply value an independent opinion then please get in touch here or over on Twitter.

Recent Posts

Recent Tweets

Invalid or expired token.

Recent Comments

Archives

Categories

Meta

GiottoPress by Enrique Chavez