Azure AD B2C – A Painful Journey, Goodbye For Now

I’ve dipped in and out of Azure AD B2C since it first launched. In theory it provides a flexible and fully managed consumer identity provider inside Azure and while I’ve had a couple of successes after recent experiences I’ve come to the conclusion that its simply not ready for anything other than narrow requirements and am pulling my current projects away from it and onto Auth0 (this isn’t a random choice – I’ve used Auth0 before and found it to be excellent). If you’re not on that happy path – it might do what you need but getting there is likely to be a time sink and involve a lot of preview features.

If you’re considering B2C for a project in the near future I’d suggest a couple of things:

  • Take a read of the below. It might save you some time.
  • Proof of concept all the B2C touch points (policies, customisation etc.) and ensure it will do what you need

Just a quick note on the below – I’ve discussed some of this with MS previously but hopefully they will provide some feedback and I will update if and as appropriate.

Documentation and Ease of Adoption

One of the more serious issues for Azure B2C is the absolutely awful state of the documentation and samples which often feel unfinished and half baked. Identity and the protocols and integration points that go with it are complex, can be intimidating, and important to get right – incorrect integration’s can lead to security vulnerabilities.

As an example of documentation done right I think Auth0 have this nailed – they have lots of detailed documentation, samples, and tutorials on a per framework basis that cover both common frameworks and more obscure ones and a component that will drop into nearly all scenarios.

In contrast Azure AD B2C, at the time of writing, doesn’t really have any of this. If you do find a link to a framework it will generally just drop you to a sample on GitHub and these are often out of date or incomplete. For example the SPA “how tos” don’t really tell you how to – they have you clone a sample of a plain JavaScript project (no framework) and enter the magic numbers.

If you then go and look at the MSAL library that this makes use of then a single scenario is documented (using a popup) and while this is actually a fairly comprehensive framework if you go to it’s API reference you will find no content at all – its just the method and property signatures with no real help on how to wire this together. There’s just enough there for you to figure it out if you know the space but it doesn’t make it easy. If you’re using React I recently published a component to wrap some of this up.

The level of friction is huge and you will have to rely almost entirely on Google and external sources.

In my view the biggest single improvement the Azure AD B2C team could make right now is to take a good look at how the competing vendors have documented their products and take a similar approach for the features they have covering step by step integration with a wide variety of platforms.

Customer Experience

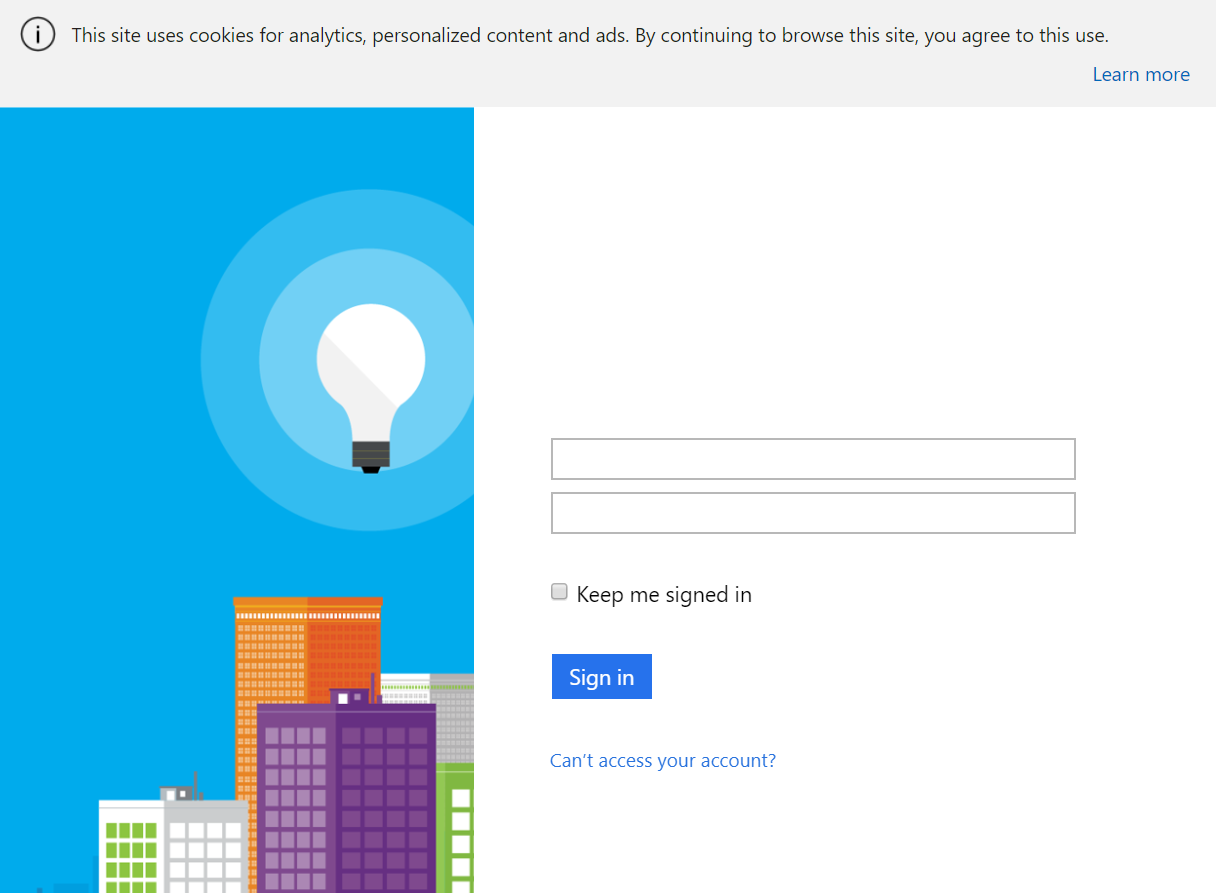
If you read the Azure documentation the favored approach, and what most of the limited documentation covers is to follow the “sign in and sign up” policy route. This presents a user interface to customers that allows them to either sign in or register. Unfortunately the user experience around this is weak and nearly every client I’ve shown this to has, rightly in my view, felt that it would discourage customers from signing up – its all well and good having a strong call to action on your homepage but getting dropped into this kind of decision process is poor. You can see an example of this with local accounts below – note the small “Sign up now” button at the bottom:

Additionally many sites want to take people directly to a registration page – you’d imagine you could modify the authorization request to Azure to take people straight to this section of this policy but unfortunately that’s not possible. And so you need to introduce a sign up policy for this. Additionally carrying information through the sign up process (for example an invite code or a payment plan) can be awkward – and again poorly documented.

If you then want to use a sign in policy as a pair to this the user experience for this is truly abysmal with local accounts – the form is missing labels. This screenshot was taken from a out the box minty fresh B2C installation:

At the time of writing this has been like this for 4 days on multiple subscriptions and others have confirmed the issue for me – I’ve reported it on Twitter and via a support ticket (on Monday – someone literally just got back to me as I wrote that – I will update this with the outcome). It just seems so… shoddy. And that’s not confidence inspiring in an identity provider.

Update: I’ve had a back and forth with Azure Support over this and its not something they are going to fix. The advice is to use a “sign in or sign up” policy instead. Basically the sign up policy as it stands today is pretty much a legacy hangover and work is underway to address the issues. Unfortunately if you do need to split sign up from sign in (and their are many reasons: users can’t self service, account migration etc.) then your only option is to use the “sign in or sign up” policy and customise the CSS to hide the sign in link. Of course a savvy user can use browser tools to edit the CSS and put them right back in – you can’t really prevent sign up with this policy. Needless to say I think this is pretty poor – its a pretty basic feature of an identity solution.

Finally, and rightly, Azure requires people signing up with an email address to verify that email address – however the way they do this is extremely clunky and takes the following form:

  1. User enters an email address in the sign up page.
  2. User clicks the Send Verification Code button.
  3. Microsoft send an email to the user with the code in.
  4. User checks their email (in the middle of the sign in process).
  5. The user has to copy and paste the verification code from the email back into B2C the verification code.
  6. They can then hit “Create” on the registration page.

There are a couple of problems with this but the main issue is: it’s synchronous. If the user doesn’t receive the email or doesn’t have convenient access to it at the point of registration then they can’t proceed and you’ve likely lost that user. There is, as far as I’m aware, no option to send out a more traditional “click the link” to verify an email address and have this done asynchronously by the user – coupled with a claim about the email verification status this would then allow applications to make decisions about a users access based on email verification.

Branding and Customization

Azure AD B2C does support a reasonable degree of flexibility around the branding. Essentially you can replace all the HTML around the core components and use your own CSS to style those. But again this is inconsistent in how it is handled and, again, feels rushed and unfinished.

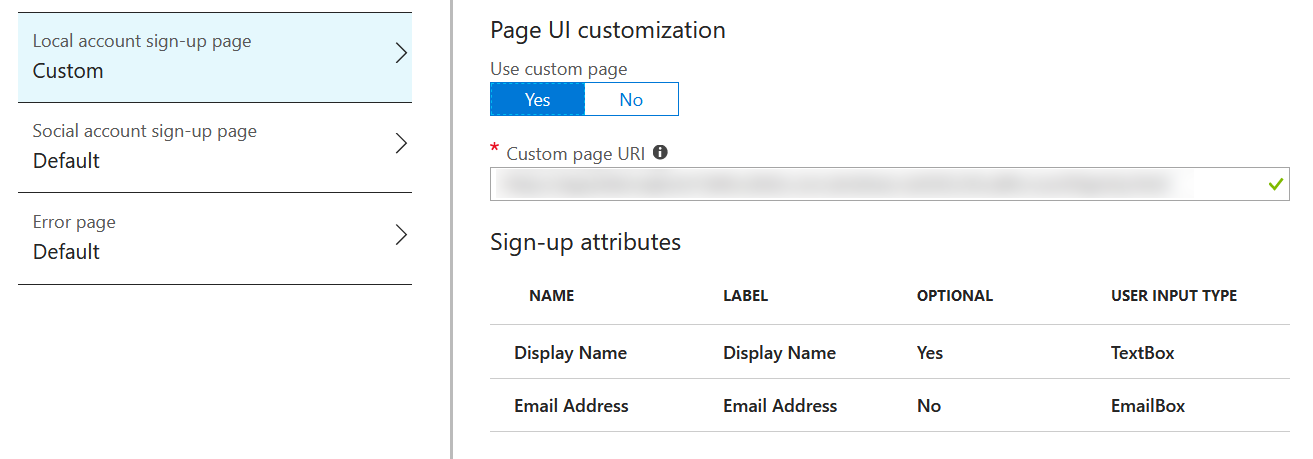
With the sign up or sign in policy we get a good range of options and you can easily provide a custom page design by uploading a HTML file to blob storage. Great:

With the sign up policy you get the options for customization shown below, again, makes sense:

Now we come to the sign in policy:

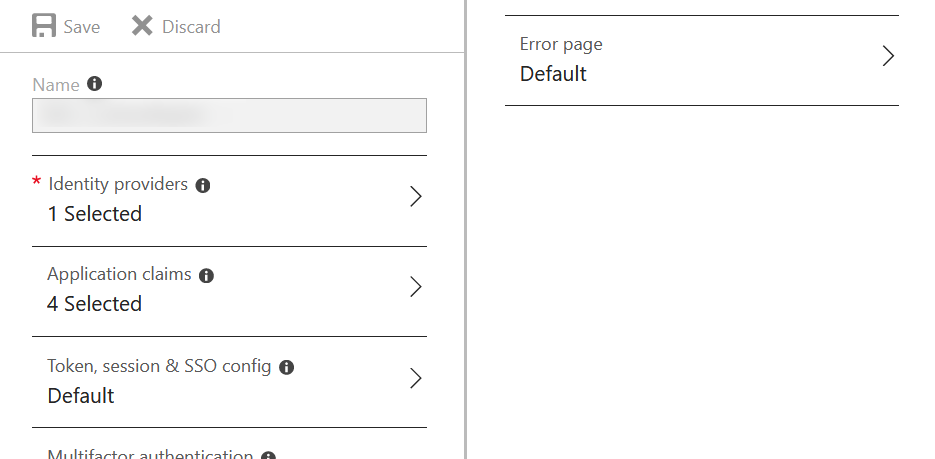
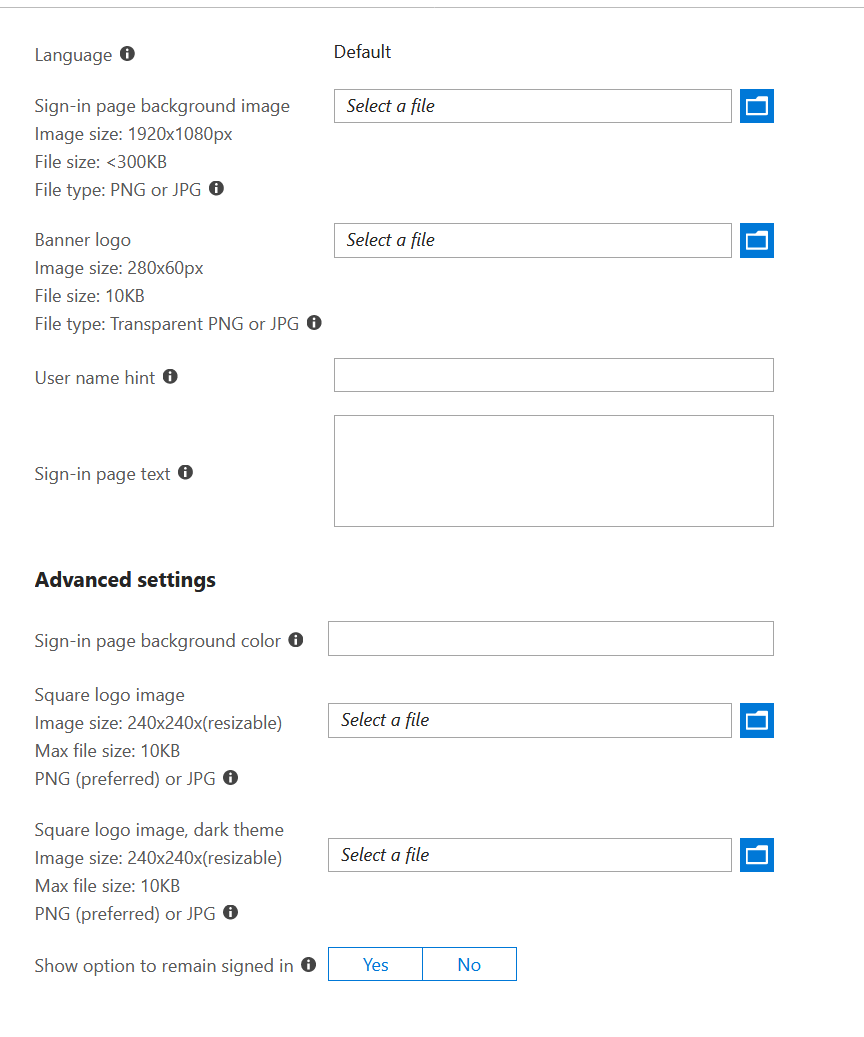
Wait, what? Where are the options? How do we customize this? Well it turns out this is done a different way on the Azure AD that the B2C AD lives within using the “Company Branding” feature that is more limited and only allows for basic customization:

Not only is this just, well, random (from a B2C perspective) but it makes it hard to get a unified branding experience across the piece. You essentially have to design for the lowest common denominator. A retort to this might be “well just use the sign in or sign up policy” but this isn’t always appropriate if sign ups are actually triggered elsewhere and self service isn’t enabled.

Azure Portal Experience

Firstly Azure AD B2C gets created as a resource in its own Azure AD directory which means it doesn’t really sit with the rest of the resources you are using to deliver a system and the Azure Portal is only able to look at one directory at a time. You can link it back to a resource group which provides a shortcut to the B2B resource but ultimately you’ll end up having to manage the directory in another tab in your browser and, if you’re like me and work on multiple systems with multiple clients, its yet another directory in the list.

Not the end of the world – but it can irk.

Beyond that it suffers, like some other services do, by being squeezed into the same one size fits all UI of the portal. Nothing major but its not as slick as vendors like Auth0 or Okta who have dedicated user interfaces.

Finally there is an extremely annoying bug – if you’re testing the sign up and login processes there’s a pretty good chance you’ll be creating and deleting users a lot. However if you try and delete a user after pressing the refresh button (to show the newly created user) on the Users page you get an “can’t find object with ID xxxx” error and have to move out of the users page and back again. Its not the end of the world but it sure is aggravating and has been unfixed for as long as I can remember.

Access to the Underlying Identity Provider Token

Lets say you’re using Facebook to log your users in and want to access the Facebook API on the users behalf – a fairly common requirement. You will generally require the identity and/or access token returned to you from Twitter. Azure AD B2C provides no documented way to do this – so although you can authenticate with social logins you can’t then use the APIs that go along with them.

Apparently this is possible through custom policies – and, after a hint from a MS PM, I believe you can do it from looking at the docs by introducing custom user flow policies but this is a lot of work for a common place requirement that ought to be achievable much more simply.

Again in sharp contrast this is clearly documented by Auth0 and is a fairly simple API call.

Custom Claims

Its not uncommon to want to store attributes against a user for custom claims and Azure AD B2C supports this via the Azure AD Graph API. This is a perfectly fine API and its fairly self explanatory though their is a pretty good chance you will bang your head against the wall for a while with the way that attributes are identified. Essentially they take the form of:

extension_<azureAdApplicationId>_<attributeName>

But as ever Azure AD B2C finds a way to make this un-intuitive and weird and there’s no way to quickly find this in the portal and instead you have to basically call the Graph API to get a list of attributes. When you do you’ll find that the azureAdApplicationId actually comes from the Azure AD that hosts your Azure AD B2C tenant – this is not the same AD your subscription lives in as each Azure AD B2C tenant gets created in its own Azure AD tenant (and yes that makes for real fun with lots of directory switching in the portal) and this AD will have an application in it called b2c-extensions-app:

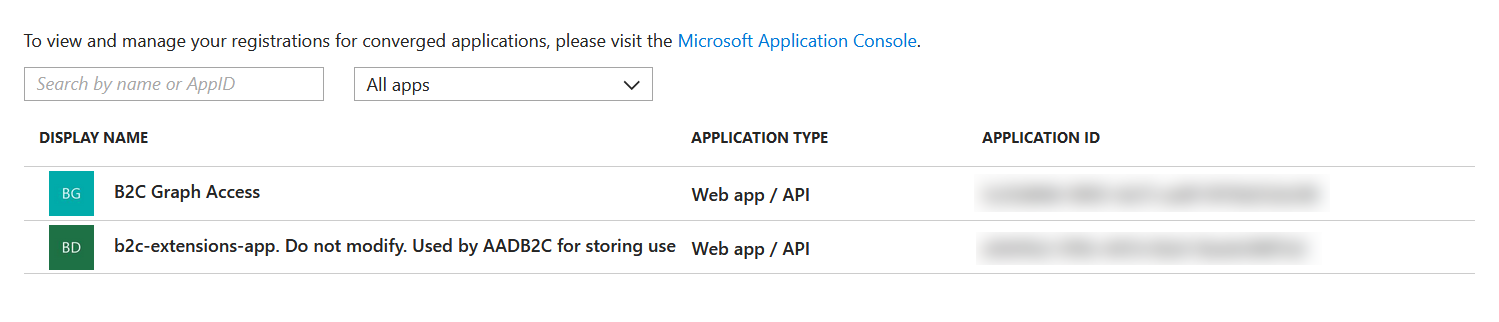
The two blurred out sections are GUIDs – application IDs. And the azureAdApplicationId you actually need as part of the attribute name is the b2c-extensions-app ID with the dashes removed. Sigh.

Getting into the Authentication / Sign Up Flow

You can now do this through custom policies (in preview) but my goodness it’s fiddly and hard to test and involves a fair amount of copy and pasting and calling out to remote REST APIs that you will need to implement. This could eventually provide a lot of flexibility and is a reasonable fit with Azure Functions but given there are so many simple to crack nuts remaining this currently feels like the proverbial sledgehammer.

Again in contrast Auth0 make this a fair bit simpler with their rules and JavaScript approach.

Conclusions

To me, at this point, B2C is massively compromised by the state of the documentation and samples and its compounded that by some poor decisions that directly effect the customers experience in what is, for many systems, a critical part of the user acquisition journey.

It then further suffers on the developer side from inconsistencies and a somewhat byzantine approach to things.

To me it currently feels under-cooked on common requirements while trying to cover the all things to all men requirements with the complex custom policies.

Is it usable? Yes – if your requirements fit down its happy path and you’re prepared to put up with the many rough edges.

However if you want to do anything that veers away from straight “Sign in or sign up” type usage then at this point I’d suggest staying away, I just think there are too many pitfalls and it doesn’t feel either complete or ready, and there are plenty of established vendors in the space with alternative offerings.

First time I’ve really said that about an Azure service.

Build Elegant REST APIs with Azure Functions

When I originally posted this piece the library I was using and developing was in an early stage of development. The good news if you’re looking to build REST APIs with Azure Functions its now pretty mature, well documented, and carries the name Function Monkey.

A good jumping off point is this video series here:

Or the getting started guide here:

http://functionmonkey.azurefromthetrenches.com/guides/gettingStarted.html

There are also a few more posts on this blog:

https://www.azurefromthetrenches.com/category/function-monkey/

Original Post

Serverless technologies bring a lot of benefits to developers and organisations running compute activities in the cloud – in fact I’d argue if you’re considering compute for your next solution or looking to evolve an existing platform and you are not considering serverless as a core component then you’re building for the past.

Serverless might not form your whole solution but for the right problem the technology and patterns can be transformational shifting the focus ever further away from managing infrastructure and a platform towards focusing on your application logic.

Azure Functions are Microsoft’s offering in this space and they can be very cost-effective as not only do they remove management burden, scale with consumption, and simplify handling events but they come with a generous monthly free allowance.

That being the case building a REST API on top of this model is a compelling proposition.

However… its a bit awkward. Azure Functions are more abstract than something like ASP.Net Core having to deal with all manner of events in addition to HTTP. For example the out the box example for a function that responds to a HTTP request looks like this:

public static class Function1
{
    [FunctionName("Function1")]
    public static IActionResult Run([HttpTrigger(AuthorizationLevel.Function, "get", "post", Route = null)]HttpRequest req, TraceWriter log)
    {
        log.Info("C# HTTP trigger function processed a request.");

        string name = req.Query["name"];

        string requestBody = new StreamReader(req.Body).ReadToEnd();
        dynamic data = JsonConvert.DeserializeObject(requestBody);
        name = name ?? data?.name;

        return name != null
            ? (ActionResult)new OkObjectResult($"Hello, {name}")
            : new BadRequestObjectResult("Please pass a name on the query string or in the request body");
    }
}

It’s missing all the niceties that come with a more dedicated HTTP framework, there’s no provision for cross cutting concerns, and if you want a nice public route to your Function you also need to build out proxies in a proxies.json file.

I think the boilerplate and cruft that goes with a typical ASP.NET Core project is bad enough and so I wouldn’t want to build out 20 or 30 of those to support a REST API. Its not that there’s anything wrong with what these teams have done (ASP.NET Core and Azure Functions) but they have to ship something that allows for as many user scenarios as possible – whereas simplifying something is generally about making decisions and assumptions on behalf of users and removing things. That I’ve been able to build both my REST framework and now this on top of the respective platforms is testament to a job well done!

In any case to help with this I’ve built out a framework that takes advantage of Roslyn and my commanding mediator framework to enable REST APIs to be created using Azure Functions in a more elegant manner. I had some very specific technical objectives:

  1. A clean separation between the trigger (Function) and the code that executes application logic
  2. Promote testable code
  3. No interference with the Function runtime
  4. An initial focus on HTTP triggers but extensible to support other triggers
  5. Support for securing Functions using token based security methods such as Open ID Connect
  6. Simple routing
  7. No complicated JSON configuration files
  8. Open API / Swagger generation – under development
  9. Validation – under development

Probably the easiest way to illustrate how this works is by way of an example – so fire up Visual Studio 2017 and follow the steps below.

Firstly create a new Azure Function project in Visual Studio. When you’re presented with the Azure Functions new project dialog make sure you use the Azure Functions v2 Preview and create an Empty project:

After your project is created you should see an empty Azure Functions project. The next step is to add the required NuGet packages – using the Package Manager Console run the following commands:

Install-Package FunctionMonkey -pre
Install-Package FunctionMonkey.Compiler -pre

The first package adds the references we need for the commanding framework and Function specific components while the second adds an MSBuild build target that will be run as part of the build process to generate an assembly containing our Functions and the corresponding JSON for them.

Next create a folder in the project called Model and into that add a class named BlogPost:

class BlogPost
{
    public Guid PostId { get; set; }

    public string Title { get; set; }

    public string Body { get; set; }
}

Next create a folder in the solution called Queries and into that add a class called GetBlogPostQuery:

public class GetBlogPostQuery : ICommand<BlogPost>
{
    public Guid PostId { get; set; }
}

This declares a command which when invoked with a blog post ID will return a blog post.

Now we need to write some code that will actually handle the invoked command – we’ll just write something that returns a blog post with some static content but with a post ID that mirrors that supplied. Create a folder called Handlers and into that add a class called GetBlogPostQueryHandler:

class GetBlogPostQueryHandler : ICommandHandler<GetBlogPostQuery, BlogPost>
{
    public Task<BlogPost> ExecuteAsync(GetBlogPostQuery command, BlogPost previousResult)
    {
        return Task.FromResult(new BlogPost
        {
            Body = "Our blog posts main text",
            PostId = command.PostId,
            Title = "Post Title"
        });
    }
}

At this point we’ve written our application logic and you should have a solution structure that looks like this:

With that in place its time to surface this as a REST end point on an Azure Function. To do this we need to add a class into the project that implements the IFunctionAppConfiguration interface. This class is used in two ways: firstly the FunctionMonkey.Compiler package will look for this in order to compile the assembly containing our function triggers and the associated JSON, secondly it will be invoked at runtime to provide an operating environment that supplies implementations for our cross cutting concerns.

Create a class called ServerlessBlogConfiguration and add it to the root of the project:

public class ServerlessBlogConfiguration : IFunctionAppConfiguration
{
    public void Build(IFunctionHostBuilder builder)
    {
        builder
            .Setup((serviceCollection, commandRegistry) =>
            {
                commandRegistry.Discover<ServerlessBlogConfiguration>();
            })
            .Functions(functions => functions
                .HttpRoute("/api/v1/post", route => route
                    .HttpFunction<GetBlogPostQuery>(HttpMethod.Get)
                )
            );
    }
}

The interface requires us to implement the Build method and this is supplied a IFunctionHostBuilder and its this we use to define both our Azure Functions and a runtime environment. In this simple case its very simple.

Firstly in the Setup method we use the supplied commandRegistry (an ICommandRegistry interface – for more details on my commanding framework please see the documentation here) to register our command handlers (our GetBlogPostQueryHandler class) via a discovery approach (supplying ServerlessBlogConfiguration as a reference type for the assembly to search). The serviceCollection parameter is an IServiceCollection interface from Microsofts IoC extensions package that we can use to register any further dependencies.

Secondly we define our Azure Functions based on commands. As we’re building a REST API we can also group HTTP functions by route (this is optional – you can just define a set of functions directly without routing) essentially associating a command type with a verb. (Quick note on routes: proxies don’t work in the local debug host for Azure Functions but a proxies.json file is generated that will work when the functions are published to Azure).

If you run the project you should see the Azure Functions local host start and a HTTP function that corresponds to our GetBlogPostQuery command being exposed:

The function naming uses a convention based approach which will give each function the same name as the command but remove a postfix of Command or Query – hence GetBlogPost.

If we run this in Postman we can see that it works as we’d expect – it runs the code in our GetBlogPostQueryHandler:

The example here is fairly simple but already a little cleaner than rolling out functions by hand. However it starts to come into its own when we have more Functions to define. Lets elaborate on our configuration block:

public class ServerlessBlogConfiguration : IFunctionAppConfiguration
{
    private const string ObjectIdentifierClaimType = "http://schemas.microsoft.com/identity/claims/objectidentifier";

    public void Build(IFunctionHostBuilder builder)
    {
        builder
            .Setup((serviceCollection, commandRegistry) =>
            {
                serviceCollection.AddTransient<IPostRepository, CosmosDbPostRepository>();
                commandRegistry.Discover<ServerlessBlogConfiguration>();
            })
            .Authorization(authorization => authorization
                .TokenValidator<BearerTokenValidator>()
                .Claims(mapping => mapping
                    .MapClaimToCommandProperty(ClaimTypes.ObjectIdentifierClaimType, "AuthenticatedUserId"))
            )
            .Functions(functions => functions
                .HttpRoute("/api/v1/post", route => route
                    .HttpFunction<GetBlogPostQuery>("/{postId}", HttpMethod.Get)
                    .HttpFunction<CreateBlogPostCommand>(HttpMethod.Post)
                )
                .HttpRoute("/api/v1/user", route => route
                    .HttpFunction<GetUserProfileQuery>(HttpMethod.Get)
                    .HttpFunction<UpdateProfileCommand>(HttpMethod.Put)
                    .HttpFunction<GetUserBlogPostsQuery>("/posts", HttpMethod.Get)
                )
                .StorageQueueFunction<CreateZipBackupCommand>("StorageAccountConnectionString", "BackupQueue")
            );
    }
}

In this example we’ve defined more API endpoints and we’ve also introduced a Function with a storage queue trigger – this will behave just like our HTTP functions but instead of being triggered by an HTTP request will be triggered by an item on a queue and so applying the same principles to this trigger type (note: I haven’t yet pushed this to the public package).

You can also see me registering a dependency in our IoC container – this will be available for injection across the system and into any of our command handlers.

We’ve also added support for token based security with our Authorization block – this adds in a class that validates tokens and builds a ClaimsPrincipal from them which we can then use by mapping claims onto the properties of our commands. This works in exactly the same way as it does on my REST API commanding library and with or without claims mapping or Authorization sensitive properties can be prevented from user access with the SecurityPropertyAttribute in the same way as in the REST API library too.

The code for the above can be found in GitHub.

Development Status

The eagle eyed will have noticed that these packages I’ve referenced here are in preview (as is the v2 Azure Functions runtime itself) and for sure I still have more work to do but they are already usable and I’m using them in three different serverless projects at the moment – as such development on them is moving quite fast, I’m essentially dogfooding.

As a rough roadmap I’m planning on tackling the following things (no particular order, they’re all important before I move out of beta):

  1. Fix bugs and tidy up code (see 6. below)
  2. Documentation
  3. Validation of input (commands)
  4. Open API / Swagger generation
  5. Additional trigger / function support
  6. Return types
  7. Automated tests – lots of automated tests. Currently the framework is not well covered by automation tests – mainly because this was a non-trivial thing to figure out. I wasn’t quite sure what was going to work and what wouldn’t and so a lot of the early work was trying different approaches and experimenting. Now all that’s settled down I need to get some tests written.

I’ve pushed this out as a couple of people have been asking if they can take a look and I’d really like to get some feedback on it. The code for the implementation of the NuGet packages is in GitHub here (make sure you’re in the develop branch).

Please do let me have any feedback over on Twitter or on the GitHub Issues page for this project.

Using ReactJS with Azure AD B2C

Azure AD B2C is Microsoft’s identity provider for social and enterprise logins allowing you to, for example, unify the login process across Twitter, Facebook, and Azure AD / Office 365. It comes with a generous free tier and following that pricing is reasonable particularly compared to the pricing for “enterprise” logins with some of the competition.

However the downside is the documentation for B2C and integration with specific technologies isn’t that clear – there’s nothing particularly strange about B2C, ultimately its just an OpenID Connect identity provider, but there is some nuance in it.

In parallel Microsoft provide MSAL (MicroSoft Authentication Library) for handling authentication from JavaScript clients and here documentation is clearer but still a little incomplete and it can be difficult to figure out the implementation required for a particular scenario – not helped by the library reference having no content other than to repeat method definitions.

I’m currently working with a handful of projects based around React JS, Azure AD B2C, and a combination of ASP.Net Core MVC and Azure Functions and found myself grappling with this. What I was doing seemed eminently reusable (and I hope useful) and so I set some time aside to take what I’d learned and create a B2C specific npm package – react-azure-adb2c.

To install it if you’re using npm:

npm install react-azure-adb2c --save

Or if you’re using yarn:

yarn add react-azure-adb2c

Before continuing you’ll need to set up Azure AD B2C for API access and the three tutorials here are a reasonably easy to follow guide on how to do that. At the end of that process you should have a tenant name, a sign in and/or up policy, an application ID, and one or more scopes.

The first change to make in your app to use the package is to initialize it with your B2C details:

import authentication from 'react-azure-adb2c';

authentication.initialize({
    // your B2C tenant
    tenant: 'myb2ctenant.onmicrosoft.com',
    // the policy to use to sign in, can also be a sign up or sign in policy
    signInPolicy: 'mysigninpolicy',
    // the the B2C application you want to authenticate with
    applicationId: '75ee2b43-ad2c-4366-9b8f-84b7d19d776e',
    // where MSAL will store state - localStorage or sessionStorage
    cacheLocation: 'sessionStorage',
    // the scopes you want included in the access token
    scopes: ['https://myb2ctenant.onmicrosoft.com/management/admin'],
    // optional, the URI to redirect to after logout
    postLogoutRedirectUri: 'http://myapp.com'
});

There are then two main ways you can use the library. You can either protect the entire application (for example if you have a React app that is launched from another landing area) or specific components. To protect the entire application simply wrap the app startup code in index.js as shown below:

authentication.run(() => {
  ReactDOM.render(<App />, document.getElementById('root'));
  registerServiceWorker();  
});

To require authentication for specific components the react-azure-adb2c library provides a function that will wrap a component in a higher order component as shown in the example below:

import React, { Component } from 'react';
import authentication from 'react-azure-adb2c'
import { BrowserRouter as Router, Route, Switch } from "react-router-dom";
import HomePage from './Homepage'
import MembersArea from './MembersArea'

class App extends Component {
  render() {
    return (
      <Router basename={process.env.PUBLIC_URL}>
        <Switch>
          <Route exact path="/" component={HomePage} />
          <Route exact path="/membersArea" component={authentication.required(MembersArea)}>
        </Switch>
      </Router>
    );
  }
}

And finally to get the access token to use with API calls:

import authentication from 'react-azure-adb2c'

// ...

const token = authentication.getAccessToken();

If you find any issues please let me know over on GitHub.

Hopefully that’s useful and takes some of the pain out of using ReactJS with Azure AD B2C and as ever I can be reached on Twitter for discussion.


Azure Cosmos DB and its Perplexing Pricing Problems

I’ve had a lot of success with Azure Cosmos DB and have regularly tweeted about how “it does what it says on the tin” – and while the Graph support has been a bit of a bumpy .NET developer experience other than that it, so far (admittedly at limited volume in real world scenarios), looks good too. It’s certainly looking like a success for Microsoft though its had a massive marketing push over the last year.

However Microsoft seem to be continually undermining it with ridiculous pricing levels that put it out of reach of smaller more cost conscious customers that prevent it from being a truly end to end scalable database solution for the cloud which is disappointing given how it is usually pitched as the defacto database for Azure.

Until this weeks Build event pricing was governed by the amount of resource units (RUs) you applied to a collection (or Graph). Collections essentially being sets of documents that share a partition key.

There are two types of collection: fixed and unlimited. Fixed is:

  • Un-partitioned (no partition key is specified).
  • The minimum number of RUs you can allocate is 400.
  • The maximum is 10000 RUs.
  • Maximum storage of 10Gb.

Whereas unlimited is:

  • Partitioned – you need to supply a partition key when you create the collection and structure your code to make use of it.
  • Pricing starts at 1000RUs (down from its previous entry point of 2500RUs).
  • There is no maximum limit although if you want to go beyond 100,000 you might need to call Azure Support.
  • There is no maximum limit for storage.

To put those into financial context fixed pricing begins at around $23 per month per collection and unlimited at $58 per month per collection.

On its own that’s pretty reasonable but remember this is per collection so if you have multiple types of document that’s potentially multiple collections. I’ve heard two workarounds suggested for this. The first is to store multiple document types inside a single collection – the problem with this is that when you design a storage strategy for a solution often you know you are going to outgrow this kind of bodge so you’re essentially being forced to incur technical debt from day one (you’re just trading hosting costs for development cost). The second is to “take advantage of our free plans” and while its great to see free plans available its hard not to feel like you’ve just set a timer running on a small explosive and have sat on it, plus combined with other service usage those plans might not be sufficient: Cosmos is unlikely to be running on its own. (As an side – why is this such an issue? Different document types often require different partition keys and strategies based on both their content and the characteristics of the queries you want to run against them – its one of the most important considerations for the storage strategy with a database like Cosmos)

Now, with the announcement at Build, we’re able to provision RUs at the database level allowing collections in that database to share them. To me that sounded great – being able to provision, say, a 2500RU database and have it sit over 10 collections that I can later pull out and provision with their own RU allocations as my needs grow. Unfortunately the devil was in the detail on this one and visiting the Azure pricing page the minimum RU level for a database has been set at 50000. That’s approximately $3000 per month and as Howard van Rooijen noted on Twitter “feels like you’re renting the cluster”. I completely agree and its not the first time in the last few months I’ve felt that Azure seemingly has an internal inability to operate at a granular level and that that is limiting its service.

Maybe Microsoft feel ignoring the cost conscious segment of the market is ok but that’s running the risk of alienating up and coming startups or turning them to competing services – the cloud is an increasingly competitive market and Microsoft are still the underdog. And with the advent of .NET Core and its cross platform capabilities it’s getting easier than ever to run .NET code on other vendors – and sometimes even better than on Azure. For example Azure Functions have come on in leaps and bounds but are still beset by problems that are not an issue on AWS Lambda.

In fact in the same space Cosmos plays, AWS have DynamoDB as a document database and Neptune as a graph database. I’m no expert in either but they seem to have far more proportional pricing models than Cosmos and increasingly look worth investigating. And that’s dangerous to Microsoft – I’ve been using both .NET and Azure since they respectively launched and so am pretty much in their developer heartland – but the more I’m pushed away by decisions like this the more likely it is that I, and others, jump in a more wholesale manner. Its really not the message they want to be leaving us with at one of their premier events.

I guess its a case of watch this space. This pricing model is in preview and there’s track record for back tracking on RU limits but getting down from 50000 RUs to something affordable – that’s going to be a massive change.

I’d love to see it happen.

Publishing to GitHub Pages from Visual Studio Team Services

During the last major release of my commanding framework I wrote a lot of new documentation. I wrote this in Markdown and converted it to a documentation website using DocFX resulting in this website.

DocFX has a VSTS extension which make it easy to integrate into your build and release pipeline but I couldn’t find any simple way to publish it to GitHub Pages which is what I am using as a simple, and free, host. My initial solution was to use a short PowerShell script which took the following steps as part of a Release Plan:

  1. Clone the gh-pages branch from my repository into a folder
  2. Copy the output from the DocFX build artefact to the folder
  3. Commit the changes
  4. Push the branch to GitHub (which publishes the changes)

This worked nicely but it irked me not being able to do it in a more off the shelf manner and so I’ve tidied this up and released a VSTS Build and Release task to the marketplace. It come complete with documentation and hopefully it’s useful to people. The source code is available on GitHub.

Writing a simple VSTS build and release task is well documented and there are plenty of blog posts on the topic and so I won’t repeat that here but I did think it might be helpful to quickly cover just a couple of things that were often not covered.

Accessing Variables

I needed to find the default working folder within my task as I needed scratch space for cloning the gh-pages branch. VSTS exposes this as a built-in variable called System.DefaultWorkingDirectory – it’s a commonly used variable and you’ve probably seen it expressed as $(System.DefaultWorkingDirectory) when using tasks for releases.

You can access variables from within a script by using the Get-VstsTaskVariable cmdlet. For example:

$defaultWorkingDirectory = Get-VstsTaskVariable -Name 'System.DefaultWorkingDirectory'

Reporting Errors

You can write to the VSTS log using the Write-Host cmdlet but I wanted a nice red error message when things went wrong. You can do this by prefixing your message as shown below:

Write-Host "##vso[task.logissue type=error;]Your error message"

To exit the script and have it fail you need to exit with a non-zero return code and using a specific Exit method:

[Environment]::Exit(1)


And that’s it. As always I hope this is useful and I can be reached for discussion and questions on Twitter.


Lean Configuration Based ASP.Net Core REST APIs

Over the last year or two, as many visitors to my blog and Twitter will know, I’ve been spending significant time and effort advocating approaches that allow a codebase and architecture to be “best fit” for its stage in the development lifecycle while being able to evolve as your product, systems and customers evolve.

As an example for early stage projects this is often about building a modular monolith that can be evolved into micro-services as market fit is achieved, the customer base grows, and both the systems and development teams need to scale.

The underlying principals with which I approach this are both organisational and technical.

On the technical side the core of the approach is to express operations as state and execute them through a mediator rather than, as in a more traditional (layered) architecture, through direct compile time interfaces and implementations. In other words I dispatch commands and queries as POCOs rather than calling methods on an interface. These operations are then executed somewhere, somehow, by a command handler.

One of the many advantages of this approach is that you can configure the mediator to behave in different ways based on the type of the command – you might choose to execute a command immediately in memory or you might dispatch it to a queue and execute it asynchronously somewhere else. And you can do this without changing any of your business logic.

It’s really what my command mediator framework is all about and at this point its getting pretty mature with a solid core and a growing number of extensions. For a broader introduction to this architectural pattern I have a series on this blog which covers moving from a, perhaps more familiar to many, “layered” approach to one based around a mediator.

However as I used this approach over a number of projects I still found myself writing very similar ASP.Net Core code time and time again to support a REST API. Nothing complicated but it was still repetitive, still onerous, and still error prone.

What I was doing, directly or otherwise, was exposing the commands on HTTP endpoints. Which makes sense – in a system built around operations expressed as commands then a subset of those commands are likely to need to be invoked via a REST API. However the payload didn’t always come exclusively from the endpoint payload (be that a  request body or route parameters) – sometimes properties were sourced from claims.

It struck me that given this I had all the information I needed to generate a REST API based on the command definitions themselves and some basic configuration and so invested some time in building a new extension package for my framework: AzureFromTheTrenches.Commanding.AspNetCore.

This allows you to take a completely “code free” (ASP.Net code) approach to exposing a command based system as a set of REST APIs simply by supplying some basic configuration. An example configuration based on a typical ASP.Net startup block  is shown below:

public void ConfigureServices(IServiceCollection services)
{
    // Configure a dependency resolver adapter around IServiceCollection and add the commanding
    // system to the service collection
    ICommandingDependencyResolverAdapter commandingAdapter =
        new CommandingDependencyResolverAdapter(
            (fromType,toInstance) => services.AddSingleton(fromType, toInstance),
            (fromType,toType) => services.AddTransient(fromType, toType),
            (resolveType) => ServiceProvider.GetService(resolveType)
        );
    // Add the core commanding framework and discover our command handlers
    commandingAdapter.AddCommanding().Discover<Startup>();

    // Add MVC to our dependencies and then configure our REST API
    services
        .AddMvc()
        .AddAspNetCoreCommanding(cfg => cfg
            // configure our controller and actions
            .Controller("Posts", controller => controller
                .Action<GetPostQuery>(HttpMethod.Get, "{Id}")
                .Action<GetPostsQuery,FromQueryAttribute>(HttpMethod.Get)
                .Action<CreatePostCommand>(HttpMethod.Post)
            )
        );                
}

If we enable Swagger too then that gives us an API that looks like this:

There is, quite literally, no other ASP.Net code involved – there are no controllers to write.

So how does it work? Essentially by writing and compiling the controllers for you using Roslyn and adding a couple of pieces of ASP.Net Core plumbing (but nothing that interferes with the broader running of ASP.Net – you can mix and match command based controllers with hand written controllers) as shown in the diagram below:

Essentially you bring along the configuration block (as shown in the code sample earlier) and your commands and the framework will do the rest.

I have a quickstart and detailed documentation available on the frameworks documentation site but I’m going to take a different perspective on this here and break down a more complex configuration block than that I showed above:

// This method gets called by the runtime. Use this method to add services to the container.
public void ConfigureServices(IServiceCollection services)
{
    ICommandingDependencyResolverAdapter commandingAdapter =
        new CommandingDependencyResolverAdapter(
            (fromType,toInstance) => services.AddSingleton(fromType, toInstance),
            (fromType,toType) => services.AddTransient(fromType, toType),
            (resolveType) => ServiceProvider.GetService(resolveType)
        );
    ICommandRegistry commandRegistry = commandingAdapter.AddCommanding().Discover<Startup>();

    services
        .Replace(new ServiceDescriptor(typeof(ICommandDispatcher), typeof(ApplicationErrorAwareCommandDispatcher), ServiceLifetime.Transient))
        .AddMvc(mvc => mvc.Filters.Add(new FakeClaimsProvider()))
        .AddAspNetCoreCommanding(cfg => cfg
            .DefaultControllerRoute("/api/v1/[controller]")
            .Controller("Posts", controller => controller
                .Action<GetPostQuery>(HttpMethod.Get, "{Id}")
                .Action<GetPostsQuery,FromQueryAttribute>(HttpMethod.Get)
                .Action<CreatePostCommand>(HttpMethod.Post)
            )
            .Claims(mapping => mapping.MapClaimToPropertyName("UserId", "AuthenticatedUserId"))
        )
        .AddFluentValidation();

    services.AddSwaggerGen(c =>
    {
        c.SwaggerDoc("v1", new Info { Title = "Headless Blog API", Version = "v1" });
        c.AddAspNetCoreCommanding();
    });

}

Firstly we register the commanding framework:

ICommandingDependencyResolverAdapter commandingAdapter =
    new CommandingDependencyResolverAdapter(
        (fromType,toInstance) => services.AddSingleton(fromType, toInstance),
        (fromType,toType) => services.AddTransient(fromType, toType),
        (resolveType) => ServiceProvider.GetService(resolveType)
    );
ICommandRegistry commandRegistry = commandingAdapter.AddCommanding().Discover<Startup>();

If you’ve used this framework below then this will be quite familiar code – we create an adapter for our IoC container (the framework itself is agnostic of IoC container and uses an adapter to work with any IoC framework of your choice) and then register the commanding infrastructure with it and finally we use the .Discover method to search for and register command handlers in the same assembly as our Startup class.

Next we begin to register our other services, including MVC, with our IoC container:

services
    .Replace(new ServiceDescriptor(typeof(ICommandDispatcher), typeof(ApplicationErrorAwareCommandDispatcher), ServiceLifetime.Transient))

The first service we register is a command dispatcher – as we’ll see shortly this is a decorator for the framework provided dispatcher. This is entirely optional but its quite common to want to apply cross cutting concerns to every operation and implementing a decorator like this is an excellent place to do so. In our example we want to translate application errors that occur during command handling into appropriate HTTP responses. The code for this decorator is shown below:

public class ApplicationErrorAwareCommandDispatcher : ICommandDispatcher
{
    private readonly IFrameworkCommandDispatcher _underlyingCommandDispatcher;

    public ApplicationErrorAwareCommandDispatcher(IFrameworkCommandDispatcher underlyingCommandDispatcher)
    {
        _underlyingCommandDispatcher = underlyingCommandDispatcher;
    }

    public async Task<CommandResult<TResult>> DispatchAsync<TResult>(ICommand<TResult> command, CancellationToken cancellationToken = new CancellationToken())
    {
        try
        {
            CommandResult<TResult> result = await _underlyingCommandDispatcher.DispatchAsync(command, cancellationToken);
            if (result.Result == null)
            {
                throw new RestApiException(HttpStatusCode.NotFound);
            }
            return result;
        }
        catch (CommandModelException ex)
        {
            ModelStateDictionary modelStateDictionary = new ModelStateDictionary();
            modelStateDictionary.AddModelError(ex.Property, ex.Message);
            throw new RestApiException(HttpStatusCode.BadRequest, modelStateDictionary);
        }
    }

    public Task<CommandResult> DispatchAsync(ICommand command, CancellationToken cancellationToken = new CancellationToken())
    {
        return _underlyingCommandDispatcher.DispatchAsync(command, cancellationToken);
    }

    public ICommandExecuter AssociatedExecuter { get; } = null;
}

Essentially this traps a specific exception raised from our handlers (CommandModelException) and translates it into model state information and rethrows that as a RestApiException. The RestApiException is an exception defined by the framework that our configuration based controllers expect to handle and will catch and translate into the appropraite HTTP result. In our case a BadRequest with the model state as the response.

This is a good example of the sort of code that, if you write controllers by hand, you tend to find yourself writing time and time again – and even if you write a base class and helpers you still need to write the code that invokes them for each action in each controller and its not uncommon to find inconsistencies creeping in over time or things being outright missed.

Returning to our configuration block the next thing we add to the service collection is ASP.Net Core MVC:

    .AddMvc(mvc => mvc.Filters.Add(new FakeClaimsProvider()))

In the example I’m basing this on I want to demonstrate the claims support without having to have everybody set up a real identity provider and so I also add a global resource filter that simply adds some fake claims to our identity model.

AddMvc returns an IMvcBuilder interface that can be used to provide additional configuration and this is what the REST commanding framework configures in order to expose commands as REST endpoints and so the next line adds our framework components to MVC and then supplies a builder of its own for configuring our endpoints and other behaviours:

    .AddAspNetCoreCommanding(cfg => cfg

On the next line we use of the configurations options exposed by the framework to replace the default controller route prefix with a versioned one:

        .DefaultControllerRoute("/api/v1/[controller]")

This is entirely optional and if not specified the framework will simply to default to the same convention used by ASP.Net Core (/api/[controller]).

Next we have a simple repition of the block we looked at earlier:

        .Controller("Posts", controller => controller
                .Action<GetPostQuery>(HttpMethod.Get, "{Id}")
                .Action<GetPostsQuery,FromQueryAttribute>(HttpMethod.Get)
                .Action<CreatePostCommand>(HttpMethod.Post)
            )

This defines a controller called Posts (the generated class name will be PostsController) and then assigns 3 actions to it to give us endpoints we saw in the Swagger definition:

  1. GET: /api/v1/Posts/{Id}
  2. GET: /api/v1/Posts
  3. POST: /api/v1/Posts

For more information on how actions can be configured take a look at this here.

Next we instruct the framework to map the claim named UserId onto any command property called AuthenticatedUserId:

        .Claims(mapping => mapping.MapClaimToPropertyName("UserId", "AuthenticatedUserId"))

Their is another variant of the claims mapper declaration that allows properties to be configured on a per command basis though if you are starting with a greenfield solution taking a consistent approach to naming can simplify things.

Data sourced from claims is generally not something you want a user to be able to supply – for example if they can supply a different user ID in our example here then that might lead to a data breach with users being able to access inappropriate data. In order to ensure this cannot happen the framework supplies an attribute, SecurityPropertyAttribute, that enables properties to be marked as sensitive. For example here’s the CreatePostCommand from the example we are looking at:

public class CreatePostCommand : ICommand<PublishedPost>
{
    // Marking this property with the SecurityProperty attribute means that the ASP.Net Core Commanding
    // framework will not allow binding to the property except by the claims mapper
    [SecurityProperty]
    public Guid AuthenticatedUserId { get; set; }

    public string Title { get; set; }

    public string Body { get; set; }
}

The framework installs extensions into ASP.Net Core that adjust model metadata and binding (including from request bodies – that ASP.Net Core behaves somewhat inconsistently with) to ensure that they cannot be written to from an endpoint and, as we’ll see shortly, are hidden from Swagger.

The final line of our MVC builder extensions replaces the built in validation with Fluent Validation:

        .AddFluentValidation();

This is optional and you can use the attribute based validation model (or any other validation model) with the command framework however if you do so you’re baking validation data into your commands and this can be limiting: for example you may want to apply different validations based on context (queue vs. REST API). It’s important to note that validation, and all other ASP.Net Core functionality, will be applied to the commands as they pass through its pipeline – their is nothing special about them at all other than what I outlined above in terms of sensitive properties. This framework really does just build on ASP.Net Core – it doesn’t subvert it or twist it in some abominable way.

Then finally we add a Swagger endpoint using Swashbuckle:

services.AddSwaggerGen(c =>
    {
        c.SwaggerDoc("v1", new Info { Title = "Headless Blog API", Version = "v1" });
        c.AddAspNetCoreCommanding();
    });

The call to AddAspNetCoreCommanding here adds schema filters into Swagger that understand how to interpret the SecurityPropertyAttribute attribute and will prevent those properties from appearing in the Swagger document.

Conclusions

By taking the approach outlined in this post we’ve greatly reduced the amount of code we need to write eliminating all the boilerplate normally associated with writing a REST API in ASP.Net Core and we’ve completely decoupled our application logic from communication protocols, runtime model and host.

Simplistically less code gives us less to test, less to review, lower maintenance, improved consistency and fewer defects.

And we’ve gained a massive amount of flexibility in our application architecture that allows us to tailor our approach to best fit our project at a given point in time / stage of development lifecycle and more easily take advantage of new technologies.

To give a flavour of the latter, support for Azure Functions is currently under development allowing for the same API and underlying implementation to be expressed in a serverless model simply by adopting a new NuGet package and changing the configuration to the below (please bear in mind this comes from the early, but functional, work in progress and so is liable to change):

public class FunctionAppConfiguration : IFunctionAppConfiguration
{
    public void Build(IFunctionHostBuilder builder)
    {
        builder
            // register services and commands
            .Setup((services, commandRegistry) => commandRegistry.Discover<FunctionAppConfiguration>())
            // register functions - by default the functions will be given the name of the command minus the postfix Command and use the GET verb
            .Functions(functions => functions
                    .HttpFunction<GetPostsQuery>()
                    .HttpFunction<GetPostQuery>()
                    .HttpFunction<CreatePostCommand>(function => function.AddVerb(HttpMethod.Post))
            );
    }
}

In addition to bringing the same benefits to Functions as the approach above does to ASP.Net Core this also provides, to my eyes, a cleaner approach for expressing Function triggers and provides structure for things like an IoC container.


Cosmos, Oh Cosmos – Graph API as a .NET Developer

I’ve done a lot of work with Cosmos over the last year as a document database and generally found it to be a rock solid experience, it does what it says on the tin, and so when I found myself with a project that was a great fit for a graph database my first port of call was Cosmos DB.

I’d done a little work with it as a Graph API but as this was a new project I visited the Azure website to refresh myself on using it as a Graph from .NET and found that Microsoft are now recommending that the Tinkerpop Gremlin .NET library be used from .NET. There are some pieces on the old Microsoft.Azure.Graphs package but it never made it out of preview and the direction of travel looks to be elsewhere.

While Gremlin .NET is easy to get started with if you try and use this in a realistic sense you quickly run into a couple of serious limitations due to it’s current design around error and response handling. It seems to be designed to support console applications rather than real world services:

  1. Vendor specific attributes of the responses such as RU costs, communicated as header values, are hidden from you.
  2. Errors from the server are presented only as text messages. Rather than expose status codes and interpretable values the Gremlin .NET library first converts these into messages designed for consumption by people. To interpret the server error you need to parse these strings.

The above two issues combine into a very unfortunate situation for a real world Cosmos Graph API application: when Cosmos rate limits you it returns a 500 error to the caller with the 429 error being communicated in a x-ms-status-code header. This doesn’t play well with resilience libraries such as Polly as you end up having to fish around in the response text for keywords.

I initially raised this as a documentation issue on GitHub and Microsoft have confirmed they are moving to open source libraries and working to improve them but best I can tell, today, for the moment you’ve got two choices:

  1. Continue to use the Microsoft.Azure.Graphs package – I’ve not used this in anger but I understand it has issues of its own related to client side performance and is a bit of a dead end.
  2. Use Gremlin.NET and work around the issues.

For the time being I’ve opted to go with option (2) as I don’t want to unpick an already obsolete package from new code. To support this I’ve forked the Gremlin.NET library and introduced a couple of changes that allow attributes and response codes to be inspected for regular requests and for exceptions. I’ve done this in a none breaking way – you should be able to replace the official Gremlin.NET package with this replacement and your code should continue to work just fine but you can more easily implement resilience patterns. You can find it on GitHub here.

If I was designing the API from fresh to work in a real world situation I would probably expose a different API surface – at the moment I really have followed the path of least none-breaking resistance in terms of getting these things visible. That makes me uncertain as to whether or not this is an appropriate Pull Request to submit – I probably will, if nothing else hopefully that will start a conversation.

Developing Fluent Flowchart – A Retrospective

I recently released a new app to the Windows Store called Fluent Flowchart – a side project I’ve been working on since, my commit history tells me, late June 2017. It struck me it might be interesting to write up a short retrospective on the development process. So without further ado a bit of a warts and all look at development follows.

Motivations

I can’t remember exactly what I was doing when I started development but I do remember it involved a lot of Visio and that I’d recently finished work on an update to Fluent Mindmap. Visio and it’s, so called, drawing aids have a habit of sending me into an incandescent rage – it’s akin to playing a game of Dark Souls only without the satisfying pay off.

I vividly recall looking at the code for Fluent Mindmap, looking at Visio, and thinking to myself that surely it wouldn’t be much of an effort to adapt one diagramming tool into another. In fact, I recall thinking to myself, without having to auto-manage a complex graph of recursive connections it would be a lot easier.

25 years of professional software development has clearly taught me nothing. Not a damn thing.

To be fair to myself in truth I wasn’t that wrong – however what I did forget as I optimistically forged off into the code was that polishing an app, particularly a highly interactive app, takes a lot of time and that although you might get the core running quickly all those “little” features that make it usable all do add up.

Phases of Development

There were definitely two distinct phases of development over a 8 month period which is borne out by the change stats I’ve graphed below.

It’s worth noting that this wasn’t solid effort even on the days where I dod commit code most of the work was done on the train or late at night in hotel rooms with some crunching over weekends. I’m tempted to run a correlation between weekend commit rate and the weather – living in the UK there’s a fair chance that the weekend crunches will align with bleak rain and grey skies.

I pulled the stats for the above graph from the git log with a PowerShell script – I don’t pretend to be a PowerShell expert and I’m pretty sure it could be expressed much more concisely but if you want to get stats like this for your project you can find the script here.

Phase 1 – The Rapid Rise and Steady Decline of Optimism

Fueled by irritation with Visio and that wonderful “early project” feeling development shot out the gate. The first order of business was to copy the Fluent Mindmap codebase and strip out all the code I wouldn’t need. While doing this I remembered that the Mindmap code wasn’t that great – that project was a port of an iOS app from Xamarin into UWP and I’d used it to first learn Xamarin and then learn about UWP. You can begin to imagine… I’d also tried some experiments with a couple of patterns that didn’t really pan out. It works – but I’m not particularly proud of it (though there is a crash to do with connectors that I’ve never been able to replicate but I know users get, stack trace isn’t helpful, if you try the app and you have the issue please let me know!).

Deleting code turned out to be an ongoing theme – as I replaced mind map optimised systems with flowchart systems I would remove more code.

I found myself faced with an early decision – try and make the patterns I’d used work or ditch them and adopt what I knew to be a better approach. I decided to ditch the broken patterns and replace them with a better approach on an “as I go” basis. This worked out ok but did leave me with a slightly disjoint codebase in the middle section of the project.

With all that done the first thing I needed to get working was a palette. My first stab at this, complete with garish colours, can be seen in the screenshot below:

The next step was to implement drag and drop from the palette. My first effort at this used the built in UWP drag and drop feature but that gave me a horrendous user experience. I spent some time trying to tweak it but it was miles away from what I wanted so I ended up implementing a custom approach that makes use of a transparent canvas overlaid over the entire editor. This gave me the fine level of control I wanted and better visuals but took a fair amount of effort. Still – it’s core to the experience and so the effort was worth it.

The next step was to introduce a grid for aligning elements – for many diagrams it’s really all I need to lay things out correctly. I find a grid to be predictable and intuitive as there is no second guessing about what a more “intelligent” alignment tool is going to do. At this point I was also starting to sort out the command bars with icons that made sense for the planned features but you can see I hadn’t yet implemented grab handles on shapes – the highlight is still based on that in the mind map tool. The screenshot below shows the app at this stage of its development:

At this point I could drop shapes but next I needed a means of connecting them. My initial attempt at this was really clunky – I was trying to make something touch friendly and not fiddly but this really was grim: you tap the connector button on the tool bar and then tap the connector points on the canvas (the small circles).

About the same time I also introduced grab handles for resizing shapes and another side bar for editing shape properties – the Mindmap tool uses a bottom app / command bar butI knew I would have too many editable properties to use for a bottom bar. Additionally although that fit into Windows 8 styling quite well I don’t really like it and it really doesn’t feel right on Windows 10. The screenshot shows this and represents development about a month after starting.

Next up was adding the ability to select connectors – this involves inflating a line into a polygon so that their is a practical hit test area. It’s just basic geometry but this proved rather taxing at 7 in the morning on the train! Eventually I got this done and also added a development flag so I can see all the hit test areas for connectors. Over the next week or two I also added some basic multi-select support and spent time expanding out the property sidebar further. For some reason, again early in the morning!, I really struggled to implement the arrow head picker in the sidebar. The implementation is actually quite simple but I really struggled to wrap my head round it.

At this point there was no hiding from the realisation that completing the application was going to take quite a bit longer particularly working with such limited time as I had. And the next task I had to tackle was updating the theme editor which really did feel like laborious work and for some reason I got stuck on arrow heads again!

I knew I’d come back to the project (probably after another grapple with Visio) but I shut the lid on my laptop on the train one morning and didn’t come back to Fluent Flowchart for some time. The screenshot below shows the last thing I worked on at this stage – the theme editor.

Phase 2 – Renewed Hope and The Grind

Around 3 months later I had a bit of time on my hands during the Christmas break and had a strong urge to resume development – I really don’t like leaving things unfinished, Visio was still annoying me, and I figured that if I knuckled down and gave a final big push I could complete the app quite quickly. I started by getting myself organised: I made a list of the features and bugs I knew were outstanding in a MarkDown file (I like to have offline access) and set it up so as I completed things I would move them to a DONE section. My cheap and cheerful version of a typical SCRUM or Kanban board.

I quickly completed the theme editor I’d been struggling with though again this felt like a grind. I figured adding a richer set of flowchart shapes would be a nice set of quick wins to really get me going again and would help me work through the remaining user experience and design issues – of which there were many, including a delightfully garish set of colours and ugly palette.

Next up was sorting out two long standing issues – the horrible oversized palette and the unpleasant way connecting shapes together functioned. As such core parts of the experience I really ought to have tackled them earlier but one of the problems with working on projects by yourself is that you get used to and blind to these things. There was still a lot left to do but this pair of tasks was the last big pieces of work I had on my list (my list, I should add, kept on growing). They took a while to implement and get right but once they were the experience was transformed:

Next there was a lot of bug fixing and small nips and tucks – screenshot feature, undo support, more connector tweaks, copy and paste and branding. At numerous points in this process I thought I was nearing completion before doing another full pass and deciding something wasn’t quite right or broken.

Working by myself this was definitely a bit of a grind – I got through it by setting myself a target of moving one thing, no matter how small, from the outstanding to done section of my task list. That way it always felt like I had momentum and eventually I arrived at the app shown in the screenshot below which was starting to look much cleaner and was a fairly stable app.

Another pass through and I found yet more things I wasn’t happy with so ran through more nips and tucks.

Finally. After 7 months of on and off part time development squeezed into train journeys, hotels, and weekend I had a finished app that I could ship to the store.

Leftovers

I did ship the project with a couple of features missing that  I wanted:

  • Right angle connectors
  • Free standing connectors (by which I mean connectors that aren’t connected to shapes)
  • SVG export

However at some point you have to ship and I really wanted to start getting feedback.

Observations and Lessons Learned

As with every project there were things I learned and observed throughout the process.

  1. Time yourself. I’ve started using Harvest to track time on all my projects whether fun side-projects, open source, or commercial. Like most developers I’m pretty poor at estimating and so occasionally create a rod for my own back – I do at least know it though sometimes this causes me to lurch into absolute pessimism as a defence mechanism. I know that too. Over the years I’ve managed to deliver the majority of my projects on time, some even early, but on occasion I’ve had to work like a demon to ensure that’s the case. I’d like to do better and I think the biggest issue I have in terms of estimating my own capacity is a lack of data. My hope is that by capturing this I’ll have a corpus of data I can use as a reference point for future work.
  2. Look through your commit log from time to time and go back to old builds. To pull out the stats for this blog post and some screenshots I went back from the commit log for the project. It was really interesting to look at the changes I’d made and see the steady progress that was made.

    Before I did this I felt somewhat dissatisfied with how development had gone. The stop start nature made it seem like an epic scale development for something fairly modest – but looking at the project like this I can see that steady progress was made in fairly limited time and instead I now feel a sense of satisfaction with the process.

  3. I know this from previous projects but its always worth a reminder: user experience takes time and iteration to get right and improve and sometimes you just need to use it and feel it to know if its right. This of course takes time. If you’re working on a project that demands a high level of user experience and you don’t allow time to fail and iterate you’re just not going to get it.
  4. Lowball / easy tasks can be really useful for getting you in the zone and moving again after an impasse.
  5. Optimising something for both touch and keyboard / mouse is really hard. In the end I focused on keyboard and mouse as its the main way I interact with creative tools but I want to improve touch support.
  6. Even if you’re working on your own maintain a task list. Ticking things off, no matter how small, can be a real motivator and I definitely found my “one task a day” goal helped me get through the grind of bug fixing and polishing towards the end of development.
  7. When you finally ship your app its super rewarding!


Hope that’s interesting. If there’s anything you want to discuss I can, as ever, be reached on Twitter.

Azure Functions – Significant Improvements in HTTP Trigger Scaling

A while back I wrote about the improvements Microsoft were working on in regard to the HTTP trigger function scaling issues. The Functions team got in touch with me this week to let me know that they had an initial set of improvements rolling out to Azure.

To get an idea of how significant these improvements are I’m first going to contrast this new update to Azure Functions with my previous measurements and then re-examine Azure Functions in the wider context of the other cloud vendors. I’m specifically separating out the Azure vs Azure comparison from the Azure vs Other Cloud Vendors comparison as while the former is interesting given where Azure found itself in the last set of tests and to highlight how things have improved but isn’t really relevant in terms of a “here and now” vendor comparison.

A quick refresh on the tests – the majority of them are run with a representative typical real world mix of a small amount of compute and a small level of IO though tests are included that remove these and involve no IO and practically no computer (return a string).

Although the improvements aren’t yet enabled by default towards the end of this post I’ll highlight how you can enable these improvements for your own Function Apps.

Azure Function Improvements

First I want to take a look at Azure Functions in isolation and see just how the new execution and scaling model differs from the one I tested in January. For consistency the tests are conducted against the exact same app I tested back in January using the same VSTS environment.

Gradual Ramp Up

This test case starts with 1 user and adds 2 users per second up to a maximum of 500 concurrent users to demonstrate a slow and steady increase in load.

This is the least demanding of my tests but we can immediately see how much better the new Functions model performs. When I ran these tests in January the response time was very spiky and averaged out around the 0.5 second mark – the new model holds a fairly steady 0.2 seconds for the majority of the run with a slight increase at the tail and manages to process over 50% more requests.

Rapid Ramp Up

This test case starts with 10 users and adds 10 users every 2 seconds up to a maximum of 1000 concurrent users to demonstrate a more rapid increase in load and a higher peak concurrency.

In the previous round of tests Azure Functions really struggled to keep up with this rate of growth. After a significant period of stability in user volume it eventually reached a state of being semi-acceptable but the data vividly showed a system really straining to respond and gave me serious concerns about its ability to handle traffic spikes. In contrast the new model grows very evenly with the increasing demand and, other than a slight spike early on, maintaining a steady response time throughout.

Immediate High Demand

This test case starts immediately with 400 concurrent users and stays at that level of load for 5 minutes demonstrating the response to a sudden spike in demand.

Again this test highlights what a significant improvement has been made in how Azure Functions responds to demand – the new model is able to deal with the sudden influx of users immediately, whereas in January it took nearly the full execution of the test for the system to catch up with the demand.

Stock Functions

This test uses the stock “return a string” function provided by each platform (I’ve captured the code in GitHub for reference) with the immediate high demand scenario: 400 concurrent users for 5 minutes.

The minimalist nature of this test (return a string) very much highlights the changes made to the Azure Functions hosting model and we can see that not only is there barely any lag in growing to meet the 400 user demand but that response time has been utterly transformed. It’s, to say the least, a significant improvement over what I saw in January when even with essentially no code to execute and no IO to perform Functions suffered from horrendous performance in this test.

Percentile Performance

I was unable to obtain this data from VSTS and so resorted to running Apache Benchmarker. For this test I used settings of 100 concurrent requests for a total of 10000 requests, collected the raw data, and processed it in Excel. It should be noted that the network conditions were less predictable for these tests and I wasn’t always as geographically close to the cloud function as I was in other tests though repeated runs yielded similar patterns:

Yet again we can see the massive improvements made by the Azure Functions team – performance remains steady up until 99.9th percentile. Full credit to the team – the improvement here is so significant that I actually had to add in the fractional percentiles to uncover the fall off.

Revised Comparison With Other Vendors

We can safely say by now that this new hosting model for Azure Functions is a dramatic improvement for HTTP triggered functions – but how does it compare with the other vendors? Last time round Functions was barely at the party – this time… lets see!

Gradual Ramp Up

On our gradual ramp up test Azure still lags behind both AWS and Google in terms of response time but actually manages a higher throughput than Google. As demand grows Azure is also experiencing a slight deterioration in response time where the other vendors remain more constant.

Rapid Ramp Up

Response time and throughput results for our rapid ramp up test are not massively dissimilar to the gradual ramp up test. Azure experiences a significant fall in performance around the 3 minute mark as the number of users approaches 1000 – but as I said earlier the Functions team are working on further area at this level of scale and beyond and I would assume at this point that some form of resource reallocation is causing this that needs smoothing out.

It’s also notable that although some way behind AWS Lambda Azure manages a reasonably higher throughput that Google Cloud – in fact it’s almost half way between the two competing vendors so although response times are longer there seems to be more overall capacity which could be an important factor in any choice between those two platforms.

Immediate High Demand

Again we see very much the same pattern – AWS Lambda is the clear leader in both response time and throughput while 2nd place for response time goes to Google and 2nd place for throughput goes to Azure.

Stock Functions

Interestingly in this comparison of stock functions (returning a string and so very isolated) we can see that Azure Functions has drawn extremely close to AWS Lambda and ahead of Google Cloud which really is an impressive improvement.

This suggests that other factors are now playing a proportionally bigger factor in the scaling tests than Functions capability to scale – previously this was clearly driving the results. Additional tests would need to be run to isolate if this is the case and whether or not this is related to the IO capabilities of the Functions host or the capabilities of external dependencies.

Percentile Performance

The percentile comparison shows some very interesting differences between the three platforms. At lower percentiles AWS and Google outperform Azure however as we head into the later percentiles they both deteriorate while Azure deteriorates more gradually with the exception of the worst case response time.

Across the graph Azure gives a more generally even performance suggesting that if consistent performance across a broader percentile range is more important than outright response time speed it may be a better choice for you.

Enabling The Improvements

The improvements I’ve measured and highlighted here are not yet enabled by default, but will be with the next release. In the meantime you can give them a go by adding an App Setting with the name WEBSITE_HTTPSCALEV2_ENABLED to 1.

Conclusions

In my view the Azure Functions team have done some impressive work in a fairly short space of time to transform the performance of Azure Functions triggered by HTTP requests. Previously the poor performance made them difficult to recommend except in a very limited range of scenarios but the work the team have done has really opened this up and made this a viable platform for many more scenarios. Performance is much more predictable and the system scales quickly to deal with demand – this is much more in line with what I’d hoped for from the platform.

I was sceptical about how much progress was possible without significant re-architecture but, as an Azure customer and someone who wants great experiences for developers (myself included), I’m very happy to have been wrong.

In the real world representative tests there is still a significant response time gap for HTTP triggered compute between Azure Functions and AWS Lambda however it is not clear from these tests alone if this is related to Functions or other Azure components. Time allowing I will investigate this further.

Finally my thanks to the @azurefunctions team, @jeffhollan and @davidebbo both for their work on improving Azure Functions but also for the ongoing dialogue we’ve had around serverless on Azure – it’s great to see a team so focused on developer experience and transparent about the platform.

If you want to discuss my findings or tech in general then I can be found on Twitter: @azuretrenches.

Contact

  • If you're looking for help with C#, .NET, Azure, Architecture, or would simply value an independent opinion then please get in touch here or over on Twitter.

Recent Posts

Recent Tweets

Invalid or expired token.

Recent Comments

Archives

Categories

Meta

GiottoPress by Enrique Chavez