If you're looking for help with C#, .NET, Azure, Architecture, or would simply value an independent opinion then please get in touch here or over on Twitter.
The latest release of Asp.Net introduces some fundamental architectural changes that have a significant effect on frameworks such as MVC and Web API as Asp.Net now sits on top of the OWIN stack.
As part of this change Microsoft have yet again changed the authentication and authorisation model. Yes you still use the Authorize attribute within your MVC and Web API controllers but the workflow around authentication has been rejigged considerably.
If, like me, you have a penchant for writing mobile apps that consume Web API based services hosted in Azure chances are you’ll want to register and authenticate with your services from the device. This is really simple to achieve with Web API 2 and OWIN, in fact it’s all in place out of the box, but the trouble is that it’s barely documented.
Having spent a morning going through significant pain figuring this out I’ve put this How To guide together to show how to do this. For added fun I’ve built the client in Xamarin as an iOS application but the approach will work on any platform including from Windows 8, JavaScript, whatever you like. In fact the C# code that I outline below can be lifted straight from the Xamarin project and dropped into any other C# application. If you want to skip ahead to the example code it can be found on GitHub.
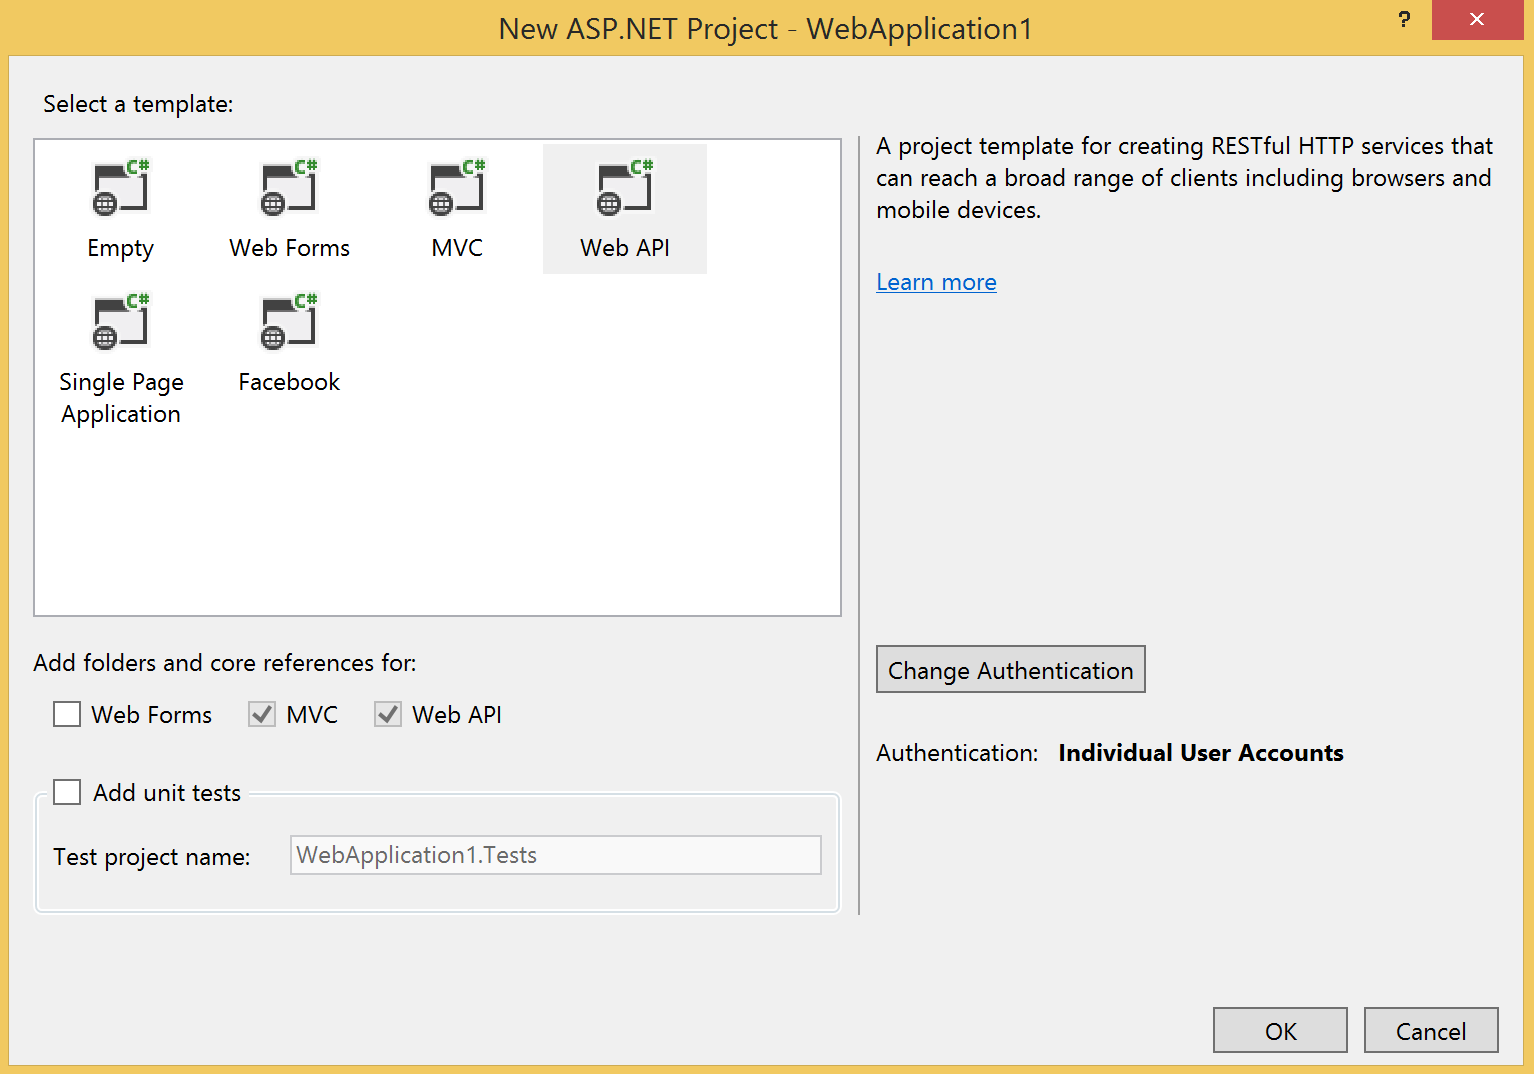
We’ll get started by creating a Web API project. In Visual Studio create a new solution and pick ASP.Net Web Application. On the ASP.Net project type page select the Web API template and change the authentication type to Individual User Accounts:
Inside this project will be a API controller called ValuesController – this is the normal Web API sample. You’ll notice the class has an Authorize attribute which will protect it from anonymous access. Your exact URL will vary depending on what port IIS Express has been set up with but enter the URL to get the values from the controller (in my case http://localhost:5287/api/Values) and you should see some XML (I’m using Chrome):
<Error>
<Message>Authorization has been denied for this request.</Message>
</Error>
So far so good – we need to be logged in to access the API which is what we want. In order to login first we’re going to need to register a user.
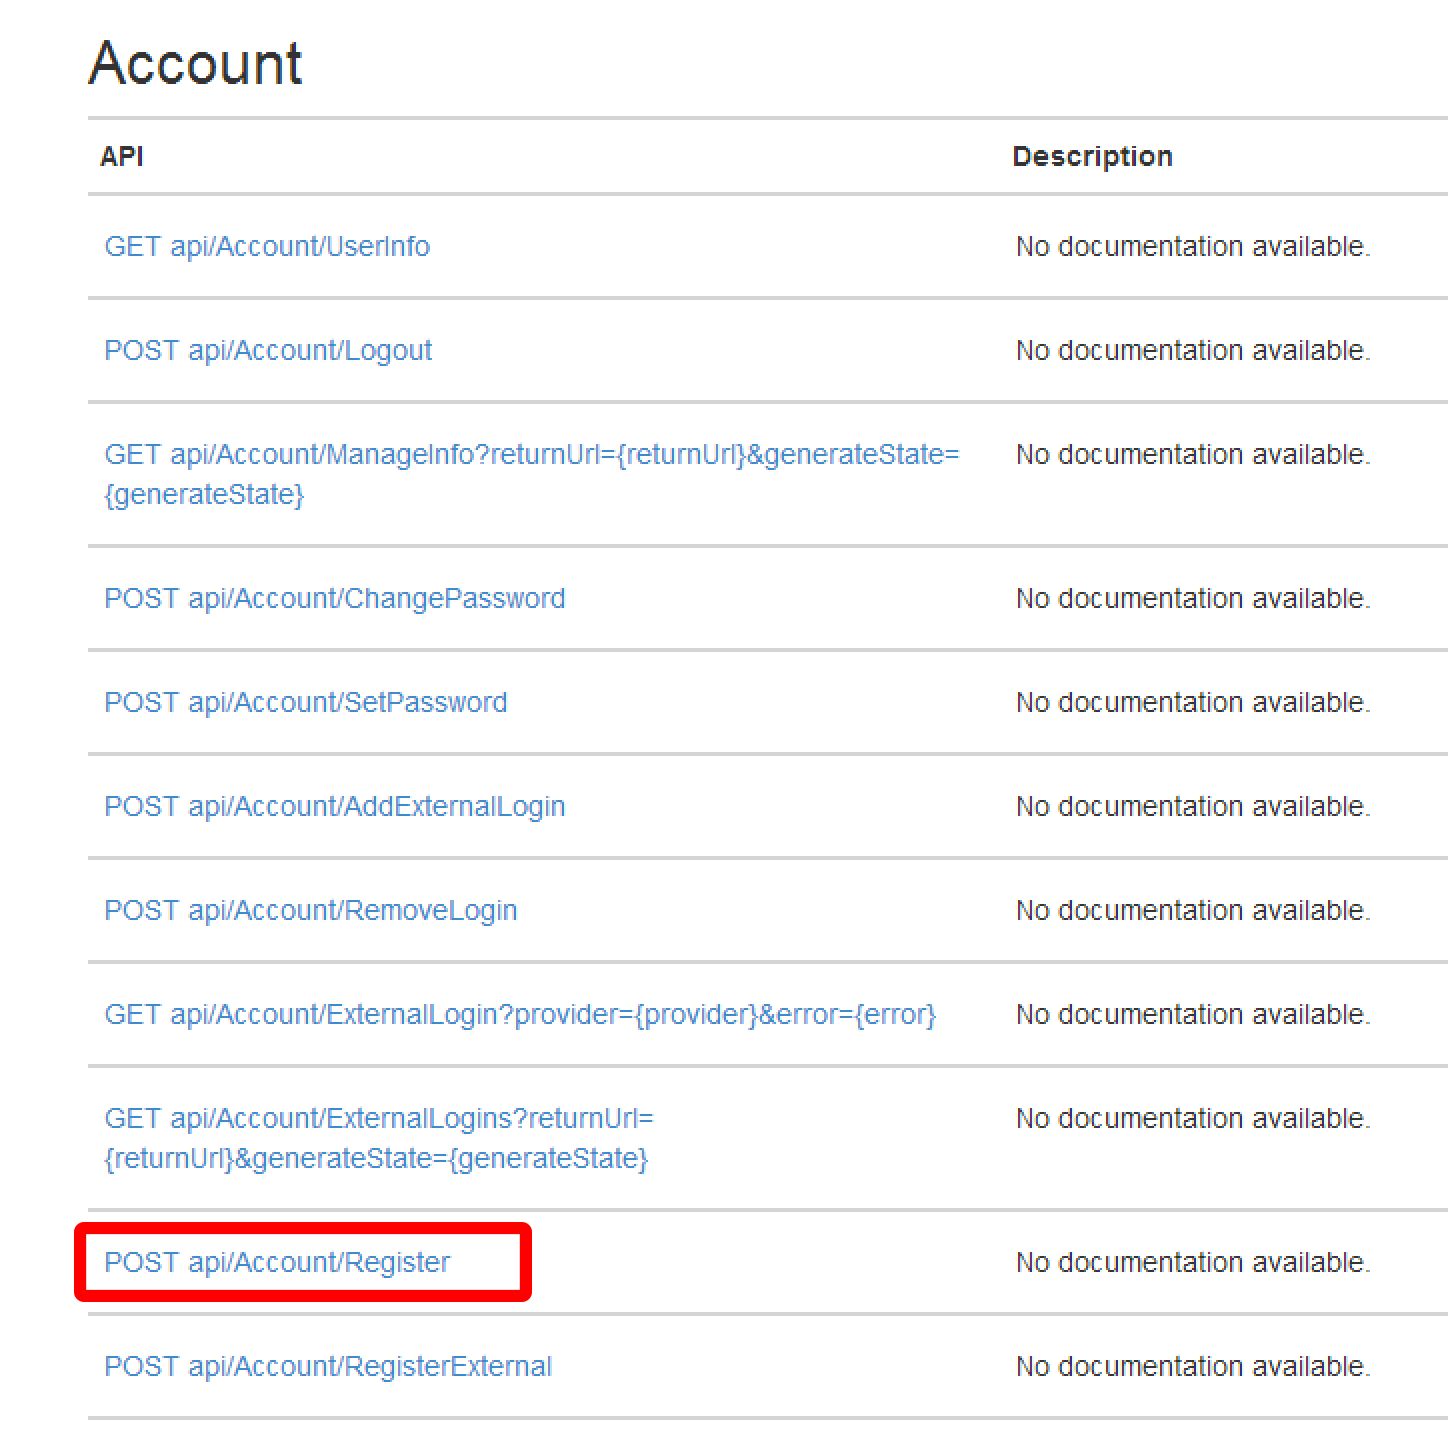
If you visit the help page for the API (for example http://localhost:5287/Help) you’ll see that there is an Account API that fronts lots of interesting methods – one of which is Register:
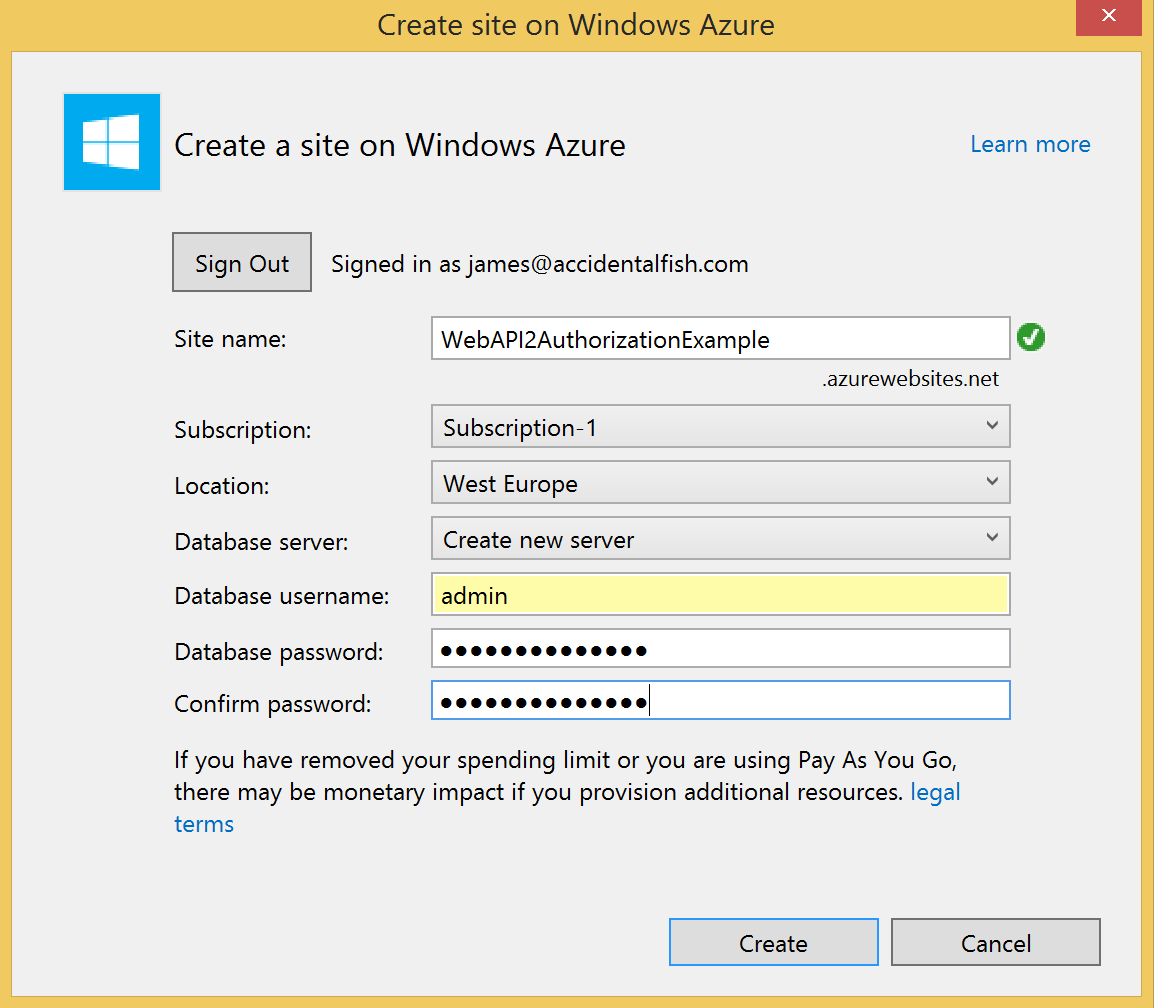
So if we post the right data to that action we should be able to register an account and believe it or not we’re done with the website so publish it to a free website in Azure and take note of the URL you’ve dropped it on. I recommend using VS2013 and the latest version of the Azure SDK (2.2 at the time of writing) as the tools make this really simple. The only real gotcha to watch out for is to point your website at a SQL Database rather than the local file approach that will be configured within your website. To point to a real database just make sure that you pick, or create as in the example below, a real database server:
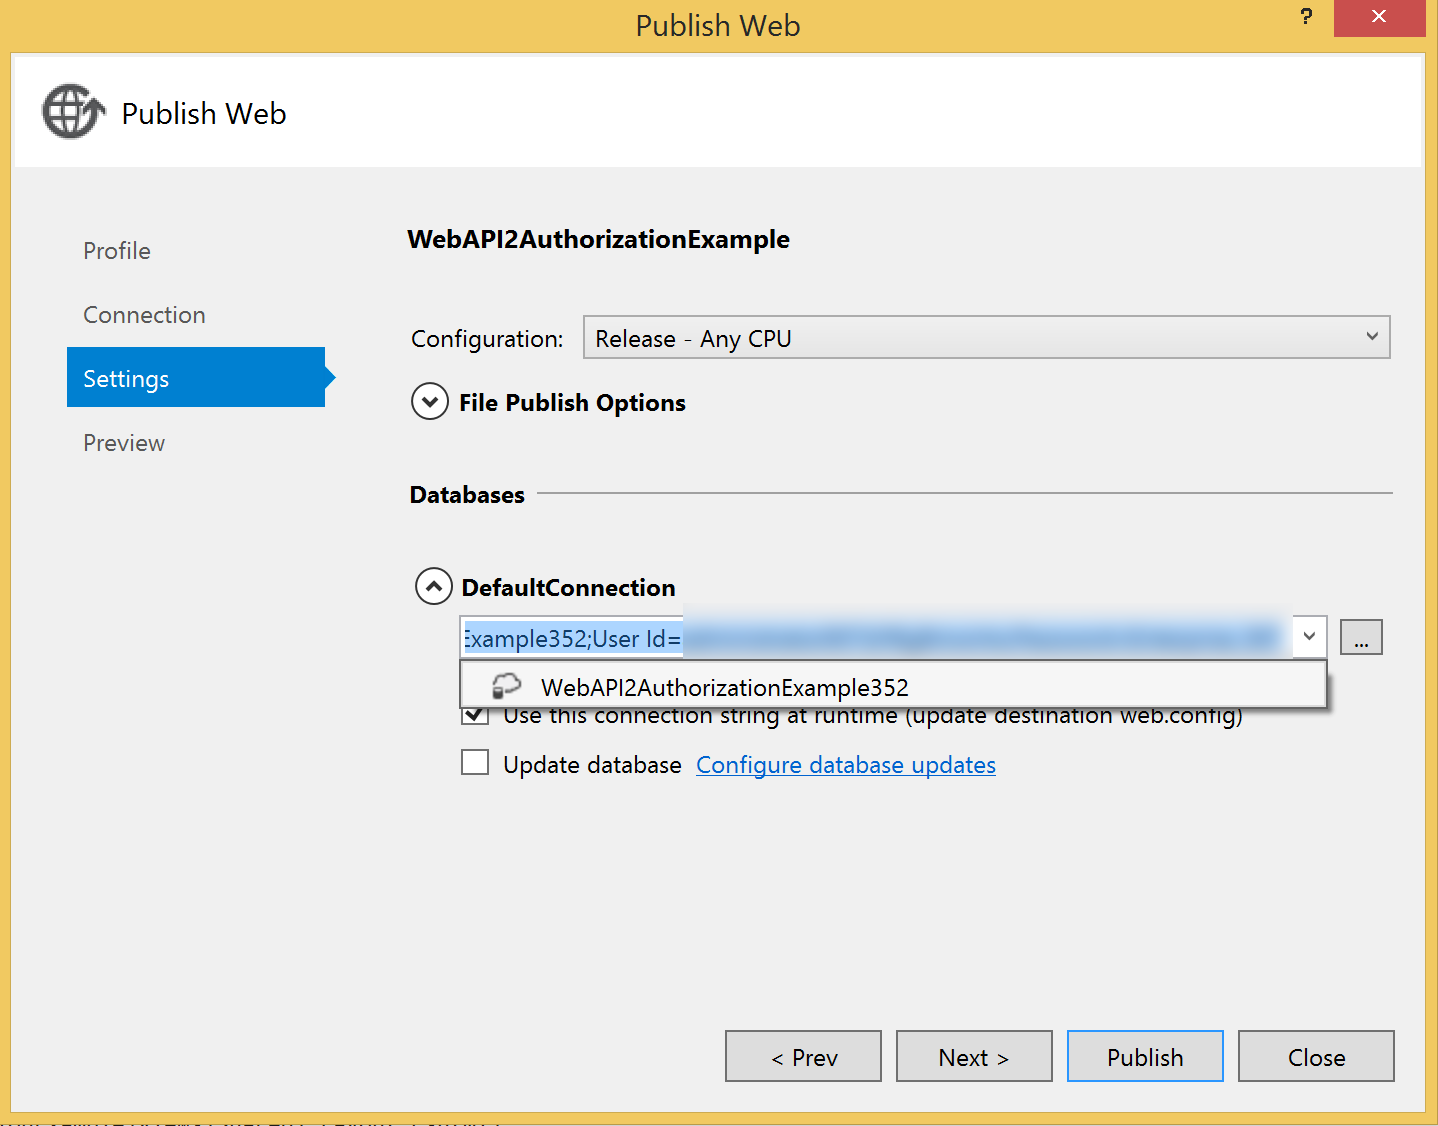
And then make sure that the DefaultConnection is updated:
With the website deployed and ready it’s time to create an iOS application. You can use either Xamarin Studio or the Visual Studio plugin. I used the Hello World template for my application and targetted iOS 7 which I then reworked to give me the user interface below:

I’m not going to spend too much time talking about the user interface of the Xamarin application (it’s not really the focus of this How To) but all I really did was update it with the user interface above and added the Json.Net component from the Xamarin Component Store (if you’re from the .Net world – think NuGet, looking forward to a PCL version of Json.Net!). None of the connectivity code was Xamarin specific.
For the application to register a user it needs to send the right model to the Register action we located earlier. The website contains a class called RegisterBindingModel which we’re going to replicate in our Xamarin application (in a production application I recommend pulling these models out into a Portable Class Library rather than copying and pasting code) in a class called RegisterModel:
class RegisterModel { public string UserName { get; set; } public string Password { get; set; } public string ConfirmPassword { get; set; } } |
We’re going to form up a HttpWebRequest with the registration information and send it to the controller. As long as we don’t get a HTTP error then registration has been successful. I’ve wrapped this in a class called RegisterServiceClient:
class RegisterService { public async Task Register(string username, string password, string confirmPassword) { RegisterModel model = new RegisterModel { ConfirmPassword = confirmPassword, Password = password, UserName = username }; HttpWebRequest request = new HttpWebRequest(new Uri(String.Format("{0}api/Account/Register", Constants.BaseAddress))); request.Method = "POST"; request.ContentType = "application/json"; request.Accept = "application/json"; string json = JsonConvert.SerializeObject(model); byte[] bytes = Encoding.UTF8.GetBytes(json); using(Stream stream = await request.GetRequestStreamAsync()) { stream.Write(bytes, 0, bytes.Length); } try { await request.GetResponseAsync(); return true; } catch (Exception ex) { return false; } } } |
That will register user but how do we log in. If we refer back to our websites API help page although there are a lot of interesting looking methods there is no Login method.
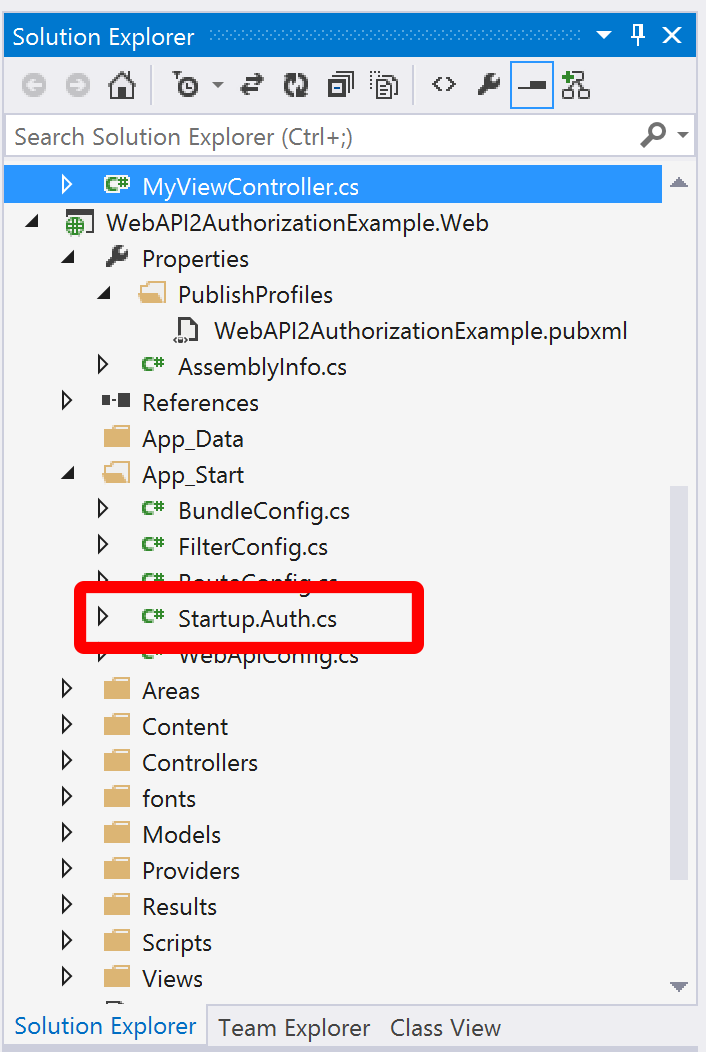
This is where OWIN comes in. If you take a look at the code that was generated for the website you’ll see that in MVC 5 / Web API 2 there is a new file in the solution (compared to MVC 4) called Startup.Auth.cs:
This is where the configuration for authentication and authorization takes place with OWIN and the real interesting bit for us is the section towards the top where OAuthOptions are set:
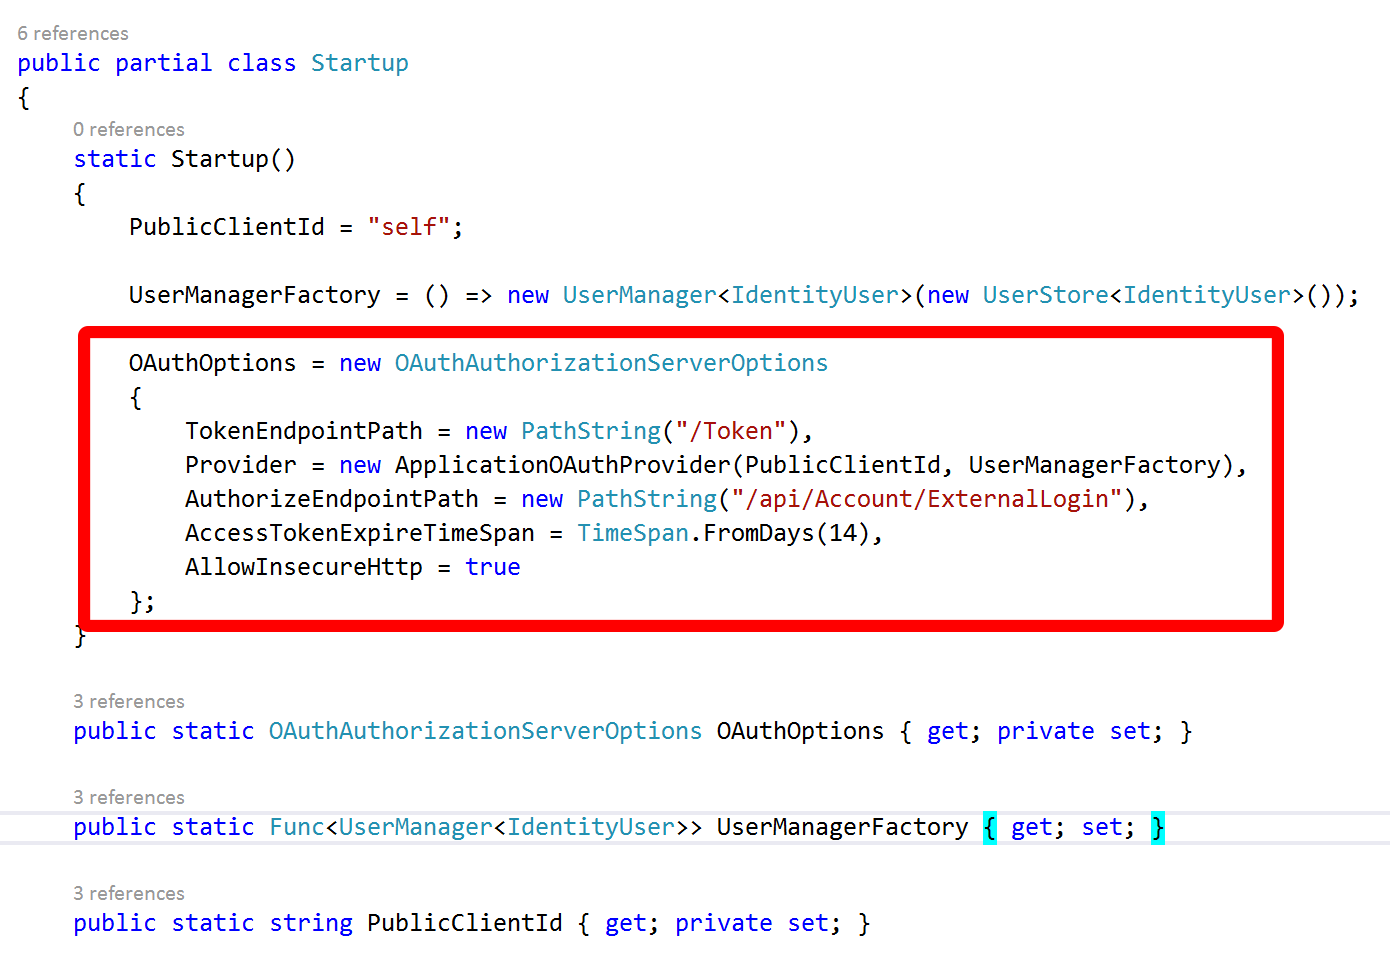
Essentially OWIN is running an OAuth authentication server within our website and setting up OAuth endpoints for us. I’m not going to dwell on OAuth but essentially to authenticate we need to request a token using our username and password to identify ourselves and then in subsequent service calls supply this token as a HTTP header in the request.
The token end point we need to call can be seen in the image above: it’s /Token. We need to pass it the username and password and also an additional piece of information: the grant type. We need the grant type to be password. The endpoint responds to form data and we make the call as shown below:
class LoginService { public async Task Login(string username, string password) { HttpWebRequest request = new HttpWebRequest(new Uri(String.Format("{0}Token", Constants.BaseAddress))); request.Method = "POST"; string postString = String.Format("username={0}&password={1}&grant_type=password", HttpUtility.HtmlEncode(username), HttpUtility.HtmlEncode(password)); byte[] bytes = Encoding.UTF8.GetBytes(postString); using (Stream requestStream = await request.GetRequestStreamAsync()) { requestStream.Write(bytes, 0, bytes.Length); } try { HttpWebResponse httpResponse = (HttpWebResponse)(await request.GetResponseAsync()); string json; using (Stream responseStream = httpResponse.GetResponseStream()) { json = new StreamReader(responseStream).ReadToEnd(); } TokenResponseModel tokenResponse = JsonConvert.DeserializeObject(json); return tokenResponse.AccessToken; } catch (Exception ex) { throw new SecurityException("Bad credentials", ex); } } } |
In response to a successful call on the Token endpoint the OAuth server will return us JSON data that includes the access token and some additional information, I’m deserializing it into a class called TokenResponseModel but the thing we’re really interested in is the access token. The full response is modelled like this:
class TokenResponseModel { [JsonProperty("access_token")] public string AccessToken { get; set; } [JsonProperty("token_type")] public string TokenType { get; set; } [JsonProperty("expires_in")] public int ExpiresIn { get; set; } [JsonProperty("userName")] public string Username { get; set; } [JsonProperty(".issued")] public string IssuedAt { get; set; } [JsonProperty(".expires")] public string ExpiresAt { get; set; } } |
Now we’ve got that access token we can use it against any future requests that require authentication and authorization – so finally we can return to our attempt to access the ValuesController. We need to supply the access token in a HTTP header called Authorization and the value for the header must have the format “Bearer {token}”, the space between Bearer and the token is significant – if you miss it authorization will fail. Here’s how we use the token to retrieve the list of values from the controller:
class ValuesService { public async Task<IEnumerable> GetValues(string accessToken) { HttpWebRequest request = new HttpWebRequest(new Uri(String.Format("{0}api/Values", Constants.BaseAddress))); request.Method = "GET"; request.Accept = "application/json"; request.Headers.Add("Authorization", String.Format("Bearer {0}", accessToken)); try { HttpWebResponse httpResponse = (HttpWebResponse)(await request.GetResponseAsync()); string json; using (Stream responseStream = httpResponse.GetResponseStream()) { json = new StreamReader(responseStream).ReadToEnd(); } List values = JsonConvert.DeserializeObject<List>(json); return values; } catch (Exception ex) { throw new SecurityException("Bad credentials", ex); } } } |
Obviously I’ve cut out a lot of error handling and have taken some short cuts to stay focussed on the topic but really it’s quite simple, just appallingly documented at the moment.
You can find the full code on GitHub.

Hey, I think your website might be having browser compatibility issues.
When I look at your website in Opera, it looks fine but
when opening in Internet Explorer, it has some overlapping.
I just wanted to give you a quick heads up! Other then that, awesome blog!
Thank you for putting together an example. How would you extend, so Xamarin.iOS can also login with Facebook, Twitter etc. I see how it can be done with Web Api 2 and a MVC 5 Website, but unsure how it will work with Xamarin.iOS.
Thanks for the feedback – funnily enough I’ve been working through this myself recently and hopefully will have a blog post explaining how you do this shortly.
Thank you for this. It really is not very documented. I just have one question, can you briefly describe the approach to take in case we’re using external authentication like with a google account? I imagine we’d be using the authorisation end point in this case instead of the token? Thanks
Hello, im getting both erros.
Constants doesn’t exist in actual context.
JsonConvert doesn’t exist in actual context.
done
(HttpWebRequest)WebRequest.Create(“/Token”);
and added using Newtonsoft.Json;
aync methods cannot return things per se. You need to await the result.
Hi,
Do you know how we can require the /Token endpoint to be SSL?
Thanks!
Hi,
Yes! When you configure the OAuthAuthorizationServerOptions in which you configure the /Token endpoint in Startup.Auth.cs has a property called AllowInsecureHttp which by default is set to true. Just set it to false.
Excelent post. I just built it into my project, but my Token’s never expire. I set it to 2 minutes and after that I can acces the resources with the token.
Do you know what can be the problem?
Hi,
I’ll have to investigate – I’ll take a look.
Surprising how recent the responses to this article are and noone acknowledges the fact that HttpWebRequest is an OBSOLETE class in .NET. Perhaps updating the code since this seems like a very promising solution to web api accounts. Assuming the code can be fixed. Thanks!
I’ll take a look.
@Jon
HttpWebRequest is NOT OBSOLELTE.
http://msdn.microsoft.com/en-GB/library/system.net.httpwebrequest(v=vs.110).aspx
Hey James,
Thanks, you have saved me lots of time with your clear example!
Can I ask what your thoughts are regarding storing the bearer token? What is the best way to go about saving it to prevent the user having to enter their login details every time the app is opened? Or should I be looking to allow them to save their pass word securely on the device?
New to all this!
Thanks!!
Hi Paul,
Thanks for the feedback, glad it was of use.
If you’re using iOS I would probably look to store the bearer token in the keychain, Apple have an overview guide to it.
It’s a bit of a gnarly API but there’s a handy wrapper for it (if you’re using Objective-C) called sskeychain.
If you’re using Xamarin they are an example project.
Hope that helps!
Very useful example, thanks for posting it. The Xamarin stuff was especially useful for me.
Trying to wrap my head around how this OAuth token works, (totally new to it) particularly how it is used subsequent to successful login. For instance, In your Get Values example, you call:
ValuesService service = new ValuesService();
GetValues signature is:
public async Task<IEnumerable> GetValues(string accessToken)
and GetValues receives accessToken. But how does it receive it since it’s not explicitly sent? Is it injected somehow?
Thanks,
Joel
Glad it’s useful.
You have to store the access token in your client and pass it up and down – storing it in a keychain is one option. When writing code in production I normally hide this implementation detail from the API and expose things over interfaces that are implemented on classes with a common implementation (inherited or injected) that retrieves the access token from local storage (e.g. key chain) and add it has a header.
Hope that helps.
Hello,
I have implemented a similar solution to yours on Xamarin.Android, however how do I access the current user in the Web API controller. The User property is null even after the user has successfully Authenticated. Where is the current user (Data) being stored in the Web API Controller?
Hi,
It’s not stored in the controller but is in the claims with the underlying data in storage (SQL or table depending on how you’ve configured things). Is your Web API protected by an Authorize attribute and are you passing the bearer token up and down using the right syntax (it has to be exactly right – that’s caught me out before).
I’d be happy to take a look at your implementation if you’ve got things on GitHub or some other accessible source system.
Hello!
Thanks for this post, it’s really useful!
However, I get an error on the token request (the register did work as expected):
{
error: “unsupported_grant_type”
}
I used your solution from github and a console application with your code.
Any idea?
Thanks
Nic
Got it 🙂
It looks like it doesn’t support the &.
Cheers,
Nic
Hi James,.. Great post…. Thanks..
I’m in the process of building a web api in visual studio 2013 and want to authenticate using OWIN middleware and bearer tokens. However I already have a database and don’t want to use Microsoft’s new Identity framework as the majority of tables and columns that it auto generates I simply don’t need.
Can you suggest me in the right direction of how to apply this type of authentication without having to use the Microsoft Identity framework?
Glad it was useful.
It does generate quite wide tables and I can understand why you’d prefer to use what you already have. However, if at all possible, I think I’d try and modify my database / live with the mess rather than build something custom. Personally I’m always reticent to roll my own security code – it requires a lot of diligence to get it right with small bugs leading to possible exploits.
There is a good article on the asp.net site as to how to migrate an existing database across:
http://www.asp.net/identity/overview/migrations/migrating-an-existing-website-from-sql-membership-to-aspnet-identity
However if that isn’t going to work for you one option might be to write a custom provider for the identity framework – as long as your database holds the minimum information required by the identity framework that could work quite nicely and leave the nasty business of managing the http side of things to the framework. This is how I implemented the table storage provider which might be a useful example. There is also guidance on doing this on the ASP.Net site:
http://www.asp.net/identity/overview/extensibility/overview-of-custom-storage-providers-for-aspnet-identity
I guess your final “nuclear option” would be to implement something custom into the OWIN pipeline – but I’d really try and avoid that.
I hope some of that is useful.
Hi,
I cloned your repo from github and I do not see the LoginService or TokenResponseModel anywhere in your code. Where are these located? I’m asking because I’m having some trouble adding in the Login method to my project. Thanks!
Hi, both the LoginService and TokenResponseModel are in the iOS project WebAPI2AuthenticationExample.iOS. TokenResponseModel is in the Model folder and LoginService is in the Services folder. Hopefully the links I’ve provided will help you locate the classes.
Thank you for the tutorial. I’m trying to figure out how if I created a web api to sit on our corporate network…the client iOS app needs to log in, be validated against our active directory and then proceed to make web api calls. The client iOS app of course isn’t on the same domain/network as the web api.
Just want to know how to do this. Is there an example out there somewher?
This isn’t something I’ve done myself I’m afraid – most of my AD work has been against Azure AD and using the Microsoft ADAL for JavaScript library.
The principal however should be largely the same: authenticate against the AD (inside the Web API) and return a token to your iOS app that you can then use with subsequent Web API calls.
I think you could combine this tutorial and this sample app (I’ve linked to the source file demonstrating how to login against AD) to end up with what you want.
Hope that helps, sorry for the delay in replying – busy month!
James