While working on a fun little F# side project over the Christmas break I had the need for a couple of resilience policies. I had a Google but couldn’t really find much in the space and what I was really looking for was an elegant way to use the battle hardened Polly with my F# code. It wasn’t critical so I parked it and moved on.
The itch kept, errr, itching and so I came back to it this last week looking to build an expressive F# feeling wrapper for Polly and the result of that is Pholly (hat tip to Scott Wlaschin for the name).
So far it includes support for the three reactive Polly policies: retry, circuit breaker and fallback and they can be used in both asynchronous and synchronous situations. The async makes use of tasks via the Ply task builder – this seemingly being the direction of travel and, as Isaac Abraham pointed out, with F# async we’d be wrapping one form of async computation with another.
The library is available on NuGet, GitHub, and documented in a Dotnet Interactive Notebook however as an example constructing and using a retry policy looks like this:
Future changes at this point include a more “word based” approach to policy composition as their are strong around current custom operators as used currently and addition of the pro-active policies.
Its an early version number on NuGet but I’m actively using it and I’ll bump it up to a 1.0.0 in fairly short order – any problems please let me know in a GitHub issue or on Twitter.
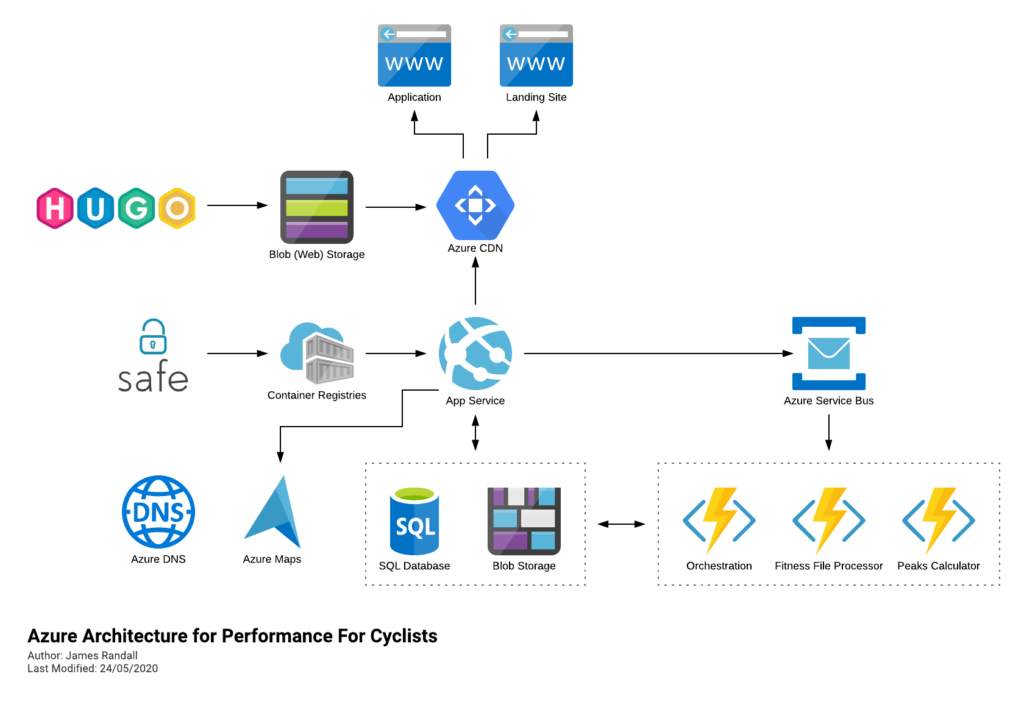
If you follow me on Twitter you might have seen that as a side project I run a cycling performance analytics website called Performance For Cyclists – this is currently running on Azure.
Its built in F# and deploys to Azure largely like this (its moved on a little since I drew this but not massively):
It runs fine but if you’ve been following me recently you’ll know I’ve been looking at AWS and am becoming somewhat concerned that Microsoft are falling behind in a couple of key areas:
Support for .NET – AWS seem to always be a step ahead in terms of .NET running in serverless environments with official support for the latest runtimes rolling out quickly and the ability to deploy custom runtimes if you need. Cold starts are much better and they have the capability to run an ASP.Net Core application serverlessly with much less fuss.
I can also, already, run .NET on ARM on AWS which leads me to my second point (its almost as if I planned this)…
Lower compute costs – my recent tests demonstrated that I could achieve a 20% to 40% saving depending on the workload by making use of ARM on AWS. It seems clear that AWS are going to broaden out ARM yet further and I can imagine them using that to put some distance between Azure and AWS pricing.
I’ve poked around this as best I can with the channels available to me but can’t get any engagement so my current assumption is Microsoft aren’t listening (to me or more broadly), know but have no response, or know but aren’t yet ready to reveal a response.
(just want to be clear about something – I don’t have an intrinsic interest in ARM, its the outcomes and any coupled economic opportunities that I am interested in)
I’m also just plain and simpe curious. I’ve dabbled with AWS, mostly when clients were using it when I freelanced, but never really gone at it with anything of significant size.
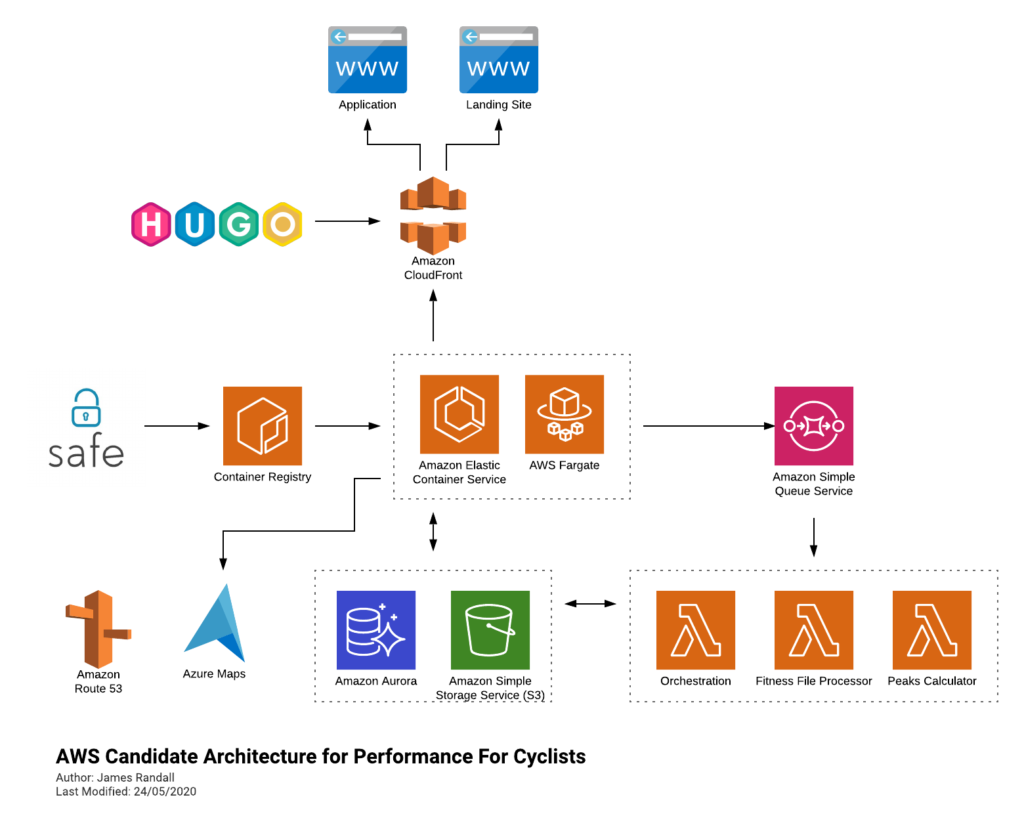
I’m going to have to figure my way through things a bit, and doubtless iterate, but at the moment I’m figuring its going to end up looking something like this:
Leaving Azure Maps their isn’t a mistake – I’m not sure what service on AWS offers the functionality I need, happy to here suggestions on Twitter!
I may go through this process and decide I’m going to stick with Azure but worst case is that I learn something! Either way I’ll blog about what I learn. I’ve already got the API up and running in ECS backed by Fargate and being built and deployed through GitHub Actions and so I’ll write about that in my next post.
If you want to follow along with this series of posts the source code and be found here, the published game here and the source for this specific post here.
If you read my blog or follow me on Twitter you’ll know I’ve really fallen in love with F# this last year and am using the SAFE stack to build out my cycling performance application. A big part of that toolkit is Fable – the F# to JavaScript transpiler that also comes with some great bindings and tools for building single page applications.
A few people have asked me how to get started with Fable, why I think F# is so well suited for this kind of work, and how to make the transition from C# and so I thought I’d build out a simple game using Fable and talk about it in a series of posts / videos.
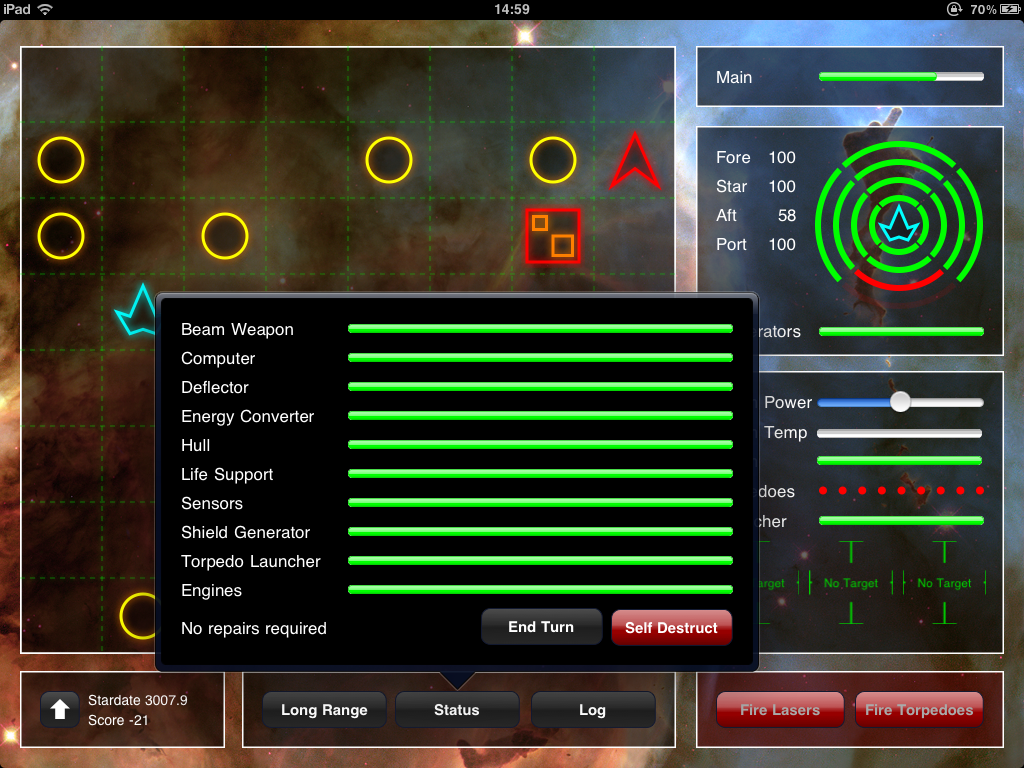
Now before anyone gets too excited this isn’t going to be the next Halo! Instead I’m going to rework my iOS version of the classic Star Trek game (PaddTrek) into Fable – now called FableTrek!
PaddTrek – an early iPad game
Its not going to be flashy but hopefully strikes the right balance between complex enough to show real problems and solutions and simple enough to understand. I don’t have a grand up-front plan for building out this game and I’m creating each part as I go – lets just hope it doesn’t turn out like the new Star Wars trilogy!
I’ll also add that I still class myself as a relative beginner with F# but I do manage to get stuff done.
With all that out of the way – lets take a look at the first code drop.
Exploring the code
To get started I used this bare bones starting point for a simple Fable app with webpack and debug support for Visual Studio Code (hat tip to Isaac Abraham who created this for me to help me out a little while back).
One of the first things to wrap your head round with Fable is that it lives in both .NET and JavaScript worlds. And so in the root folder you’ll find a package.json and a webpack.config.js and in the src folder a F# project file – App.fsproj.
When adding dependencies you’ll often find yourself adding both a NuGet package and an npm package. I’m using the dotnet command line tools to manage the former and yarn for the latter.
The Fable compiler itself is generally invoked through webpack using the fable-loader plugin. I’ve got a fairly simple webpack file – I’ve added support for Stylus and a little work to output a production build to a deploy folder.
App.fs and Index.html – entry point
Starting up a React app in F# is not much different to doing the same with JavaScript or TypeScript. First you need a HTML file:
We’re going to create the React app inside the trek-app div block. You might notice their is no <script> tag – so how does any code get invoked? I’ve set up webpack to inject the <script> tag during the build process using the HtmlWebpackPlugin plugin – this way we can handle unique script filenames that include a hash component.
The code entry point for our app is App.fs in the source folder. At the top of the file first we import some dependencies:
open Elmish
open Fable.React
open App.Types
open App.State
open Fable.Core.JsInterop

importSideEffects "./game.styl"
The interesting line here is the final one where we import game.styl. This is our Stylus CSS file. Importing it like this will ensure webpack will compile it to CSS and include it in our final bundle – to do this I’ve used the stylus-loader package for webpack.
If we skip to the end of the file we can see a block of code that starts up a Fable Elmish based React app:
We’re passing in a whole load of stuff to this startup block – init, update, root, pageParser and urlUpdate are the basic building blocks of our Elmish app. And so I guess its time I answered the question: what is Elmish?
Elmish…
… is a set of abstractions that allow us to implement the Model View Update pattern in F# based on Elm. Essentially its a pattern where a user interface (a view) is created from immutable state and from which messages are passed back to our program to update the state (via a transformation – its immutable) and regenerate the view. To make this work their are a number of concepts which I’ve started to flesh out in our game.
Thomas Bandt has written a blog post around a simple counter example that introduces the same concepts that is worth reading before continuing. I’m going to go through the same concepts but using the game we’re creating which is a little more complex as we have more data to model and in our game I’m subdividing the system into smaller sub-applications.
Model
The model contains our application state and the best way to express this in F# is using a record. You can see our applications top level model in our App.Types.fs file:
type Model =
  {
    CurrentPage: Router.Page
    StartScreen: Interface.StartScreen.Types.Model option
  }
  static member Empty =
    { CurrentPage = StartScreenPage
      StartScreen = Some Interface.StartScreen.Types.Model.Empty
    }
Our root model keeps track of the current page we’re looking at (based on a URL – we’ll look at the router later) and the state for our sub-applications of which we currently only have one – the start screen. These are optional pieces of state that we create as required as the URL changes. I’ve added a static member that returns an empty model that we can use when we need to initiate a default model.
Being records the state is immutable and we’ll look at how we manage updates to this a little later.
The StartScreen model is currently just a placeholder which we’ll flesh out in later parts.
Messages
Messages are what we use to glue our system together. They’re typically sent by the user interacting with our views through a dispatcher and are handled by update functions that we’ll look at in a moment. Each of our sub-applications will have its own set of messages only visible within its own scope – this makes for a great way to isolate the moving parts of a system and is particularly useful in large systems like my cycling analytic website. It means I can change one sub-application without worrying about breaking others.
When we flesh out our start screen this message will be dispatched when the user clicks a new game button.
Discriminated unions are almost tailor made for messages. If you come from a C# background you might think they look like an enumerated type but they are much more! For one thing they can be associated with payloads and we already have an example of this – we use a top level set of messages that themselves encapsulate our sub-application messages to enable our program to route messages to the correct sub-application. You can see an example of this in App.Types.fs:
type Msg =
  | GameScreenDispatcherMsg
  | StartScreenDispatcherMsg of Interface.StartScreen.Types.StartScreenMsg
Updates
Update functions are how we respond to messages and update our state however they never modify state. Instead given the current state and a message they return new state and a command (often another message).
We don’t yet have a simple example of this but we do have an example of an update function coordinating between our sub-applications which you can find in App.State.fs:
let update msg model =
  match (msg, model) with
  | (StartScreenDispatcherMsg subMsg, { StartScreen = Some extractedModel }) ->
    let (subModel, subCmd) = Interface.StartScreen.State.update subMsg extractedModel
    { model with StartScreen = Some subModel}, Cmd.map StartScreenDispatcherMsg subCmd
  | _ ->
    console.error("Missing match in App.State")
    model, Cmd.none
If you’re not familiar with F# you might currently be asking what is this crazy wizardry. I’ll try and break it down! F# has great support for pattern matching – we begin a match set using the match with construct. In our case we’re saying match the msg and model together (what we’re actually doing is creating a tuple out of the message and the model).
Each pattern for consideration, they are evaluated in order, is started with the pipe | operator and in our case we have two possible matches.
Our first pattern match we look for a message of type StartScreenDispatcherMsg and a model that has the StartScreen attribute set to Some. While matching we can also extract values – in our case we’re extracting the sub message for the start screen and the model we have assigned to StartScreen. If we find these things then we pass them on to to our sub-applications updater – it also returns a model and a command. Finally we return a model with the new submodel returned by our child updater and whatever command it returned.
Our second match (the one that reads | _) is our fall through match. This will match anything and simply return the model and the command but pop an error into our browsers console. I’ve got no implementation at all yet for the GameScreenDispatcherMsg.
Routing
I briefly mentioned routing earlier when we looked at models – routing being the process of displaying the correct content within a SPA for a given URL. Elmish comes with some support for routing which I’ve used to build the router here which you can find in Router.fs. Firstly we use a disciminated union to define our routes:
type Page =
  | StartScreenPage
  | GameScreenPage
If we had sub-routes we could use the payload of a discriminated union to nest them but we don’t (at least not yet) so for now that’s it. Next we need a way to turn out union members into URL paths:
let private toHash page =
  match page with
  | StartScreenPage -> "#/"
  | GameScreenPage -> "#/game"
Here I’m using hash based paths but you can also use full paths. Finally we need a parser – a function that can extract values from routes and return a correctly structured Page discriminated union. We don’t have any parameters for the routes yet so this is quite simple:
let pageParser =
  oneOf [
    map GameScreenPage (s "game")
    map StartScreenPage top
  ]
Finally when a URL changes we need a way of updating the current page and state in our model. In App.State.fs we have a urlUpdate function:
let urlUpdate (result: Option<Router.Page>) model =
  match result with
  | None ->
    console.error("Error parsing url: " + window.location.href)
    model, Router.modifyUrl model.CurrentPage
  | Some page ->
    let model = { model with CurrentPage = page}
    match page with
    | StartScreenPage ->
      let (subModel, subCmd) = Interface.StartScreen.State.init ()
      { model with StartScreen = Some subModel }, Cmd.map StartScreenDispatcherMsg subCmd
    | _ -> model, Cmd.none
This is very similar in form to a regular update function except rather than take a message in takes our page discriminated union. Like the regular update it returns an updated model and command.
Views
Ok. With all that plumbing in place we need a way of transforming our state into user interface and we do that with views. Our root view can be found in App.fs:
let root model dispatch =
  div [Class "container"] [
    match model with
    | { CurrentPage = Router.Page.StartScreenPage ; StartScreen = Some extractedModel } ->
      Interface.StartScreen.View.root model dispatch
    | _ -> div [] [str "not found"]
  ]
Like much of our code so far this is somewhat infrastructural – it looks at our model, determines the current sub-application based on the route, and delegates its handling down to that (which you can find in Interface/StartScreen/View.fs):
let root model dispatch =
  div [Class "startScreen"] [
    div [Class "title"] [str "< work in progress >"]
  ]
If you come from a typical React background you’re probably used to using JSX – a DSL that is extremely similar to HTML. In F# we use a DSL that is, well, F#. Its still very similar in use but being F# is typesafe and because its F# you don’t have those slightly awkward breaks between JSX and JavaScript. We’ll see later on how easy it is to use with FP techniques to create complex interfaces cleanly.
Styling with Stylus
I’m building the CSS by hand for this project and to help me do that I’m using a preprocessor called Stylus. I like it because it removes a lot of the noise and clutter from a CSS file. You can find the, fairly limited, amounts of CSS in our game.styl file.
For the time being I’m referring to class names by strings but I may do something about this as we progress 🙂
Putting it all together
If we wind back to where we started and look at the block of code at the bottom of App.fs:
You can see how all these bits we’ve looked at are brought together in the first two lines of this to create our Elmish program that can now parse URLs, update models, and translate models into views.
Deploying to Azure Static Web Hosting with GitHub Actions
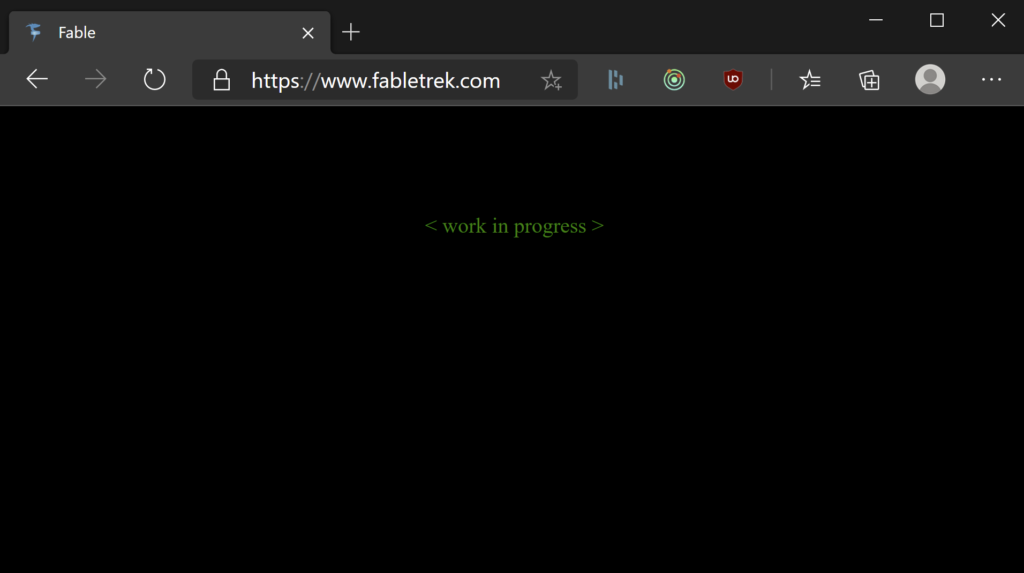
Right back at the start of this piece I shared a link to the game running live on the web – you can find it at https://www.fabletrek.com. Its not all that exciting at the moment:
But it is running – and its deploying automatically and directly of the GitHub repository using GitHub Actions and Azure Static Web Apps. This solution doesn’t come with automatic support for Fable but its pretty straightforward to add.
Start by creating the Azure Static Web App itself in Azure following these instructions. For the app artifact directory enter deploy but otherwise follow those instructions.
This will create a GitHub Action for you in the repository but if you run it you’ll get an error stating that the job they provide doesn’t know how to build out code. Their is support for using a custom build command (and we build our solution with the command yarn webpack) but I found using that gives an error with locating and running dotnet from within the Fable compiler webpack loader.
Instead what we need to do is move the build outside of their job so all we need to then do is pick up the contents of our deploy folder. To do that we add these steps:
This makes sure the correct version of .NET Core is installed, restores our NuGet and NPM packages, and then finally builds the solution.
We then need to modify the provided Azure Static Web App job to prevent it from trying to build the solution again. Their is no way to disable the build process but what you can do is supply it with a harmless build command – rather than build anything I simply run yarn –version:
         with:
          azure_static_web_apps_api_token: ${{ secrets.AZURE_STATIC_WEB_APPS_API_TOKEN_UNIQUE_FOR_YOU }}
          repo_token: ${{ secrets.GITHUB_TOKEN }} # Used for Github integrations (i.e. PR comments)
          action: "upload"
          ###### Repository/Build Configurations - These values can be configured to match you app requirements. ######
          # For more information regarding Static Web App workflow configurations, please visit: https://aka.ms/swaworkflowconfig
          app_location: "/" # App source code path
          api_location: "api" # Api source code path - optional
          app_artifact_location: "deploy" # Built app content directory - optional
          # we need a separate build step as the fable-compiler fails when run under the context of the static site builder
          # and their is no disable build property that I am aware of so we run a harmless command
          app_build_command: "yarn --version"
          ###### End of Repository/Build Configurations ######
With those changes made every time you commit code to your branch it will be built and deployed. You can find the complete action here. I then added a custom domain which gives you a free SSL cert too.
Next Steps
That’s the setup part done really – if you’re new to Fable, F# and Elmish then this I think is the more complex bit. In the next stage we’ll build out a start screen and get to the point where we can start a new game.
Farmer is a DSL for generating and executing ARM templates and one of the great things about it is that its based on .NET Core. That means that you can use it in combination with other components from the .NET ecosystem to create end to end typesafe deployment solutions.
As an aside – I recently posted a critique of Microsofts new DSL Bicep. One of the things I didn’t mention in that but did in a series of tweets was the shortcomings of inventing a new language that lives in its own ecosystem.
Ultimately Bicep will need to support “extension points” or you’ll have to wrap them in script and communicate information across boundaries (of course their can be benefits to that approach too). Not to mention they need to write all the tooling from scratch and developers / administrators need to learn another language.
By taking the approach Farmer has handling boundaries is a lot cleaner – as we’ll see – and we can take advantage of some neat language features.
In this example I’m going to provision an Azure SQL Database into Azure and then upgrade its schema using DbUp and we’ll run all this through GitHub Actions giving us an automated end to end deployment / upgrade system for our SQL database. You could do this with less F# code (almost none) but I also want to try and illustrate how this approach can form a nice framework for more complicated deployment scenarios so we’re also going to look at error handling across a deployment pipeline.
Starting with a F# console app, adding the Farmer NuGet package, and the boilerplate Program.fs file first we need to declare our Azure resources – in this case a SQL Server and a database and then bring them together in an ARM template:
let demoDatabase = sqlServer {
    name serverName
    admin_username "demoAdmin"
    enable_azure_firewall

    add_databases [
        sqlDb { name databaseName ; sku DbSku.Basic }
    ]
}

let template = arm {
    location Location.UKWest
    add_resource demoDatabase
    output "connection-string" (demoDatabase.ConnectionString databaseName)
}
Pretty straightforward but a couple of things worth noting:
Both serverName and databaseName are simple constants (e.g. let databaseName = “myDatabaseName”) that I’ve created as I’m going to use them a couple of times.
Opening up the database to azure services (enable_azure_firewall) will allow the GitHub Actions Runner to access the database.
On the final line of our arm block we output the connection string for the database so we can use it later.
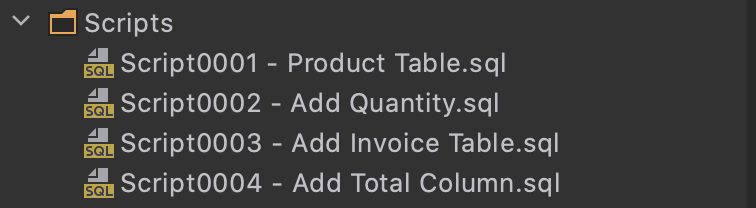
That’s our Azure resources but how do we apply our SQL scripts to generate our schema? First we’ll need to add the dbup-sqlserver NuGet package and with that in place we’ll first add a Scripts folder to our solution and in my example four scripts:
DbUp keeps track of the last script it ran and applies subsequent scripts – essentially its a forward only ladder of migrations. If you’re adding scripts of your own make sure you mark them as Embedded Resource otherwise DbUp won’t find them. To apply the scripts we simply need some fairly standard DbUp code like that shown below, I’ve placed this in a F# module called DbUpgrade so, as we’ll see in a minute, we can pipe to it quite elegantly:
let tryExecute =
  Result.bind (fun (outputs:Map<string,string>) ->
    try
      let connectionString = outputs.["connection-string"]
      let result =
        DeployChanges
          .To
          .SqlDatabase(connectionString)
          .WithScriptsEmbeddedInAssembly(Assembly.GetExecutingAssembly())
          .LogToConsole()
          .Build()
          .PerformUpgrade()
      match result.Successful with
      | true -> Ok outputs
      | false -> Error (sprintf "%s: %s" (result.Error.GetType().Name.ToUpper()) result.Error.Message)
    with _ -> Error "Unexpected error occurred upgrading database"
  )
If you’re not familiar with F# you might wonder what this Result.bind function is. F# has a wrapper type for handling success and error states called options and a bunch of helper functions for their use. One of the neat things about it is it lets you chain lots of functions together with an elegant pattern for handling failure – this is often referred to as Railway Oriented Programming.
We’ve now declared our Azure resources and we’ve got a process for deploying our upgrade scripts and we need to bring it all together and actually execute all this. First lets create our deployment pipeline that first provisions the resources and then upgrades the database:
let deploymentPipeline =
  Deploy.tryExecute "demoResourceGroup" [ adminPasswordParameter ]
  >> DbUpgrade.tryExecute
If we had additional tasks to run in our pipeline we’d join them together with the >> operator as I’ve done here.
To run the deployment we need to provide an admin passford for SQL server which you can see in this code snippet as sqlServerPasswordParameter and we need to do this securely – so it can’t sit in the source code. Instead as I’m going to be running this from GitHub Actions an obvious place is the Secrets area of GitHub and an easy way to make that available to our deployment console app is through an environment variable in the appropriate action (which we’ll look at later). We can then access this and format it for use with Farmber by adding this line:
let adminPasswordParameter =
  Environment.GetEnvironmentVariable("ADMIN_PASSWORD") |> createSqlServerPasswordParameter serverName
Farmer uses a convention approach to a parameter name – I’ve built a little helper function createSqlServerPassword to form that up.
(We could take a number of different approaches to this – ARM parameters for example – I’ve just picked a simple mechanism for this demo)
Finally to invoke all this we add this line at the bottom of our file:
template |> deploymentPipeline |> asGitHubAction
asGitHubAction is another little helper I’ve created that simply returns a 0 on success or prints a message to the console and returns a 1 in the event of an error. This will cause the GitHub Action to fail as we want.
That’s the code side of things done. Our finished Program.cs looks like this:
open System
open Farmer
open Farmer.Builders
open Sql
open Constants
open Helpers

[<EntryPoint>]
let main _ =
  let adminPasswordParameter =
    Environment.GetEnvironmentVariable("ADMIN_PASSWORD") |> createSqlServerPasswordParameter serverName

  let demoDatabase = sqlServer {
    name serverName
    admin_username "demoAdmin"
    enable_azure_firewall

    add_databases [
      sqlDb { name databaseName ; sku DbSku.Basic }
    ]
  }

  let template = arm {
    location Location.UKWest
    add_resource demoDatabase
    output "connection-string" (demoDatabase.ConnectionString databaseName)
  }

  let deploymentPipeline =
    Deploy.tryExecute "demoResourceGroup" [ adminPasswordParameter ]
    >> DbUpgrade.tryExecute

  template |> deploymentPipeline |> asGitHubAction
All we need to do now is wrap it up in a GitHub Action. I’ve based this action on the stock .NET Core build one – lets take a look at it:
If you’re familiar with GitHub Actions most of this should be fairly self explanatory – there’s nothing special about our deployment code, its a standard .NET Core console app so we begin by building it as we would any other (again this is one of the things I like about Farmer – its just .NET, and if you’re using .NET there’s nothing else required). However after building it we do a couple of things:
To do the deployment Farmer will use the Azure CLI and so we need to login to Azure via that. We do that in the Login via Az module step which is pretty stock and documented on GitHub here. I’ve stored the secret for the service principal in the secrets area of GitHub.
In the final step we run our deployment – again its just a standard console app. You an see in this step the use of the env section – we take a secret we’ve called ADMIN_PASSWORD and set it as an environment variable making it available to our console app.
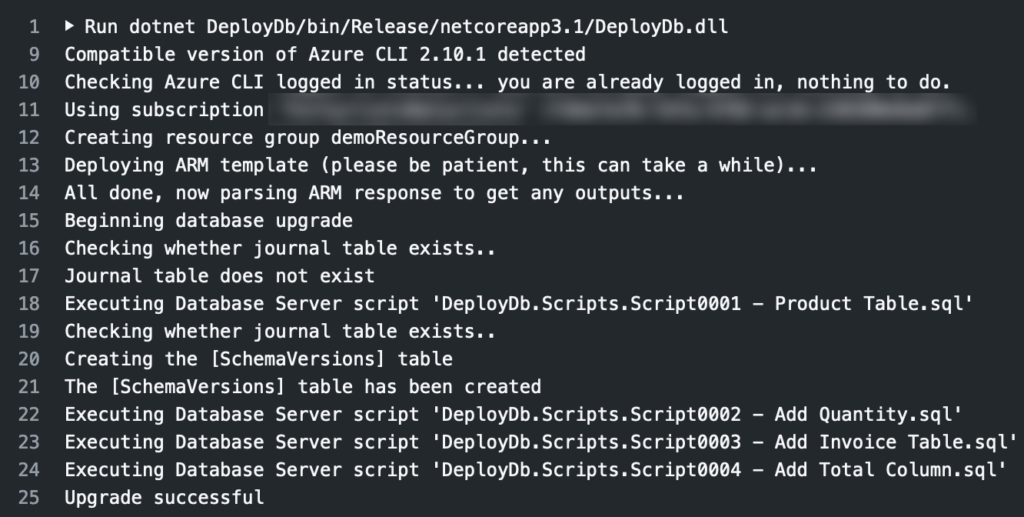
And that’s it! At this point you’ve got an automated solution that will make sure your Azure SQL database infrastructure and its schema are managed get up to date. Change the configuration of your SQL database and/or add a SQL script and this will kick off and apply the changes for you. If / when you run it for the first time you should see output like this from the build section of the Action:
I think its a simple, but powerful, example of infrastructure as code and the benefits of using an existing language and ecosystem for creating DSLs – you get so much for free by doing so. And if the rest of your codebase is in .NET then with Farmer you can share code, whether that be simple constants and names or implementation, easily across your deployment and runtime environments. Thats a big win. I’m slowly adding it into my Performance for Cyclists project and this approach here is largely lifted from their.
Finally I think its worth emphasising – you don’t need to really know F# to use Farmer and you certainly don’t need to be using it elsewhere in your solution. Its a pretty simple DSL build on top of F# and a fantastic example of how good F# is as a basis for DSLs. I’ve dug a little deeper into the language here to integrate another .NET tool but if all you want to do is generate ARM templates then, as you can see from the Farmer examples on its website, you really don’t need to get into the F# side (though I do encourage you to!).
There are an awful lot of services available on Azure but I’ve noticed a pattern emerging in a lot of my work around web apps. At their core they often have a similar architecture, deployment in Azure, and process for build and release.
For context a lot my hands on work over the last 3 years has been as a freelancer developing custom systems for people or on my own side projects (most recently https://www.forcyclistsbycyclists.com). In these situations I’ve found productivity to be super important in a few key ways:
There’s a lot to get done, one or two people, and not much time – so being able to crank out a lot of work quickly and to a good level of quality is key.
Adaptability – if its an externally focused green field system there’s a reasonable chance that there’s a degree of uncertainty over what the right feature set is. I generally expect to have to iterate a few times.
I can’t be wasting time repeating myself or undertaking lengthy manual tasks.
Due to this I generally avoid over complicating my early stage deployment with too much separation – but I *do* make sure I understand where my boundaries and apply principles that support the later distribution of a system in the code.
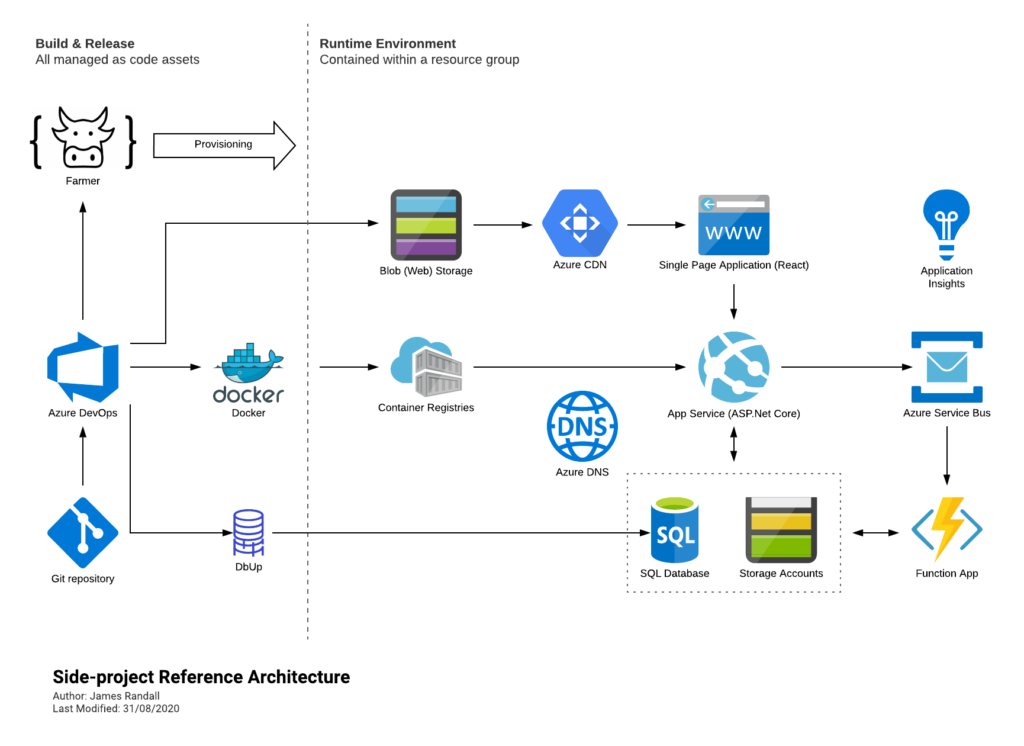
With that out the way… here’s an architecture I’ve used as a good starting point several times now. And while it continues to evolve and I will vary specific decisions based on need its served me well and so I thought I’d share it here.
I realise there are some elements on here that are not “the latest and greatest” however its rarely productive to be on the bleeding edge. It seems likely, for example, that I’ll adopt the Azure SPA support at some point – but there’s not much in it for me doing that now. Similarly I can imagine giving GitHub Actions ago at some point – but what do I really gain by throwing what I know away today. From the experiments I’ve run I gain no productivity. Judging this stuff is something of a fine line but at the risk of banging this drum too hard: far too many people adopt technology because they see it being pushed and talked about on Twitter or dev.to (etc.) by the vendor, by their DevRel folk and by their community (e.g. MVPs) and by those who have jumped early and are quite possibly (likely!) suffering from a bizarre mix of Stockholm Syndrome and sunk cost fallacy “honestly the grass is so much greener over here… I’m so happy I crawled through the barbed wire”.
Rant over. If you’ve got any questions, want to tell me I’m crazy or question my parentage: catch me over on Twitter.
Architecture
Build & Release
I’ve long been a fan of automating at least all the high value parts of build & release. If you’re able to get it up and running quickly it rapidly pays for itself over the lifetime of a project. And one of the benefits of not CV chasing the latest tech is that most of this stuff is movable from project to project. Once you’ve set up a pipeline for a given set of assets and components its pretty easy to use on your next project. Introduce lots of new components… yeah you’ll have lots of figuring out to do. Consistency is underrated in our industry.
So what do I use and why?
Git repository – I was actually an early adopter of Git. Mostly because I was taking my personal laptop into a disconnected environment on a regular basis when it first started to emege and I’m a frequent committer.
In this architecture it holds all the assets required to build & deploy my system other than secrets.
Azure DevOps – I use the pipelines to co-ordinate build & release activities both directly using built in tasks, third party tasks and scripts. Why? At the time I started it was free and “good enough”. I’ve slowly moved over to the YAML pipelines. Slowly.
My builds will output four main assets: an ARM template, Docker container, a built single page application, and SQL migration scripts. These get deployed into a an Azure resource group, Azure container registry, blob storage, and a SQL database respectively.
My migration scripts are applied against a SQL database using DbUp and my ARM templates are generated using Farmer and then used to provision a resource group. I’m fairly new to Farmer but so far its been fantastic – previously I was using Terraform but Farmer just fit a little nicer with my workflow and I like to support the F# community.
Runtime Environment
So what do I actually use to run and host my code?
App Service – I’ve nearly always got an API to host and though I will sometimes use Azure Functions for this I more often use the Web App for Containers support.
Originally I deployed directly into a “plain” App Service but grew really tired with the ongoing “now this is really how you deploy without locked files” fiasco and the final straw was the bungled .NET Core release.
Its just easier and more reliable to deploy a container.
Azure DNS – what it says on the tin! Unless there is a good reason to run it elsewhere I prefer to keep things together, keeps things simple.
Azure CDN – gets you a free SSL cert for your single page app, is fairly inexpensive, and helps with load times.
SQL Database – still, I think, the most flexible general purpose and productive data solution. Sure at scale others might be better. Sure sometimes less structured data is better suited to less structured data sources. But when you’re trying to get stuff done there’s a lot to be said for having an atomic, transactional data store. And if I had a tenner for every distributed / none transactional design I’ve seen that dealt only with the happy path I would be a very very wealthy man.
Oh and “schema-less”. In most cases the question is is the schema explicit or implicit. If its implicit… again a lot of what I’ve seen doesn’t account for much beyodn the happy path.
SQL might not be cool, and maybe I’m boring (but I’ll take boring and gets shit done), but it goes a long way in a simple to reason about manner.
Storage accounts – in many systems you come across small bits of data that are handy to dump into, say, a blob store (poor mans NoSQL right there!) or table store. I generally find myself using it at some point.
Service Bus – the unsung hero of Azure in my opinion. Its reliable. Does what it says on the tin and is easy to work with. Most applications have some background activity, chatter or async events to deal with and service bus is a great way of handling this. I sometimes pair this (and Azure Functions below) with SignalR.
Azure Functions – great for processing the Service Bus, running code on a schedule and generally providing glue for your system. Again I often find myself with at least a handful of these. I often also use Service Bus queues with Functions to provide a “poor mans admin console”. Basically allow me to kick off administrative events by dropping a message on a queue.
Application Insights – easy way of gathering together logs, metrics, telemetry etc. If something does go wrong or your system is doing something strange the query console is a good way of exploring what the root cause might be.
Code
I’m not going to spend too long talking about how I write the system itself (plenty of that on this blog already). In generally I try and keep things loosely coupled and normally start with a modular monolith – easy to reason about, well supported by tooling, minimal complexity but can grow into something more complex when and if that’s needed.
My current tools of choice is end to end F# with Fable and Saturn / Giraffe on top of ASP.Net Core and Fable Remoting on top of all that. I hopped onto functional programming as:
It seemed a better fit for building web applications and APIs.
I’d grown tired with all the C# ceremony.
Collectively we seem to have decided that traditional OO is not that useful – yet we’re working in languages built for that way of working. And I felt I was holding myself back / being held back.
But if you’re looking to be productive – use what you know.
I’m still at that point in my F# journey where from time to time I have to pause and think about something that is no doubt second nature and reflexive to more experienced developers.
This morning I wanted to fold with an index and typed something like this:
myCollection |> Seq.foldi (fun i acc val -> sprintf "%s.%d.%s" acc i val) ""
To my surprise there was no foldi function.
I thought for a while then realised there didn’t need to be one and I could simply use a tuple:
The thing I like about F# as a language, in contrast to the current functional state of C#, is the way it seems thought through: all its parts interlock and play off each other. Its not “one thing” that makes F# great – its all the bits together.
If you read my last post you’ll know I’ve been doing some work in the SAFE stack recently with F# – inevitably this eventually required me to tackle authentication and authorization. I’m using an Open ID Connect identity provider (Auth0 in my case) to externalise all that complexity but I still needed to hook this up.
My application architecture is based around using Fable Remoting (on top of Saturn and Giraffe) to abstract away HTTP and simplify my development experience (this is very much a spare time project and so time is at a premium and productivity trumps all else) and while there is a lot of documentation on the various parts I noticed a few things:
A lot of my reading boiled down to a manual check inside my API implementations, problem with is at some point I’m going to forget and it makes for messy code. I don’t really want my business logic to be polluted with token validation and claims extraction.
I struggled to find anything that really covered an end to end approach to authentication and authorization with access tokens and being fairly new to Saturn, Giraffe and Fable Remoting their was a lot of concepts to cover and unpick.
That being the case I thought I’d write about the approach I eventually took here. Note this isn’t a guide to OAuth / Open ID Connect and the rest of this post assumes a basic knowledge of token based authentication schemes.
Its basically the out the box SAFE implementation. I wanted to leverage the existing Saturn / Giraffe / ASP .NET Core framework for actually validating tokens – that’s a robust and well tested infrastructure and it seems somewhat foolish to not leverage it. That means I didn’t a way to add the configuration for the ASP .NET Core authentication packages based on the Auth0 guidance.
You can do this by extending the Saturn DSL which is basically a wrapper over the familiar ASP .NET Core authentication packages. I added a keyword use_token_authentication which you can see below:
type Saturn.Application.ApplicationBuilder with
  [<CustomOperation("use_token_authentication")>]
  member __.UseTokenAuthentication(state: ApplicationState) =
    let middleware (app: IApplicationBuilder) =
      app.UseAuthentication()

    let service (s : IServiceCollection) =
      s.AddAuthentication(fun options ->
        options.DefaultAuthenticateScheme <- JwtBearerDefaults.AuthenticationScheme
        options.DefaultChallengeScheme <- JwtBearerDefaults.AuthenticationScheme
      ).AddJwtBearer(fun options ->
        options.Authority <- sprintf "https://%s/" domain
        options.Audience <- audience
        options.TokenValidationParameters <- TokenValidationParameters(
          NameClaimType = ClaimTypes.NameIdentifier
        )
      ) |> ignore
      s

    { state with ServicesConfig = service::state.ServicesConfig ; AppConfigs = middleware::state.AppConfigs ; CookiesAlreadyAdded = true }
You’ll need to ensure you have the NuGet packages Microsoft.IdentityModel.Protocols.OpenIdConnect and Microsoft.Extensions.DependencyInjection.Abstractions included in your project for the above.
With that in place I can make use of this in my application builder:
Like many APIs mine is a mix of endpoints requiring authentication and a few endpoints that don’t. For example I have an authentication endpoint for handling token exchange in the authentication code flow. I also have enough endpoints that I wanted to separate them out into multiple sub-domains for a cleaner “not one giant file” implementation and so I’m using Fable Remotings multiple protocol support to compose my APIs as shown below:
let buildApi () =
  Remoting.createApi()
  |> Remoting.withRouteBuilder Route.builder
  |> Remoting.withErrorHandler errorHandler

let lookupApi =
  buildApi ()
  |> Remoting.fromValue LookupApi.implementation
  |> Remoting.buildHttpHandler

let businessLogicApi =
  buildApi ()
  |> Remoting.fromValue BusinessLogicApi.implementation)
  |> Remoting.buildHttpHandler

let completeApi = choose [
    authenticationApi
    businessLogicApi
]
In this example its the business logic API that I want to require authentication and make use of a user ID extracted from a claim (the subject claim), and in fact nearly all my authenticated APIs have the same requirements.
Many examples I’ve seen pass the token as a parameter, for example:
type IBusinessLogicApi =
  { getAll: AccessToken -> Async<Invoice list>
  }
I dislike this for the reasons mentioned earlier – I can’t leverage the well tested ASP. NET Core framework and although it makes the fact that the function requires an access token clear it means I also have to remember to code the handling of the access token. We could use function injection and currying to help but these are still things we could easily miss. Whereas if authentication is baked into our HTTP handling chain we can’t make these mistakes.
My solution to this was to use Fable Remotings ability to create an API implementation based on the HTTP context using a factory approach combined with Saturn’s “pipeline” support.
Firstly I defined my API interface without the access token:
type IBusinessLogicApi =
  { getAll: unit -> Async<Invoice list>
  }
Next I provided an implementation for this via a function that accepts a user ID as a parameter and therefore makes it available to the contained implementation:
let implementation (userId) = {
  getAll = fun () -> async {
    Database.getInvoices userId
  }
}
And now I need a HTTP request context aware factory for this implementation that is able to pull the user ID from the subject claim:
let createAuthorized (authorizedImplementation : string -> 'apiinterface) (context:HttpContext) =
  let claim = context.User.FindFirst(ClaimTypes.NameIdentifier)
  claim.Value |> authorizedImplementation
With our authentication handled by ASP .NET then after successful token validation the builder will be called and the HttpContext will contain a claims principal.
With all this in place I can modify my API to be constructed using this factory rather than from a value:
And we’re done on the server. With these components the routes we want protected are protected and our implementations can stay clear of protocol related concerns.
Client
If we’re not passing the token as a parameter then how do we pass it as a header? Fortunately Fable Remoting has built in support for this and a naive implementation would look as follows:
let authorizationToken = "Bearer abcdefg"

let businessLogicApi : IBusinessLogicApi =
    Remoting.createApi()
    |> Remoting.withAuthorizationHeader authorizationToken
    |> Remoting.buildProxy<IBusinessLogicApi>
The problem with this is that your token is highly unlikely to be a constant! Fortunately we can again use a higher order function to provide a dynamic token as illustrated in the Fable documentation:
let createBusinessLogicApi () =
  Remoting.createApi()
  |> Remoting.withAuthorizationHeader (tokenProvider.Token ())
  |> Remoting.withRouteBuilder Shared.Route.builder
  |> Remoting.buildProxy<IBusinessLogicApi>

let businessLogicApi (f: IBusinessLogicApi -> Async<'t>) : Async<'t> =
  async {
    // can do a token refresh here if required
    return! f (createBusinessLogicApi ())
  }
This necessitates a minor change in how we now call our APIs as per the example below:
let! response = businessLogicApi(fun f -> f.getAll ())
Again this now leaves the majority of our application code free from worrying about access tokens.
Wrapping Up
Hopefully the approach presented above is helpful. If you’re familiar with Giraffe, Saturn and Fable Remoting this may be fairly obvious stuff but as a newcomer it did take some time to figure out an approach that worked.
Its likely to evolve somewhat over time and as I learn more and if so I’ll revisit and update.
With my recent role change I’m getting most of my coding kicks for fun these days – which means I’m working almost entirely on OSS and get to play around with whatever takes my fancy! Exploring Fable and the broader SAFE stack has been on my list of things to do for some time and so this last weekend I dove in and got started building something simple.
If you’ve not come across the SAFE stack before its an entirely open source community driven end to end web development framework for F# that takes a functional first approach that brings together a number of projects:
Saturn – a web development framework that is ultimately running on top of ASP .Net Core
Azure – Microsoft’s cloud hosting platform. Doesn’t really “come” with SAFE (I think someone was reaching to make a cool name!) but it is a natural companion.
Fable – A F# to JavaScript transpiler.
Elmish – a set of abstractions for writing user interfaces in F#. Fable and Elmish come pre-configured with React bindings. Yes – you can write React apps in F# and using very familiar patterns.
Its worth noting that the excellent Fabulous framework, for mobile apps based on Xamarin Forms, also makes use of Elmish and I think makes a natural companion to the SAFE stack.
While I don’t intend to write an end to end tutorial I thought it would be useful to highlight some of the challenges I faced getting started and solutions I found. This will be a bit of a grab bag but lets dive into it…
Getting Started
Before you begin there are a few tools its useful to have ready. Firstly Visual Studio Code and Ionide are very useful for working on F#. Ionide is an open source community extension for VS Code and while I prefer to work on server side / backend code in Rider it contains some useful tools for working with Fable. We’ll come to my embryonic workflow later!
For now – ensure you’ve got Visual Studio Code and the Ionide extension for it. You’ll also want to have .NET Core 3 installed.
With all that done you can get started with your first SAFE project. There’s little point me repeating the documentation – to get started with a new project just follow the simple instructions on the SAFE website.
Working With The Solution
My first stab at working with the solution was to open it in Rider – my preferred IDE for all things .NET. It does all open but you need to do some work to get it to compile and run the client and I haven’t yet managed to get it debugging the client.
Next stop was VS Code which does work quite nicely – the out the box project includes all the configuration for VS Code to compile and run both server and client with an end to end debugging experience. Great! Except….
I found it a bit confusing and noisy having everything in one project. The console output is excessive and not well delineated and generally its just too much for my brain to deal with. It could be something I get used to in time but I’m fairly used to having my client code in VS Code and my backend code in Rider.
It was super simple to create two new solutions from the shipped sln file – one for client and one for server – and then I could work in a pattern I found more comfortable.
Custom HTML Attributes
Sooner or later you’ll come across a piece of HTML / JavaScript that makes use of custom attributes on HTML tags, for example “x-data”. Given that Fable-React makes use of a type safe discriminated union for HTML attributes how do we do this? Handily their is a member of the union called Custom so you can write something like:
div [Custom("x-data", "somevalue") ; ClassName="my-class"] []
Converting HTML To Fable Elmish
Fable uses functions to represent HTML elements and while this closely resembles HTML itself it does take a different form and at some point you’re going to want to convert a large piece of HTML to Fable.
That wouldn’t be fun, but fortunately you don’t need to do this by hand! There is an online tool available that you can post HTML into and out will pop the Elmish verison.
Alternatively this is also built into Ionide and you can do the conversion right their in Code:
Introducing Tailwind CSS
The SAFE template ships with Fulma for CSS – a F# wrapper for the Bulma CSS framework. However I’m already used to working with Tailwind (having moved away from Bootstrap) and I didn’t really want to learn / adopt another CSS toolkit so wanted to introduce this. Reasons why I like Tailwind are well articulated, not by me, here.
I confess I’ve not had any luck introducing it into the FAKE and webpack build chain for Fable. I’m certainly not an expert on either of those tools and so am likely hitting the limits of my knowledge rather than a fundamental issue (and were I not doing this project for fun I’d keep banging away until I’d solved it – but frankly other things to be doing!).
In the end I had to settle for a simple npx based approach that pre-generates the CSS. Not ideal but it works.
Routing / Endpoints
Creating endpoints is ridiculously simple in Saturn as you can see from this code:
let webApp = router {
    get "/api/init" (fun next ctx ->
        task {
            let counter = {Value = 42}
            return! json counter next ctx
        })
There’s no reason C# ASP .NET Core can’t be this simple (and in fact David Fowler recently posted an example of how it can be) but Microsoft have chosen the “way of pain” in most of their example code and templates and so ASP .NET Core code tends to, well, not be simple even for simple scenarios. In any case I appreciate the simple approach in the SAFE stack.
If you’ve made the journey from C# to F# you’ve probably gone through the same “wait… what… how…” in terms of the async changes. And there’s a fair chance that like me once you’ve figured the differences and what’s going on you’ve come to rather like the F# approach with its async { } computation expressions.
To ease interop with the rest of the .NET world Saturn uses a task { } block rather than F# async blocks. Practically speaking it doesn’t change much, for me at least, I prefer my domain code to be protocol agnostic and somewhat agnostic and so my Saturn endpoints are simple wrappers around functions which I continue to use async with.
Just caught me by surprise.
Serialization with Thoth
Under the covers SAFE is using Thoth to handle serialization. I’ve only just started to explore this. Mostly it seems to work as you’d expect just be aware that you need to return concrete collection types from routes. If you return a seq you’ll get an error like this at runtime:
Cannot generate auto encoder for Microsoft.FSharp.Collections.IEnumerator+mkSeq@132[[Shared.Api+Lift, Server, Version=1.0.0.0, Culture=neutral, PublicKeyToken=null]]. Please pass an extra encoder.
SQL Access
I’ve not done much SQL work from F# to date but I needed to in the context of the small project I’m building. I went scouting around for different ways of doing this and Twitter came to my rescue with a lot of suggestions.
In general I like to keep this simple and I don’t like DSLs in this space. I always find them a poor abstraction over SQL itself and one that simulatenously offers little value but a fair amount of risk: you have to second guess the SQL that is being generated. If I had a pound for every time I’ve been asked to fix performance issues that turned out to be due to this… well I’d have made enough to offset my stock market losses this week!
As a result with C# I generally use Dapper. There is a project that purports to wrap this in a F# friendly way in FSharp.Data.Dapper but it seems to have some pretty basic bugs (I couldn’t get it to run at all against SQL Server – open a connection first and it complains about that, don’t open a connection and it complains the connection is closed – I gave up). I was just about to write my own wrapper based on some work I did with Cosmos when I came across a handy gist:
I extended this with some async methods and that was me done.
In Summary
The F# community have created, and made very accessible, a fantastic set of tools that allow you to write F# end to end on the web and in a way that embraces the existing world and ecosystems rather than by trying to create its own new world (I’m looking at you Blazor). I’ve been able to take my F# knowledge and React knowledge and quite easily combine the two to be productive fast.
I’m looking forward to exploring this further over the next few weeks and will certainly write a new post as I learn more and as I find solutions for the things I currently have unresolved here.
The documentation for using Function Monkey with F# is finally on its way! I’ve got an actual documentation site under construction at the moment and it includes video content – the first of which is here!
The full source code, expanded with validation, is available on GitHub.
Over the last couple of weeks I’ve been working on adapting Function Monkey so that it feels natural to work with in F#. The driver for this is that I find myself writing more and more F# and want to develop the backend for a new app in it and run it on Azure Functions.
I’m not going to pretend its pretty under the covers but its starting to take shape and I’m beginning to use it in my new backend and so now seemed like a good time to write a little about it by walking through putting together a simple ToDo style API that saves data to CosmosDB.
Declaring a Function App
As ever you’ll need to begin by creating a new Azure Function app in the IDE / editor of your choice. Once you’ve got that empty starting point you’ll need to two NuGet package FunctionMonkey.FSharp to the project (either with Paket or Nuget):
FunctionMonkey.FSharp FunctionMonkey.Compiler
This is currently in alpha and so you’ll need to enable pre-release packages and add the following NuGet repository:
Next by create a new module called EntryPoint that looks like this:
namespace FmFsharpDemo
open AccidentalFish.FSharp.Validation
open System.Security.Claims
open FunctionMonkey.FSharp.Configuration
open FunctionMonkey.FSharp.Models

module EntryPoint =
    exception InvalidTokenException

    let validateToken (bearerToken:string) =
        match bearerToken.Length with
        | 0 -> raise InvalidTokenException
        | _ -> new ClaimsPrincipal(new ClaimsIdentity([new Claim("userId", "2FF4D861-F9E3-4694-9553-C49A94D7E665")]))

    let isResultValid (result:ValidationState) =
        match result with
        | Ok -> true
        | _ -> false

    let app = functionApp {
        // authorization
        defaultAuthorizationMode Token
        tokenValidator validateToken
        claimsMappings [
            claimsMapper.shared ("userId", "userId")
        ]
        // validation
        isValid isResultValid
        // functions
        httpRoute "version" [
            azureFunction.http (Handler(getApiVersion), Get)
        ]
    }
Ok. So what’s going on here? We’ll break it down block by block. We’re going to demonstrate authorisation using a (pretend) bearer token and so we begin by creating a function that can validate a token:
exception InvalidTokenException

let validateToken (bearerToken:string) =
    match bearerToken.Length with
    | 0 -> raise InvalidTokenException
    | _ -> new ClaimsPrincipal(new ClaimsIdentity([new Claim("userId", "2FF4D861-F9E3-4694-9553-C49A94D7E665")]))
This is our F# equivalent of the ITokenValidator interface in the C# version. In this case we take valid to mean any string of length in the authorization header and if the token is valid then we return a ClaimsPrincipal. Again here we just return a made up principal. In the case of an invalid token we simply raise an exception – Function Monkey will translate this to a 401 HTTP status.
We’re going to validate the inputs to our functions using my recently released validation framework. Function Monkey for F# supports any validation framework but as such you need to tell it what constitutes a validation failure and so next we create a function that is able to do this:
let isResultValid result = match result with | Ok -> true | _ -> false
We declare our settings (and optionally functions) inside a functionApp block that we have to assign to a public member on the module so that the Function Monkey compiler can find your declaration.
Within the block we start by setting up our authorisation to use token validation (line 3) and instruct it to use the token validator function we created earlier (line 4). In lines 5 to 7 we then set up a claims mapping which will set userId on any of our record types associated with functions to the value of the userId claim. You can also set mappings to specific command type property like in the C# version.
On line 9 we tell Function Monkey to use our isResultValid function to determine if a validation results constitutes success of failure.
Then finally on line 11 we declare a HTTP route and a function within it. If you’re familiar with the C# version you can see here that we no longer use commands and command handlers – instead we use functions and their input parameter determines the type of the model being passed into the Azure Function and their return value determines the output of the Azure Function. In this case the function has no parameters and returns a string – a simple API version. We set this specific function to not require authorisation.
Finally lets add a host.json file to remove the auto-prefixing of api to routes (this causes problems with things like Open API output):
If we run this now then in PostMan we should be able go call the endpoint http://localhost:7071/version and receive the response “1.0.0”.
Building our ToDo API
If you’re familiar with Function Monkey for C# then at this point you might be wandering where the rest of the functions are. We could declare them all here like we would in C# but the F# version of Function Monkey allows functions to be declared in multiple modules so that the functions can be located close to the domain logic and to avoid a huge function declaration block.
To get started create a new module called ToDo and we’ll begin by creating a type to model our to do items – we’ll also use this type for updating out to do items:
And finally an type that represents querying to find an item:
type GetToDoItemQuery =
    {
        id: string
    }
Next we’ll declare our validations for these models:
let withIdValidations = [
   isNotEmpty
   hasLengthOf 36
]

let withTitleValidations = [
    isNotEmpty
    hasMinLengthOf 1
    hasMaxLengthOf 255
]

let validateGetToDoItemQuery = createValidatorFor<GetToDoItemQuery>() {
    validate (fun q -> q.id) withIdValidations
}

let validateAddToDoItemCommand = createValidatorFor<AddToDoItemCommand>() {
    validate (fun c -> c.userId) withIdValidations
    validate (fun c -> c.title) withTitleValidations
}

let validateToDoItem = createValidatorFor<ToDoItem>() {
    validate (fun c -> c.id) withIdValidations
    validate (fun c -> c.title) withTitleValidations
    validate (fun c -> c.owningUserId) withIdValidations
}
Ok. So now we need to create functions for adding an item to the database and another for getting one from it. We’ll use Azure CosmosDB as a data store and I’m going to assume you’ve set one up. Our add function needs to accept a record of type AddToDoItemCommand and return a new record of type ToDoItem assigning properties as appropriate:
let addToDoItem command =
    {
        id = Guid.NewGuid().ToString()
        owningUserId = command.userId
        title = command.title
        isComplete = command.isComplete
    }
The user ID on our command will have been populated by the claims binding. We don’t write the item to Cosmos here, instead we’re going to use an output binding shortly.
Next our function for reading a to do item from Cosmos:
let getToDoItem query =
    CosmosDb.reader<ToDoItem> <| query.id
CosmosDb.reader is a super simple helper function I created:
namespace FmFsharpDemo
open Microsoft.Azure.Cosmos
open System

module CosmosDb =
    let cosmosDatabase = "testdatabase"
    let cosmosCollection = "colToDoItems"
    let cosmosConnectionString = Environment.GetEnvironmentVariable("cosmosConnectionString")

    let reader<'t> id =
        async {
            use client = new CosmosClient(cosmosConnectionString)
            let container = client.GetContainer(cosmosDatabase, cosmosCollection)
            let! response = container.ReadItemAsync<'t>(id, new PartitionKey(id)) |> Async.AwaitTask
            return response.Resource
        }
If we inspect the signatures for our two functions we’ll find that addToDoItem has a signature of AddToDoItemCommand -> ToDoItem and getToDoItem has a signature of GetToDoItemQuery -> Async<ToDoItem>. One of them is asynchronous and the other is not – Function Monkey for F# supports both forms. We’re not going to create a function for updating an existing item to demonstrate handler-less functions (though as we’ll see we’ll duck a slight issue for the time being!).
There is one last step we’re going to take before we declare our functions and that’s to create a curried output binding function:
let todoDatabase =
    cosmosDb cosmosCollection cosmosDatabase
In the above cosmosDb is a function that is part of the Function Monkey output binding set and it takes three parameters – the collection / container name, the database name and finally the function that the output binding is being applied to. We’re going to use it multiple times so we create this curried function to make our code less repetitive and more readable.
With all that we can now declare our functions block:
The functions block is a subset of the functionApp block we saw earlier and can only be used to define functions – shared configuration must go in the functionApp block.
Hopefully the first, GET verb, function is reasonably self-explanatory. The AsyncHandler case instructs Function Monkey that this is an async function and we assign a validator with the validator option.
The second function, for our POST verb, introduces a new concept – output bindings. We pipe the output of azureFunction.http to our curried output binding and this will result in a function being created that outputs to Cosmos DB. Because we’re using the Cosmos output binding we also need to add the Microsoft.Azure.WebJobs.Extensions.CosmosDB package to our functional project. We set the option returnResponseBodyWithOutputBinding to true so that as well as sending the output of our function to the output trigger we also return it as part of the HTTP response (this is optional as you can imagine in a more complex scenario that could leak data).
Finally for the third function our PUT verb also uses an output binding but this doesn’t have a handler at all, hence the NoHandler case. In this scenario the command that is passed in, once validated, is simply passed on as the output of the function. And so in this instance we can PUT a to do item to our endpoint and it will update the appropriate entry in Cosmos. (Note that for the moment I have not answered the question as to how to prevent one user from updating another users to do items – our authorisation approach is currently limited and I’ll come back to that in a future post).
Trying It Out
With all that done we can try this function app out in Postman. If we begin by attempting to add an invalid post to our POST endpoint, say with an empty title, we’ll get a 400 status code returned and a response as follows:
{
  "case": "Errors",
  "fields": [
    [
      {
        "message": "Must not be empty",
        "property": "title",
        "errorCode": "isNotEmpty"
      },
      {
        "message": "Must have a length no less than 1",
        "property": "title",
        "errorCode": "hasMinLengthOf"
      }
    ]
  ]
}
Now if we run it with a valid payload we will get:
These are with me really – I need to continue to flesh out the functionality which at this point essentially boils down to expanding out the computation expression and its helpers. I also need to spend some time refactoring aspects of Function Monkey. I’ve had to dig up and change quite a few things so that it can work in this more functional manner as well as continue to support the more typical C# patterns.
Then of course there is documentation!
Contact
If you're looking for help with C#, .NET, Azure, Architecture, or would simply value an independent opinion then please get in touch here or over on Twitter.

Recent Comments