Category: Table Storage

ASP.Net Identity Provider 2.0 and Table Storage

I’ve started to implement the new storage interfaces in AccidentalFish.AspNet.Identity.Azure so you should be able to use the new features of Identity Provider 2.0 with table storage.

I’ve added an MVC5 project that shows how to configure the provider.

It’s not fully tested yet but if you come across any bugs please log them on GitHub and I’ll get right on it. Once complete I’ll publish the new version on NuGet.

Using Blob Leases to Manage Concurrency with Table Storage

Azure’s table storage service allows for highly scalable and reliable access to large quantities of data but if you come from a SQL background it can seem very primitive – there is essentially no support for transactions (ok so you can transact a batch but that’s not often that useful) and only support for optimistic concurrency within the Table Storage itself. You can’t do much about the former, though there are some strategies you can adopt that help – future blog post, but their is a technique you can use if optimistic concurrency isn’t good enough and you want exclusive access to table storage resources for a period of time – essentially obtaining a lock.

The trick is in coupling table storage with blob storage to take advantage of the leasing functionality available on blobs. I frequently use this technique when I want to access or perform an update on data across multiple tables and be certain the data is going to be consistent.

There is a simple example hosted on GitHub here from which I’m going to highlight some of the code to illustrate how this approach works in practice.

Firstly we need to create a table entry and a blob to go with it:

lease1

You can see that this is fairly standard code for uploading a blob and inserting an entity however note that we’ve given the blob a name that matches up with the key of our table entity. We have no row key but if you did you’d form the blob from the composite of the key (unless you were interested in locking a range).

Now lets look at the code for a lease protected table access:

lease2

The code inside the try block is the fairly familiar looking code for accessing and updating entities for table storage however before we access table storage you can see that we get a reference to our blob using the entities key as a name again and then we call AcquireLease on the blob.

Importantly we do this with a timespan. It’s possible to indefinitely acquire a lease on a blob but this is not usually a good idea: if you suffer a crash (either your code or an Azure failure) you’re going to have a real problem on your hands as the blob will be leased by something that no longer exists.

It’s important to consider how long you want the lease for – thinking hard about retry policies and how long a series of operations could theoretically take. This is an extremely simple example but lets assume you were updating two tables – how long could that take? Well normally milliseconds assuming you’ve keyed your tables well. But let’s assume both operations require a significant retry period. The default retry policy for the storage client (on version 2 through to 3.0.3.0) has a maximum duration of 120 seconds. So if all your operations (read table 1, read table 2, write table 1, write table 2) succeed but are at the upper range of this threshold then you are looking at around 480 seconds for it to fully complete. In my experience this is unlikely – but it does happen.

So to cover this lets say you set your leases timespan to 490 seconds – it will cover the total possible operation time but if there is an issue and your lease doesn’t get released due to an application crash (or Azure issue) then the entity you are attempting to lock cannot be updated again until the full 490 seconds have passed. You can mitigate this from an application error with a finally block as in this sample code but that won’t help you if your process dies.

Another option open to you is to renew the lease between operations. Their is a method on the blob called RenewLease that will do exactly what it says on the tin and renew the lease and this can be an effective, if messy looking, solution but it does come with a performance penalty. Just like acquiring a lease in the first place takes time renewing a lease does too – in most cases it is extremely quick but you should be prepared for variance.

There’s no magic answer and, as ever, it’s a series of trade offs and you need to pick the best fit for your use case. It’s so use case specific that it’s difficult to give general advice – however general common sense is reasonable apply and try to cater for the common case and treat exceptional cases as just that: exceptional. As long as you know the fault has happened you can do something about it later – just don’t put your head in the sand and ignore it.

With that aside back to our example. Run the application and have it call the SimpleExample method shown below:

lease3

At the end of this you should see the expected output in the storage emulator – an entry in table storage in the entities table and a blob with a name that matches the partition key in the leaseObjects blob container.

Now lets add a method that adds a delay into the update process so we can see force a collision and see what happens:

lease4

And finally lets use that to run two updates concurrently with the task library:

lease5

You should find that a storage exception is raised on the AcquireLease line with a status code of 409 – conflict. The lease is acquired and so the second attempt to acquire the lease fails. Depending on your use case you may choose to fail the operation entirely or catch the exception and use a backoff policy to retry later.

Obviously the example here is somewhat simplistic and artificial but hopefully it illustrates how you can use this technique in more complex scenarios. And you can of course use the blob lease pattern in other concurrency scenarios.

Finally – the AccidentalFish.ApplicationSupport library on GitHub contains a dependency injectable lease manager you can use to simplify your code.

Follow up: Use Azure Table Storage as an OAuth Identity Store with Web API 2

My original blog post and NuGet package have generated a lot of interest (great!) and a couple of bugs (not so great!) in the slightly naive code I dropped out of a early development project I was working on.

I’ve since had the opportunity to test the code at reasonable scale (> 1 million users, 1000s of concurrent logons) and made a few changes to the table structures as a result of learning more about the ASP.Net provider workflow.

There’s also a fix on the way for the “Google” issue – invalid (from an Azure table storage perspective) characters being placed in partition and row keys.

Finally apologies in the delay for replying to everybody’s comments – I took a solid 2 weeks off over the Christmas break and since rejoining the fray have been absolutely snowed under. I hope normal service is now resumed and as well as these bug fixes I’ve got some blog posts on the way covering topics such as cross-table concurrent table storage patterns, alerting around an Azure system and using Shared Access Signatures to reduce server rental fees.

How To: Use Azure Table Storage as an OAuth Identity Store with Web API 2

In my previous post I looked at how to register, login and authenticate using the new OWIN based ASP.Net architecture underpinning MVC 5 and Web API 2. The default website provided was configured to use SQL database which is why we needed to configure a SQL Database within Azure as we deployed our website.

There’s a fair chance, if you’re experienced with Azure, that you’re wondering if you can swap that out and use Table Storage, fortunately one of the improvements in this latest version of ASP.Net is to better abstract storage away from management.

There is however a fair bit of leg work to doing so. I’m going to firstly touch on how you go about this, then look at the NuGet package I’ve put online (source code in GitHub) that means you don’t have to do this leg work!, and finally we’ll look at the changes you would need to make in the Web API 2 sample project we introduced in the previous post. I’m going to make reference to that code so you can quickly grab it from GitHub if that’s useful.

1) Implementing a New Identity Store

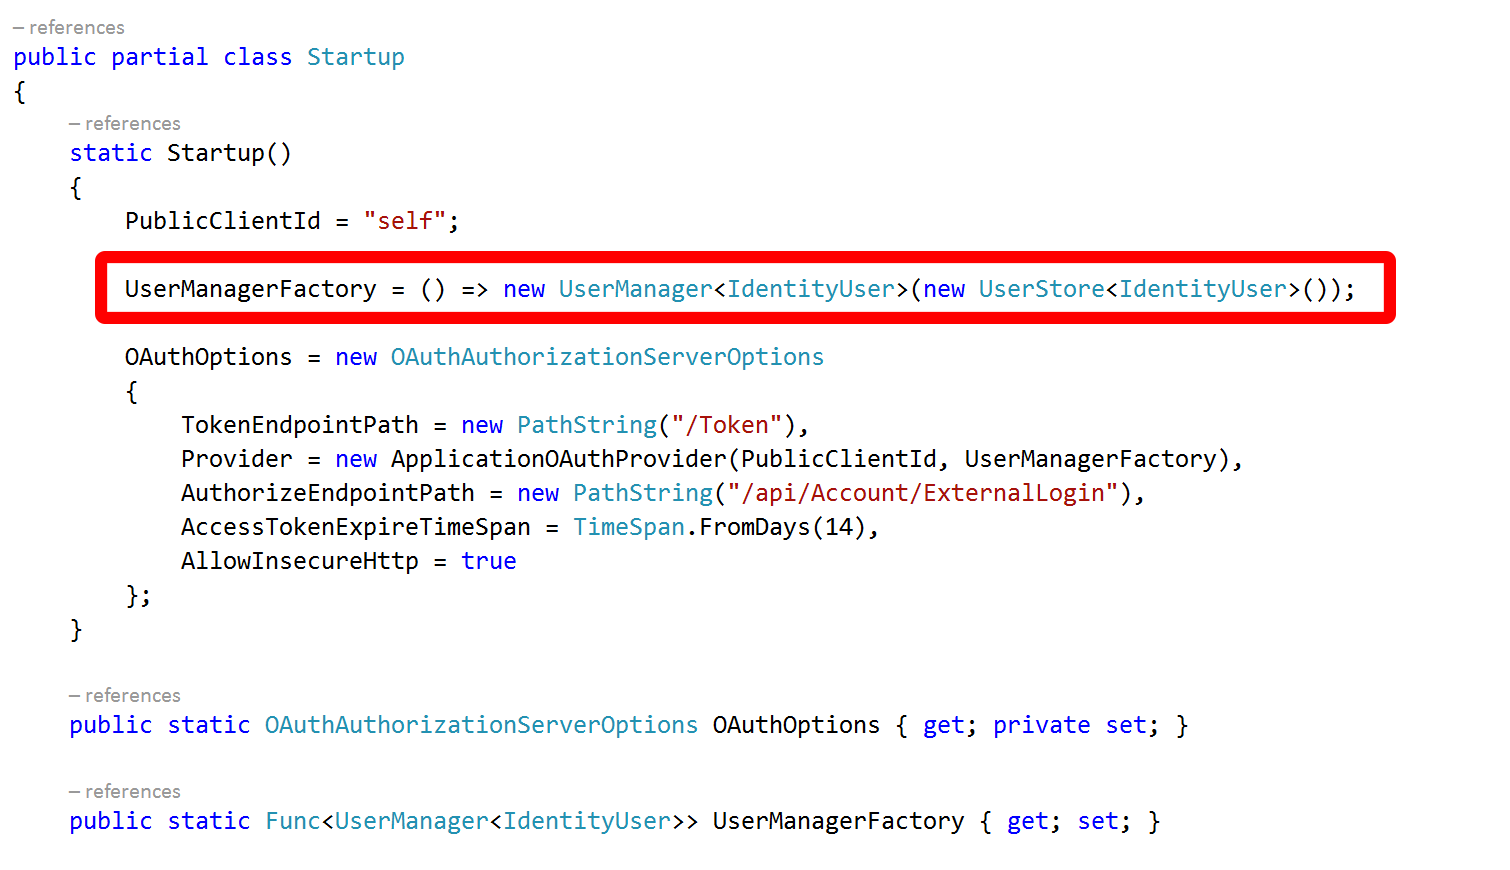
The clue to how to go about this can, again, be found at the top of the Startup.Auth.cs file in the App_Start folder:

Step1

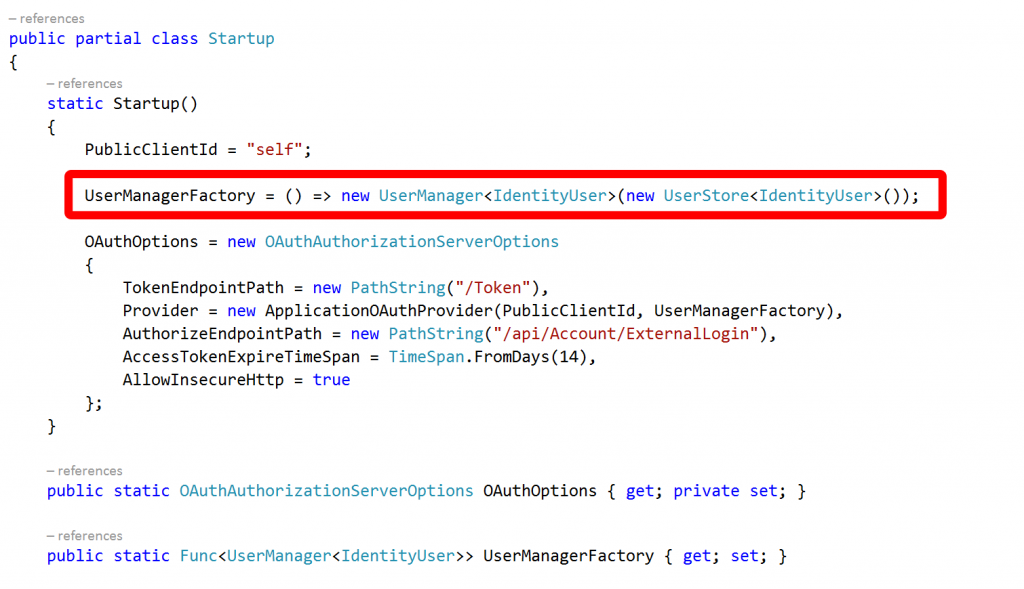
A factory function is assigned and asked to return a user manager and a user store.

The UserManager is a core class of the identity framework (Microsoft.AspNet.Identity.Core) and works with classes that describe users through the IUser interface (another core class) and persists them with implementations of the IUserStore interface.

The core identity framework provides no storage implementation and the UserStore class that is being instantiated here is provided by Microsoft.AspNet.Identity.EntityFramework as is the IdentityUser class.

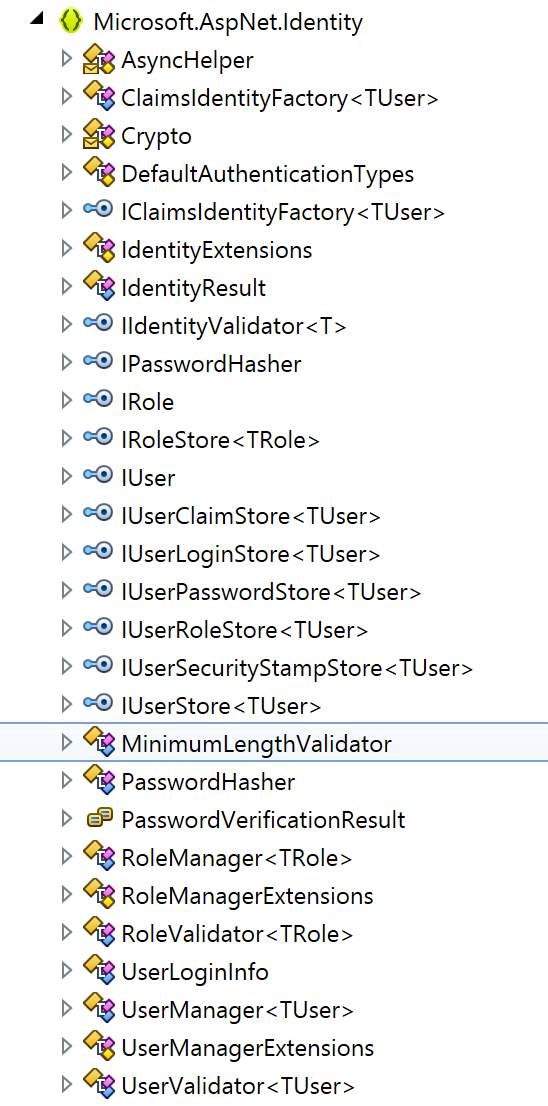
In fact if we look at the Microsoft.AspNet.Identity.Core assembly we can see it’s really very focussed on managing abstract interfaces:

Step2

It’s not difficult to see where we’re going at this point – to implement our own store we need to provide implementations for a number of interfaces. If we want to replicate full local identity management in the same way as the Entity Framework supplied implementation then realistically we need to implement most of the interfaces shown above – IRole, IRoleStore, IUser, IUserClaimStore, IUserLoginStore, IUserPasswordStore, IUserRoleStore, IUserSecurityStampStore and IUserStore.

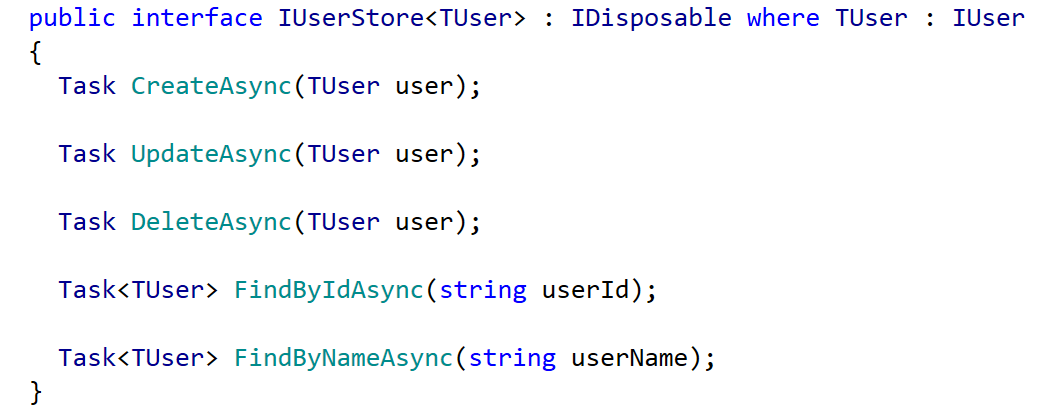
That’s not as daunting as it sounds as most of the interfaces are quite simple, for example IUserStore:

Step3

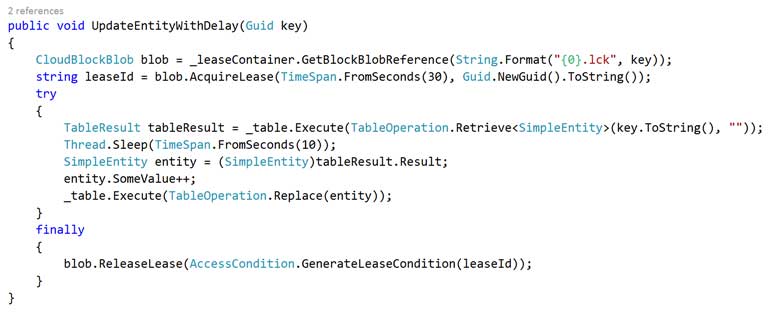
The remaining interfaces also follow this asynchronous CRUD pattern and are fairly simple to implement, here’s the Entity Framework implementation for CreateAsync:

Step4

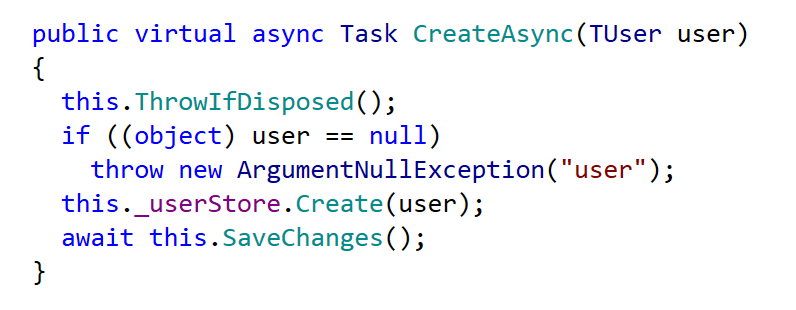
And by way of contrast here’s a Table Storage implementation:

Step5

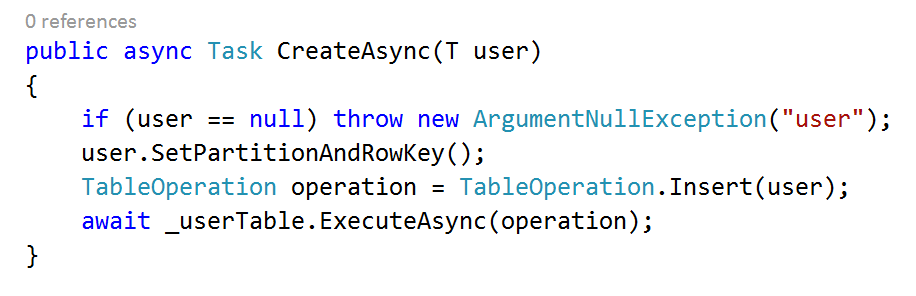
Pretty much the same I think you’ll agree, however it’s still a lot of boilerplate code to write so I’ve wrapped it into a NuGet package called AccidentalFish.AspNet.Identity.Azure which can also be found on GitHub.

2) Using AccidentalFish.AspNet.Identity.Azure

To get started either download the package from NuGet using the package manager in Visual Studio or download the source from GitHub and attach the project to your solution. The NuGet package manager console to install the package is:

Install-Package accidentalfish.aspnet.identity.azure

You can use the package in commercial or open source projects as it’s published under the permissive MIT license though as ever I do appreciate an email or GitHub star if it’s useful to you – yes I’m that vain (and I like to hear about my code being used).

Once you’ve got the package installed you’ll find there is still a little work to do to integrate it into your Web API 2 project as although the Microsoft.AspNet.Identity framework is nice and clean it seems that whoever put the Web API 2 project template didn’t think it made sense to keep a nice level of abstraction and have tied it tightly to the Entity Framework implementation in a few places.

However it’s not too onerous (just a couple of steps) and I’ve built the package with replacement in mind. To help I’ve included the Web API 2 project from my previous post and commented out the old Entity Framework code that bleeds into the MVC host site. I’ll walk through these changes below.

Firstly we need to visit the Startup.Auth.cs file and make three changes at the start:

Step6

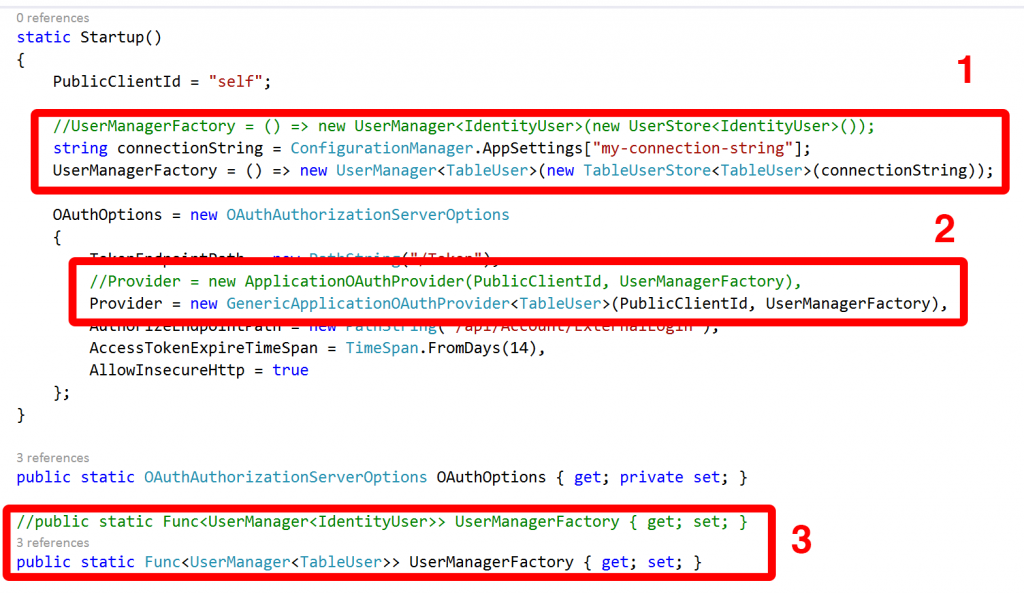
1) Update the factory assignment to return a UserManager that manipulates users of type TableUser and users a data store of type TableUserStore. Pass it your Azure connection string. The constructor is overloaded with parameters for table names and whether or not to create them if they don’t exist – by default it will.

2) Replace the ApplicationOAuthProvider with a generic version of it contained within the package. This code is exactly the same but replaces the fixed IdentityUser types with a generic (you can see what I was referring to in regard to the template – this ought to have been this way out of the box).

3) Update the declaration for the factory to return a UserManager manipulating users of type TableUser.

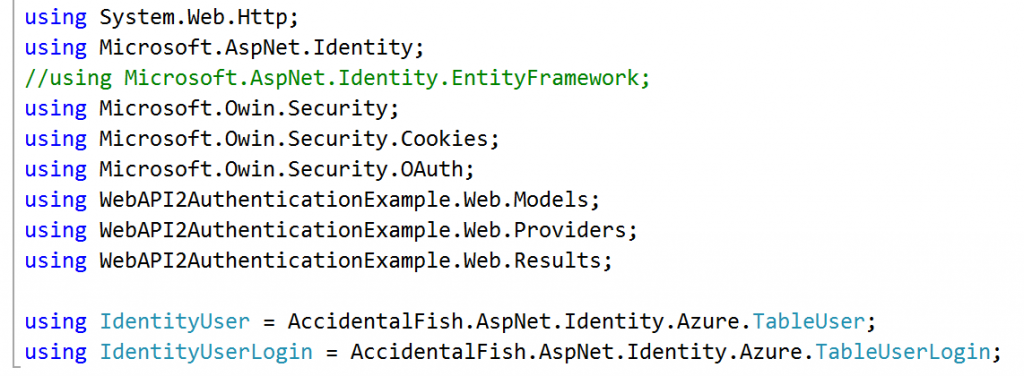
At this point we’ve done the bulk of the OAuth work but unfortunately the MVC AccountController also has a, needless, hard dependency on the Entity Framework library so we need to sort that out. To do this either go through the class and replace the type declarations of IdentityUser and IdentityUserLogin with TableUser and TableUserLogin respectively. Alternatively you can “cheat” and remove the Microsoft.AspNet.Identity.EntityFramework using reference and add a pair of aliases:

Step7

That’s it you’re done. Identity information should now be persisted in Azure Table Storage.

I’ll be doing some more work on this package in the coming weeks – I want to test it at scale and I know I need to build at least one index for one of the IUserStore calls which queries in the reverse way to which the partition and row key are set up: I’ve tried to set up the partition and row keys for the most commonly used methods.

If you find any problems or have any feedback then please let me know.


Welcome (and a Table Storage date sorting tip)

Welcome to Azure From The Trenches, a blog where I hope to share information learned from using Azure to develop and run real production applications. The  applications themselves shall largely remain nameless but to illustrate some points I have a sample application to go along with this blog which I’ll be publishing on GitHub shortly.

I really want to cover Azure in a broad sense so expect to see topics on subjects such as:

  • Architecture
  • Business
  • Code
  • Cost modelling
  • Deployment
  • Operating an Azure system
  • Scaling
  • SLAs
  • Testing

As well as sharing information I’d love for this blog to be visited and commented on by others working on Azure so that I can learn from you and improve my own understanding and future work.

As my companion application isn’t quite ready I thought I’d kick things off with a short tip for sorting table storage within a partition by date in a descending order. This had me scratching my head for a while when I first wanted to do this during my early use of Table Storage.

The solution relies on the rows in a partition being stored sorted by the row key in an ascending fashion. The row key is a string so you can’t just drop a date in their but as long as you’re dealing with recent dates you can quickly and easily place a string in the row key that will let you sort in an ascending date count: the Tick property of the DateTime class.

This is a long value that counts the number of ticks (100 nanoseconds) that have elapsed since midnight on the 1st January 0001. If we zero pad that as a string then the partition will be sorted by date:

1
RowKey = String.Format("{0:D19}", DateTime.UtcNow.Ticks);

To sort in a descending date order we simply need to subtract the current number of ticks from the number of ticks for the maximum date:

1
RowKey = String.Format("{0:D19}", DateTime.MaxValue.Ticks - DateTime.UtcNow.Ticks);

When I first began to use Azure and Table Storage my instinct was always to run back to SQL but with some lateral thinking you can often bend Table Storage to your will and get better scalability, reliability and cheaper running costs – a topic I plan on coming back to.

Contact

  • If you're looking for help with C#, .NET, Azure, Architecture, or would simply value an independent opinion then please get in touch here or over on Twitter.

Recent Posts

Recent Tweets

Invalid or expired token.

Recent Comments

Archives

Categories

Meta

GiottoPress by Enrique Chavez