Category: AzureFromTheTrenches.Commanding

Build Elegant REST APIs with Azure Functions

When I originally posted this piece the library I was using and developing was in an early stage of development. The good news if you’re looking to build REST APIs with Azure Functions its now pretty mature, well documented, and carries the name Function Monkey.

A good jumping off point is this video series here:

Or the getting started guide here:

http://functionmonkey.azurefromthetrenches.com/guides/gettingStarted.html

There are also a few more posts on this blog:

https://www.azurefromthetrenches.com/category/function-monkey/

Original Post

Serverless technologies bring a lot of benefits to developers and organisations running compute activities in the cloud – in fact I’d argue if you’re considering compute for your next solution or looking to evolve an existing platform and you are not considering serverless as a core component then you’re building for the past.

Serverless might not form your whole solution but for the right problem the technology and patterns can be transformational shifting the focus ever further away from managing infrastructure and a platform towards focusing on your application logic.

Azure Functions are Microsoft’s offering in this space and they can be very cost-effective as not only do they remove management burden, scale with consumption, and simplify handling events but they come with a generous monthly free allowance.

That being the case building a REST API on top of this model is a compelling proposition.

However… its a bit awkward. Azure Functions are more abstract than something like ASP.Net Core having to deal with all manner of events in addition to HTTP. For example the out the box example for a function that responds to a HTTP request looks like this:

public static class Function1
{
    [FunctionName("Function1")]
    public static IActionResult Run([HttpTrigger(AuthorizationLevel.Function, "get", "post", Route = null)]HttpRequest req, TraceWriter log)
    {
        log.Info("C# HTTP trigger function processed a request.");

        string name = req.Query["name"];

        string requestBody = new StreamReader(req.Body).ReadToEnd();
        dynamic data = JsonConvert.DeserializeObject(requestBody);
        name = name ?? data?.name;

        return name != null
            ? (ActionResult)new OkObjectResult($"Hello, {name}")
            : new BadRequestObjectResult("Please pass a name on the query string or in the request body");
    }
}

It’s missing all the niceties that come with a more dedicated HTTP framework, there’s no provision for cross cutting concerns, and if you want a nice public route to your Function you also need to build out proxies in a proxies.json file.

I think the boilerplate and cruft that goes with a typical ASP.NET Core project is bad enough and so I wouldn’t want to build out 20 or 30 of those to support a REST API. Its not that there’s anything wrong with what these teams have done (ASP.NET Core and Azure Functions) but they have to ship something that allows for as many user scenarios as possible – whereas simplifying something is generally about making decisions and assumptions on behalf of users and removing things. That I’ve been able to build both my REST framework and now this on top of the respective platforms is testament to a job well done!

In any case to help with this I’ve built out a framework that takes advantage of Roslyn and my commanding mediator framework to enable REST APIs to be created using Azure Functions in a more elegant manner. I had some very specific technical objectives:

  1. A clean separation between the trigger (Function) and the code that executes application logic
  2. Promote testable code
  3. No interference with the Function runtime
  4. An initial focus on HTTP triggers but extensible to support other triggers
  5. Support for securing Functions using token based security methods such as Open ID Connect
  6. Simple routing
  7. No complicated JSON configuration files
  8. Open API / Swagger generation – under development
  9. Validation – under development

Probably the easiest way to illustrate how this works is by way of an example – so fire up Visual Studio 2017 and follow the steps below.

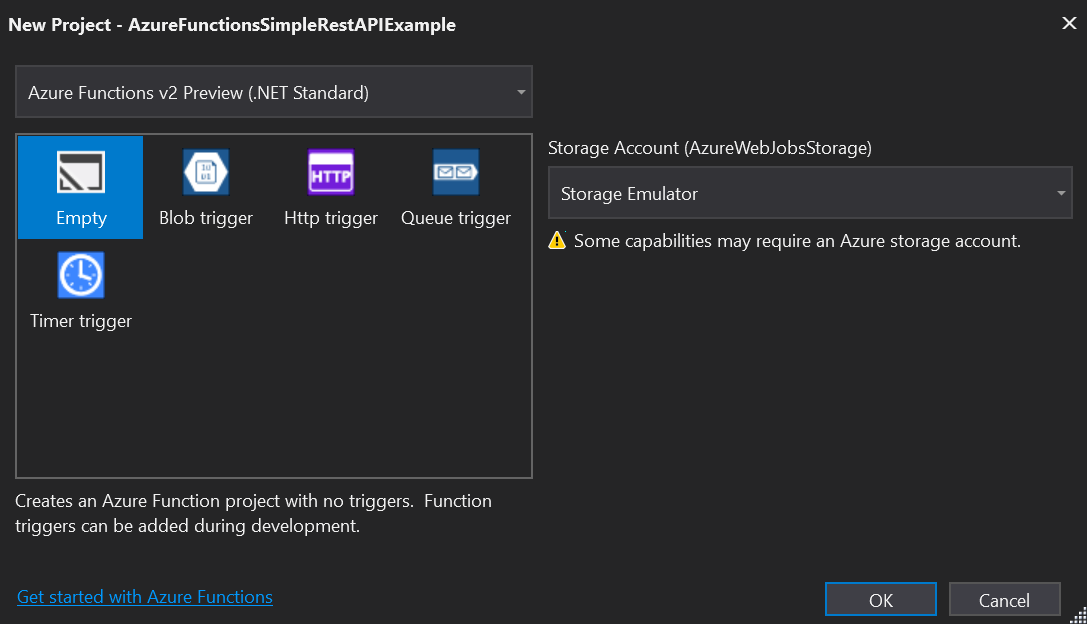
Firstly create a new Azure Function project in Visual Studio. When you’re presented with the Azure Functions new project dialog make sure you use the Azure Functions v2 Preview and create an Empty project:

After your project is created you should see an empty Azure Functions project. The next step is to add the required NuGet packages – using the Package Manager Console run the following commands:

Install-Package FunctionMonkey -pre
Install-Package FunctionMonkey.Compiler -pre

The first package adds the references we need for the commanding framework and Function specific components while the second adds an MSBuild build target that will be run as part of the build process to generate an assembly containing our Functions and the corresponding JSON for them.

Next create a folder in the project called Model and into that add a class named BlogPost:

class BlogPost
{
    public Guid PostId { get; set; }

    public string Title { get; set; }

    public string Body { get; set; }
}

Next create a folder in the solution called Queries and into that add a class called GetBlogPostQuery:

public class GetBlogPostQuery : ICommand<BlogPost>
{
    public Guid PostId { get; set; }
}

This declares a command which when invoked with a blog post ID will return a blog post.

Now we need to write some code that will actually handle the invoked command – we’ll just write something that returns a blog post with some static content but with a post ID that mirrors that supplied. Create a folder called Handlers and into that add a class called GetBlogPostQueryHandler:

class GetBlogPostQueryHandler : ICommandHandler<GetBlogPostQuery, BlogPost>
{
    public Task<BlogPost> ExecuteAsync(GetBlogPostQuery command, BlogPost previousResult)
    {
        return Task.FromResult(new BlogPost
        {
            Body = "Our blog posts main text",
            PostId = command.PostId,
            Title = "Post Title"
        });
    }
}

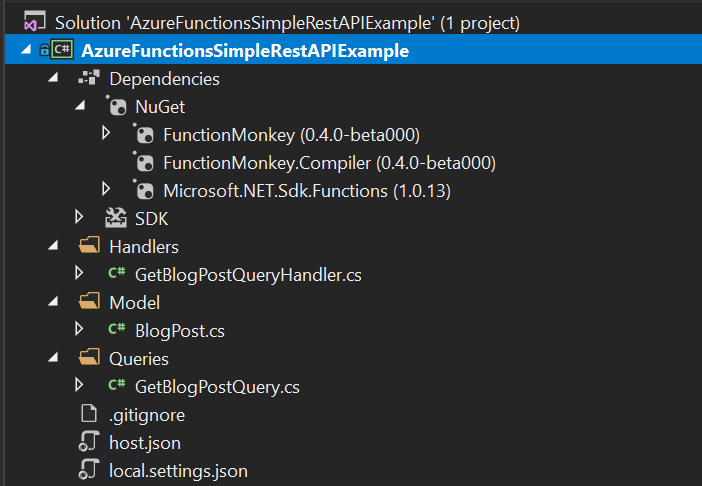
At this point we’ve written our application logic and you should have a solution structure that looks like this:

With that in place its time to surface this as a REST end point on an Azure Function. To do this we need to add a class into the project that implements the IFunctionAppConfiguration interface. This class is used in two ways: firstly the FunctionMonkey.Compiler package will look for this in order to compile the assembly containing our function triggers and the associated JSON, secondly it will be invoked at runtime to provide an operating environment that supplies implementations for our cross cutting concerns.

Create a class called ServerlessBlogConfiguration and add it to the root of the project:

public class ServerlessBlogConfiguration : IFunctionAppConfiguration
{
    public void Build(IFunctionHostBuilder builder)
    {
        builder
            .Setup((serviceCollection, commandRegistry) =>
            {
                commandRegistry.Discover<ServerlessBlogConfiguration>();
            })
            .Functions(functions => functions
                .HttpRoute("/api/v1/post", route => route
                    .HttpFunction<GetBlogPostQuery>(HttpMethod.Get)
                )
            );
    }
}

The interface requires us to implement the Build method and this is supplied a IFunctionHostBuilder and its this we use to define both our Azure Functions and a runtime environment. In this simple case its very simple.

Firstly in the Setup method we use the supplied commandRegistry (an ICommandRegistry interface – for more details on my commanding framework please see the documentation here) to register our command handlers (our GetBlogPostQueryHandler class) via a discovery approach (supplying ServerlessBlogConfiguration as a reference type for the assembly to search). The serviceCollection parameter is an IServiceCollection interface from Microsofts IoC extensions package that we can use to register any further dependencies.

Secondly we define our Azure Functions based on commands. As we’re building a REST API we can also group HTTP functions by route (this is optional – you can just define a set of functions directly without routing) essentially associating a command type with a verb. (Quick note on routes: proxies don’t work in the local debug host for Azure Functions but a proxies.json file is generated that will work when the functions are published to Azure).

If you run the project you should see the Azure Functions local host start and a HTTP function that corresponds to our GetBlogPostQuery command being exposed:

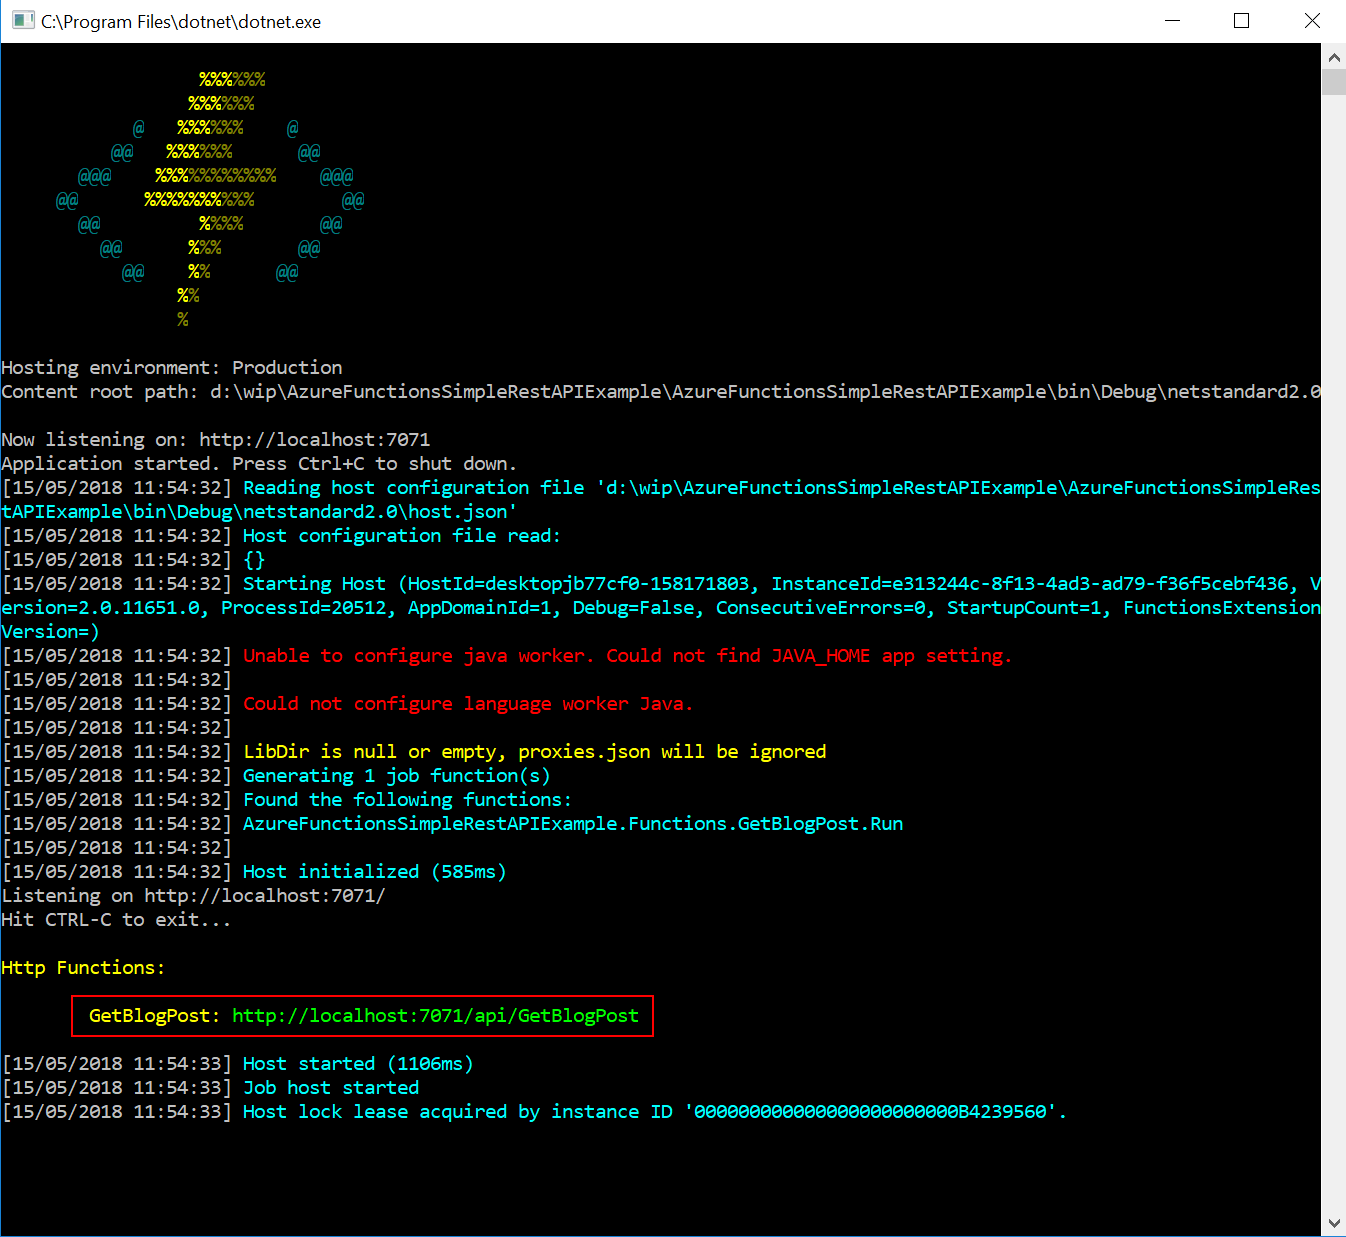
The function naming uses a convention based approach which will give each function the same name as the command but remove a postfix of Command or Query – hence GetBlogPost.

If we run this in Postman we can see that it works as we’d expect – it runs the code in our GetBlogPostQueryHandler:

The example here is fairly simple but already a little cleaner than rolling out functions by hand. However it starts to come into its own when we have more Functions to define. Lets elaborate on our configuration block:

public class ServerlessBlogConfiguration : IFunctionAppConfiguration
{
    private const string ObjectIdentifierClaimType = "http://schemas.microsoft.com/identity/claims/objectidentifier";

    public void Build(IFunctionHostBuilder builder)
    {
        builder
            .Setup((serviceCollection, commandRegistry) =>
            {
                serviceCollection.AddTransient<IPostRepository, CosmosDbPostRepository>();
                commandRegistry.Discover<ServerlessBlogConfiguration>();
            })
            .Authorization(authorization => authorization
                .TokenValidator<BearerTokenValidator>()
                .Claims(mapping => mapping
                    .MapClaimToCommandProperty(ClaimTypes.ObjectIdentifierClaimType, "AuthenticatedUserId"))
            )
            .Functions(functions => functions
                .HttpRoute("/api/v1/post", route => route
                    .HttpFunction<GetBlogPostQuery>("/{postId}", HttpMethod.Get)
                    .HttpFunction<CreateBlogPostCommand>(HttpMethod.Post)
                )
                .HttpRoute("/api/v1/user", route => route
                    .HttpFunction<GetUserProfileQuery>(HttpMethod.Get)
                    .HttpFunction<UpdateProfileCommand>(HttpMethod.Put)
                    .HttpFunction<GetUserBlogPostsQuery>("/posts", HttpMethod.Get)
                )
                .StorageQueueFunction<CreateZipBackupCommand>("StorageAccountConnectionString", "BackupQueue")
            );
    }
}

In this example we’ve defined more API endpoints and we’ve also introduced a Function with a storage queue trigger – this will behave just like our HTTP functions but instead of being triggered by an HTTP request will be triggered by an item on a queue and so applying the same principles to this trigger type (note: I haven’t yet pushed this to the public package).

You can also see me registering a dependency in our IoC container – this will be available for injection across the system and into any of our command handlers.

We’ve also added support for token based security with our Authorization block – this adds in a class that validates tokens and builds a ClaimsPrincipal from them which we can then use by mapping claims onto the properties of our commands. This works in exactly the same way as it does on my REST API commanding library and with or without claims mapping or Authorization sensitive properties can be prevented from user access with the SecurityPropertyAttribute in the same way as in the REST API library too.

The code for the above can be found in GitHub.

Development Status

The eagle eyed will have noticed that these packages I’ve referenced here are in preview (as is the v2 Azure Functions runtime itself) and for sure I still have more work to do but they are already usable and I’m using them in three different serverless projects at the moment – as such development on them is moving quite fast, I’m essentially dogfooding.

As a rough roadmap I’m planning on tackling the following things (no particular order, they’re all important before I move out of beta):

  1. Fix bugs and tidy up code (see 6. below)
  2. Documentation
  3. Validation of input (commands)
  4. Open API / Swagger generation
  5. Additional trigger / function support
  6. Return types
  7. Automated tests – lots of automated tests. Currently the framework is not well covered by automation tests – mainly because this was a non-trivial thing to figure out. I wasn’t quite sure what was going to work and what wouldn’t and so a lot of the early work was trying different approaches and experimenting. Now all that’s settled down I need to get some tests written.

I’ve pushed this out as a couple of people have been asking if they can take a look and I’d really like to get some feedback on it. The code for the implementation of the NuGet packages is in GitHub here (make sure you’re in the develop branch).

Please do let me have any feedback over on Twitter or on the GitHub Issues page for this project.

Lean Configuration Based ASP.Net Core REST APIs

Over the last year or two, as many visitors to my blog and Twitter will know, I’ve been spending significant time and effort advocating approaches that allow a codebase and architecture to be “best fit” for its stage in the development lifecycle while being able to evolve as your product, systems and customers evolve.

As an example for early stage projects this is often about building a modular monolith that can be evolved into micro-services as market fit is achieved, the customer base grows, and both the systems and development teams need to scale.

The underlying principals with which I approach this are both organisational and technical.

On the technical side the core of the approach is to express operations as state and execute them through a mediator rather than, as in a more traditional (layered) architecture, through direct compile time interfaces and implementations. In other words I dispatch commands and queries as POCOs rather than calling methods on an interface. These operations are then executed somewhere, somehow, by a command handler.

One of the many advantages of this approach is that you can configure the mediator to behave in different ways based on the type of the command – you might choose to execute a command immediately in memory or you might dispatch it to a queue and execute it asynchronously somewhere else. And you can do this without changing any of your business logic.

It’s really what my command mediator framework is all about and at this point its getting pretty mature with a solid core and a growing number of extensions. For a broader introduction to this architectural pattern I have a series on this blog which covers moving from a, perhaps more familiar to many, “layered” approach to one based around a mediator.

However as I used this approach over a number of projects I still found myself writing very similar ASP.Net Core code time and time again to support a REST API. Nothing complicated but it was still repetitive, still onerous, and still error prone.

What I was doing, directly or otherwise, was exposing the commands on HTTP endpoints. Which makes sense – in a system built around operations expressed as commands then a subset of those commands are likely to need to be invoked via a REST API. However the payload didn’t always come exclusively from the endpoint payload (be that a  request body or route parameters) – sometimes properties were sourced from claims.

It struck me that given this I had all the information I needed to generate a REST API based on the command definitions themselves and some basic configuration and so invested some time in building a new extension package for my framework: AzureFromTheTrenches.Commanding.AspNetCore.

This allows you to take a completely “code free” (ASP.Net code) approach to exposing a command based system as a set of REST APIs simply by supplying some basic configuration. An example configuration based on a typical ASP.Net startup block  is shown below:

public void ConfigureServices(IServiceCollection services)
{
    // Configure a dependency resolver adapter around IServiceCollection and add the commanding
    // system to the service collection
    ICommandingDependencyResolverAdapter commandingAdapter =
        new CommandingDependencyResolverAdapter(
            (fromType,toInstance) => services.AddSingleton(fromType, toInstance),
            (fromType,toType) => services.AddTransient(fromType, toType),
            (resolveType) => ServiceProvider.GetService(resolveType)
        );
    // Add the core commanding framework and discover our command handlers
    commandingAdapter.AddCommanding().Discover<Startup>();

    // Add MVC to our dependencies and then configure our REST API
    services
        .AddMvc()
        .AddAspNetCoreCommanding(cfg => cfg
            // configure our controller and actions
            .Controller("Posts", controller => controller
                .Action<GetPostQuery>(HttpMethod.Get, "{Id}")
                .Action<GetPostsQuery,FromQueryAttribute>(HttpMethod.Get)
                .Action<CreatePostCommand>(HttpMethod.Post)
            )
        );                
}

If we enable Swagger too then that gives us an API that looks like this:

There is, quite literally, no other ASP.Net code involved – there are no controllers to write.

So how does it work? Essentially by writing and compiling the controllers for you using Roslyn and adding a couple of pieces of ASP.Net Core plumbing (but nothing that interferes with the broader running of ASP.Net – you can mix and match command based controllers with hand written controllers) as shown in the diagram below:

Essentially you bring along the configuration block (as shown in the code sample earlier) and your commands and the framework will do the rest.

I have a quickstart and detailed documentation available on the frameworks documentation site but I’m going to take a different perspective on this here and break down a more complex configuration block than that I showed above:

// This method gets called by the runtime. Use this method to add services to the container.
public void ConfigureServices(IServiceCollection services)
{
    ICommandingDependencyResolverAdapter commandingAdapter =
        new CommandingDependencyResolverAdapter(
            (fromType,toInstance) => services.AddSingleton(fromType, toInstance),
            (fromType,toType) => services.AddTransient(fromType, toType),
            (resolveType) => ServiceProvider.GetService(resolveType)
        );
    ICommandRegistry commandRegistry = commandingAdapter.AddCommanding().Discover<Startup>();

    services
        .Replace(new ServiceDescriptor(typeof(ICommandDispatcher), typeof(ApplicationErrorAwareCommandDispatcher), ServiceLifetime.Transient))
        .AddMvc(mvc => mvc.Filters.Add(new FakeClaimsProvider()))
        .AddAspNetCoreCommanding(cfg => cfg
            .DefaultControllerRoute("/api/v1/[controller]")
            .Controller("Posts", controller => controller
                .Action<GetPostQuery>(HttpMethod.Get, "{Id}")
                .Action<GetPostsQuery,FromQueryAttribute>(HttpMethod.Get)
                .Action<CreatePostCommand>(HttpMethod.Post)
            )
            .Claims(mapping => mapping.MapClaimToPropertyName("UserId", "AuthenticatedUserId"))
        )
        .AddFluentValidation();

    services.AddSwaggerGen(c =>
    {
        c.SwaggerDoc("v1", new Info { Title = "Headless Blog API", Version = "v1" });
        c.AddAspNetCoreCommanding();
    });

}

Firstly we register the commanding framework:

ICommandingDependencyResolverAdapter commandingAdapter =
    new CommandingDependencyResolverAdapter(
        (fromType,toInstance) => services.AddSingleton(fromType, toInstance),
        (fromType,toType) => services.AddTransient(fromType, toType),
        (resolveType) => ServiceProvider.GetService(resolveType)
    );
ICommandRegistry commandRegistry = commandingAdapter.AddCommanding().Discover<Startup>();

If you’ve used this framework below then this will be quite familiar code – we create an adapter for our IoC container (the framework itself is agnostic of IoC container and uses an adapter to work with any IoC framework of your choice) and then register the commanding infrastructure with it and finally we use the .Discover method to search for and register command handlers in the same assembly as our Startup class.

Next we begin to register our other services, including MVC, with our IoC container:

services
    .Replace(new ServiceDescriptor(typeof(ICommandDispatcher), typeof(ApplicationErrorAwareCommandDispatcher), ServiceLifetime.Transient))

The first service we register is a command dispatcher – as we’ll see shortly this is a decorator for the framework provided dispatcher. This is entirely optional but its quite common to want to apply cross cutting concerns to every operation and implementing a decorator like this is an excellent place to do so. In our example we want to translate application errors that occur during command handling into appropriate HTTP responses. The code for this decorator is shown below:

public class ApplicationErrorAwareCommandDispatcher : ICommandDispatcher
{
    private readonly IFrameworkCommandDispatcher _underlyingCommandDispatcher;

    public ApplicationErrorAwareCommandDispatcher(IFrameworkCommandDispatcher underlyingCommandDispatcher)
    {
        _underlyingCommandDispatcher = underlyingCommandDispatcher;
    }

    public async Task<CommandResult<TResult>> DispatchAsync<TResult>(ICommand<TResult> command, CancellationToken cancellationToken = new CancellationToken())
    {
        try
        {
            CommandResult<TResult> result = await _underlyingCommandDispatcher.DispatchAsync(command, cancellationToken);
            if (result.Result == null)
            {
                throw new RestApiException(HttpStatusCode.NotFound);
            }
            return result;
        }
        catch (CommandModelException ex)
        {
            ModelStateDictionary modelStateDictionary = new ModelStateDictionary();
            modelStateDictionary.AddModelError(ex.Property, ex.Message);
            throw new RestApiException(HttpStatusCode.BadRequest, modelStateDictionary);
        }
    }

    public Task<CommandResult> DispatchAsync(ICommand command, CancellationToken cancellationToken = new CancellationToken())
    {
        return _underlyingCommandDispatcher.DispatchAsync(command, cancellationToken);
    }

    public ICommandExecuter AssociatedExecuter { get; } = null;
}

Essentially this traps a specific exception raised from our handlers (CommandModelException) and translates it into model state information and rethrows that as a RestApiException. The RestApiException is an exception defined by the framework that our configuration based controllers expect to handle and will catch and translate into the appropraite HTTP result. In our case a BadRequest with the model state as the response.

This is a good example of the sort of code that, if you write controllers by hand, you tend to find yourself writing time and time again – and even if you write a base class and helpers you still need to write the code that invokes them for each action in each controller and its not uncommon to find inconsistencies creeping in over time or things being outright missed.

Returning to our configuration block the next thing we add to the service collection is ASP.Net Core MVC:

    .AddMvc(mvc => mvc.Filters.Add(new FakeClaimsProvider()))

In the example I’m basing this on I want to demonstrate the claims support without having to have everybody set up a real identity provider and so I also add a global resource filter that simply adds some fake claims to our identity model.

AddMvc returns an IMvcBuilder interface that can be used to provide additional configuration and this is what the REST commanding framework configures in order to expose commands as REST endpoints and so the next line adds our framework components to MVC and then supplies a builder of its own for configuring our endpoints and other behaviours:

    .AddAspNetCoreCommanding(cfg => cfg

On the next line we use of the configurations options exposed by the framework to replace the default controller route prefix with a versioned one:

        .DefaultControllerRoute("/api/v1/[controller]")

This is entirely optional and if not specified the framework will simply to default to the same convention used by ASP.Net Core (/api/[controller]).

Next we have a simple repition of the block we looked at earlier:

        .Controller("Posts", controller => controller
                .Action<GetPostQuery>(HttpMethod.Get, "{Id}")
                .Action<GetPostsQuery,FromQueryAttribute>(HttpMethod.Get)
                .Action<CreatePostCommand>(HttpMethod.Post)
            )

This defines a controller called Posts (the generated class name will be PostsController) and then assigns 3 actions to it to give us endpoints we saw in the Swagger definition:

  1. GET: /api/v1/Posts/{Id}
  2. GET: /api/v1/Posts
  3. POST: /api/v1/Posts

For more information on how actions can be configured take a look at this here.

Next we instruct the framework to map the claim named UserId onto any command property called AuthenticatedUserId:

        .Claims(mapping => mapping.MapClaimToPropertyName("UserId", "AuthenticatedUserId"))

Their is another variant of the claims mapper declaration that allows properties to be configured on a per command basis though if you are starting with a greenfield solution taking a consistent approach to naming can simplify things.

Data sourced from claims is generally not something you want a user to be able to supply – for example if they can supply a different user ID in our example here then that might lead to a data breach with users being able to access inappropriate data. In order to ensure this cannot happen the framework supplies an attribute, SecurityPropertyAttribute, that enables properties to be marked as sensitive. For example here’s the CreatePostCommand from the example we are looking at:

public class CreatePostCommand : ICommand<PublishedPost>
{
    // Marking this property with the SecurityProperty attribute means that the ASP.Net Core Commanding
    // framework will not allow binding to the property except by the claims mapper
    [SecurityProperty]
    public Guid AuthenticatedUserId { get; set; }

    public string Title { get; set; }

    public string Body { get; set; }
}

The framework installs extensions into ASP.Net Core that adjust model metadata and binding (including from request bodies – that ASP.Net Core behaves somewhat inconsistently with) to ensure that they cannot be written to from an endpoint and, as we’ll see shortly, are hidden from Swagger.

The final line of our MVC builder extensions replaces the built in validation with Fluent Validation:

        .AddFluentValidation();

This is optional and you can use the attribute based validation model (or any other validation model) with the command framework however if you do so you’re baking validation data into your commands and this can be limiting: for example you may want to apply different validations based on context (queue vs. REST API). It’s important to note that validation, and all other ASP.Net Core functionality, will be applied to the commands as they pass through its pipeline – their is nothing special about them at all other than what I outlined above in terms of sensitive properties. This framework really does just build on ASP.Net Core – it doesn’t subvert it or twist it in some abominable way.

Then finally we add a Swagger endpoint using Swashbuckle:

services.AddSwaggerGen(c =>
    {
        c.SwaggerDoc("v1", new Info { Title = "Headless Blog API", Version = "v1" });
        c.AddAspNetCoreCommanding();
    });

The call to AddAspNetCoreCommanding here adds schema filters into Swagger that understand how to interpret the SecurityPropertyAttribute attribute and will prevent those properties from appearing in the Swagger document.

Conclusions

By taking the approach outlined in this post we’ve greatly reduced the amount of code we need to write eliminating all the boilerplate normally associated with writing a REST API in ASP.Net Core and we’ve completely decoupled our application logic from communication protocols, runtime model and host.

Simplistically less code gives us less to test, less to review, lower maintenance, improved consistency and fewer defects.

And we’ve gained a massive amount of flexibility in our application architecture that allows us to tailor our approach to best fit our project at a given point in time / stage of development lifecycle and more easily take advantage of new technologies.

To give a flavour of the latter, support for Azure Functions is currently under development allowing for the same API and underlying implementation to be expressed in a serverless model simply by adopting a new NuGet package and changing the configuration to the below (please bear in mind this comes from the early, but functional, work in progress and so is liable to change):

public class FunctionAppConfiguration : IFunctionAppConfiguration
{
    public void Build(IFunctionHostBuilder builder)
    {
        builder
            // register services and commands
            .Setup((services, commandRegistry) => commandRegistry.Discover<FunctionAppConfiguration>())
            // register functions - by default the functions will be given the name of the command minus the postfix Command and use the GET verb
            .Functions(functions => functions
                    .HttpFunction<GetPostsQuery>()
                    .HttpFunction<GetPostQuery>()
                    .HttpFunction<CreatePostCommand>(function => function.AddVerb(HttpMethod.Post))
            );
    }
}

In addition to bringing the same benefits to Functions as the approach above does to ASP.Net Core this also provides, to my eyes, a cleaner approach for expressing Function triggers and provides structure for things like an IoC container.


AzureFromTheTrenches.Commanding 6.1.0 – 10x Performance Improvement

I spent some time today look at the performance of my commanding / mediator framework. Although I did a little performance work early on I’ve made a lot of changes since then and been very focused on getting the feature set and API where I want it.

As a target I wanted to get near to the performance of Mediatr – an excellent framework that describes itself as a “simple, unambitious mediator implementation”. When I began work on my framework I had flexibility as a key goal: I wanted it to support persistent event based models (event sourcing) and an evolutionary approach to architecture and development enabling the seamless movement between command handlers that run locally and remotely. There’s usually a performance price to pay for flexibility and features and so although I’d used some performance focused techniques in the code it seemed unlikely I’d be able to equal the performance of a smaller simpler framework. I decided getting within 20% the performance of Mediatr would be a reasonable price to pay for the additional functionality and flexibility.

Despite starting off in a pretty dismal place – nearly 10x slower than Mediatr – I’ve improved the performance of the framework so it is now about 10% faster than Mediatr as can be seen below (the numbers are from running large numbers of commands through both frameworks):

Commands Time Taken (ms) Per Command (ms)
AzureFromTheTrenches.Commanding 6.1.0 10000000 11695 0.0011695
Mediatr 4.0.1 10000000 12818 0.0012818
AzureFromTheTrenches.Commanding 6.0.0 10000000 127709 0.0127709


I’m really pleased by that but I would suggest the numbers are sufficiently close that unless you have an extreme scenario you would be better choosing between the two frameworks based on other factors – predominantly how well they address your specific domain.

For those interested in how I improved the performance of the framework I’ll be documenting my process in an upcoming post (as well as highlighting a blooper that illustrates the need to always test performance in code where it is important).

Contact

  • If you're looking for help with C#, .NET, Azure, Architecture, or would simply value an independent opinion then please get in touch here or over on Twitter.

Recent Posts

Recent Tweets

Invalid or expired token.

Recent Comments

Archives

Categories

Meta

GiottoPress by Enrique Chavez