Category: Architecture

Code has no value

Nor does SCRUM.
Nor does XP.
Nor does waterfall (I could keep going with the methodologies).
Nor does unit testing.
Nor does acceptance testing.
Nor does the runtime you are using.
Nor does the version of a framework you are using.
Nor does your automated deployment process.
Nor does the language you are using.
Nor do the patterns you are using.
Nor do those post-its you’ve put on the wall.

We get so worked up about these things on Twitter (and boy do we get worked up) but they are all intrinsically valueless. Utterly valueless.

What gives them value (positive or negative) is context – your goal and your constraints. To illustrate this I’m going to use three examples from my career.

Hobbyist developer

As far as my public persona goes this is largely what I am today. My goal and constraints are pretty clear: I want to have fun, there’s only me and limited time, and I only want to spend hobby levels of money.

In many ways I’m back where I started with my BBC Micro. I have an idea, it appeals to me, and I just crack on and have a bash it. Sometimes the focus on satisfying my curiosity, sometimes its making something I will use, sometimes its making something I hope others will use. I don’t have to talk to anybody about it, I don’t need to make money, I’m the customer / customer proxy.

This being the case I’ll use a toolchain I think is fun and the most complex process I’m likely to have is a Trello board, but mostly not even that. I might add a unit test in if it helps me. I’ll probably do an automated deployment process because the things I do are simple enough that its really just “build and upload”.

I really just make day to day decisions based on what will amuse me.

Small startup

The phrase “next paycheck delivery” was used in what I think was a pejorative manner in a reply to one of my tweets earlier today but actually next paycheck delivery (much like code) has no value in and of itself and can be either good or bad depending on your context. I’ve spent time in a number of startups where actually that was entirely the right thing to be doing – without the next paycheck the company was going to sink.

In the specific example I’m thinking of the business needed to pivot and had very little runway left. We had to attract customers and fast and they wanted to see something working and be able to use it.

So our goal was clear – get a working, usable, demo for a customer. Our constraints: we had an insane deadline, no money, and there were two of us.

We sketched out a plan. Minimum possible set of features based on what would be useful and what we thought it would cost to build. We divided up the work so we could do it in parallel. We wrote no unit tests. We used the most bare bones of process (you do this stuff and I’ll do this stuff). We threw things together in a fairly ramshackle way based on how each of us could move fastest. We were not gnashing out teeth about what version of runtimes we were using. We reused some bits in a different language that had issues but would serve our purpose.

It was so down to the wire we were doing the proverbial “coding while the customer was watching”. Put simply: “I ain’t got time to bleed”.

Did this cause a problem for later down the road? Yes. Absolutely.
Did it enable the business to survive? Yes. Absolutely.
Would it have been better not to end up here? Yes. Absolutely.
Is it code I was proud of? Yes. Absolutely. It met its goal.

I’ve been involved in a few more startups and super constrained environments since and I’ve got a lot better at moving fast and ending up with something that is easier to move along and develop.

If you find yourself here the important thing is to recognise that yes you’re likely building up debt for the future, try to minimise that, understand that at some point yes you may enter rewrite territory.

Large organisation, established products

I’ve also spent time in larger organisations doing various roles – I think the biggest had 50 development teams and it was an environment where, at the wrong time, mistakes in some parts of the system could cost millions in minutes.

The company had market fit, it had customers, it was still growing rapidly, it had complex integrated systems and services, and a physical presence. It didn’t matter if teams did things differently but there were economies of scale that came from solving similar classes of problem in similar ways (why generate unique DevOps pipelines for two .NET API services for example). But what was really hard was co-ordinating all this. Sure we could use versioned APIs, contracts etc. but delivering a significant new piece of value required the delivery from several teams and co-ordination with the physical aspects of the business.

Goals and constraints would change but to focus in on just a handful of key things that were common:

  • Predictable delivery
  • Visibility
  • Common understanding of contracts
  • High quality

As a result we had people focused on service integration and standards, teams followed agile processes (there was variance between the teams), there were two or three runtime environments but some basic conformance standards, a lot of focus on both unit and acceptance testing, formalised roles, code reviews, architecture reviews, discipline specialists, etc. etc.

These things worked for this organisation – in the context of the organisations goals and constraints they added value. “We’re not at home to Mr Cockup”.

See the source image

But the practices they found essential would have crippled the startup trying to pivot.

Finishing thoughts

I provide these examples hopefully to illustrate that its all about context. For me understanding this is what sets a good developer apart from a coder and its vital to engineering management.

To finish in the pithy tone in which I started I just have a few recommendations really:

  • Always make sure you understand and can clearly articulate your goal
  • Always make sure you understand and can clearly articulate your constraints
  • Always make sure you understand what success looks like and how you will measure that
  • Always make sure you understand what failure looks like
  • Always make sure your approach is based on maximizing your outcomes within those constraints.
  • Have an eye on the future but don’t let it impede your today – the future may never come if you do.
  • Relentlessly focus on value – but remember that value is related to your context and not what some dude told you on Twitter.
  • When someone tells you technology, tools, practices have value in and of themselves – they’re probably trying to sell you something.
  • Do not, I repeat, do not become an evangelist unless your job is to be an evangelist. The minute you do you’ve lost objectivity.

An Azure Reference Architecture

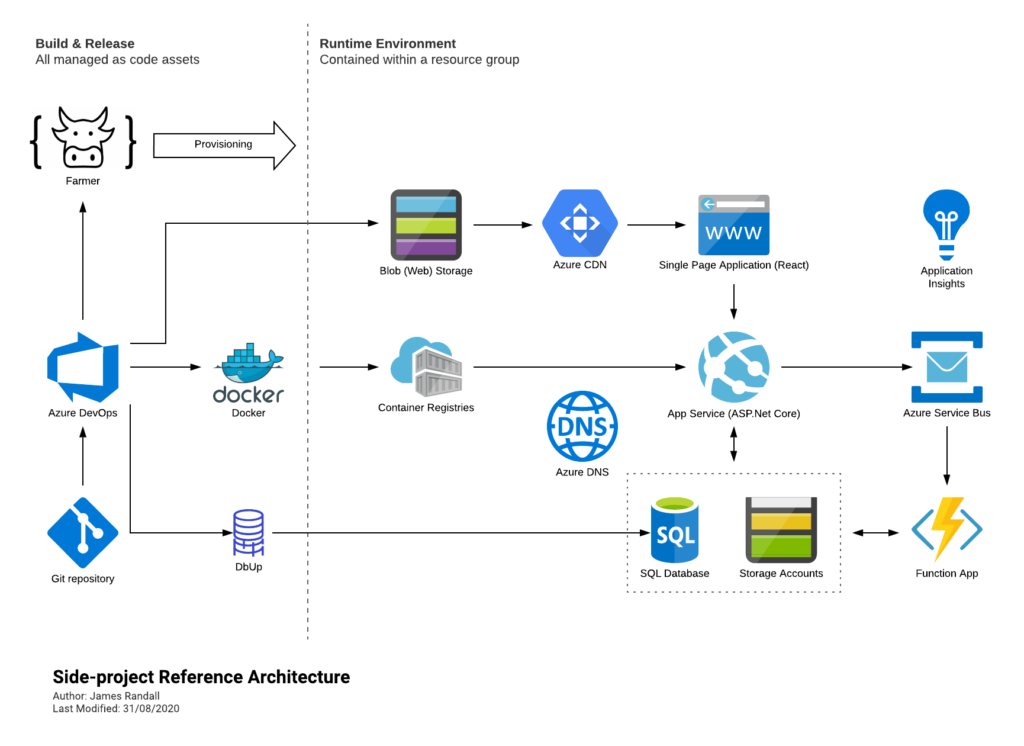
There are an awful lot of services available on Azure but I’ve noticed a pattern emerging in a lot of my work around web apps. At their core they often have a similar architecture, deployment in Azure, and process for build and release.

For context a lot my hands on work over the last 3 years has been as a freelancer developing custom systems for people or on my own side projects (most recently https://www.forcyclistsbycyclists.com). In these situations I’ve found productivity to be super important in a few key ways:

  1. There’s a lot to get done, one or two people, and not much time – so being able to crank out a lot of work quickly and to a good level of quality is key.
  2. Adaptability – if its an externally focused green field system there’s a reasonable chance that there’s a degree of uncertainty over what the right feature set is. I generally expect to have to iterate a few times.
  3. I can’t be wasting time repeating myself or undertaking lengthy manual tasks.

Due to this I generally avoid over complicating my early stage deployment with too much separation – but I *do* make sure I understand where my boundaries and apply principles that support the later distribution of a system in the code.

With that out the way… here’s an architecture I’ve used as a good starting point several times now. And while it continues to evolve and I will vary specific decisions based on need its served me well and so I thought I’d share it here.

I realise there are some elements on here that are not “the latest and greatest” however its rarely productive to be on the bleeding edge. It seems likely, for example, that I’ll adopt the Azure SPA support at some point – but there’s not much in it for me doing that now. Similarly I can imagine giving GitHub Actions ago at some point – but what do I really gain by throwing what I know away today. From the experiments I’ve run I gain no productivity. Judging this stuff is something of a fine line but at the risk of banging this drum too hard: far too many people adopt technology because they see it being pushed and talked about on Twitter or dev.to (etc.) by the vendor, by their DevRel folk and by their community (e.g. MVPs) and by those who have jumped early and are quite possibly (likely!) suffering from a bizarre mix of Stockholm Syndrome and sunk cost fallacy “honestly the grass is so much greener over here… I’m so happy I crawled through the barbed wire”.

Rant over. If you’ve got any questions, want to tell me I’m crazy or question my parentage: catch me over on Twitter.

Architecture

Build & Release

I’ve long been a fan of automating at least all the high value parts of build & release. If you’re able to get it up and running quickly it rapidly pays for itself over the lifetime of a project. And one of the benefits of not CV chasing the latest tech is that most of this stuff is movable from project to project. Once you’ve set up a pipeline for a given set of assets and components its pretty easy to use on your next project. Introduce lots of new components… yeah you’ll have lots of figuring out to do. Consistency is underrated in our industry.

So what do I use and why?

  1. Git repository – I was actually an early adopter of Git. Mostly because I was taking my personal laptop into a disconnected environment on a regular basis when it first started to emege and I’m a frequent committer.

    In this architecture it holds all the assets required to build & deploy my system other than secrets.
  2. Azure DevOps – I use the pipelines to co-ordinate build & release activities both directly using built in tasks, third party tasks and scripts. Why? At the time I started it was free and “good enough”. I’ve slowly moved over to the YAML pipelines. Slowly.
  3. My builds will output four main assets: an ARM template, Docker container, a built single page application, and SQL migration scripts. These get deployed into a an Azure resource group, Azure container registry, blob storage, and a SQL database respectively.

    My migration scripts are applied against a SQL database using DbUp and my ARM templates are generated using Farmer and then used to provision a resource group. I’m fairly new to Farmer but so far its been fantastic – previously I was using Terraform but Farmer just fit a little nicer with my workflow and I like to support the F# community.

Runtime Environment

So what do I actually use to run and host my code?

  1. App Service – I’ve nearly always got an API to host and though I will sometimes use Azure Functions for this I more often use the Web App for Containers support.

    Originally I deployed directly into a “plain” App Service but grew really tired with the ongoing “now this is really how you deploy without locked files” fiasco and the final straw was the bungled .NET Core release.

    Its just easier and more reliable to deploy a container.
  2. Azure DNS – what it says on the tin! Unless there is a good reason to run it elsewhere I prefer to keep things together, keeps things simple.
  3. Azure CDN – gets you a free SSL cert for your single page app, is fairly inexpensive, and helps with load times.
  4. SQL Database – still, I think, the most flexible general purpose and productive data solution. Sure at scale others might be better. Sure sometimes less structured data is better suited to less structured data sources. But when you’re trying to get stuff done there’s a lot to be said for having an atomic, transactional data store. And if I had a tenner for every distributed / none transactional design I’ve seen that dealt only with the happy path I would be a very very wealthy man.

    Oh and “schema-less”. In most cases the question is is the schema explicit or implicit. If its implicit… again a lot of what I’ve seen doesn’t account for much beyodn the happy path.

    SQL might not be cool, and maybe I’m boring (but I’ll take boring and gets shit done), but it goes a long way in a simple to reason about manner.
  5. Storage accounts – in many systems you come across small bits of data that are handy to dump into, say, a blob store (poor mans NoSQL right there!) or table store. I generally find myself using it at some point.
  6. Service Bus – the unsung hero of Azure in my opinion. Its reliable. Does what it says on the tin and is easy to work with. Most applications have some background activity, chatter or async events to deal with and service bus is a great way of handling this. I sometimes pair this (and Azure Functions below) with SignalR.
  7. Azure Functions – great for processing the Service Bus, running code on a schedule and generally providing glue for your system. Again I often find myself with at least a handful of these. I often also use Service Bus queues with Functions to provide a “poor mans admin console”. Basically allow me to kick off administrative events by dropping a message on a queue.
  8. Application Insights – easy way of gathering together logs, metrics, telemetry etc. If something does go wrong or your system is doing something strange the query console is a good way of exploring what the root cause might be.

Code

I’m not going to spend too long talking about how I write the system itself (plenty of that on this blog already). In generally I try and keep things loosely coupled and normally start with a modular monolith – easy to reason about, well supported by tooling, minimal complexity but can grow into something more complex when and if that’s needed.

My current tools of choice is end to end F# with Fable and Saturn / Giraffe on top of ASP.Net Core and Fable Remoting on top of all that. I hopped onto functional programming as:

  1. It seemed a better fit for building web applications and APIs.
  2. I’d grown tired with all the C# ceremony.
  3. Collectively we seem to have decided that traditional OO is not that useful – yet we’re working in languages built for that way of working. And I felt I was holding myself back / being held back.

But if you’re looking to be productive – use what you know.

Bike Reminders – A breakdown of a real Azure application (Part 1)

I’ve been meaning to write about a real cloud based project for some time but the criteria a good candidate project needs to fit are challenging:

  • Significant enough to illustrate numerous design and implementation decisions
  • Not so large that the time investment for a reader to get into it is prohibitive
  • I need to own, or have free access to, the intellectual property
  • It needs to be something I want, or am contracted, to build for reasons beyond writing about it

To expand upon that last point a little – I don’t have the time to build something just for a series of blog posts and if I did I suspect it would be too artificial and essentially would end up a strawman.

The real world and real development is constrained messy, you come across things that you can’t economically solve in an ivory towered fashion. You can’t always predict everything in advance, you get things wrong and don’t always have the time available to start again and so have to do the best that you can with what you have.

In the case of this project I hadn’t really thought about it as a candidate for writing about until I neared the end of building the MVP and so it comes, rather handily, with warts and all. For sure I’ve refactored things but no more than you’d expect to on any time and budget constrained project.

My intention is, over the course of a series of posts, to explore this application in an end to end fashion: the requirements, the architecture, the code, testing, deployment – pretty much its end to end lifecycle. Hopefully this will contain useful nuggets of information that can be applied on other projects and help those new to Azure get up and running.

About the project

So what does the project do?

If you’re a keen cyclist you’ll know that you need to check various components on your bike at regular intervals. You’ll also know that some of the components last just long enough that you’ll forget about them – my personal nemesis is chain wear, more than once I’ve taken that to the point where it is likely to start damaging the rear cassette having completely forgotten about it.

I’m fortunate enough to have a rather nice bike and so there is nothing cheap about replacing anything so really not a mistake you want to be making. Many bikes also now contain components that need charging – Di2 and eTap are increasingly common and though I’ve yet to get caught out on a ride I’ve definitely run it closer than I realised.

After the last time I made this mistake I decided to do something about it and thus was born Bike Reminders: a website that links up with Strava to send you reminders as you accrue mileage on each of your bikes. While not a substitute for regularly checking your bike I’m hopeful it will at least give me a prod over chain wear! I contemplated going direct to Garmin but they seem to want circa $5000 for API access and thats a lot of component damage before I break even – ouch.

In terms of an MVP that distilled out into a handful of high level requirements:

  • Authenticate with Strava
  • Access a users bikes in Strava
  • Allow a mileage based maintenance schedule to be set up against a bike
  • Allow email reminders to be dismissed / reset
  • Allow email reminders to be snoozed
  • Update the progress towards each reminder based on rider activity in Strava

There were also some requirements I wanted to keep in mind for the future:

  • Time based reminders
  • “First ride of the week” type reminders
  • Allow reminders to be sent via push notifications
  • Predictive information – based on a riders history when is a reminder likely to be triggered, this is useful if you’re going away on a training camp for example and want to get maintenance done before you go

Setting off on the project I set a number of overarching goals / none functional requirements for it:

  • Keep it small enough that it could be built alongside a two (expanded to three!) week cycling training block in Mallorca
  • To have a very low cost to run both in terms of minimum footprint (cost to run 1 user) and per user cost as the system scales up
  • To require little to no maintenance and a fully automated delivery mechanism
  • To support multiple client types (initially web but to be followed up with a Flutter app)
  • Keep personal data out of it as far as possible
  • As far as possible spin out any work that isn’t specific to the problem domain as open source (I’m fairly likely to reuse it myself if nothing else)

And although I try not to jump ahead of myself that mapped nicely onto using Azure as a cloud provider with Azure Functions for compute and Azure DevOps and Application Insights for the operational side of things.

Architecture

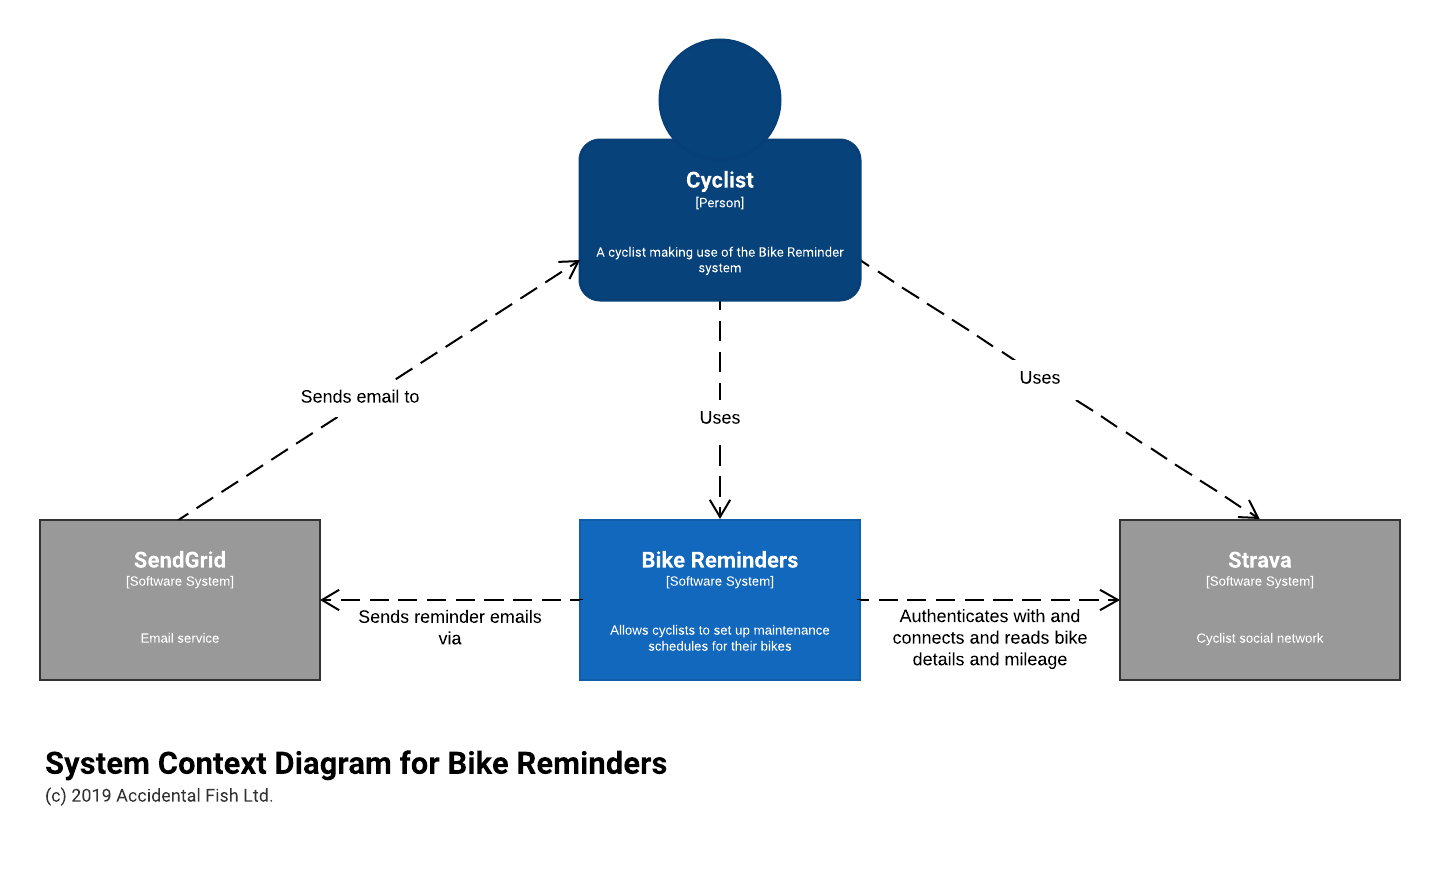
The next step was to figure out what I’d need to build – initially I worked this through on a “mental beermat” while out cycling but I like to use the C4 Model to describe software systems. It gives a basic structure and just enough tools to think about and describe systems at different levels of architecture without disappearing up its own backside in complexity and becoming an end in and of itself.

System Context

For this fairly simple and greenfield system establishing the big picture was fairly straight forward. It’s initially going to comprise of a website accessed by cyclists with their Strava logins, connecting to Strava for tracking mileage, and sending emails for which I chose SendGrid due to existing familiarity with it.

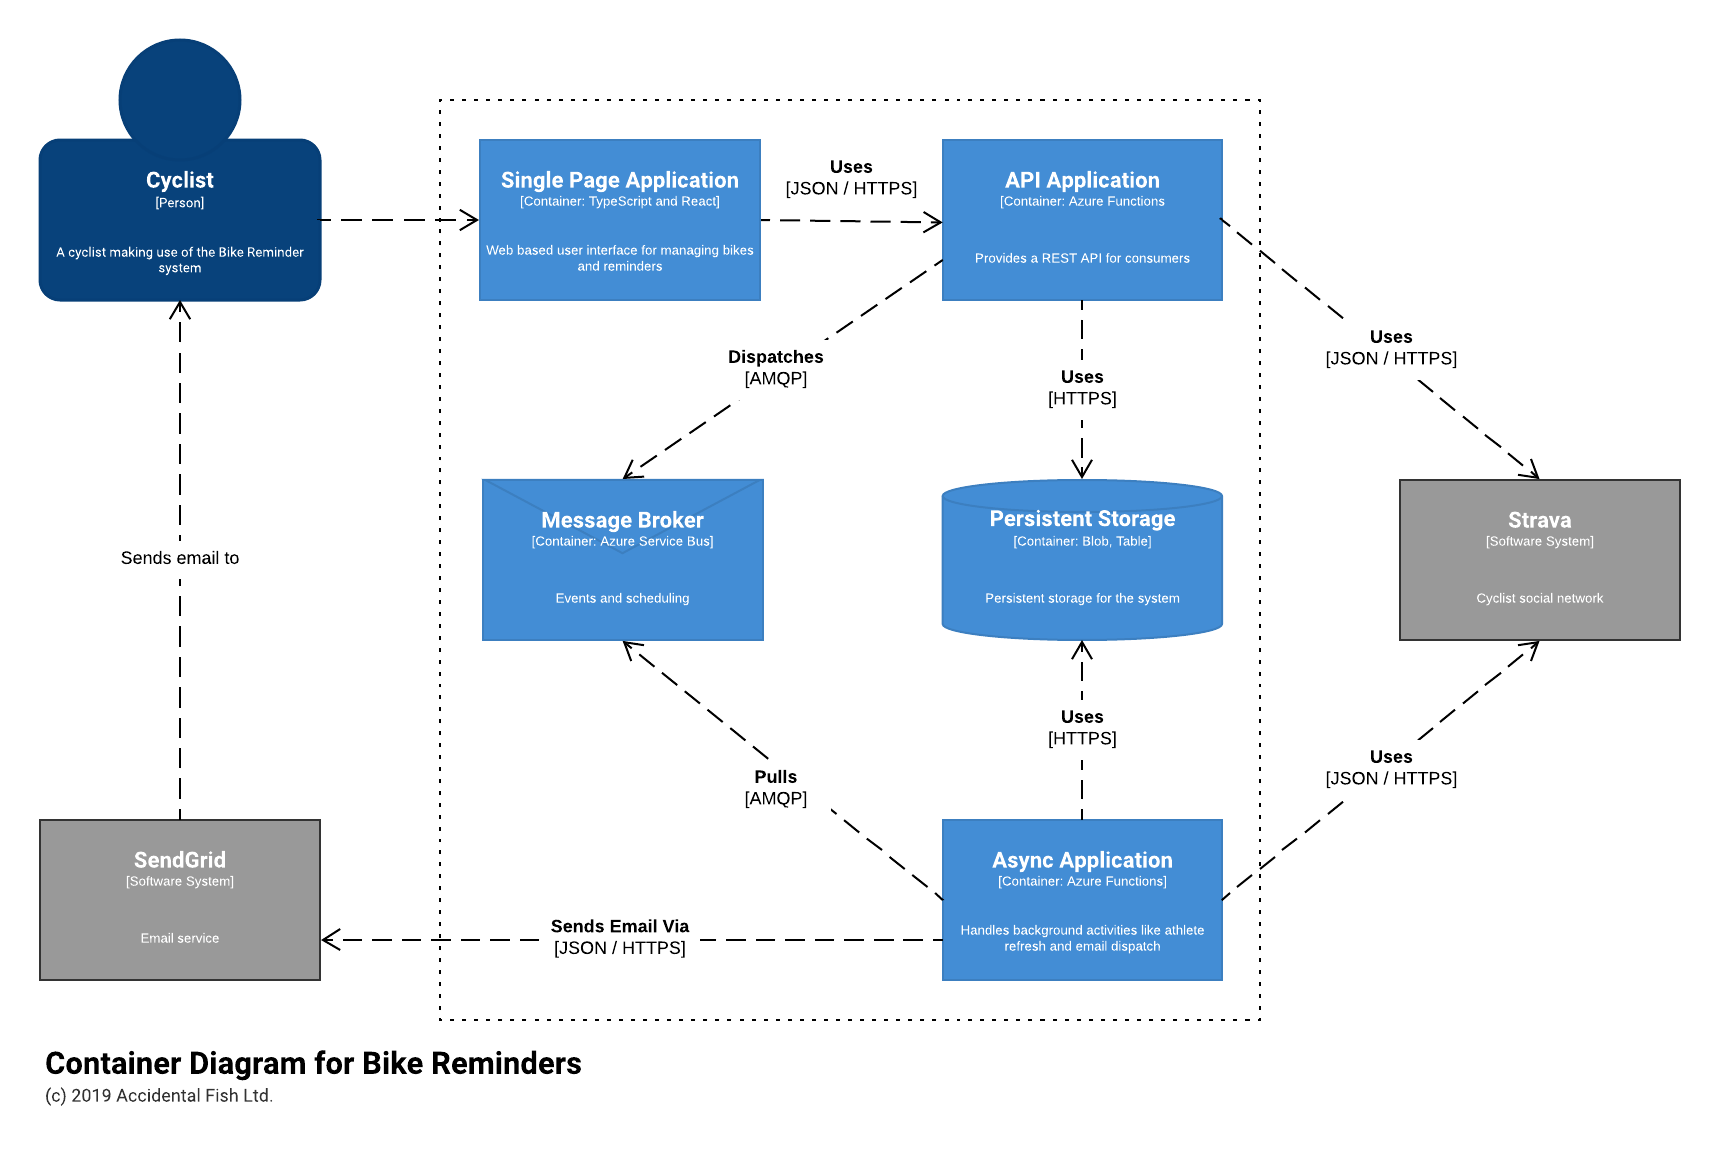
Containers

Breaking this down into more detail forced me to start making some additional decisions. If I was going to build an interactive website / app I’d need some kind of API for which I decided to use Azure Functions. I’ve done a lot of work with them, have a pretty good library for building REST APIs with them (Function Monkey) and they come with a generous free usage allowance which would help me meet my low cost to operate criterion. The event based programming model would also lend itself to handling things like processing queues which is how I envisaged sending emails (hence a message broker – the Azure Service Bus).

For storage I wanted something simple – although at an early stage it seemed to me that I’d be able to store all the key details about cyclists, their bikes and reminders in a JSON document keyed off the cyclists ID. And if something more complex emerged I reasoned it would be easy to convert this kind of format into another. Again cost was a factor and as I couldn’t see, based on my simple requirements, any need for complex queries I decided to at least start with plain old Azure Storage Blob Containers and a filename based on the ID. This would have the advantage of being really simple and really cheap!

The user interface was a simple decision: I’ve done a lot of work with React and I saw no reason it wouldn’t work for this project. Over the last few months I’ve been experimenting with TypeScript and I’ve found it of help with the maintainability of JavaScript projects and so decided to use that from the start on this project.

Finally I needed to figure out how I’d most likely interact with the Strava API to track changes in mileage. They do have a push API that is available by email request but I wanted to start quickly (and this was Christmas and I had no idea how soon I’d hear back from them) and I’d probably have to do some buffering around the ingestion – when you upload a route its not necessarily associated with the right bike (for example my Zwift rides always end up on my main road bike, not my turbo trainer mounted bike) to prevent confusing short term adjustments.

So to begin with I decided to poll Strava once a day for updates which would require some form of scheduling. While I wasn’t expecting huge amounts of overnight for the website Strava do rate limit APIs and so I couldn’t use a timer function with Azure as that would run the risk of overloading the API quite easily. Instead I figured I could use enqueue visibility on the Service Bus and spread out athletes so that the API would never be overloaded. I’ve faced a similar issue before and so I figured this might also make for a useful piece of open source (it did).

All this is summarised in the diagram below:

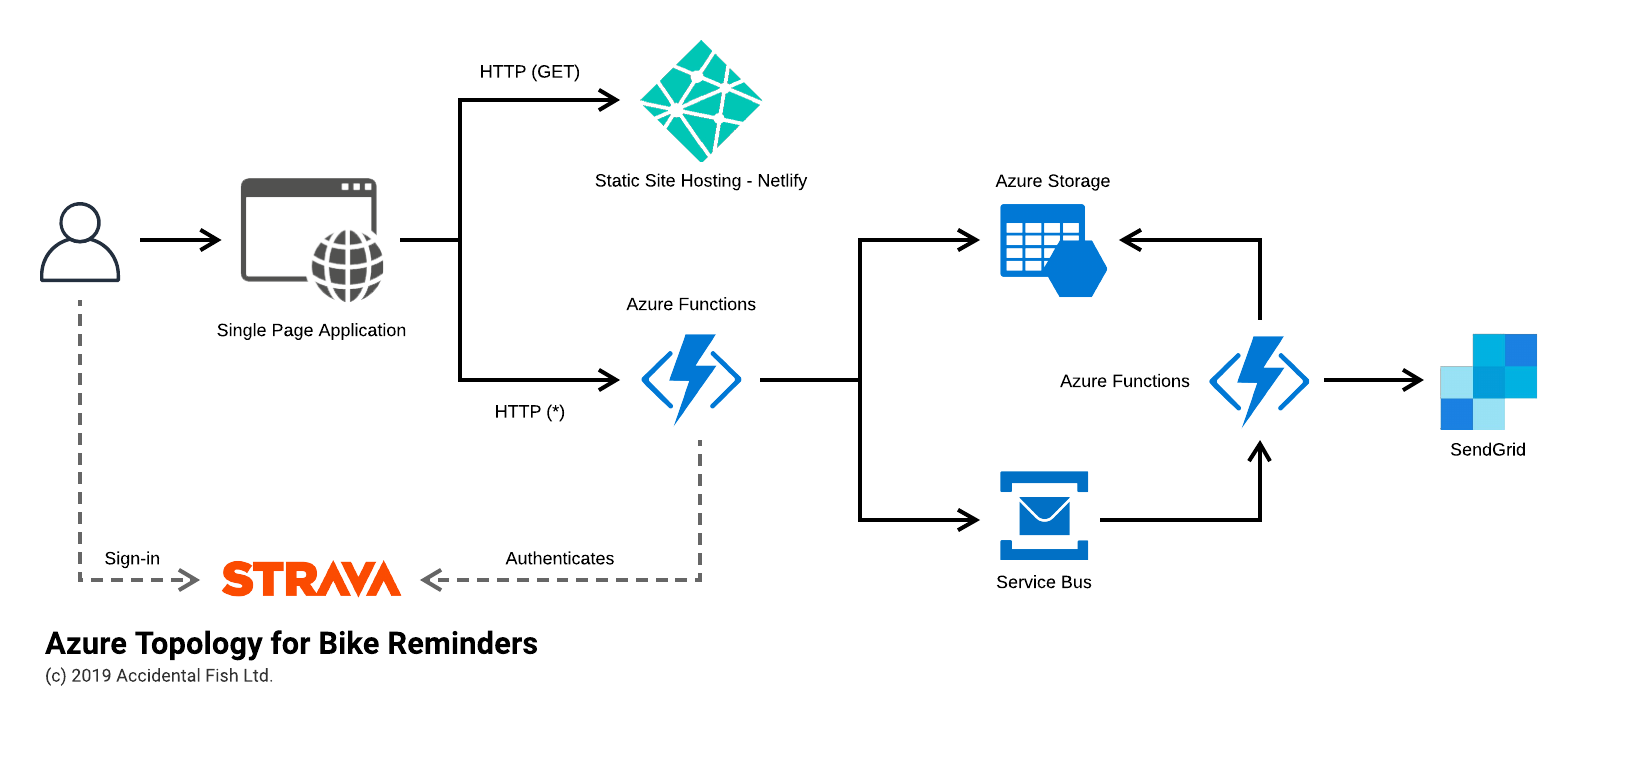
Azure Topology

Mapped (largely) onto Azure I expected the system to look something like the below:

The notable exception is the introduction of Netlify for my static site hosting. While you can host static sites on Azure it is inelegant at best (and the Azure Storage SPA support is useless as you can’t use SSL and a custom domain) and so a few months back I went searching for an alternative and came across Netlify. It makes building, deploying and hosting sites ridiculously easy and so I’ve been gradually switching my work over to here.

I also, currently, don’t have API Management in front of the Azure Functions that present the REST API – the provisioned approach is simply too expensive for this system at the moment and the consumption model, at least at the time of writing, has a horrific cold start time. I do plan to revisit this.

Next Steps

In the next part we’ll break out the code and begin by taking a look at how I structured the Azure Function app.

Lean Configuration Based ASP.Net Core REST APIs

Over the last year or two, as many visitors to my blog and Twitter will know, I’ve been spending significant time and effort advocating approaches that allow a codebase and architecture to be “best fit” for its stage in the development lifecycle while being able to evolve as your product, systems and customers evolve.

As an example for early stage projects this is often about building a modular monolith that can be evolved into micro-services as market fit is achieved, the customer base grows, and both the systems and development teams need to scale.

The underlying principals with which I approach this are both organisational and technical.

On the technical side the core of the approach is to express operations as state and execute them through a mediator rather than, as in a more traditional (layered) architecture, through direct compile time interfaces and implementations. In other words I dispatch commands and queries as POCOs rather than calling methods on an interface. These operations are then executed somewhere, somehow, by a command handler.

One of the many advantages of this approach is that you can configure the mediator to behave in different ways based on the type of the command – you might choose to execute a command immediately in memory or you might dispatch it to a queue and execute it asynchronously somewhere else. And you can do this without changing any of your business logic.

It’s really what my command mediator framework is all about and at this point its getting pretty mature with a solid core and a growing number of extensions. For a broader introduction to this architectural pattern I have a series on this blog which covers moving from a, perhaps more familiar to many, “layered” approach to one based around a mediator.

However as I used this approach over a number of projects I still found myself writing very similar ASP.Net Core code time and time again to support a REST API. Nothing complicated but it was still repetitive, still onerous, and still error prone.

What I was doing, directly or otherwise, was exposing the commands on HTTP endpoints. Which makes sense – in a system built around operations expressed as commands then a subset of those commands are likely to need to be invoked via a REST API. However the payload didn’t always come exclusively from the endpoint payload (be that a  request body or route parameters) – sometimes properties were sourced from claims.

It struck me that given this I had all the information I needed to generate a REST API based on the command definitions themselves and some basic configuration and so invested some time in building a new extension package for my framework: AzureFromTheTrenches.Commanding.AspNetCore.

This allows you to take a completely “code free” (ASP.Net code) approach to exposing a command based system as a set of REST APIs simply by supplying some basic configuration. An example configuration based on a typical ASP.Net startup block  is shown below:

public void ConfigureServices(IServiceCollection services)
{
    // Configure a dependency resolver adapter around IServiceCollection and add the commanding
    // system to the service collection
    ICommandingDependencyResolverAdapter commandingAdapter =
        new CommandingDependencyResolverAdapter(
            (fromType,toInstance) => services.AddSingleton(fromType, toInstance),
            (fromType,toType) => services.AddTransient(fromType, toType),
            (resolveType) => ServiceProvider.GetService(resolveType)
        );
    // Add the core commanding framework and discover our command handlers
    commandingAdapter.AddCommanding().Discover<Startup>();

    // Add MVC to our dependencies and then configure our REST API
    services
        .AddMvc()
        .AddAspNetCoreCommanding(cfg => cfg
            // configure our controller and actions
            .Controller("Posts", controller => controller
                .Action<GetPostQuery>(HttpMethod.Get, "{Id}")
                .Action<GetPostsQuery,FromQueryAttribute>(HttpMethod.Get)
                .Action<CreatePostCommand>(HttpMethod.Post)
            )
        );                
}

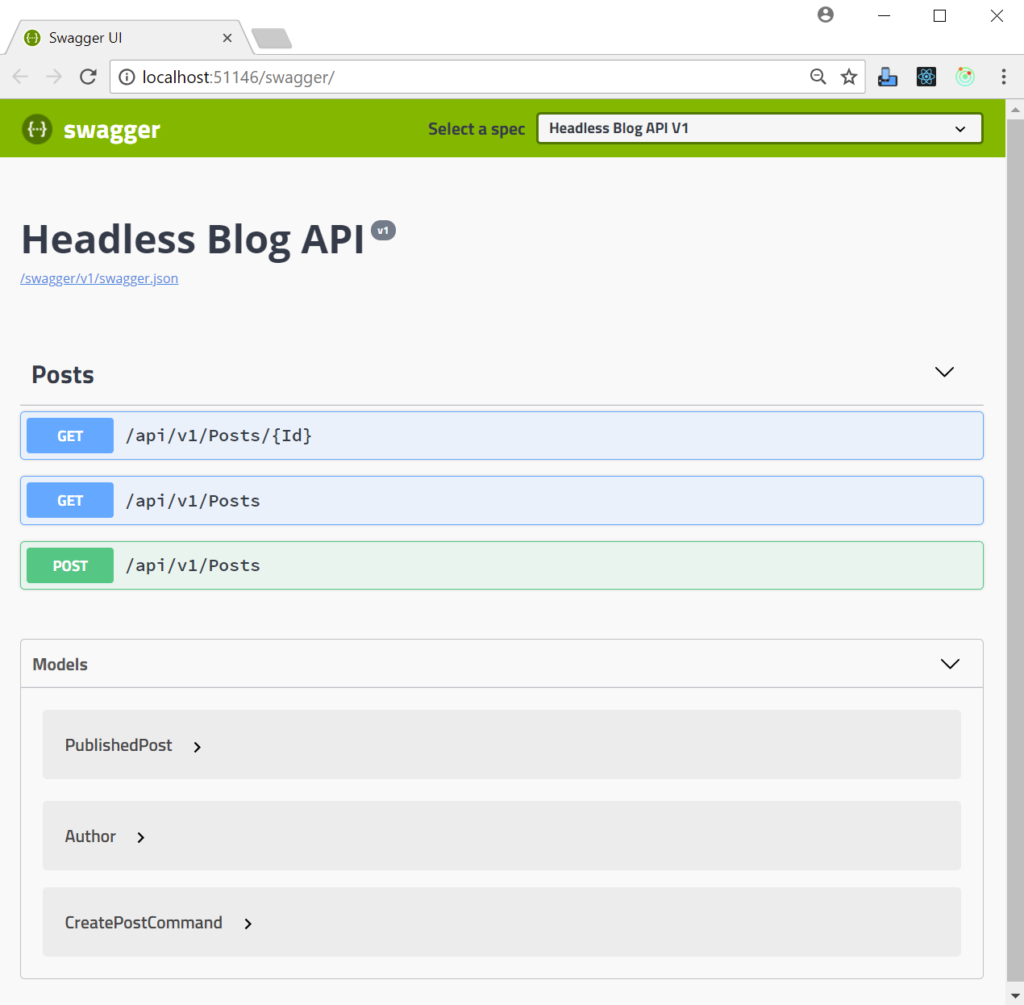
If we enable Swagger too then that gives us an API that looks like this:

There is, quite literally, no other ASP.Net code involved – there are no controllers to write.

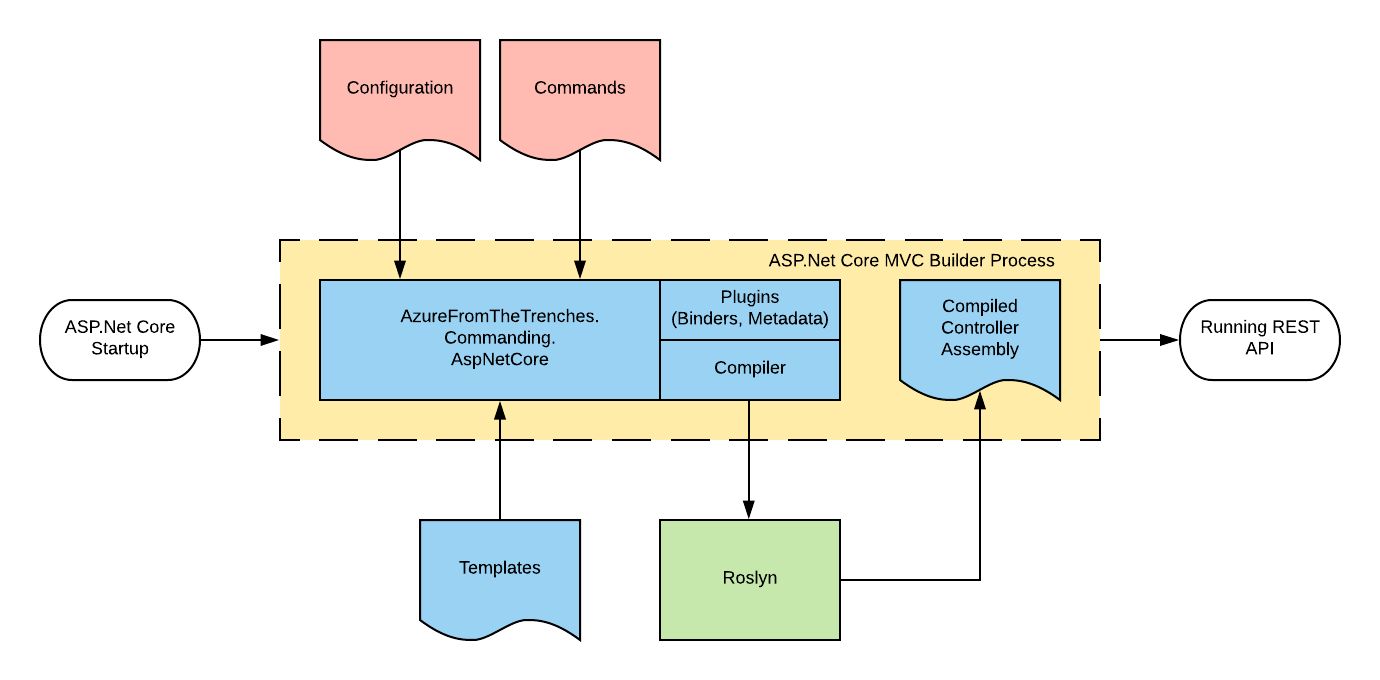
So how does it work? Essentially by writing and compiling the controllers for you using Roslyn and adding a couple of pieces of ASP.Net Core plumbing (but nothing that interferes with the broader running of ASP.Net – you can mix and match command based controllers with hand written controllers) as shown in the diagram below:

Essentially you bring along the configuration block (as shown in the code sample earlier) and your commands and the framework will do the rest.

I have a quickstart and detailed documentation available on the frameworks documentation site but I’m going to take a different perspective on this here and break down a more complex configuration block than that I showed above:

// This method gets called by the runtime. Use this method to add services to the container.
public void ConfigureServices(IServiceCollection services)
{
    ICommandingDependencyResolverAdapter commandingAdapter =
        new CommandingDependencyResolverAdapter(
            (fromType,toInstance) => services.AddSingleton(fromType, toInstance),
            (fromType,toType) => services.AddTransient(fromType, toType),
            (resolveType) => ServiceProvider.GetService(resolveType)
        );
    ICommandRegistry commandRegistry = commandingAdapter.AddCommanding().Discover<Startup>();

    services
        .Replace(new ServiceDescriptor(typeof(ICommandDispatcher), typeof(ApplicationErrorAwareCommandDispatcher), ServiceLifetime.Transient))
        .AddMvc(mvc => mvc.Filters.Add(new FakeClaimsProvider()))
        .AddAspNetCoreCommanding(cfg => cfg
            .DefaultControllerRoute("/api/v1/[controller]")
            .Controller("Posts", controller => controller
                .Action<GetPostQuery>(HttpMethod.Get, "{Id}")
                .Action<GetPostsQuery,FromQueryAttribute>(HttpMethod.Get)
                .Action<CreatePostCommand>(HttpMethod.Post)
            )
            .Claims(mapping => mapping.MapClaimToPropertyName("UserId", "AuthenticatedUserId"))
        )
        .AddFluentValidation();

    services.AddSwaggerGen(c =>
    {
        c.SwaggerDoc("v1", new Info { Title = "Headless Blog API", Version = "v1" });
        c.AddAspNetCoreCommanding();
    });

}

Firstly we register the commanding framework:

ICommandingDependencyResolverAdapter commandingAdapter =
    new CommandingDependencyResolverAdapter(
        (fromType,toInstance) => services.AddSingleton(fromType, toInstance),
        (fromType,toType) => services.AddTransient(fromType, toType),
        (resolveType) => ServiceProvider.GetService(resolveType)
    );
ICommandRegistry commandRegistry = commandingAdapter.AddCommanding().Discover<Startup>();

If you’ve used this framework below then this will be quite familiar code – we create an adapter for our IoC container (the framework itself is agnostic of IoC container and uses an adapter to work with any IoC framework of your choice) and then register the commanding infrastructure with it and finally we use the .Discover method to search for and register command handlers in the same assembly as our Startup class.

Next we begin to register our other services, including MVC, with our IoC container:

services
    .Replace(new ServiceDescriptor(typeof(ICommandDispatcher), typeof(ApplicationErrorAwareCommandDispatcher), ServiceLifetime.Transient))

The first service we register is a command dispatcher – as we’ll see shortly this is a decorator for the framework provided dispatcher. This is entirely optional but its quite common to want to apply cross cutting concerns to every operation and implementing a decorator like this is an excellent place to do so. In our example we want to translate application errors that occur during command handling into appropriate HTTP responses. The code for this decorator is shown below:

public class ApplicationErrorAwareCommandDispatcher : ICommandDispatcher
{
    private readonly IFrameworkCommandDispatcher _underlyingCommandDispatcher;

    public ApplicationErrorAwareCommandDispatcher(IFrameworkCommandDispatcher underlyingCommandDispatcher)
    {
        _underlyingCommandDispatcher = underlyingCommandDispatcher;
    }

    public async Task<CommandResult<TResult>> DispatchAsync<TResult>(ICommand<TResult> command, CancellationToken cancellationToken = new CancellationToken())
    {
        try
        {
            CommandResult<TResult> result = await _underlyingCommandDispatcher.DispatchAsync(command, cancellationToken);
            if (result.Result == null)
            {
                throw new RestApiException(HttpStatusCode.NotFound);
            }
            return result;
        }
        catch (CommandModelException ex)
        {
            ModelStateDictionary modelStateDictionary = new ModelStateDictionary();
            modelStateDictionary.AddModelError(ex.Property, ex.Message);
            throw new RestApiException(HttpStatusCode.BadRequest, modelStateDictionary);
        }
    }

    public Task<CommandResult> DispatchAsync(ICommand command, CancellationToken cancellationToken = new CancellationToken())
    {
        return _underlyingCommandDispatcher.DispatchAsync(command, cancellationToken);
    }

    public ICommandExecuter AssociatedExecuter { get; } = null;
}

Essentially this traps a specific exception raised from our handlers (CommandModelException) and translates it into model state information and rethrows that as a RestApiException. The RestApiException is an exception defined by the framework that our configuration based controllers expect to handle and will catch and translate into the appropraite HTTP result. In our case a BadRequest with the model state as the response.

This is a good example of the sort of code that, if you write controllers by hand, you tend to find yourself writing time and time again – and even if you write a base class and helpers you still need to write the code that invokes them for each action in each controller and its not uncommon to find inconsistencies creeping in over time or things being outright missed.

Returning to our configuration block the next thing we add to the service collection is ASP.Net Core MVC:

    .AddMvc(mvc => mvc.Filters.Add(new FakeClaimsProvider()))

In the example I’m basing this on I want to demonstrate the claims support without having to have everybody set up a real identity provider and so I also add a global resource filter that simply adds some fake claims to our identity model.

AddMvc returns an IMvcBuilder interface that can be used to provide additional configuration and this is what the REST commanding framework configures in order to expose commands as REST endpoints and so the next line adds our framework components to MVC and then supplies a builder of its own for configuring our endpoints and other behaviours:

    .AddAspNetCoreCommanding(cfg => cfg

On the next line we use of the configurations options exposed by the framework to replace the default controller route prefix with a versioned one:

        .DefaultControllerRoute("/api/v1/[controller]")

This is entirely optional and if not specified the framework will simply to default to the same convention used by ASP.Net Core (/api/[controller]).

Next we have a simple repition of the block we looked at earlier:

        .Controller("Posts", controller => controller
                .Action<GetPostQuery>(HttpMethod.Get, "{Id}")
                .Action<GetPostsQuery,FromQueryAttribute>(HttpMethod.Get)
                .Action<CreatePostCommand>(HttpMethod.Post)
            )

This defines a controller called Posts (the generated class name will be PostsController) and then assigns 3 actions to it to give us endpoints we saw in the Swagger definition:

  1. GET: /api/v1/Posts/{Id}
  2. GET: /api/v1/Posts
  3. POST: /api/v1/Posts

For more information on how actions can be configured take a look at this here.

Next we instruct the framework to map the claim named UserId onto any command property called AuthenticatedUserId:

        .Claims(mapping => mapping.MapClaimToPropertyName("UserId", "AuthenticatedUserId"))

Their is another variant of the claims mapper declaration that allows properties to be configured on a per command basis though if you are starting with a greenfield solution taking a consistent approach to naming can simplify things.

Data sourced from claims is generally not something you want a user to be able to supply – for example if they can supply a different user ID in our example here then that might lead to a data breach with users being able to access inappropriate data. In order to ensure this cannot happen the framework supplies an attribute, SecurityPropertyAttribute, that enables properties to be marked as sensitive. For example here’s the CreatePostCommand from the example we are looking at:

public class CreatePostCommand : ICommand<PublishedPost>
{
    // Marking this property with the SecurityProperty attribute means that the ASP.Net Core Commanding
    // framework will not allow binding to the property except by the claims mapper
    [SecurityProperty]
    public Guid AuthenticatedUserId { get; set; }

    public string Title { get; set; }

    public string Body { get; set; }
}

The framework installs extensions into ASP.Net Core that adjust model metadata and binding (including from request bodies – that ASP.Net Core behaves somewhat inconsistently with) to ensure that they cannot be written to from an endpoint and, as we’ll see shortly, are hidden from Swagger.

The final line of our MVC builder extensions replaces the built in validation with Fluent Validation:

        .AddFluentValidation();

This is optional and you can use the attribute based validation model (or any other validation model) with the command framework however if you do so you’re baking validation data into your commands and this can be limiting: for example you may want to apply different validations based on context (queue vs. REST API). It’s important to note that validation, and all other ASP.Net Core functionality, will be applied to the commands as they pass through its pipeline – their is nothing special about them at all other than what I outlined above in terms of sensitive properties. This framework really does just build on ASP.Net Core – it doesn’t subvert it or twist it in some abominable way.

Then finally we add a Swagger endpoint using Swashbuckle:

services.AddSwaggerGen(c =>
    {
        c.SwaggerDoc("v1", new Info { Title = "Headless Blog API", Version = "v1" });
        c.AddAspNetCoreCommanding();
    });

The call to AddAspNetCoreCommanding here adds schema filters into Swagger that understand how to interpret the SecurityPropertyAttribute attribute and will prevent those properties from appearing in the Swagger document.

Conclusions

By taking the approach outlined in this post we’ve greatly reduced the amount of code we need to write eliminating all the boilerplate normally associated with writing a REST API in ASP.Net Core and we’ve completely decoupled our application logic from communication protocols, runtime model and host.

Simplistically less code gives us less to test, less to review, lower maintenance, improved consistency and fewer defects.

And we’ve gained a massive amount of flexibility in our application architecture that allows us to tailor our approach to best fit our project at a given point in time / stage of development lifecycle and more easily take advantage of new technologies.

To give a flavour of the latter, support for Azure Functions is currently under development allowing for the same API and underlying implementation to be expressed in a serverless model simply by adopting a new NuGet package and changing the configuration to the below (please bear in mind this comes from the early, but functional, work in progress and so is liable to change):

public class FunctionAppConfiguration : IFunctionAppConfiguration
{
    public void Build(IFunctionHostBuilder builder)
    {
        builder
            // register services and commands
            .Setup((services, commandRegistry) => commandRegistry.Discover<FunctionAppConfiguration>())
            // register functions - by default the functions will be given the name of the command minus the postfix Command and use the GET verb
            .Functions(functions => functions
                    .HttpFunction<GetPostsQuery>()
                    .HttpFunction<GetPostQuery>()
                    .HttpFunction<CreatePostCommand>(function => function.AddVerb(HttpMethod.Post))
            );
    }
}

In addition to bringing the same benefits to Functions as the approach above does to ASP.Net Core this also provides, to my eyes, a cleaner approach for expressing Function triggers and provides structure for things like an IoC container.


C# Cloud Application Architecture – Commanding via a Mediator (Part 5)

Over the last 4 parts of this series we’ve taken a simple application built around a layered architecture and restructured it into an application based around dispatching queries and commands as state through a mediator.

We’ve seen many of the advantages this can bring to a codebase reducing repetition and allowing for a clear decomposition into business, or service, oriented modules.

In this final part I’ll demonstrate how this pattern can support an application through the various stages of it’s lifecycle. The early stages of a software development project are often susceptible to a high degree of change. If it’s a new product under development then the challenge is often around establishing market fit (be that internal or external) without burning through the entire budget. Additionally if the problem domain is new it’s likely that the first attempt at drawing out bounded contexts will contain errors and if the system is built as fully isolated components change can be expensive. In either case keeping the cost of development and change low in the early phases of the project can lead to much more effective use of a projects budget.

In the system we’ve been developing we’ve developed three sub-systems: a checkout, a shopping cart and a product store – essentially we have a modular monolith.

In this part we’re going to assume that we’re finding that our product store is coming under a lot of strain and we are going to pull it out into a micro-service so that we can scale it independently. And we’re going to make this change without altering any consuming business logic code at all.

In our system we make use of the store in two places through the dispatch of GetStoreProductQuery queries. Firstly it is represented in the primary API as an endpoint that can be called by clients in the ProductController class:

[Route("api/[controller]")]
public class ProductController : AbstractCommandController
{
    public ProductController(ICommandDispatcher dispatcher) : base(dispatcher)
    {
            
    }

    [HttpGet("{productId}")]
    [ProducesResponseType(typeof(StoreProduct), 200)]
    public async Task<IActionResult> Get([FromRoute] GetStoreProductQuery query) => await ExecuteCommand(query);
}

Secondly it is also used to provide validation of products within the handler for the AddToCartCommand in the AddToCartCommandHandler class:

public async Task<CommandResponse> ExecuteAsync(AddToCartCommand command, CommandResponse previousResult)
{
    Model.ShoppingCart cart = await _repository.GetActualOrDefaultAsync(command.AuthenticatedUserId);

    StoreProduct product = (await _dispatcher.DispatchAsync(new GetStoreProductQuery{ProductId = command.ProductId})).Result;

    if (product == null)
    {
        _logger.LogWarning("Product {0} can not be added to cart for user {1} as it does not exist", command.ProductId, command.AuthenticatedUserId);
        return CommandResponse.WithError($"Product {command.ProductId} does not exist");
    }
    List<ShoppingCartItem> cartItems = new List<ShoppingCartItem>(cart.Items);
    cartItems.Add(new ShoppingCartItem
    {
        Product = product,
        Quantity = command.Quantity
    });
    cart.Items = cartItems;
    await _repository.UpdateAsync(cart);
    return CommandResponse.Ok();
}

To make our change the first thing we need to do is to be able to execute our command inside a different host – we’ll use an Azure Function that accepts the ProductID required by ourGetStoreProductQuery query. The code for this function is shown below:

public static class GetStoreProduct
{
    private static readonly IServiceProvider ServiceProvider;
    private static readonly AsyncLocal<ILogger> Logger = new AsyncLocal<ILogger>();
        
    static GetStoreProduct()
    {
        IServiceCollection serviceCollection = new ServiceCollection();
        MicrosoftDependencyInjectionCommandingResolver resolver = new MicrosoftDependencyInjectionCommandingResolver(serviceCollection);
        ICommandRegistry registry = resolver.UseCommanding();
        serviceCollection.UseCoreCommanding(resolver);
        serviceCollection.UseStore(() => ServiceProvider, registry, ApplicationModeEnum.Server);
        serviceCollection.AddTransient((sp) => Logger.Value);
        ServiceProvider = resolver.ServiceProvider = serviceCollection.BuildServiceProvider();
    }

    [FunctionName("GetStoreProduct")]
    public static async Task<IActionResult> Run([HttpTrigger(AuthorizationLevel.Anonymous, "get", "post", Route = null)]HttpRequest req, ILogger logger)
    {
        Logger.Value = logger;
        logger.LogInformation("C# HTTP trigger function processed a request.");
            
        IDirectCommandExecuter executer = ServiceProvider.GetService<IDirectCommandExecuter>();

        GetStoreProductQuery query = new GetStoreProductQuery
        {
            ProductId = Guid.Parse(req.GetQueryParameterDictionary()["ProductId"])
        };
        CommandResponse<StoreProduct> result = await executer.ExecuteAsync(query);
        return new OkObjectResult(result);
    }
}

Our static constructor sets up our IoC container (Azure Functions actually run on app service instances and you can share state between them – though their are few guarantees and you can debate at length how “serverless” this makes things – AWS Lambda is much the same) and should be fairly familiar code by now.

Our function entry point does something different – it creates an instance of our GetStoreProductQuery from the query parameters supplied but rather than dispatch it through the ICommandDispatcher interface we’ve seen before it executes it using a reference to a IDirectCommandExecuter resolved from our IoC container. This instructs the command framework to execute the command without any dispatch semantics – that means that any logging of dispatch portions of the command flow won’t be replicated by this function and it is slightly more efficient (it’s worth noting that you can dispatch again here if you need to – though generally you would take the approach I am showing here).

To support this new approach I’ve also made a change to the IServiceCollectionsExtensions UseStore registration method inside the Store.Application project so that it can be supplied an enum that determines how our command should be handled: in process (as we’ve been doing up until now), as a client of a remote service, or as a server (as we have done above). The enum is used to register the command in one of two ways and this is the key change to the existing change that enables us to remote the command:

if (applicationMode == ApplicationModeEnum.InProcess || applicationMode == ApplicationModeEnum.Server)
{
    commandRegistry.Register<GetStoreProductQueryHandler>();
}
else if (applicationMode == ApplicationModeEnum.Client)
{
    // this configures the command dispatcher to send the command over HTTP and wait for the result
    Uri functionUri = new Uri("http://localhost:7071/api/GetStoreProduct");
    commandRegistry.Register<GetStoreProductQuery, CommandResponse<StoreProduct>>(() =>
    {
        IHttpCommandDispatcherFactory httpCommandDispatcherFactory = serviceProvider().GetService<IHttpCommandDispatcherFactory>();
        return httpCommandDispatcherFactory.Create(functionUri, HttpMethod.Get);
    });
}

Both the in-process and server mode continue to register the handler as they have done before however when the application mode is set to client the registration takes a different form. Rather than register the handler we supply the type of the command and the type of the result as generic type parameters but then we setup a lambda that will resolve an instance of a IHttpCommandDispatcherFactory and create a HTTP dispatcher with the URI of the function and the HTTP verb to use. These interfaces can be found within the NuGet package AzureFromTheTrenches.Commanding.Http which I’ve added to the Store.Application project.

Registering in this way instructs the commanding system to dispatch the command using the, in this case, HTTP dispatcher rather than attempt to execute it locally. All the other framework features around the dispatch process continue to behave as usual and as we saw earlier you can pick this up on the other side of the HTTP call with the IDirectCommandExecuter.

I have shifted some other code around inside the solution to support code sharing with the Azure Function but that is really the extent of the code change. We’ve changed no business logic or consuming application code – we’ve simply moved where the command runs and the calling semantics are seamless – and essentially split the store out as a micro-service running inside an Azure Function. As long as you build your sub-systems as isolated units as we have here this same approach can be used with queues and other forms of remote call.

I’ve found this approach to be massively powerful – in the early stages of a project you can make changes within a codebase and with an operational environment that is fairly simple and is easy to manage and supported by tooling and as long as you have the tests to go with it refactoring a solution like this is really simple and is supported by tools like Resharper. Then, as you begin to lock things down or the solution grows, you can pull out the sub-systems into fully independent micro services without significant code change – it’s largely just configuration as we’ve seen above.

I wrote the commanding framework I’ve been using specifically to enable this approach and you can find it, and documentation, on GitHub here.

I hope this series has been interesting and presented (or refreshed) a different way of thinking about C# application architecture. There’s a fair chance I’ll swing back round and talk a bit about commanding result caching and some other scenarios that this approach enables so watch this space.

In the meantime if you have any questions about the approach or my commanding framework please do get in touch over on Twitter.

Finally the code for this final part can be found on GitHub here:

https://github.com/JamesRandall/CommandMessagePatternTutorial/tree/master/Part5

Other Parts in the Series

Part 4
Part 3
Part 2
Part 1

C# Cloud Application Architecture – Commanding via a Mediator (Part 4)

In the last post we added validation to our solution. This time we’re going to clean up our command handlers so that they are focused more on business / domain concerns and we pull out the infrastructural concerns. After that we’ll add some telemetry to the system to further reinforce some of the benefits of the pattern. As the handlers currently stand they mix up logging with their business concerns, for example our add to cart command handler:

public async Task<CommandResponse> ExecuteAsync(AddToCartCommand command, CommandResponse previousResult)
{
    Model.ShoppingCart cart = await _repository.GetActualOrDefaultAsync(command.AuthenticatedUserId);

    StoreProduct product = (await _dispatcher.DispatchAsync(new GetStoreProductQuery{ProductId = command.ProductId})).Result;

    if (product == null)
    {
        _logger.LogWarning("Product {0} can not be added to cart for user {1} as it does not exist", command.ProductId, command.AuthenticatedUserId);
        return CommandResponse.WithError($"Product {command.ProductId} does not exist");
    }
    List<ShoppingCartItem> cartItems = new List<ShoppingCartItem>(cart.Items);
    cartItems.Add(new ShoppingCartItem
    {
        Product = product,
        Quantity = command.Quantity
    });
    cart.Items = cartItems;
    await _repository.UpdateAsync(cart);
    _logger.LogInformation("Updated basket for user {0}", command.AuthenticatedUserId);
    return CommandResponse.Ok();
}

There are a number of drawbacks with this:

  • As the author of a handler you have to remember to add all this logging code, with the best will and review cycle in the world people do forget these things or drop them due to time pressure. In fact, as a case in point, here I’ve missed the entry point logger.
  • It’s hard to tell what is exceptional and business as usual – for example the log of a warning is something specific to this business process while the top and tail is not.
  • It adds to unit test cost and complexity.
  • It’s more code and more code equals more bugs.
  • It makes the code more difficult to read.

This is all compounded further if we begin to add additional infrastructural work such as counters and further error handling:

public async Task<CommandResponse> ExecuteAsync(AddToCartCommand command, CommandResponse previousResult)
{
    Measure measure = _telemetry.Start<AddToCartCommandHandler>();
    try
    {
        _logger.LogInformation("Updating basket for user {0}", command.AuthenticatedUserId);
        Model.ShoppingCart cart = await _repository.GetActualOrDefaultAsync(command.AuthenticatedUserId);

        StoreProduct product =
            (await _dispatcher.DispatchAsync(new GetStoreProductQuery {ProductId = command.ProductId})).Result;

        if (product == null)
        {
            _logger.LogWarning("Product {0} can not be added to cart for user {1} as it does not exist",
                command.ProductId, command.AuthenticatedUserId);
            return CommandResponse.WithError($"Product {command.ProductId} does not exist");
        }
        List<ShoppingCartItem> cartItems = new List<ShoppingCartItem>(cart.Items);
        cartItems.Add(new ShoppingCartItem
        {
            Product = product,
            Quantity = command.Quantity
        });
        cart.Items = cartItems;
        await _repository.UpdateAsync(cart);
        _logger.LogInformation("Updated basket for user {0}", command.AuthenticatedUserId);
        return CommandResponse.Ok();
    }
    catch(Exception ex)
    {
        _logger.LogError("Error updating basket for user {0}", command.AuthenticatedUserId, ex);
    }
    finally
    {
        measure.Complete();
    }
}

This is getting messier and messier but, sadly, it’s not uncommon to see code like this in applications (we’ve all seen it right?) and while the traditional layered architecture can help with sorting this out (it’s common to see per service decorators for example) it tends to lead to code repitition. And if you wanted to add measures like that shown above to our system we have to visit every command handler or service. Essentially you are limited in the degree to which you can tidy this up because you’re dealing with operations expressed and executed using compiled calling semantics.

However now we’ve moved our operations over to being expressed as state and executed through a mediator we have a lot more flexibility in how we can approach this and I’d like to illustrate this through two approaches to the problem. Firstly by using the decorator pattern and then by using a feature of the AzureFromTheTrenches.Commanding framework.

Before we get into the meat of this it’s worth quickly noting that this isn’t the only approach to such a problem. One alternative, for example, is to take a strongly functional approach – something that I may explore in a future post.

Decorator Approach

Before we get started the code for this approach can be found here:

https://github.com/JamesRandall/CommandMessagePatternTutorial/tree/master/Part4-decorator

The decorator pattern allow us to add new behaviours to an existing implementation – in the system here all of our controllers make use of the ICommandDispatcher interface to execute commands and queries. For example our shopping cart controller looks like this:

[Route("api/[controller]")]
public class ShoppingCartController : AbstractCommandController
{
    public ShoppingCartController(ICommandDispatcher dispatcher) : base(dispatcher)
    {
            
    }

    [HttpGet]
    [ProducesResponseType(typeof(ShoppingCart.Model.ShoppingCart), 200)]
    public async Task<IActionResult> Get() => await ExecuteCommand<GetCartQuery, ShoppingCart.Model.ShoppingCart>();

    [HttpPut("{productId}/{quantity}")]
    public async Task<IActionResult> Put([FromRoute] AddToCartCommand command) => await ExecuteCommand(command);
        

    [HttpDelete]
    public async Task<IActionResult> Delete() => await ExecuteCommand<ClearCartCommand>();
}

If we can extend the ICommandDispatcher to handle our logging in a generic sense and replace it’s implementation in the IoC container then we no longer need to handle logging on a per command handler basis. Happily we can! First let’s take a look at the declaration of the interface:

public interface ICommandDispatcher : IFrameworkCommandDispatcher
{
        
}

Interestingly it doesn’t contain any declarations itself but it does derive from something called IFrameworkCommandDispatcher that does:

public interface IFrameworkCommandDispatcher
{
    Task<CommandResult<TResult>> DispatchAsync<TResult>(ICommand<TResult> command, CancellationToken cancellationToken = default(CancellationToken));

    Task<CommandResult> DispatchAsync(ICommand command, CancellationToken cancellationToken = default(CancellationToken));

    ICommandExecuter AssociatedExecuter { get; }
}

And so to decorate the default implementation of ICommandDispatcher with new behaviour we need to provide an implementation of this interface that adds the new functionality and calls down to the original dispatcher. For example a first cut of this might look like this:

internal class LoggingCommandDispatcher : ICommandDispatcher
{
    private readonly ICommandDispatcher _underlyingDispatcher;
    private readonly ILogger<LoggingCommandDispatcher> _logger;

    public LoggingCommandDispatcher(ICommandDispatcher underlyingDispatcher,
        ILoggerFactory loggerFactory)
    {
        _underlyingDispatcher = underlyingDispatcher;
        _logger = loggerFactory.CreateLogger<LoggingCommandDispatcher>();
    }

    public async Task<CommandResult<TResult>> DispatchAsync<TResult>(ICommand<TResult> command, CancellationToken cancellationToken)
    {
        try
        {
            _logger.LogInformation("Executing command {commandType}", command.GetType().Name);
            CommandResult<TResult> result = await _underlyingDispatcher.DispatchAsync(command, cancellationToken);
            _logger.LogInformation("Successfully executed command {commandType}", command.GetType().Name);
            return result;
        }
        catch (Exception ex)
        {
            LogFailedPostDispatchMessage(command, ex);
            return new CommandResult<TResult>(CommandResponse<TResult>.WithError($"Error occurred performing operation {command.GetType().Name}"), false);
        }
    }

    public Task<CommandResult> DispatchAsync(ICommand command, CancellationToken cancellationToken = new CancellationToken())
    {
        throw new NotSupportedException("All commands must return a CommandResponse");
    }

    public ICommandExecuter AssociatedExecuter => _underlyingDispatcher.AssociatedExecuter;
}

We’ve wrapped the underlying dispatch mechanism with loggers and a try catch block that deals with errors and by doing so we no longer have to implement this in each and every command handler. As our pattern and convention approach requires all our command to be declared with a CommandResponse result I’ve also updated the resultless DispatchAsync implementation to throw an exception – it should never be called but if it is we know we’ve missed something on a command.

Before updating all our handlers we need to replace the registration inside our IoC container so that a resolution of ICommandDispatcher will return an instance of our new decorated version. And so in our Startup.cs for the API project we need to add this line to the end of the ConfigureServices method:

services.Replace(
    new ServiceDescriptor(typeof(ICommandDispatcher), typeof(LoggingCommandDispatcher),
    ServiceLifetime.Transient));

This removes the previous implementation and replaces it with our implementation. However if we try to run this we’ll quickly run into exceptions being thrown as we’ve got a problem – and it’s a fairly common problem that you’ll run across when implementing decorators over interfaces who’s implementation is defined in a third party library. When the IoC container attempts to resolve the ICommandFactory it will correctly locate the LoggingCommandDispatcher class but its constructor expects to be passed, and here’s the problem, an instance of ICommandFactory which will cause the IoC container to attempt to instantiate another instance of LoggingCommandDispatcher and so on. At best this is going to be recognised as a problem by the IoC container and a specific excpetion will be thrown or at worst it’s going to result in a stack overflow exception.

The framework supplied implementation of ICommandDispatcher is an internal class and not something we can get access to and so the question is how do we solve it? We could declare a new interface type derived from ICommandDispatcher for our new class and update all our references but I prefer to keep the references somewhat generic – as the classes making references to ICommandDispatcher aren’t themselves asserting the capabilities they require ICommandDispatcher seems a better fit.

One option is to resolve an instance of ICommandDispatcher before we register our LoggingCommandDispatcher and then use a factory to instantiate our class – or take a similar approach but register the LoggingCommandDispatcher as a singleton. However in either case we’ve forced a lifecycle change on the ICommandDispatcher implementation (in the former example the underlying ICommandDispatcher has been made a singleton and in the latter the LoggingCommandDispatcher) which is a fairly significant change in behaviour. While, as things stand, that would work for now is likely to lead to issues and limitations later on.

We do however have an alternative approach and it’s the reason that the AzureFromTheTrenches.Commanding package defines the interface IFrameworkCommandDispatcher that we saw earlier. It’s not designed to be referenced directly by command disptching code instead its provided to support the exact scenario we have here – decorating an internal class with an IoC container without lifecycle change. The internal implementation of the command dispather is registered against both ICommandDispatcher and IFrameworkCommandDispatcher. We can take advantage of this by updating our decorated dispatcher to accept this interface as a constructor parameter:

internal class LoggingCommandDispatcher : ICommandDispatcher
{
    private readonly ICommandDispatcher _underlyingDispatcher;
    private readonly ILogger<LoggingCommandDispatcher> _logger;

    public LoggingCommandDispatcher(IFrameworkCommandDispatcher underlyingDispatcher,
        ILoggerFactory loggerFactory)
    {
        _underlyingDispatcher = underlyingDispatcher;
        _logger = loggerFactory.CreateLogger<LoggingCommandDispatcher>();
    }

    // ... rest of the code is the same
}

With that taken care of we can revisit our handlers and remove the logging code and so our add to cart command handler, which had become quite bloated, now looks like this:

public async Task<CommandResponse> ExecuteAsync(AddToCartCommand command, CommandResponse previousResult)
{
    Model.ShoppingCart cart = await _repository.GetActualOrDefaultAsync(command.AuthenticatedUserId);

    StoreProduct product = (await _dispatcher.DispatchAsync(new GetStoreProductQuery{ProductId = command.ProductId})).Result;

    if (product == null)
    {
        _logger.LogWarning("Product {0} can not be added to cart for user {1} as it does not exist", command.ProductId, command.AuthenticatedUserId);
        return CommandResponse.WithError($"Product {command.ProductId} does not exist");
    }
    List<ShoppingCartItem> cartItems = new List<ShoppingCartItem>(cart.Items);
    cartItems.Add(new ShoppingCartItem
    {
        Product = product,
        Quantity = command.Quantity
    });
    cart.Items = cartItems;
    await _repository.UpdateAsync(cart);
    return CommandResponse.Ok();
}

As another example the GetCartQueryHandler previously looked like this:

public async Task<CommandResponse<Model.ShoppingCart>> ExecuteAsync(GetCartQuery command, CommandResponse<Model.ShoppingCart> previousResult)
{
    _logger.LogInformation("Getting basket for user {0}", command.AuthenticatedUserId);
    try
    {
        Model.ShoppingCart cart = await _repository.GetActualOrDefaultAsync(command.AuthenticatedUserId);
        _logger.LogInformation("Retrieved cart for user {0} with {1} items", command.AuthenticatedUserId, cart.Items.Count);
        return CommandResponse<Model.ShoppingCart>.Ok(cart);
    }
    catch (Exception e)
    {
        _logger.LogError(e, "Unable to get basket for user {0}", command.AuthenticatedUserId);
        return CommandResponse<Model.ShoppingCart>.WithError("Unable to get basket");
    }
}

And now looks like this:

public async Task<CommandResponse<Model.ShoppingCart>> ExecuteAsync(GetCartQuery command, CommandResponse<Model.ShoppingCart> previousResult)
{
    Model.ShoppingCart cart = await _repository.GetActualOrDefaultAsync(command.AuthenticatedUserId);
    return CommandResponse<Model.ShoppingCart>.Ok(cart);
}

Much cleaner, less code, we can’t forget to do things and its much simpler to test!

Earlier I mentioned adding some basic telemetry in to track the execution time of our commands. Now we’ve got our decorated command dispatcher in place to add this to all our commands requires just a few lines of code:

public async Task<CommandResult<TResult>> DispatchAsync<TResult>(ICommand<TResult> command, CancellationToken cancellationToken)
{
    IMetricCollector metricCollector = _metricCollectorFactory.Create(command.GetType());
    try
    {   
        LogPreDispatchMessage(command);
        CommandResult<TResult> result = await _underlyingDispatcher.DispatchAsync(command, cancellationToken);
        LogSuccessfulPostDispatchMessage(command);
        metricCollector.Complete();
        return result;
    }
    catch (Exception ex)
    {
        LogFailedPostDispatchMessage(command, ex);
        metricCollector.CompleteWithError();
        return new CommandResult<TResult>(CommandResponse<TResult>.WithError($"Error occurred performing operation {command.GetType().Name}"), false);
    }
}

Again by taking this approach we don’t have to revisit each of our handlers, we don’t have to remember to do so in future, our code volume is kept low, and we don’t have to revisit all our handler unit tests.

The collector itself is just a simple wrapper for Application Insights and can be found in the full solution. Additionally in the final solution code I’ve further enhanced the LoggingCommandDispatcher to demonstrate how richer log syntax can still be output – there are a variety of ways this could be done, I’ve picked a simple to implement one here. The code for this approach can be found here:

https://github.com/JamesRandall/CommandMessagePatternTutorial/tree/master/Part4-decorator

The decorator approach is a powerful pattern that can be used to extend functionality of third party components but now we’ll look at using a built-in feature of the commanding framework we’re using to achieve the same results in a different way.

Framework Approach

The code for the below can be found at:

https://github.com/JamesRandall/CommandMessagePatternTutorial/tree/master/Part4-framework

The framework we are using contains functionality designed to support logging and event store type scenarios that we can make use of to record log entries similar to those we recorded using our decorator approach and collect our timing metrics. It does this by allowing us to attach auditor classes to three hook points:

  • Pre-dispatch – occurs as soon as a command is received by the framework
  • Post-dispatch – occurs once a command has been dispatched, this only really applies when execution happens on the other side of a network or process boundary (we’ll come back to this in the next part)
  • Post-execution – occurs once a command has been executed

For the moment we’re only going to make use of the pre-dispatch and post-execution hooks. Auditors need to implement the ICommandAuditor interface as shown in our pre-dispatch auditor below:

internal class LoggingCommandPreDispatchAuditor : ICommandAuditor
{
    private readonly ILogger<LoggingCommandPreDispatchAuditor> _logger;

    public LoggingCommandPreDispatchAuditor(ILogger<LoggingCommandPreDispatchAuditor> logger)
    {
        _logger = logger;
    }

    public Task Audit(AuditItem auditItem, CancellationToken cancellationToken)
    {
        if (auditItem.AdditionalProperties.ContainsKey("UserId"))
        {
            _logger.LogInformation("Executing command {commandType} for user {userId}",
                auditItem.CommandType,
                auditItem.AdditionalProperties["UserId"]);
        }
        else
        {
            _logger.LogInformation("Executing command {commandType}",
                auditItem.CommandType);
        }
        return Task.FromResult(0);
    }
}

The framework constructs them using the IoC container and so dependencies can be injected as appropriate.

The auditors don’t have direct access to commands but in the code above we can see that we are looking at the UserId as part of our logging logic. The framework also provides the ability for audit items to be enriched using an IAuditItemEnricher instance that does have access to the command and so we pull this information out and make it available as a property on the AuditItem using one of these enrichers:

public class AuditItemUserIdEnricher : IAuditItemEnricher
{
    public void Enrich(Dictionary<string, string> properties, ICommand command, ICommandDispatchContext context)
    {
        if (command is IUserContextCommand userContextCommand)
        {
            properties["UserId"] = userContextCommand.AuthenticatedUserId.ToString();
        }
    }
}

It’s also possible to use the same audit class for all three hook types and inspect a property of the AuditItem parameter to determine the stage but I find if that sort of branching is needed it’s often neater to have discrete classes and so I have separated out the logic for the post-execution logic into another auditor class:

internal class LoggingCommandExecutionAuditor : ICommandAuditor
{
    private readonly ILogger<LoggingCommandExecutionAuditor> _logger;
    private readonly IMetricCollector _metricCollector;

    public LoggingCommandExecutionAuditor(ILogger<LoggingCommandExecutionAuditor> logger,
        IMetricCollector metricCollector)
    {
        _logger = logger;
        _metricCollector = metricCollector;
    }

    public Task Audit(AuditItem auditItem, CancellationToken cancellationToken)
    {
        Debug.Assert(auditItem.ExecutedSuccessfully.HasValue);
        Debug.Assert(auditItem.ExecutionTimeMs.HasValue);

        if (auditItem.ExecutedSuccessfully.Value)
        {
            if (auditItem.AdditionalProperties.ContainsKey("UserId"))
            {
                _logger.LogInformation("Successfully executed command {commandType} for user {userId}",
                    auditItem.CommandType,
                    auditItem.AdditionalProperties["UserId"]);
            }
            else
            {
                _logger.LogInformation("Executing command {commandType}",
                    auditItem.CommandType);
            }
            _metricCollector.Record(auditItem.CommandType, auditItem.ExecutionTimeMs.Value);
        }
        else
        {
            if (auditItem.AdditionalProperties.ContainsKey("UserId"))
            {
                _logger.LogInformation("Error executing command {commandType} for user {userId}",
                    auditItem.CommandType,
                    auditItem.AdditionalProperties["UserId"]);
            }
            else
            {
                _logger.LogInformation("Error executing command {commandType}",
                    auditItem.CommandType);
            }
            _metricCollector.RecordWithError(auditItem.CommandType, auditItem.ExecutionTimeMs.Value);
        }
            
        return Task.FromResult(0);
    }
}

This class also collects the metrics based on the time to execute the command – the framework handily collects these for us as part of its own infrastructure.

At this point we’ve got all the components we need to perform our logging so all that is left is to register the components with the command system which is done in Startup.cs at the end of the ConfigureServices method:

CommandingDependencyResolver
    .UsePreDispatchCommandingAuditor<LoggingCommandPreDispatchAuditor>()
    .UseExecutionCommandingAuditor<LoggingCommandExecutionAuditor>()
    .UseAuditItemEnricher<AuditItemUserIdEnricher>();

Next Steps

With both approaches we’ve cleaned up our command handlers so that all they are concerned with is functional / business requirements and though I’ve presented the above as an either/or choice but it’s quite possible to use a combined approach if neither quite meets your requirements however we’re going to move forward with the framework auditor approach as it will support our next step quite nicely: we’re going to take our GetStoreProductQuery command and essentially turn it into a standalone microservice running as an Azure Function without changing any of the code that uses the command.

Other Parts in the Series

Part 5
Part 3
Part 2
Part 1

Serverless Blog – Christmas 2017 Project

Happy New Year everyone – I hope everyone had a great break and has a fantastic 2018.

Much like last year I’d set some time aside over the Christmas break to tinker with something fairly left-field and somewhat experimental (algorithmic art) but unfortunately spent a lot of the break ill. This left me with a lot less time on my hands than I’d planned for and based my project around – I’d hoped to spend 4 to 5 days on it and an additional day for writing this blog post but had been left with only around 12 hours available for the implementation.

That being the case I scrabbled around for something smaller but still interesting and useful to me and that I thought would fit into the reduced amount of time I had available. I decided I’d attempt to put together a Minimum Viable Product for replacing my WordPress based blog with something that looks and feels the same to the reader but is entirely serverless in it’s architecture. My aim was to get, in no particular order, something that:

  • Renders using a similar look and feel to my current blog
  • Supports the same URL patterns for posts so that I could port my content, do a DNS change, and wouldn’t cause Google or linking sites a problem
  • Has super-cheap running costs
  • Has high uptime
  • Uses Markdown as it’s post authoring format
  • Has fast response times (< 100ms for the main payload)
  • Is capable of scaling up to high volumes of concurrent users
  • Support https for all content as my current blog does
  • Was deployed and running on an endpoint at the end of my allotted time (you can try it out here)

Knowing I only had 12 or so hours to spend on this I didn’t expect to be flicking the switch at the end of the second day and migrating my blog to this serverless system but I did want to have it running on my domain name, fairly sound, and be able to prove the points above with a working Minimum Viable Product. From a code quality point of view I wanted it to be testable and reasonably structured but I wasn’t aiming for perfection and expected low to zero automated test coverage.

The challenge here was covering enough ground in 12 hours to demonstrate an MVP worked and was in a sufficiently developed state that it was clear how the quality could be raised to a high degree with a fairly small amount of additional work.

If you’re interested in seeing the code it can be found on GitHub. If you use this as a basis for your own projects please bear in mind this was put together very rapidly in just over 12 hours – it needs more work (see next steps at the bottom of this post).

https://github.com/JamesRandall/AzureFromTheTrenches.ServerlessBlog

Planning

Normally when I undertake a project like this I’ve had the chance to roll it around in my head for a few days and can hit the ground running. With the late change of direction I didn’t really get the chance to do that and so I really came into this pretty cold.

As I wanted to replace my current WordPress blog with a serverless approach a good place to start seemed to be looking at it’s design and my workflows around it. The layout of my blog is pretty simple and every page has the same structure: a title bar, a content panel, and a sidebar:

In addition their are only really 4 types of page: a homepage made up of the most recent posts, posts, category pages, and archives. The category and archive pages simply list the posts within a category and month respectively. The only thing that causes site change is the addition or editing of a post that can cause all those pages to require update.

I do most of my writing on the train and use the markdown format which I subsequently import into WordPress for publishing. This means I don’t really use the editing capabilities of WordPress (other than to deal with markdown to WordPress conversion issues!) and so was comfortable simply uploading the Markdown to a blob container for this serverless blog. This left the question of how to get any metadata into posts (for example categories) and I decided on a simple convention based approach where an optional block of JSON could be included at the start of a post. That way that too could be maintained in a text editor.

Given all that my general approach (at this point best catgorised as a harebrained scheme) was to render the components of the site as static HTML snippets using a blob triggered Azure Function and assemble them into the overarching layout when a user visits a given page with page requests being handled by HTTP triggered Azure Functions – one per page type. I toyed with the idea of going full static and re-rendering the whole website on each update but felt this “mostly” static approach revolving around the side components might provide a bit more flexibility without much performance impact as all I’m really doing to compose a page is stitching together some strings, and if I were to actually start using this I’d like to add a couple of dynamic components.

In any case having settled on that approach I mapped the architecture out onto Azure services as shown below:
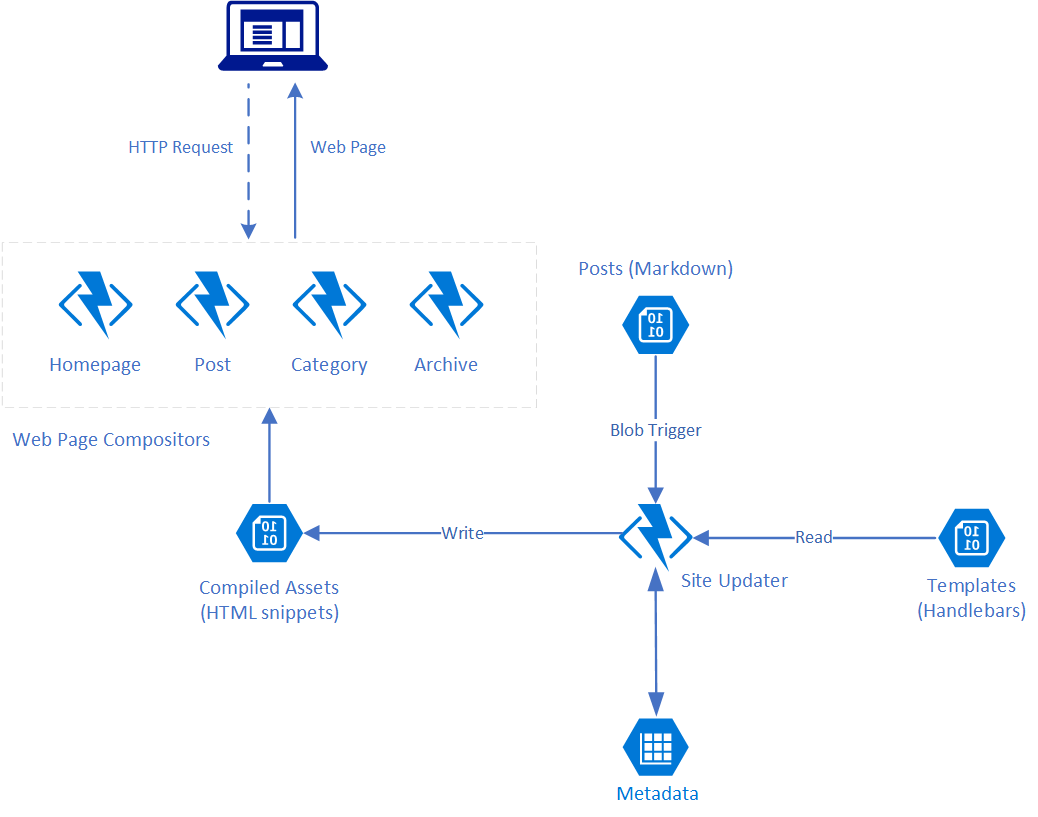
In addition to using Azure Functions as my compute platform for building out the components I picked a toolset I’m either working with day to day or have used in the past:

  • C# and .NET Core
  • Visual Studio 2017 and Visual Studio Code
  • Handlebars for page templating
  • Blob and Table storage

I briefly considered using CosmosDB as a datastore but my query needs were limited and it would bump up the running cost and add complexity for no real gain and so quickly discounted it.

Implementation

With the rough planning complete it was time to knuckle down with the laptop, a quiet room, a large quantity of coffee, and get started on some implementation. Bliss!

In order to make this readable I’ve organised my approach into a linear series of steps but like most development work there was some to-ing and fro-ing and things were iterated on and fleshed out as I moved through the process.

My general approach on a project like this is to prioritise the building out of a vertical slice and so here that meant starting with a markdown file, generating enough of the static assets that I could compose web pages, and then a couple of entry points so I could try it out in the Azure environment.

Step 1 – Replicating the Styling of my Existing Blog

As this project is really about markdown in and HTML out I wanted to start by ensuring I had a clearly defined view of that final output and so I began by creating a HTML file and CSS file that mimicked the layout of my existing blog. Design is always easier for a none-designer when you have a reference and so I quite literally opened up my current blog in one tab, my candidate HTML file in another tab and iterated over the content of it and the CSS until I had something that was a reasonable approximation.

While I’m not going to pretend that the CSS is a stunning piece of artistry this didn’t take long and I was sufficiently in the ballpark after just an hour.

Time taken: 1 hour

Step 2 – Creating a Solution and Code Skeleton

Next up was creating a solution skeleton in Visual Studio establishing the basic coding practices along with the models I expected to use throughout. My previous work with Azure Functions has been for small and quite isolatable parts of a wider system rather than being the main compute resource for the system and so I’d not really had to think too hard about how to organise the code.

Something I knew I wanted to carry over as a pattern from my previous work was the concept of “thin” functions. The function methods themselves are, to me, much like actions on a ASP.Net Core / Web API controller – entry points that accept input and return output and should be kept small and focused, handing off to more appropriate implementers that are not aware of the technicalities of the specific host technology (via services, commands etc.). Not doing that is a mix of concerns and tightly ties your implementation to the Functions runtime.

While I wanted to separate my concerns out I also didn’t want this simple solution to inflate into an overly complex system and so I settled on a fairly traditional layered approach comprised, from an implementation point of view, of 4 assemblies communicating over public C# interfaces but with fully private implementations all written to .NET Standard 2.0:

  • Models – a small set of classes to communicate basic information up and down, but not out of (by which I mean they are not persisted in a data store directly nor are they returned to the end user), the stack
  • Data Access – simple implementations on top of table storage and blob storage
  • Runtime – the handful of classes that do the actual work
  • Functions – the entry point assembly

Mapped out this ultimately gave me a solution structure like this:
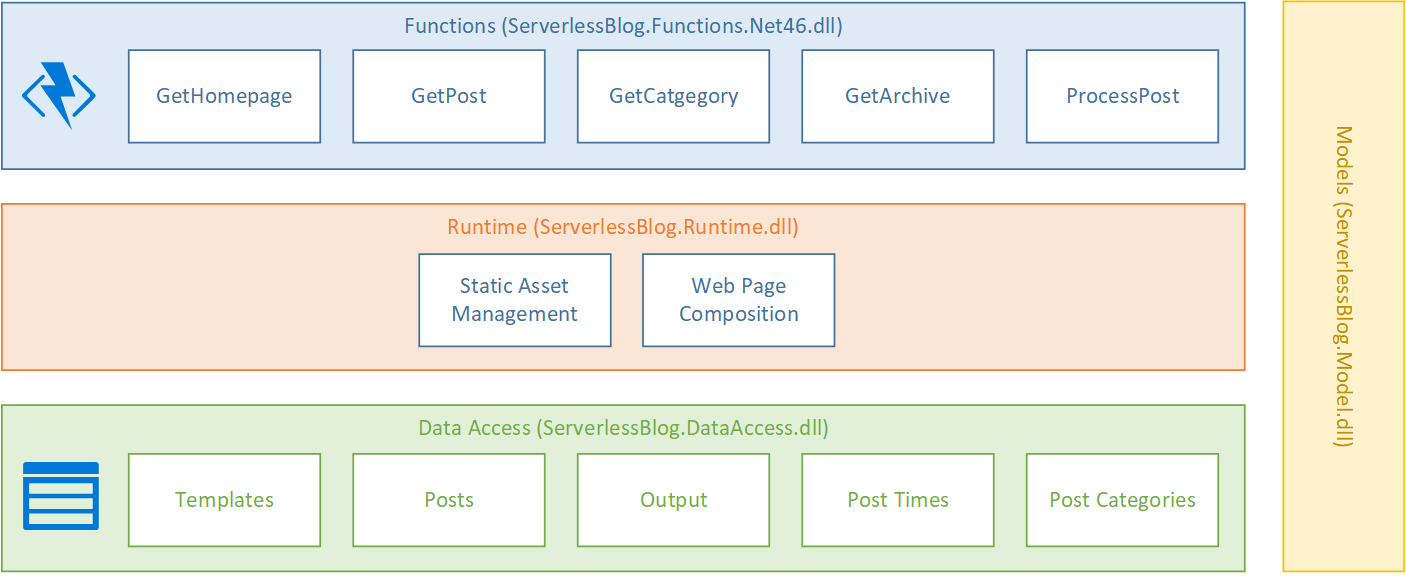
The remaining decision I needed to make was how to handle dependency injection. An equivalent system written with, say, ASP.Net Core would use an IoC container and register the configuration during startup but that’s state that persists for the lifetime of the server and functions are ideally stateless. Spinning up and configuring an IoC container for each execution of a function seemed needlessly expensive so I made the decision to use a “poor mans” approach to dependency injection with the Runtime and Data Access assemblies each exposing a static factory class that was responsible for essentially implementing the “Resolve” method for each of my instantiable types and that exposed public create methods for the public interfaces of each layer.

For the limited number of classes I have this approach worked pretty well and allowed me to write testable code in the same way as if I was using a fully fledged container.

Time taken: 1 hour

Step 3 – Creating the Layout, Posts and the Homepage

The first step in turning my earlier HTML and CSS work into something that could be used to create a real blog from real posts was to write a Handlebars template for the overall layout that could stitch together the main content and sidebar into a full HTML document. Based on my earlier work this was pretty simple and looked like this:

<html>
    <head>
        <title>{{pageTitle}}</title>
        <link href="{{stylesheetUrl}}" rel="stylesheet" />
        <link rel='stylesheet' href='https://fonts.googleapis.com/css?family=Roboto:regular' type='text/css' media='all' />
        <link href="{{faviconUrl}}" rel="shortcut icon" type="image/x-icon" />
    </head>
    <body>
        <div class="title-panel">
            <div class="container">
                <a class="primary-title" href="/">{{blogName}}</a>
            </div>
        </div>
        <div class="container">
            <div class="content">            
                <div class="reading">                            
                    {{{readingContent}}}
                </div>
                <div class="sidebar">
                    {{{sidebar}}}
                </div>
            </div>
        </div>
        <div class="footer-panel">
            <div class="container">
                Copyright &copy; {{defaultAuthor}}
            </div>
        </div>
    </body>
</html>

Along with this I created a pair of methods in my composition class to bring the components of the site together:

public async Task<string> GetHomepage()
{
    return await GetWrappedContent(() => _outputRepository.GetHomepageContent());
}

private async Task<string> GetWrappedContent(Func<Task<string>> contentFunc)
{
    Task<string> templateTask = _templateRepository.GetLayoutTemplate();
    Task<string> sidebarTask = _outputRepository.GetSidebar();
    Task<string> contentTask = contentFunc();

    await Task.WhenAll(templateTask, sidebarTask, contentTask);

    string template = templateTask.Result;
    string content = contentTask.Result;
    string sidebar = sidebarTask.Result;

    TemplatePayload payload = new TemplatePayload
    {
        BlogName = _blogName,
        DefaultAuthor = _defaultAuthor,
        PageTitle = _blogName,
        ReadingContent = content,
        Sidebar = sidebar,
        StylesheetUrl = _stylesheetUrl,
        FavIconUrl = _favIconUrl
    };
    Func<object, string> compiledTemplate = Handlebars.Compile(template);

    string html = compiledTemplate(payload);
    return html;
}

To generate posts I needed to read a post from an IO stream and then convert the Markdown into un-styled HTML and for that I used the excellent CommonMark.NET which I hid behind an injected helper to facilitate later testing. After conversion the post is saved to the output blob store:

Post post = await _postRepository.Get(postStream);
string html = _markdownToHtmlConverter.FromMarkdown(post.Markdown, post.UrlName, post.Author, post.PostedAtUtc);
await _outputRepository.SavePost(post.UrlName, html);

Actually deserializing the post took a little more effort as I needed to also parse out the metadata and this can be seen in the PostParser.cs implementation.

The homepage on my blog is basically the most recent n posts compiled together and so to do this I used another Handlebars template:

{{#each this}}
    {{#if @index}}
        <div class="post-spacer"></div>
    {{/if}}
    {{{this}}}
{{/each}}

To order the posts on the homepage (and later the sidebar) I need to track the “posted at” dates of each post. I can’t use on the LastModified property of the blob as that won’t deal with updates correctly and to migrate my content over I need to be able to set the dates as part of that process. To do this I persisted some basic data to an Azure Storage table.

And finally I created a handlebars template for generating a hard coded sidebar based on my sample.

Time taken: 3 hour

Step 4 – Blob Triggered Post Processing Function

At this point I had a bunch of code written for processing markdown and generating web pages but no way to call it and so the next step was to implement a function that would listen for new and updated blobs and generate the appropriate assets:

public static class ProcessPost
{
    [FunctionName("ProcessPost")]
    public static async Task Run([BlobTrigger("posts/{name}", Connection = "BlogStorage")]Stream myBlob, string name, TraceWriter log)
    {
        log.Info($"ProcessPost triggered\n Blob Name:{name} \n Size: {myBlob.Length} Bytes");

        Factory.Create(ConfigurationOptionsFactory.Create());

        IStaticAssetManager staticAssetManager = Factory.Instance.GetRenderer();
        await staticAssetManager.AddOrUpdatePost(myBlob);
    }
}

This function demonstrates the use of some of the principles and practices I thought about during the first step of this process:

  • The Azure Function is small and restricts it’s actions to that domain: it takes an input, sets up the subsequent environment and hands off.
  • The poor mans dependency injection approach is used to resolve an instance if IStaticAssetManager.

I tested this first locally using the Azure Functions Core Tools and other than some minor fiddling around with the local tooling it just worked which I verified by checking the output blob repository and eyeballing the contents. No great genius on my part: I’m using things I’ve used before and am familiar with to solve a new problem.

Time taken: 1 hour

Step 5 – Homepage and Post Functions

Next up was to try and render my homepage and for this I wrote a new function following the same principles as before:

[FunctionName("GetHomepage")]
public static async Task<ContentResult> Run([HttpTrigger(AuthorizationLevel.Anonymous, "get", Route = "home")]HttpRequest req, TraceWriter log)
{
    log.Info("C# getContent HTTP trigger function processing a request.");
            
    Factory.Create(ConfigurationOptionsFactory.Create());

    IResponseRenderer responseRenderer = Manager.Factory.Instance.GetResponseRenderer();
    string content = await responseRenderer.GetHomepage();

    return new ContentResult
    {
        Content = content,
        ContentType = "text/html",
        StatusCode = 200
    };            
}

This worked but I encountered my first challenge of the day: the function was on a path of https://blog.azurewebsites.net/api/home which is not going to allow it to function as the root page for my website. In fact if I went to the root I would instead see the Azure Functions welcome page:

While this is a perfectly fine page it’s not really going to help my readers view my content. Fortunately Azure Functions also include a capability called Proxies which allow you to take any incoming request, reshape it, and call an alternate backend. I had no idea if this would work on a root path but wrote the simple pass through proxy shown below:

{
  "$schema": "http://json.schemastore.org/proxies",
  "proxies": {
    "HomePageProxy": {
      "matchCondition": {
        "route": "/",
        "methods": [
          "GET"
        ]
      },
      "backendUri": "https://%BlogDomain%/home"
    }
  }
}

That matches on a GET request to the root and sends it on to my home page handler. This works absolutely fine when run on Azure but doesn’t work locally in the Core Tools – they seem to use the root path for something else. I need to do more investigation here but for now, given it works in the target environment and I only have 12 hours, I settled on this and moved on.

To remove the api component of the URI on my future functions I also modified the hosts.json file used by Azure Functions setting the HTTP routePrefix option to blank:

{
  "http": {
    "routePrefix": ""
  }
}

Writing this I’m wandering if this is what’s causing my issues with the root proxy on the local tools. Hmm. Something to try later as I can accomplish the same with another proxy.

Time taken: 2 hours

Step 6 – Load Testing

With my homepage compositor function written and a working system deployed to the cloud with this first fully representative vertical slice I wanted to get a quick handle on how it would cope with a reasonable amount of load.

Visual Studio Team Services is great for quickly throwing lots of concurrent virtual users against a public endpoint. I set up a test with a fairly rapid step up in the number of users going from 0 to 400 concurrent users in around 5 minutes and then staying at that level for another 15 minutes.

I knew from my casual browser testing that the response from the homepage function for a single user page load on a quiet system took between 60 and 100ms which I was fairly pleased about. I expected some divergence from that as the system scaled up but for things essentially to work.

Much to my surprise and horror that was not the case. As the user count increased the response time started running at around 3 to 4 seconds per request and generated an awful lot of errors along the way. The system never scaled up to a point where the load could really be acceptably dealt with as can be seen below:
I blogged about this extensively in my last post and so won’t cover it again here but the short version is that the Azure Functions v2 .NET Core runtime (that is still in preview) was the culprit. To resolve things I migrated my functions over to .NET 4.6.2 and after doing so and running a similar test again I got a much more acceptable result:
Average response time over the run averages 700ms and the system scaled out pretty nicely to deal with the additional users (and I pushed this up to 600 on this test). The anecdotal experience (me using the browser with the cache disabled as the test ran) was also excellent and felt consistently snappy throughout with timings of between 90ms and 900ms with the majority that I saw taking around 300ms (it’s worth noting I’m geographically closer than the test agents to the Azure data centre the blog is running in – VSTS doesn’t run managed agents from UK South currently).

As part of moving to .NET 4.6 I had to make some changes to my functions, an example of this is below:

[FunctionName("GetHomepage")]
public static async Task<HttpResponseMessage> Run([HttpTrigger(AuthorizationLevel.Anonymous, "get", Route = "home")]HttpRequestMessage req, TraceWriter log)
{
    log.Info("GetHomepage triggered");
    Factory.Create(ConfigurationOptionsFactory.Create());

    IWebPageComposer webPageComposer = Factory.Instance.GetResponseRenderer();
    string content = await webPageComposer.GetHomepage();

    HttpResponseMessage response = req.CreateResponse(HttpStatusCode.OK);
    response.Content = new StringContent(content, Encoding.UTF8, "text/html");            

    return response;            
}

Time Taken: 3 hours

Step 7 – Sidebar Content

To maintain a sidebar I needed to maintain some additional metadata – what posts belong in what categories which I’m pulling from the (optional) JSON annotation of the Markdown files I outlined earlier. An example of that can be seen below:

{
    createdAtUtc: '2017-12-29 10:01:00',
    categories: [
        'C#',
        'Code'
    ],
    urlName: 'aUrlNameForAPost',
    author: 'James Randall'
}

The categories get parsed into a very simple table storage class:

internal class CategoryItem : TableEntity
{
    public string UrlName => PartitionKey;

    public string PostUrlName => RowKey;

    public string DisplayName { get; set; }

    public string PostTitle { get; set; }

    public DateTime PostedAtUtc { get; set; }

    public static string GetPartitionKey(string categoryUrlName)
    {
        return categoryUrlName;
    }

    public static string GetRowKey(string postUrlName)
    {
        return postUrlName;
    }
}

The UrlName‘s referenced above are just (by default) camelcase alphabetic strings used to identify posts as part of a URI and as such are unique (within the context of a blog). Because all this activity takes place on the backend and away from user requests I’ve not bothered with any more complex indexing strategies or further storage tables to store the unique set of categories – instead when I need to organise the categories into a hierarchical structure or get the category names I simply load them all from table store and run some simple LINQ:

internal class CategoryListBuilder : ICategoryListBuilder
{
    public IReadOnlyCollection<Category> FromCategoryItems(IEnumerable<CategoryItem> items)
    {
        var result = items.GroupBy(x => x.UrlName, (k, g) => new Category
        {
            UrlName = k,
            DisplayName = g.First().DisplayName,
            Posts = g.OrderByDescending(x => x.PostedAtUtc).Select(x => new PostSummary
            {
                PostedAtUtc = x.PostedAtUtc,
                Title = x.PostTitle,
                UrlName = x.PostUrlName
            }).ToArray()
        }).OrderBy(x => x.DisplayName).ToArray();

        return result;
    }
}

This is something that might need revisiting at some point but this isn’t some uber-content management system, it’s designed to handle simple blogs like mine, and, hey, I only have 12 hours!

I take a similar approach to generating the list of months for the archives section of the sidebar and then create it as a static asset with a Handlebars template:

<h2>Recent Posts</h2>
<ul>
    {{#each recentPosts}}
        <li><a href="/{{urlName}}">{{title}}</a></li>        
    {{/each}}    
</ul>
<h2>Archives</h2>
<ul>
    {{#each archives}}
        <li><a href="/archive/{{year}}/{{month}}">{{displayName}}</a></li>
    {{/each}}    
</ul>
<h2>Categories</h2>
<ul>
    {{#each categories}}
        <li><a href="/category/{{urlName}}">{{displayName}}</a></li>
    {{/each}}    
</ul>

Time taken: 2 hours

Step 8 – Wrap Up

With most of the system working and problems solved all that was left was to fill in a couple of the empty pages: post lists for categories and archives. The only new code I needed to this was something to summarise a post, for the moment I’ve taken a quick and dirty approach to this based on how my content is structured: I look for the title and the end of the first paragraph in the HTML output.

And having got that again I simply use another Handlebars template to generate the output and a couple more functions to return the content to a user.

Time taken: 2 hours

Conclusions and Next Steps

Did I succeed? Well I have my MVP,  it works, and it ticks off what I wanted! However I took 14 hours to put this together rather than the 12 I’d allowed. Most of the overrun was due to the performance issue with .NET Core and the Azure Functions v2 runtime, it took a little while to pin down the cause of the issue as the starting point for my investigation was based on the (generally reasonable!) assumption that I’d done something stupid.

Given that and as it’s New Year I’m going to give myself a pass and class this as a resounding success! A few takeaways for me:

  • Azure Functions are very flexible and serverless can be a great model but there are some definite limitations in the Azure Function implementation some of which stem from the underlying hosting model – I’m going to come back to this in a future blog post and, time allowing, contrast them with AWS Lamda’s.
  • Implementing this using Azure Functions was not really any harder than using ASP.Net Core or Web API.
  • Never underestimate the need to test with some load against your code.
  • It’s always spending some time on identifying the main challenges in a project and focusing your efforts against them. In this case it was covering enough ground quickly enough to validate the design without making things a nightmare to move on and into a more professional codebase.
  • If you really focus its amazing how much you can get done quickly with modern tools and technologies.
  • Development is fun! I had a great time building this small project.
  • Blogging takes even longer than development. The real overrun on this project was the blog post – I think its taken me the best part of 2 days.

If I continue with this project the next steps, in a rough priority order, will be to:

  1. Add unit tests
  2. Introduce fault tolerance strategies and logging
  3. Add a proper deployment script so others can get up and running with it
  4. Test it with more content (extracted from my blog)
  5. Improve code syntax highlighting
  6. Ensure images work

Finally the code that goes along with this blog can be found over on GitHub:

https://github.com/JamesRandall/AzureFromTheTrenches.ServerlessBlog

C# Cloud Application Architecture – Commanding via a Mediator (Part 3)

In the previous post we simplified our controllers by having them accept commands directly and configured ASP.Net Core so that consumers of our API couldn’t insert data into sensitive properties. However we’ve not yet set up any validation so, for example, it is possible for a user to add a product to a cart with a negative quantity. We’ll address that in this post and take a look at an alternative to the attribute model of validation that comes out the box with ASP.Net and ASP.Net Core.

The source code for this post can be found on GitHub:

https://github.com/JamesRandall/CommandMessagePatternTutorial/tree/master/Part3

The built in ASP.Net Core approach to validation, like previous versions, relies on a model being annotated with attributes but there are some significant drawbacks with this approach:

  1. You need access to the source code to add the attributes – sometimes this isn’t possible and so you end up maintaining multiple sets of models just to express validation rules.
  2. It requires you to tightly couple your model to a specific validation system and set of validation rules and include additional dependencies that may not be appropriate everywhere you want to use the model.
  3. It’s extensible but not particularly elegantly and complicated rules are hard to implement.

Depending on your application architecture maintaining multiple sets of model can be a good solution to some of these issues, and might be the right thing to do for your architecture in any case (for example you certainly don’t want Entity Framework models bleeding out through an API for example) but in our scenario there’s little to be gained by maintaining multiple representations of commands, at least in the general sense.

An excellent alternative framework for validation is Jeremy Skinner’s Fluent Validation package set. This allows validation rules to be expressed separately from models, hooks into the ASP.Net Core pipeline to support the standard ModelState approach, and allows validations to be run easily from anywhere.

We’re going to continue to follow our application encapsulation model for adding validations and so we will add a validator package to each domain, for example ShoppingCart.Validation. Each of these assemblies will consist of private classes for the validators that are registered in the IoC container using an installer. Below is an example of the validator for our AddToCartCommand command:

internal class AddToCartCommandValidator : AbstractValidator<AddToCartCommand>
{
    public AddToCartCommandValidator()
    {
        RuleFor(c => c.ProductId).NotEqual(Guid.Empty);
        RuleFor(c => c.Quantity).GreaterThan(0);
    }
}

This validator makes sure that we have a none-empty product ID and specify a quantity of 1 or more. We register this in our installer as follows:

public static class IServiceCollectionExtensions
{
    public static IServiceCollection RegisterValidators(this IServiceCollection serviceCollection)
    {
        serviceCollection.AddTransient<IValidator<AddToCartCommand>, AddToCartCommandValidator>();
        return serviceCollection;
    }
}

The ShoppingCart.Validation assembly is referenced only from the ShoppingCart.Application installer as shown below:

public static class IServiceCollectionExtensions
{
    public static IServiceCollection UseShoppingCart(this IServiceCollection serviceCollection,
        ICommandRegistry commandRegistry)
    {
        serviceCollection.AddSingleton<IShoppingCartRepository, ShoppingCartRepository>();

        commandRegistry.Register<GetCartQueryHandler>();
        commandRegistry.Register<AddToCartCommandHandler>();

        serviceCollection.RegisterValidators();

        return serviceCollection;
    }
}

And finally in our ASP.Net Core project, OnlineStore.Api, in the Startup class we register the Fluent Validation framework – however it doesn’t need to know anything about the specific validators:

public void ConfigureServices(IServiceCollection services)
{
    services.AddMvc(c =>
    {
        c.Filters.Add<AssignAuthenticatedUserIdActionFilter>();
        c.AddAuthenticatedUserIdAwareBodyModelBinderProvider();
    }).AddFluentValidation();

    services.AddSwaggerGen(c =>
    {
        c.SwaggerDoc("v1", new Info { Title = "Online Store API", Version = "v1" });
        c.SchemaFilter<SwaggerAuthenticatedUserIdFilter>();
        c.OperationFilter<SwaggerAuthenticatedUserIdOperationFilter>();
    });

    CommandingDependencyResolver = new MicrosoftDependencyInjectionCommandingResolver(services);
    ICommandRegistry registry = CommandingDependencyResolver.UseCommanding();

    services
        .UseShoppingCart(registry)
        .UseStore(registry)
        .UseCheckout(registry);
    services.Replace(new ServiceDescriptor(typeof(ICommandDispatcher), typeof(LoggingCommandDispatcher),
        ServiceLifetime.Transient));
}

We can roll that approach out over the rest of our commands and with the validator configured in ASP.Net can add model state checks into our AbstractCommandController, for example:

public abstract class AbstractCommandController : Controller
{
    protected AbstractCommandController(ICommandDispatcher dispatcher)
    {
        Dispatcher = dispatcher;
    }

    protected ICommandDispatcher Dispatcher { get; }

    protected async Task<IActionResult> ExecuteCommand<TResult>(ICommand<TResult> command)
    {
        if (!ModelState.IsValid)
        {
            return BadRequest(ModelState);
        }
        TResult response = await Dispatcher.DispatchAsync(command);
        return Ok(response);
    }
        
    // ...
}

At this point we can enforce simple entry point validation but what if we need to make validation decisions based on state we only know about in a handler? For example in our AddToCartCommand example we want to make sure the product really does exist before we add it and perhaps return an error if it does not (or, for example, if its not in stock).

To achieve this we’ll make some small changes to our CommandResponse class so that instead of simply returning a string it returns a collection of keys (property names) and values (error messages). This might sound like it should be a dictionary but the ModelState design of ASP.Net supports multiple error messages per key and so a dictionary won’t work, instead we’ll use an IReadOnlyCollection backed by an array. Here’s the changes made to the result-free implementation (the changes are the same for the typed variant):

public class CommandResponse
{
    protected CommandResponse()
    {
        Errors = new CommandError[0];
    }

    public bool IsSuccess => Errors.Count==0;

    public IReadOnlyCollection<CommandError> Errors { get; set; }

    public static CommandResponse Ok() {  return new CommandResponse();}

    public static CommandResponse WithError(string error)
    {
        return new CommandResponse
        {
            Errors = new []{new CommandError(error)}
        };
    }

    public static CommandResponse WithError(string key, string error)
    {
        return new CommandResponse
        {
            Errors = new[] { new CommandError(key, error) }
        };
    }

    public static CommandResponse WithErrors(IReadOnlyCollection<CommandError> errors)
    {
        return new CommandResponse
        {
            Errors = errors
        };
    }
}

We’ll add the errors from our command response into model state through an extension method in the API assembly – that way the syntax will stay clean but we won’t need to add a reference to ASP.Net in our shared assembly. We want to keep that as dependency free as possible. The extension method is pretty simple and looks like this:

public static class CommandResponseExtensions
{
    public static void AddToModelState(
        this CommandResponse commandResponse,
        ModelStateDictionary modelStateDictionary)
    {
        foreach (CommandError error in commandResponse.Errors)
        {
            modelStateDictionary.AddModelError(error.Key ?? "", error.Message);
        }
    }
}

And finally another update to the methods within our AbstractCommandController to wire up the response to the model state:

protected async Task<IActionResult> ExecuteCommand<TCommand, TResult>() where TCommand : class, ICommand<CommandResponse<TResult>>, new()
{
    if (!ModelState.IsValid)
    {
        return BadRequest(ModelState);
    }
    TCommand command = CreateCommand<TCommand>();
    CommandResponse<TResult> response = await Dispatcher.DispatchAsync(command);
    if (response.IsSuccess)
    {
        return Ok(response.Result);
    }
    response.AddToModelState(ModelState);
    return BadRequest(ModelState);
}

With that we can now return simple model level validation errors to clients and more complex validations from our business domains. An example from our AddToCartHandler that makes use of this looks as follows:

public async Task<CommandResponse> ExecuteAsync(AddToCartCommand command, CommandResponse previousResult)
{
    Model.ShoppingCart cart = await _repository.GetActualOrDefaultAsync(command.AuthenticatedUserId);

    StoreProduct product = (await _dispatcher.DispatchAsync(new GetStoreProductQuery{ProductId = command.ProductId})).Result;

    if (product == null)
    {
        _logger.LogWarning("Product {0} can not be added to cart for user {1} as it does not exist", command.ProductId, command.AuthenticatedUserId);
        return CommandResponse.WithError($"Product {command.ProductId} does not exist");
    }
    List<ShoppingCartItem> cartItems = new List<ShoppingCartItem>(cart.Items);
    cartItems.Add(new ShoppingCartItem
    {
        Product = product,
        Quantity = command.Quantity
    });
    cart.Items = cartItems;
    await _repository.UpdateAsync(cart);
    _logger.LogInformation("Updated basket for user {0}", command.AuthenticatedUserId);
    return CommandResponse.Ok();
}

Hopefully that’s a good concrete example of how this loosely coupled state and convention based approach to an architecture can reap benefits. We’ve added validation to all of our controllers and actions without having to revisit each one to add boilerplate and we don’t have to worry about unit testing each and every one to ensure validation is enforced and to be sure this worked we simply updated the unit tests for our AbstractCommandController, and our validations are clearly separated from our models and testable. And we’ve done all this through simple POCO (plain old C# object) type models that are easily serializable – something we’ll make good use of later.

In the next part we’ll move on to our handlers and clean them up so that they become purely focused on business domain concerns and at the same time improve the consistency of the logging we’ve got scattered around the handlers at the moment. We’ll also add some basic telemetry to the system using Application Insights so that we can measure how often and for how long each of our handlers take to run.

Other Parts in the Series

Part 5
Part 4
Part 2
Part 1

Contact

  • If you're looking for help with C#, .NET, Azure, Architecture, or would simply value an independent opinion then please get in touch here or over on Twitter.

Recent Posts

Recent Tweets

Invalid or expired token.

Recent Comments

Archives

Categories

Meta

GiottoPress by Enrique Chavez