Happy New Year everyone – I hope everyone had a great break and has a fantastic 2018.
Much like last year I’d set some time aside over the Christmas break to tinker with something fairly left-field and somewhat experimental (algorithmic art) but unfortunately spent a lot of the break ill. This left me with a lot less time on my hands than I’d planned for and based my project around – I’d hoped to spend 4 to 5 days on it and an additional day for writing this blog post but had been left with only around 12 hours available for the implementation.
That being the case I scrabbled around for something smaller but still interesting and useful to me and that I thought would fit into the reduced amount of time I had available. I decided I’d attempt to put together a Minimum Viable Product for replacing my WordPress based blog with something that looks and feels the same to the reader but is entirely serverless in it’s architecture. My aim was to get, in no particular order, something that:
- Renders using a similar look and feel to my current blog
- Supports the same URL patterns for posts so that I could port my content, do a DNS change, and wouldn’t cause Google or linking sites a problem
- Has super-cheap running costs
- Has high uptime
- Uses Markdown as it’s post authoring format
- Has fast response times (< 100ms for the main payload)
- Is capable of scaling up to high volumes of concurrent users
- Support https for all content as my current blog does
- Was deployed and running on an endpoint at the end of my allotted time (you can try it out here)
Knowing I only had 12 or so hours to spend on this I didn’t expect to be flicking the switch at the end of the second day and migrating my blog to this serverless system but I did want to have it running on my domain name, fairly sound, and be able to prove the points above with a working Minimum Viable Product. From a code quality point of view I wanted it to be testable and reasonably structured but I wasn’t aiming for perfection and expected low to zero automated test coverage.
The challenge here was covering enough ground in 12 hours to demonstrate an MVP worked and was in a sufficiently developed state that it was clear how the quality could be raised to a high degree with a fairly small amount of additional work.
If you’re interested in seeing the code it can be found on GitHub. If you use this as a basis for your own projects please bear in mind this was put together very rapidly in just over 12 hours – it needs more work (see next steps at the bottom of this post).
https://github.com/JamesRandall/AzureFromTheTrenches.ServerlessBlog
Planning
Normally when I undertake a project like this I’ve had the chance to roll it around in my head for a few days and can hit the ground running. With the late change of direction I didn’t really get the chance to do that and so I really came into this pretty cold.
As I wanted to replace my current WordPress blog with a serverless approach a good place to start seemed to be looking at it’s design and my workflows around it. The layout of my blog is pretty simple and every page has the same structure: a title bar, a content panel, and a sidebar:
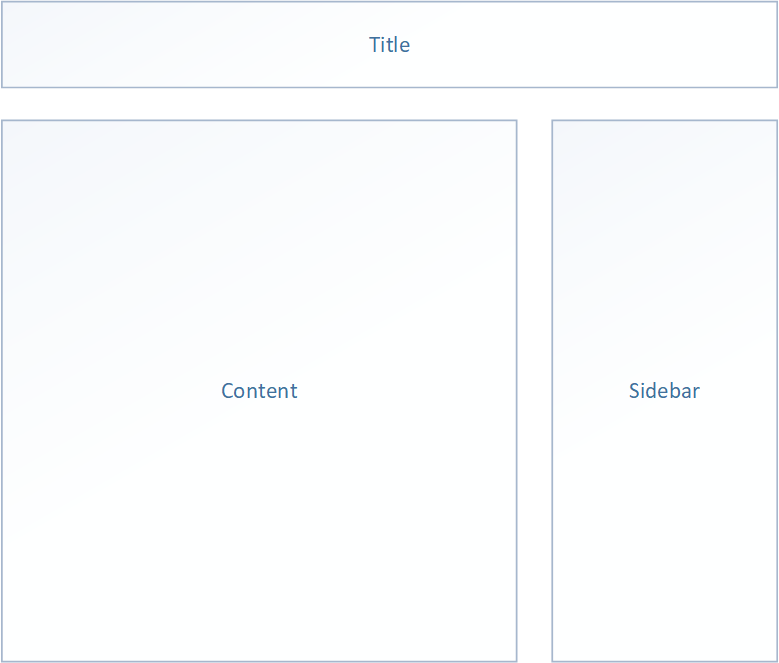
In addition their are only really 4 types of page: a homepage made up of the most recent posts, posts, category pages, and archives. The category and archive pages simply list the posts within a category and month respectively. The only thing that causes site change is the addition or editing of a post that can cause all those pages to require update.
I do most of my writing on the train and use the markdown format which I subsequently import into WordPress for publishing. This means I don’t really use the editing capabilities of WordPress (other than to deal with markdown to WordPress conversion issues!) and so was comfortable simply uploading the Markdown to a blob container for this serverless blog. This left the question of how to get any metadata into posts (for example categories) and I decided on a simple convention based approach where an optional block of JSON could be included at the start of a post. That way that too could be maintained in a text editor.
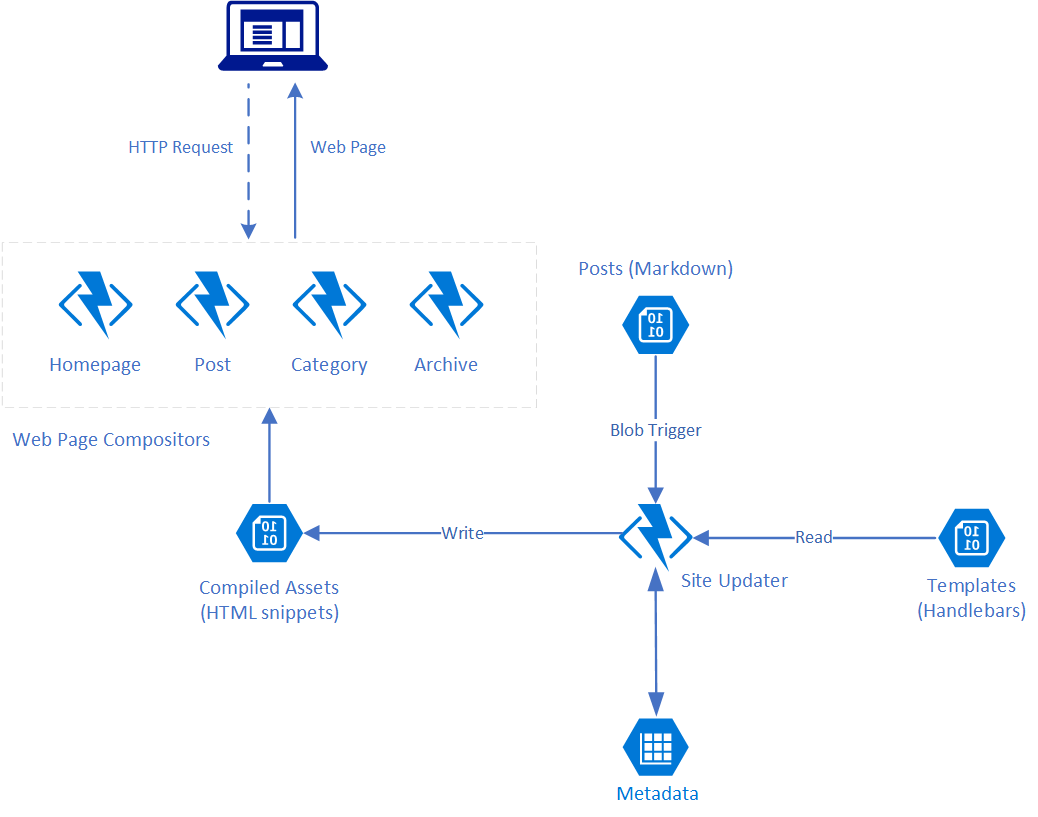
Given all that my general approach (at this point best catgorised as a harebrained scheme) was to render the components of the site as static HTML snippets using a blob triggered Azure Function and assemble them into the overarching layout when a user visits a given page with page requests being handled by HTTP triggered Azure Functions – one per page type. I toyed with the idea of going full static and re-rendering the whole website on each update but felt this “mostly” static approach revolving around the side components might provide a bit more flexibility without much performance impact as all I’m really doing to compose a page is stitching together some strings, and if I were to actually start using this I’d like to add a couple of dynamic components.
In any case having settled on that approach I mapped the architecture out onto Azure services as shown below:
In addition to using Azure Functions as my compute platform for building out the components I picked a toolset I’m either working with day to day or have used in the past:
- C# and .NET Core
- Visual Studio 2017 and Visual Studio Code
- Handlebars for page templating
- Blob and Table storage
I briefly considered using CosmosDB as a datastore but my query needs were limited and it would bump up the running cost and add complexity for no real gain and so quickly discounted it.
Implementation
With the rough planning complete it was time to knuckle down with the laptop, a quiet room, a large quantity of coffee, and get started on some implementation. Bliss!
In order to make this readable I’ve organised my approach into a linear series of steps but like most development work there was some to-ing and fro-ing and things were iterated on and fleshed out as I moved through the process.
My general approach on a project like this is to prioritise the building out of a vertical slice and so here that meant starting with a markdown file, generating enough of the static assets that I could compose web pages, and then a couple of entry points so I could try it out in the Azure environment.
Step 1 – Replicating the Styling of my Existing Blog
As this project is really about markdown in and HTML out I wanted to start by ensuring I had a clearly defined view of that final output and so I began by creating a HTML file and CSS file that mimicked the layout of my existing blog. Design is always easier for a none-designer when you have a reference and so I quite literally opened up my current blog in one tab, my candidate HTML file in another tab and iterated over the content of it and the CSS until I had something that was a reasonable approximation.
While I’m not going to pretend that the CSS is a stunning piece of artistry this didn’t take long and I was sufficiently in the ballpark after just an hour.
Time taken: 1 hour
Step 2 – Creating a Solution and Code Skeleton
Next up was creating a solution skeleton in Visual Studio establishing the basic coding practices along with the models I expected to use throughout. My previous work with Azure Functions has been for small and quite isolatable parts of a wider system rather than being the main compute resource for the system and so I’d not really had to think too hard about how to organise the code.
Something I knew I wanted to carry over as a pattern from my previous work was the concept of “thin” functions. The function methods themselves are, to me, much like actions on a ASP.Net Core / Web API controller – entry points that accept input and return output and should be kept small and focused, handing off to more appropriate implementers that are not aware of the technicalities of the specific host technology (via services, commands etc.). Not doing that is a mix of concerns and tightly ties your implementation to the Functions runtime.
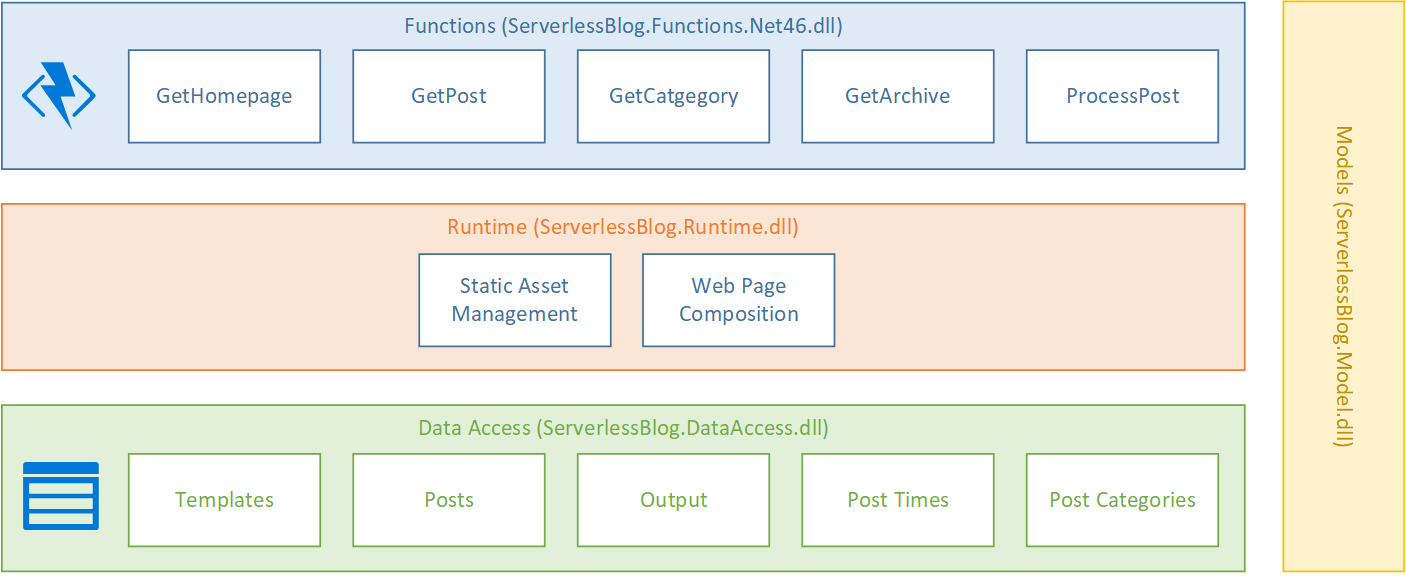
While I wanted to separate my concerns out I also didn’t want this simple solution to inflate into an overly complex system and so I settled on a fairly traditional layered approach comprised, from an implementation point of view, of 4 assemblies communicating over public C# interfaces but with fully private implementations all written to .NET Standard 2.0:
- Models – a small set of classes to communicate basic information up and down, but not out of (by which I mean they are not persisted in a data store directly nor are they returned to the end user), the stack
- Data Access – simple implementations on top of table storage and blob storage
- Runtime – the handful of classes that do the actual work
- Functions – the entry point assembly
Mapped out this ultimately gave me a solution structure like this:
The remaining decision I needed to make was how to handle dependency injection. An equivalent system written with, say, ASP.Net Core would use an IoC container and register the configuration during startup but that’s state that persists for the lifetime of the server and functions are ideally stateless. Spinning up and configuring an IoC container for each execution of a function seemed needlessly expensive so I made the decision to use a “poor mans” approach to dependency injection with the Runtime and Data Access assemblies each exposing a static factory class that was responsible for essentially implementing the “Resolve” method for each of my instantiable types and that exposed public create methods for the public interfaces of each layer.
For the limited number of classes I have this approach worked pretty well and allowed me to write testable code in the same way as if I was using a fully fledged container.
Time taken: 1 hour
Step 3 – Creating the Layout, Posts and the Homepage
The first step in turning my earlier HTML and CSS work into something that could be used to create a real blog from real posts was to write a Handlebars template for the overall layout that could stitch together the main content and sidebar into a full HTML document. Based on my earlier work this was pretty simple and looked like this:
<html>
<head>
<title>{{pageTitle}}</title>
<link href="{{stylesheetUrl}}" rel="stylesheet" />
<link rel='stylesheet' href='https://fonts.googleapis.com/css?family=Roboto:regular' type='text/css' media='all' />
<link href="{{faviconUrl}}" rel="shortcut icon" type="image/x-icon" />
</head>
<body>
<div class="title-panel">
<div class="container">
<a class="primary-title" href="/">{{blogName}}</a>
</div>
</div>
<div class="container">
<div class="content">
<div class="reading">
{{{readingContent}}}
</div>
<div class="sidebar">
{{{sidebar}}}
</div>
</div>
</div>
<div class="footer-panel">
<div class="container">
Copyright © {{defaultAuthor}}
</div>
</div>
</body>
</html>
Along with this I created a pair of methods in my composition class to bring the components of the site together:
public async Task<string> GetHomepage()
{
    return await GetWrappedContent(() => _outputRepository.GetHomepageContent());
}

private async Task<string> GetWrappedContent(Func<Task<string>> contentFunc)
{
    Task<string> templateTask = _templateRepository.GetLayoutTemplate();
    Task<string> sidebarTask = _outputRepository.GetSidebar();
    Task<string> contentTask = contentFunc();

    await Task.WhenAll(templateTask, sidebarTask, contentTask);

    string template = templateTask.Result;
    string content = contentTask.Result;
    string sidebar = sidebarTask.Result;

    TemplatePayload payload = new TemplatePayload
    {
        BlogName = _blogName,
        DefaultAuthor = _defaultAuthor,
        PageTitle = _blogName,
        ReadingContent = content,
        Sidebar = sidebar,
        StylesheetUrl = _stylesheetUrl,
        FavIconUrl = _favIconUrl
    };
    Func<object, string> compiledTemplate = Handlebars.Compile(template);

    string html = compiledTemplate(payload);
    return html;
}
To generate posts I needed to read a post from an IO stream and then convert the Markdown into un-styled HTML and for that I used the excellent CommonMark.NET which I hid behind an injected helper to facilitate later testing. After conversion the post is saved to the output blob store:
Post post = await _postRepository.Get(postStream);
string html = _markdownToHtmlConverter.FromMarkdown(post.Markdown, post.UrlName, post.Author, post.PostedAtUtc);
await _outputRepository.SavePost(post.UrlName, html);
Actually deserializing the post took a little more effort as I needed to also parse out the metadata and this can be seen in the PostParser.cs implementation.
The homepage on my blog is basically the most recent n posts compiled together and so to do this I used another Handlebars template:
{{#each this}}
    {{#if @index}}
        <div class="post-spacer"></div>
    {{/if}}
    {{{this}}}
{{/each}}
To order the posts on the homepage (and later the sidebar) I need to track the “posted at” dates of each post. I can’t use on the LastModified property of the blob as that won’t deal with updates correctly and to migrate my content over I need to be able to set the dates as part of that process. To do this I persisted some basic data to an Azure Storage table.
And finally I created a handlebars template for generating a hard coded sidebar based on my sample.
Time taken: 3 hour
Step 4 – Blob Triggered Post Processing Function
At this point I had a bunch of code written for processing markdown and generating web pages but no way to call it and so the next step was to implement a function that would listen for new and updated blobs and generate the appropriate assets:
public static class ProcessPost
{
    [FunctionName("ProcessPost")]
    public static async Task Run([BlobTrigger("posts/{name}", Connection = "BlogStorage")]Stream myBlob, string name, TraceWriter log)
    {
        log.Info($"ProcessPost triggered\n Blob Name:{name} \n Size: {myBlob.Length} Bytes");

        Factory.Create(ConfigurationOptionsFactory.Create());

        IStaticAssetManager staticAssetManager = Factory.Instance.GetRenderer();
        await staticAssetManager.AddOrUpdatePost(myBlob);
    }
}
This function demonstrates the use of some of the principles and practices I thought about during the first step of this process:
- The Azure Function is small and restricts it’s actions to that domain: it takes an input, sets up the subsequent environment and hands off.
- The poor mans dependency injection approach is used to resolve an instance if IStaticAssetManager.
I tested this first locally using the Azure Functions Core Tools and other than some minor fiddling around with the local tooling it just worked which I verified by checking the output blob repository and eyeballing the contents. No great genius on my part: I’m using things I’ve used before and am familiar with to solve a new problem.
Time taken: 1 hour
Step 5 – Homepage and Post Functions
Next up was to try and render my homepage and for this I wrote a new function following the same principles as before:
[FunctionName("GetHomepage")]
public static async Task<ContentResult> Run([HttpTrigger(AuthorizationLevel.Anonymous, "get", Route = "home")]HttpRequest req, TraceWriter log)
{
    log.Info("C# getContent HTTP trigger function processing a request.");

    Factory.Create(ConfigurationOptionsFactory.Create());

    IResponseRenderer responseRenderer = Manager.Factory.Instance.GetResponseRenderer();
    string content = await responseRenderer.GetHomepage();

    return new ContentResult
    {
        Content = content,
        ContentType = "text/html",
        StatusCode = 200
    };
}
This worked but I encountered my first challenge of the day: the function was on a path of https://blog.azurewebsites.net/api/home which is not going to allow it to function as the root page for my website. In fact if I went to the root I would instead see the Azure Functions welcome page:
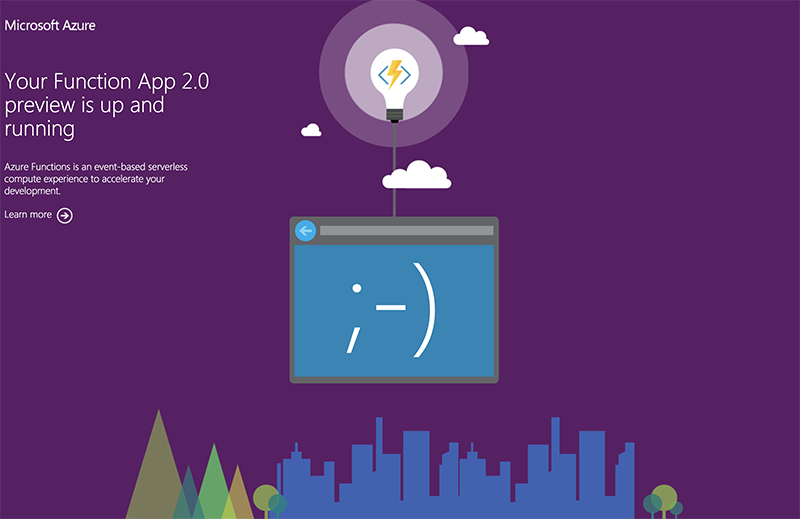
While this is a perfectly fine page it’s not really going to help my readers view my content. Fortunately Azure Functions also include a capability called Proxies which allow you to take any incoming request, reshape it, and call an alternate backend. I had no idea if this would work on a root path but wrote the simple pass through proxy shown below:
{
  "$schema": "http://json.schemastore.org/proxies",
  "proxies": {
    "HomePageProxy": {
      "matchCondition": {
        "route": "/",
        "methods": [
          "GET"
        ]
      },
      "backendUri": "https://%BlogDomain%/home"
    }
  }
}
That matches on a GET request to the root and sends it on to my home page handler. This works absolutely fine when run on Azure but doesn’t work locally in the Core Tools – they seem to use the root path for something else. I need to do more investigation here but for now, given it works in the target environment and I only have 12 hours, I settled on this and moved on.
To remove the api component of the URI on my future functions I also modified the hosts.json file used by Azure Functions setting the HTTP routePrefix option to blank:
{
  "http": {
    "routePrefix": ""
  }
}
Writing this I’m wandering if this is what’s causing my issues with the root proxy on the local tools. Hmm. Something to try later as I can accomplish the same with another proxy.
Time taken: 2 hours
Step 6 – Load Testing
With my homepage compositor function written and a working system deployed to the cloud with this first fully representative vertical slice I wanted to get a quick handle on how it would cope with a reasonable amount of load.
Visual Studio Team Services is great for quickly throwing lots of concurrent virtual users against a public endpoint. I set up a test with a fairly rapid step up in the number of users going from 0 to 400 concurrent users in around 5 minutes and then staying at that level for another 15 minutes.
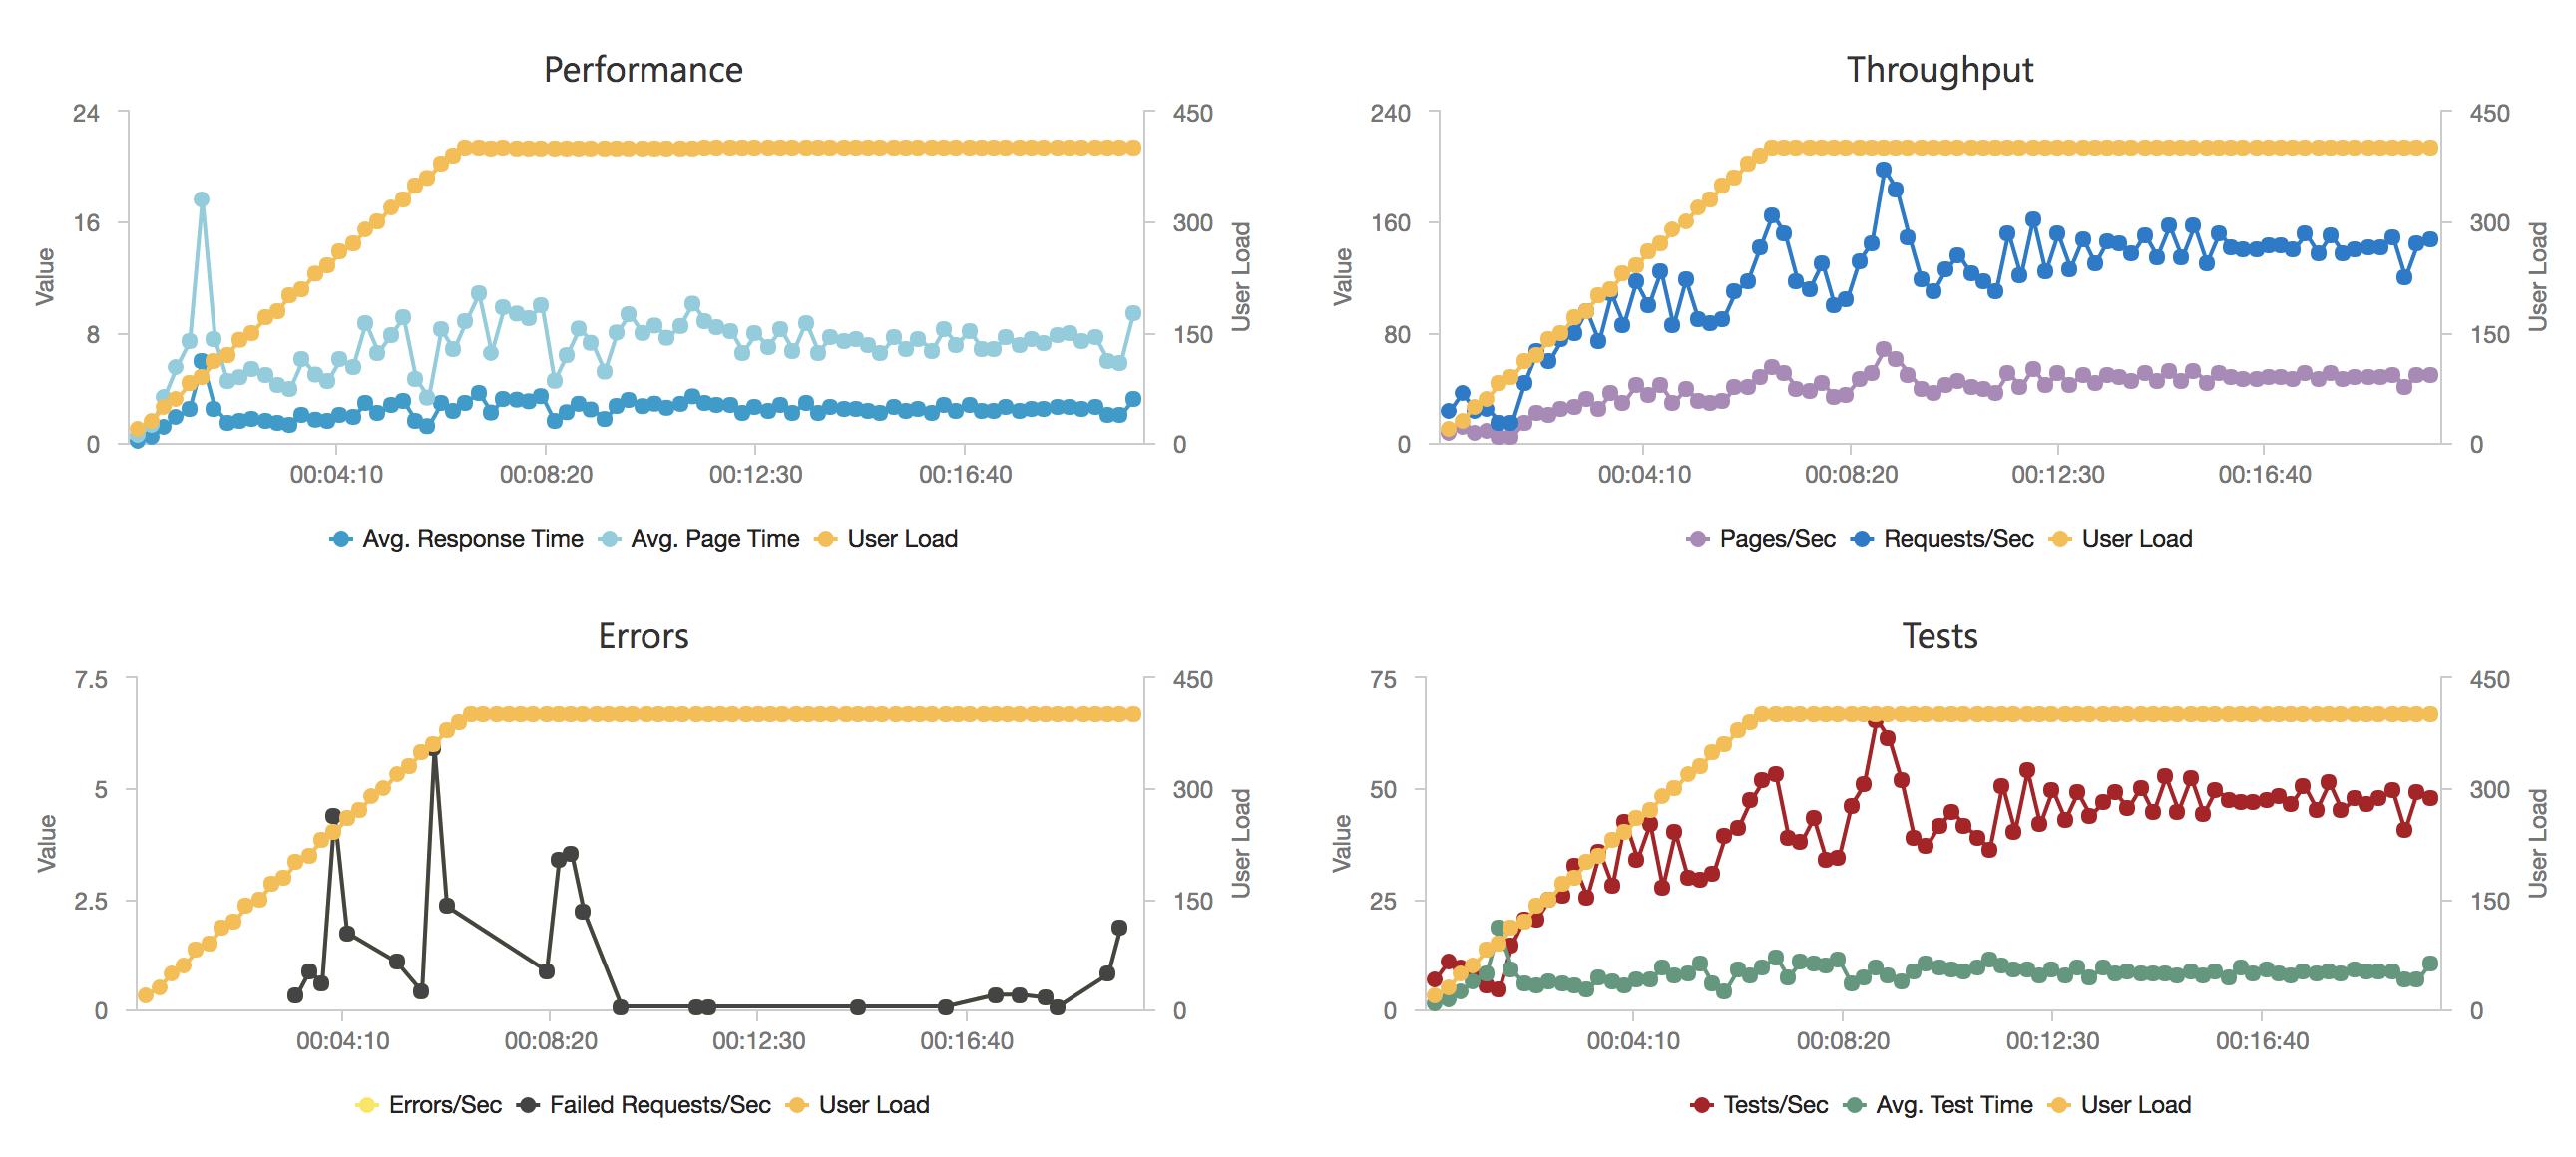
I knew from my casual browser testing that the response from the homepage function for a single user page load on a quiet system took between 60 and 100ms which I was fairly pleased about. I expected some divergence from that as the system scaled up but for things essentially to work.
Much to my surprise and horror that was not the case. As the user count increased the response time started running at around 3 to 4 seconds per request and generated an awful lot of errors along the way. The system never scaled up to a point where the load could really be acceptably dealt with as can be seen below:
I blogged about this extensively in my last post and so won’t cover it again here but the short version is that the Azure Functions v2 .NET Core runtime (that is still in preview) was the culprit. To resolve things I migrated my functions over to .NET 4.6.2 and after doing so and running a similar test again I got a much more acceptable result:
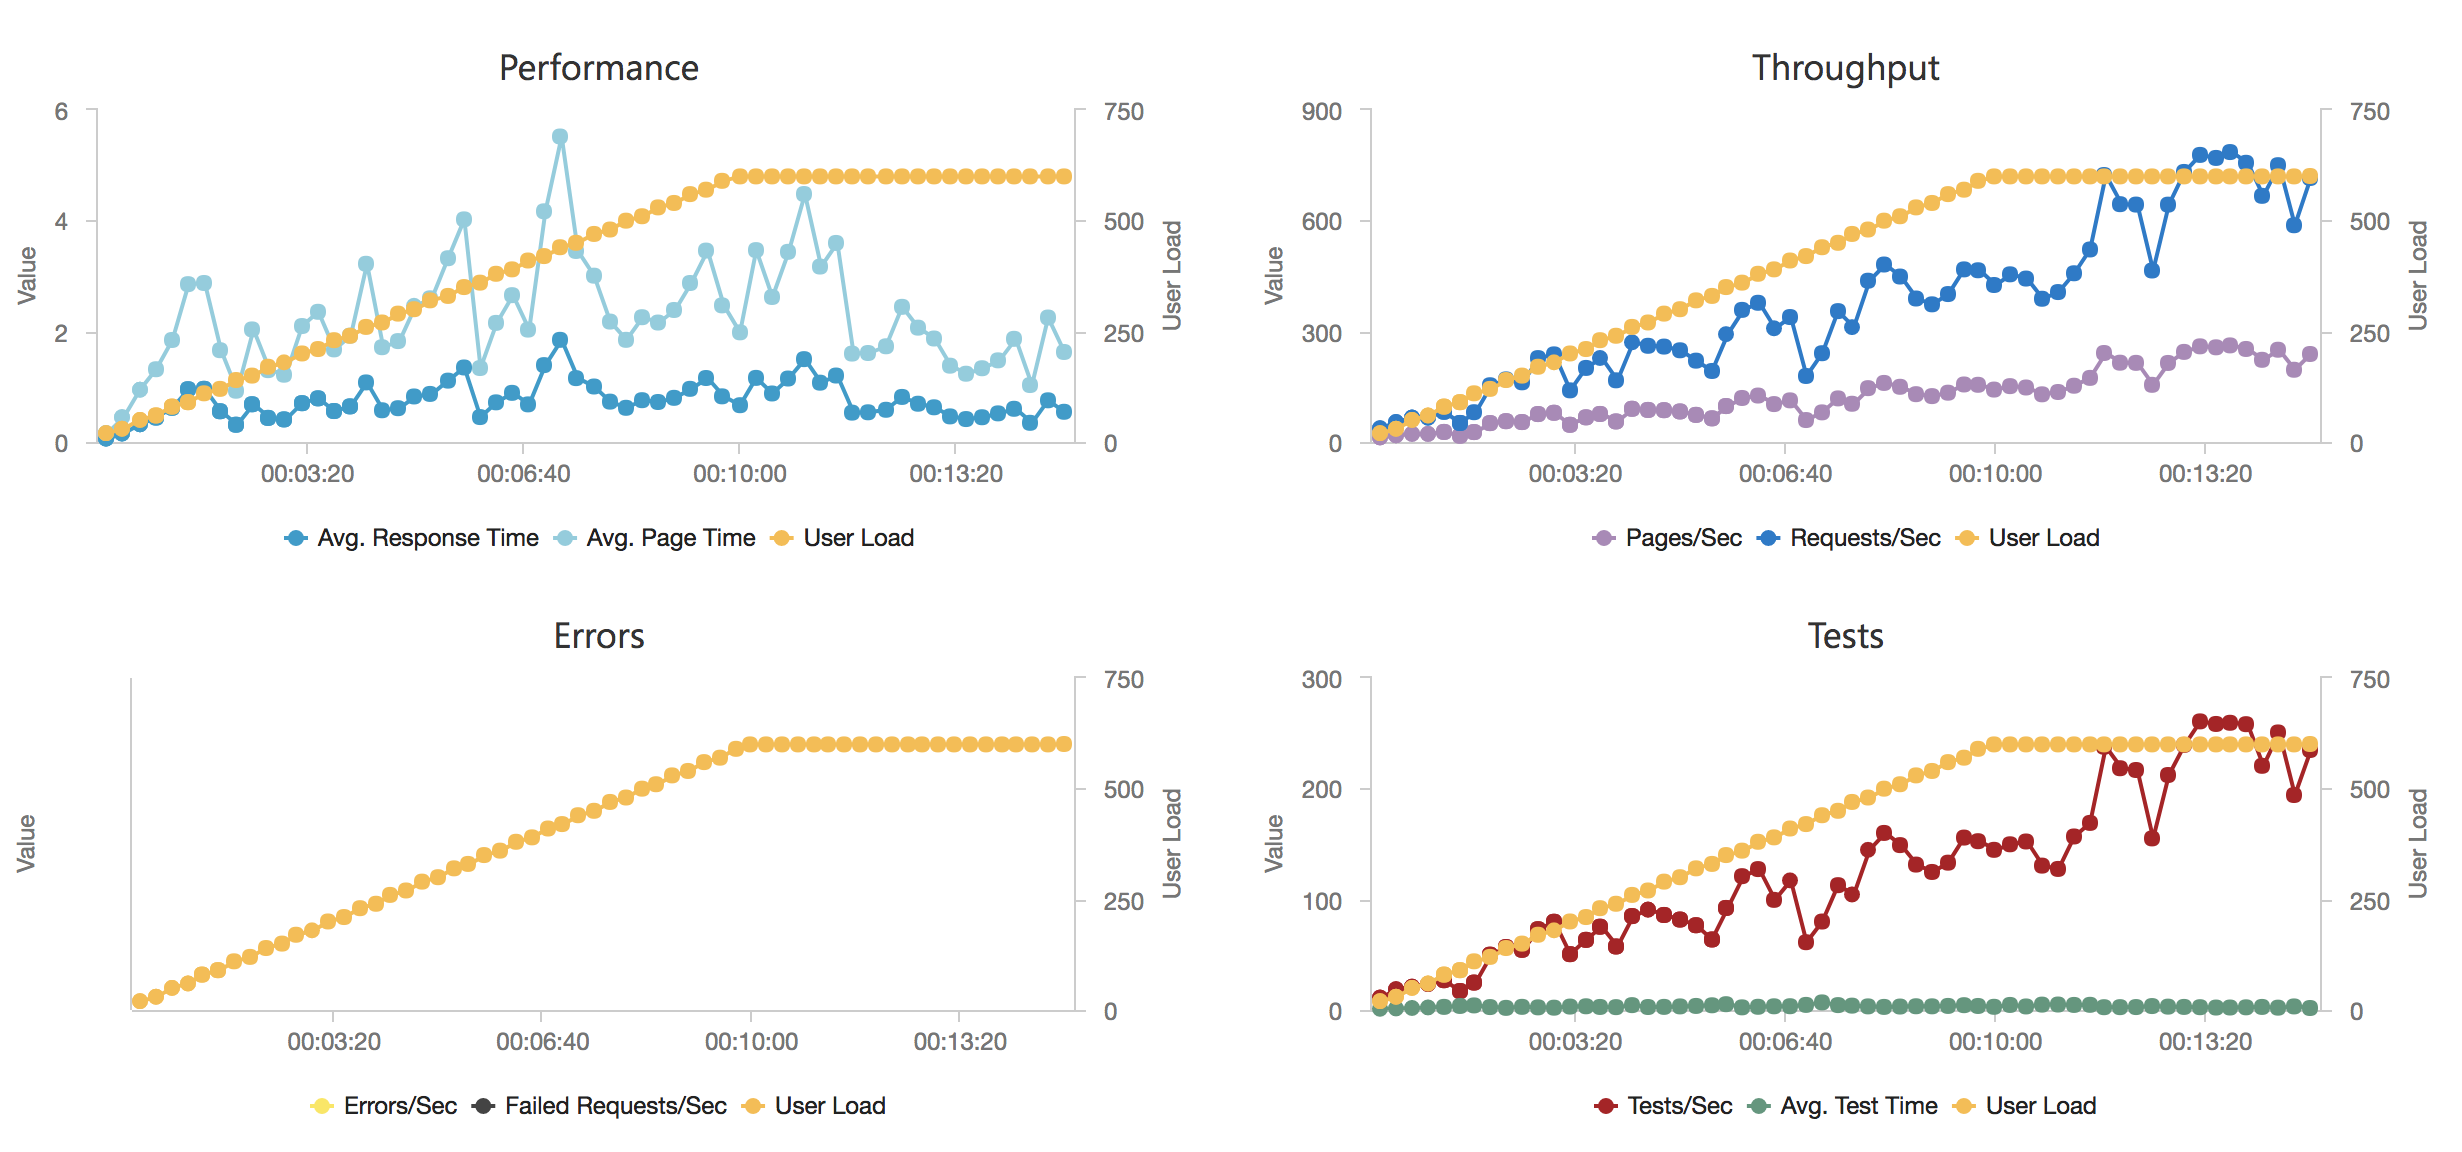
Average response time over the run averages 700ms and the system scaled out pretty nicely to deal with the additional users (and I pushed this up to 600 on this test). The anecdotal experience (me using the browser with the cache disabled as the test ran) was also excellent and felt consistently snappy throughout with timings of between 90ms and 900ms with the majority that I saw taking around 300ms (it’s worth noting I’m geographically closer than the test agents to the Azure data centre the blog is running in – VSTS doesn’t run managed agents from UK South currently).
As part of moving to .NET 4.6 I had to make some changes to my functions, an example of this is below:
[FunctionName("GetHomepage")]
public static async Task<HttpResponseMessage> Run([HttpTrigger(AuthorizationLevel.Anonymous, "get", Route = "home")]HttpRequestMessage req, TraceWriter log)
{
    log.Info("GetHomepage triggered");
    Factory.Create(ConfigurationOptionsFactory.Create());

    IWebPageComposer webPageComposer = Factory.Instance.GetResponseRenderer();
    string content = await webPageComposer.GetHomepage();

    HttpResponseMessage response = req.CreateResponse(HttpStatusCode.OK);
    response.Content = new StringContent(content, Encoding.UTF8, "text/html");

    return response;
}
Time Taken: 3 hours
Step 7 – Sidebar Content
To maintain a sidebar I needed to maintain some additional metadata – what posts belong in what categories which I’m pulling from the (optional) JSON annotation of the Markdown files I outlined earlier. An example of that can be seen below:
{
    createdAtUtc: '2017-12-29 10:01:00',
    categories: [
        'C#',
        'Code'
    ],
    urlName: 'aUrlNameForAPost',
    author: 'James Randall'
}
The categories get parsed into a very simple table storage class:
internal class CategoryItem : TableEntity
{
    public string UrlName => PartitionKey;

    public string PostUrlName => RowKey;

    public string DisplayName { get; set; }

    public string PostTitle { get; set; }

    public DateTime PostedAtUtc { get; set; }

    public static string GetPartitionKey(string categoryUrlName)
    {
        return categoryUrlName;
    }

    public static string GetRowKey(string postUrlName)
    {
        return postUrlName;
    }
}
The UrlName‘s referenced above are just (by default) camelcase alphabetic strings used to identify posts as part of a URI and as such are unique (within the context of a blog). Because all this activity takes place on the backend and away from user requests I’ve not bothered with any more complex indexing strategies or further storage tables to store the unique set of categories – instead when I need to organise the categories into a hierarchical structure or get the category names I simply load them all from table store and run some simple LINQ:
internal class CategoryListBuilder : ICategoryListBuilder
{
    public IReadOnlyCollection<Category> FromCategoryItems(IEnumerable<CategoryItem> items)
    {
        var result = items.GroupBy(x => x.UrlName, (k, g) => new Category
        {
            UrlName = k,
            DisplayName = g.First().DisplayName,
            Posts = g.OrderByDescending(x => x.PostedAtUtc).Select(x => new PostSummary
            {
                PostedAtUtc = x.PostedAtUtc,
                Title = x.PostTitle,
                UrlName = x.PostUrlName
            }).ToArray()
        }).OrderBy(x => x.DisplayName).ToArray();

        return result;
    }
}
This is something that might need revisiting at some point but this isn’t some uber-content management system, it’s designed to handle simple blogs like mine, and, hey, I only have 12 hours!
I take a similar approach to generating the list of months for the archives section of the sidebar and then create it as a static asset with a Handlebars template:
<h2>Recent Posts</h2>
<ul>
    {{#each recentPosts}}
        <li><a href="/{{urlName}}">{{title}}</a></li>
    {{/each}}
</ul>
<h2>Archives</h2>
<ul>
    {{#each archives}}
        <li><a href="/archive/{{year}}/{{month}}">{{displayName}}</a></li>
    {{/each}}
</ul>
<h2>Categories</h2>
<ul>
    {{#each categories}}
        <li><a href="/category/{{urlName}}">{{displayName}}</a></li>
    {{/each}}
</ul>
Time taken: 2 hours
Step 8 – Wrap Up
With most of the system working and problems solved all that was left was to fill in a couple of the empty pages: post lists for categories and archives. The only new code I needed to this was something to summarise a post, for the moment I’ve taken a quick and dirty approach to this based on how my content is structured: I look for the title and the end of the first paragraph in the HTML output.
And having got that again I simply use another Handlebars template to generate the output and a couple more functions to return the content to a user.
Time taken: 2 hours
Conclusions and Next Steps
Did I succeed? Well I have my MVP, it works, and it ticks off what I wanted! However I took 14 hours to put this together rather than the 12 I’d allowed. Most of the overrun was due to the performance issue with .NET Core and the Azure Functions v2 runtime, it took a little while to pin down the cause of the issue as the starting point for my investigation was based on the (generally reasonable!) assumption that I’d done something stupid.
Given that and as it’s New Year I’m going to give myself a pass and class this as a resounding success! A few takeaways for me:
- Azure Functions are very flexible and serverless can be a great model but there are some definite limitations in the Azure Function implementation some of which stem from the underlying hosting model – I’m going to come back to this in a future blog post and, time allowing, contrast them with AWS Lamda’s.
- Implementing this using Azure Functions was not really any harder than using ASP.Net Core or Web API.
- Never underestimate the need to test with some load against your code.
- It’s always spending some time on identifying the main challenges in a project and focusing your efforts against them. In this case it was covering enough ground quickly enough to validate the design without making things a nightmare to move on and into a more professional codebase.
- If you really focus its amazing how much you can get done quickly with modern tools and technologies.
- Development is fun! I had a great time building this small project.
- Blogging takes even longer than development. The real overrun on this project was the blog post – I think its taken me the best part of 2 days.
If I continue with this project the next steps, in a rough priority order, will be to:
- Add unit tests
- Introduce fault tolerance strategies and logging
- Add a proper deployment script so others can get up and running with it
- Test it with more content (extracted from my blog)
- Improve code syntax highlighting
- Ensure images work
Finally the code that goes along with this blog can be found over on GitHub:
https://github.com/JamesRandall/AzureFromTheTrenches.ServerlessBlog


Recent Comments