Category: Azure Resource Manager

Azure SQL Database deployment with Farmer, DbUp and GitHub Actions

Farmer is a DSL for generating and executing ARM templates and one of the great things about it is that its based on .NET Core. That means that you can use it in combination with other components from the .NET ecosystem to create end to end typesafe deployment solutions.

As an aside – I recently posted a critique of Microsofts new DSL Bicep. One of the things I didn’t mention in that but did in a series of tweets was the shortcomings of inventing a new language that lives in its own ecosystem.

Ultimately Bicep will need to support “extension points” or you’ll have to wrap them in script and communicate information across boundaries (of course their can be benefits to that approach too). Not to mention they need to write all the tooling from scratch and developers / administrators need to learn another language.

By taking the approach Farmer has handling boundaries is a lot cleaner – as we’ll see – and we can take advantage of some neat language features.

In this example I’m going to provision an Azure SQL Database into Azure and then upgrade its schema using DbUp and we’ll run all this through GitHub Actions giving us an automated end to end deployment / upgrade system for our SQL database. You could do this with less F# code (almost none) but I also want to try and illustrate how this approach can form a nice framework for more complicated deployment scenarios so we’re also going to look at error handling across a deployment pipeline.

As all the components themselves are well documented I’m not going to go end to end on all the detail of each component here – instead I’m going to focus on the big picture and the glue. You can find the code for the finished demonstration on GitHub here.

Starting with a F# console app, adding the Farmer NuGet package, and the boilerplate Program.fs file first we need to declare our Azure resources – in this case a SQL Server and a database and then bring them together in an ARM template:

let demoDatabase = sqlServer {
    name serverName
    admin_username "demoAdmin"
    enable_azure_firewall
    
    add_databases [
        sqlDb { name databaseName ; sku DbSku.Basic }
    ]
}

let template = arm {
    location Location.UKWest
    add_resource demoDatabase
    output "connection-string" (demoDatabase.ConnectionString databaseName)
}

Pretty straightforward but a couple of things worth noting:

  1. Both serverName and databaseName are simple constants (e.g. let databaseName = “myDatabaseName”) that I’ve created as I’m going to use them a couple of times.
  2. Opening up the database to azure services (enable_azure_firewall) will allow the GitHub Actions Runner to access the database.
  3. On the final line of our arm block we output the connection string for the database so we can use it later.

That’s our Azure resources but how do we apply our SQL scripts to generate our schema? First we’ll need to add the dbup-sqlserver NuGet package and with that in place we’ll first add a Scripts folder to our solution and in my example four scripts:

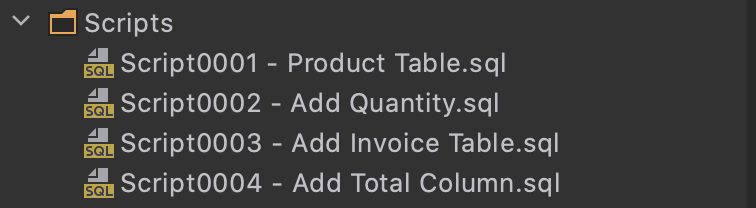
DbUp keeps track of the last script it ran and applies subsequent scripts – essentially its a forward only ladder of migrations. If you’re adding scripts of your own make sure you mark them as Embedded Resource otherwise DbUp won’t find them. To apply the scripts we simply need some fairly standard DbUp code like that shown below, I’ve placed this in a F# module called DbUpgrade so, as we’ll see in a minute, we can pipe to it quite elegantly:

let tryExecute =
  Result.bind (fun (outputs:Map<string,string>) ->
    try
      let connectionString = outputs.["connection-string"]
      let result =
        DeployChanges
          .To
          .SqlDatabase(connectionString)
          .WithScriptsEmbeddedInAssembly(Assembly.GetExecutingAssembly())
          .LogToConsole()
          .Build()
          .PerformUpgrade()
      match result.Successful with
      | true -> Ok outputs
      | false -> Error (sprintf "%s: %s" (result.Error.GetType().Name.ToUpper()) result.Error.Message)
    with _ -> Error "Unexpected error occurred upgrading database"
  )

If you’re not familiar with F# you might wonder what this Result.bind function is. F# has a wrapper type for handling success and error states called options and a bunch of helper functions for their use. One of the neat things about it is it lets you chain lots of functions together with an elegant pattern for handling failure – this is often referred to as Railway Oriented Programming.

We’ve now declared our Azure resources and we’ve got a process for deploying our upgrade scripts and we need to bring it all together and actually execute all this. First lets create our deployment pipeline that first provisions the resources and then upgrades the database:

let deploymentPipeline =
  Deploy.tryExecute "demoResourceGroup" [ adminPasswordParameter ]
  >> DbUpgrade.tryExecute 

If we had additional tasks to run in our pipeline we’d join them together with the >> operator as I’ve done here.

To run the deployment we need to provide an admin passford for SQL server which you can see in this code snippet as sqlServerPasswordParameter and we need to do this securely – so it can’t sit in the source code. Instead as I’m going to be running this from GitHub Actions an obvious place is the Secrets area of GitHub and an easy way to make that available to our deployment console app is through an environment variable in the appropriate action (which we’ll look at later). We can then access this and format it for use with Farmber by adding this line:

let adminPasswordParameter =
  Environment.GetEnvironmentVariable("ADMIN_PASSWORD") |> createSqlServerPasswordParameter serverName

Farmer uses a convention approach to a parameter name – I’ve built a little helper function createSqlServerPassword to form that up.

(We could take a number of different approaches to this – ARM parameters for example – I’ve just picked a simple mechanism for this demo)

Finally to invoke all this we add this line at the bottom of our file:

template |> deploymentPipeline |> asGitHubAction

asGitHubAction is another little helper I’ve created that simply returns a 0 on success or prints a message to the console and returns a 1 in the event of an error. This will cause the GitHub Action to fail as we want.

That’s the code side of things done. Our finished Program.cs looks like this:

open System
open Farmer
open Farmer.Builders
open Sql
open Constants
open Helpers

[<EntryPoint>]
let main _ =
  let adminPasswordParameter =
    Environment.GetEnvironmentVariable("ADMIN_PASSWORD") |> createSqlServerPasswordParameter serverName

  let demoDatabase = sqlServer {
    name serverName
    admin_username "demoAdmin"
    enable_azure_firewall
      
    add_databases [
      sqlDb { name databaseName ; sku DbSku.Basic }
    ]
  }

  let template = arm {
    location Location.UKWest
    add_resource demoDatabase
    output "connection-string" (demoDatabase.ConnectionString databaseName)
  }

  let deploymentPipeline =
    Deploy.tryExecute "demoResourceGroup" [ adminPasswordParameter ]
    >> DbUpgrade.tryExecute 
  
  template |> deploymentPipeline |> asGitHubAction

All we need to do now is wrap it up in a GitHub Action. I’ve based this action on the stock .NET Core build one – lets take a look at it:

name: Deploy SQL database

on:
  push:
    branches: [ master ]
  pull_request:
    branches: [ master ]

jobs:
  build:

    runs-on: ubuntu-latest

    steps:
    - uses: actions/checkout@v2
    - name: Setup .NET Core
      uses: actions/setup-dotnet@v1
      with:
        dotnet-version: 3.1.301
    - name: Install dependencies
      run: dotnet restore
    - name: Build
      run: dotnet build --configuration Release --no-restore
    - name: Login via Az module
      uses: azure/login@v1.1
      with:
        creds: ${{secrets.AZURE_CREDENTIALS}}
        enable-AzPSSession: true
    - name: Run
      env:
        ADMIN_PASSWORD: ${{ secrets.ADMIN_PASSWORD}}
      run: dotnet DeployDb/bin/Release/netcoreapp3.1/DeployDb.dll

If you’re familiar with GitHub Actions most of this should be fairly self explanatory – there’s nothing special about our deployment code, its a standard .NET Core console app so we begin by building it as we would any other (again this is one of the things I like about Farmer – its just .NET, and if you’re using .NET there’s nothing else required). However after building it we do a couple of things:

  1. To do the deployment Farmer will use the Azure CLI and so we need to login to Azure via that. We do that in the Login via Az module step which is pretty stock and documented on GitHub here. I’ve stored the secret for the service principal in the secrets area of GitHub.
  2. In the final step we run our deployment – again its just a standard console app. You an see in this step the use of the env section – we take a secret we’ve called ADMIN_PASSWORD and set it as an environment variable making it available to our console app.

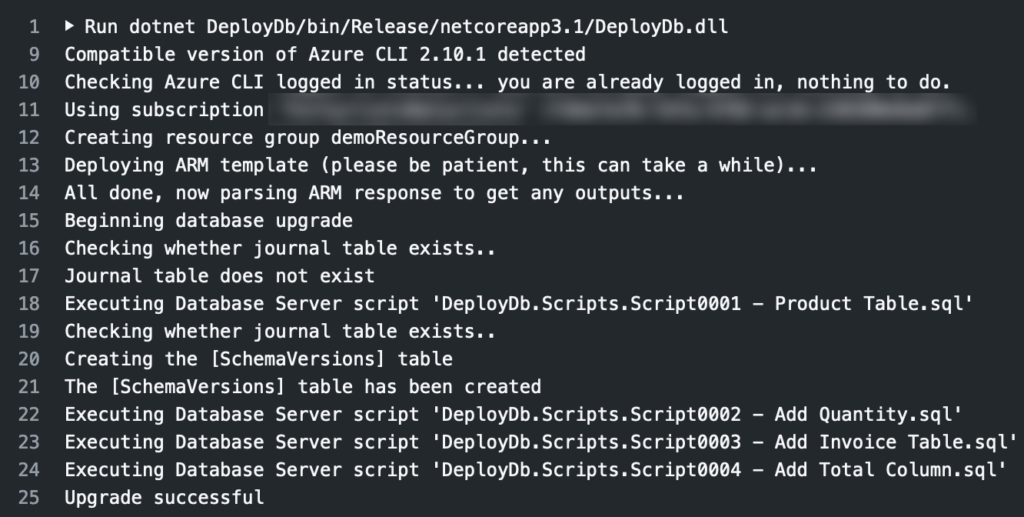
And that’s it! At this point you’ve got an automated solution that will make sure your Azure SQL database infrastructure and its schema are managed get up to date. Change the configuration of your SQL database and/or add a SQL script and this will kick off and apply the changes for you. If / when you run it for the first time you should see output like this from the build section of the Action:

I think its a simple, but powerful, example of infrastructure as code and the benefits of using an existing language and ecosystem for creating DSLs – you get so much for free by doing so. And if the rest of your codebase is in .NET then with Farmer you can share code, whether that be simple constants and names or implementation, easily across your deployment and runtime environments. Thats a big win. I’m slowly adding it into my Performance for Cyclists project and this approach here is largely lifted from their.

Finally I think its worth emphasising – you don’t need to really know F# to use Farmer and you certainly don’t need to be using it elsewhere in your solution. Its a pretty simple DSL build on top of F# and a fantastic example of how good F# is as a basis for DSLs. I’ve dug a little deeper into the language here to integrate another .NET tool but if all you want to do is generate ARM templates then, as you can see from the Farmer examples on its website, you really don’t need to get into the F# side (though I do encourage you to!).

An Azure Reference Architecture

There are an awful lot of services available on Azure but I’ve noticed a pattern emerging in a lot of my work around web apps. At their core they often have a similar architecture, deployment in Azure, and process for build and release.

For context a lot my hands on work over the last 3 years has been as a freelancer developing custom systems for people or on my own side projects (most recently https://www.forcyclistsbycyclists.com). In these situations I’ve found productivity to be super important in a few key ways:

  1. There’s a lot to get done, one or two people, and not much time – so being able to crank out a lot of work quickly and to a good level of quality is key.
  2. Adaptability – if its an externally focused green field system there’s a reasonable chance that there’s a degree of uncertainty over what the right feature set is. I generally expect to have to iterate a few times.
  3. I can’t be wasting time repeating myself or undertaking lengthy manual tasks.

Due to this I generally avoid over complicating my early stage deployment with too much separation – but I *do* make sure I understand where my boundaries and apply principles that support the later distribution of a system in the code.

With that out the way… here’s an architecture I’ve used as a good starting point several times now. And while it continues to evolve and I will vary specific decisions based on need its served me well and so I thought I’d share it here.

I realise there are some elements on here that are not “the latest and greatest” however its rarely productive to be on the bleeding edge. It seems likely, for example, that I’ll adopt the Azure SPA support at some point – but there’s not much in it for me doing that now. Similarly I can imagine giving GitHub Actions ago at some point – but what do I really gain by throwing what I know away today. From the experiments I’ve run I gain no productivity. Judging this stuff is something of a fine line but at the risk of banging this drum too hard: far too many people adopt technology because they see it being pushed and talked about on Twitter or dev.to (etc.) by the vendor, by their DevRel folk and by their community (e.g. MVPs) and by those who have jumped early and are quite possibly (likely!) suffering from a bizarre mix of Stockholm Syndrome and sunk cost fallacy “honestly the grass is so much greener over here… I’m so happy I crawled through the barbed wire”.

Rant over. If you’ve got any questions, want to tell me I’m crazy or question my parentage: catch me over on Twitter.

Architecture

Build & Release

I’ve long been a fan of automating at least all the high value parts of build & release. If you’re able to get it up and running quickly it rapidly pays for itself over the lifetime of a project. And one of the benefits of not CV chasing the latest tech is that most of this stuff is movable from project to project. Once you’ve set up a pipeline for a given set of assets and components its pretty easy to use on your next project. Introduce lots of new components… yeah you’ll have lots of figuring out to do. Consistency is underrated in our industry.

So what do I use and why?

  1. Git repository – I was actually an early adopter of Git. Mostly because I was taking my personal laptop into a disconnected environment on a regular basis when it first started to emege and I’m a frequent committer.

    In this architecture it holds all the assets required to build & deploy my system other than secrets.
  2. Azure DevOps – I use the pipelines to co-ordinate build & release activities both directly using built in tasks, third party tasks and scripts. Why? At the time I started it was free and “good enough”. I’ve slowly moved over to the YAML pipelines. Slowly.
  3. My builds will output four main assets: an ARM template, Docker container, a built single page application, and SQL migration scripts. These get deployed into a an Azure resource group, Azure container registry, blob storage, and a SQL database respectively.

    My migration scripts are applied against a SQL database using DbUp and my ARM templates are generated using Farmer and then used to provision a resource group. I’m fairly new to Farmer but so far its been fantastic – previously I was using Terraform but Farmer just fit a little nicer with my workflow and I like to support the F# community.

Runtime Environment

So what do I actually use to run and host my code?

  1. App Service – I’ve nearly always got an API to host and though I will sometimes use Azure Functions for this I more often use the Web App for Containers support.

    Originally I deployed directly into a “plain” App Service but grew really tired with the ongoing “now this is really how you deploy without locked files” fiasco and the final straw was the bungled .NET Core release.

    Its just easier and more reliable to deploy a container.
  2. Azure DNS – what it says on the tin! Unless there is a good reason to run it elsewhere I prefer to keep things together, keeps things simple.
  3. Azure CDN – gets you a free SSL cert for your single page app, is fairly inexpensive, and helps with load times.
  4. SQL Database – still, I think, the most flexible general purpose and productive data solution. Sure at scale others might be better. Sure sometimes less structured data is better suited to less structured data sources. But when you’re trying to get stuff done there’s a lot to be said for having an atomic, transactional data store. And if I had a tenner for every distributed / none transactional design I’ve seen that dealt only with the happy path I would be a very very wealthy man.

    Oh and “schema-less”. In most cases the question is is the schema explicit or implicit. If its implicit… again a lot of what I’ve seen doesn’t account for much beyodn the happy path.

    SQL might not be cool, and maybe I’m boring (but I’ll take boring and gets shit done), but it goes a long way in a simple to reason about manner.
  5. Storage accounts – in many systems you come across small bits of data that are handy to dump into, say, a blob store (poor mans NoSQL right there!) or table store. I generally find myself using it at some point.
  6. Service Bus – the unsung hero of Azure in my opinion. Its reliable. Does what it says on the tin and is easy to work with. Most applications have some background activity, chatter or async events to deal with and service bus is a great way of handling this. I sometimes pair this (and Azure Functions below) with SignalR.
  7. Azure Functions – great for processing the Service Bus, running code on a schedule and generally providing glue for your system. Again I often find myself with at least a handful of these. I often also use Service Bus queues with Functions to provide a “poor mans admin console”. Basically allow me to kick off administrative events by dropping a message on a queue.
  8. Application Insights – easy way of gathering together logs, metrics, telemetry etc. If something does go wrong or your system is doing something strange the query console is a good way of exploring what the root cause might be.

Code

I’m not going to spend too long talking about how I write the system itself (plenty of that on this blog already). In generally I try and keep things loosely coupled and normally start with a modular monolith – easy to reason about, well supported by tooling, minimal complexity but can grow into something more complex when and if that’s needed.

My current tools of choice is end to end F# with Fable and Saturn / Giraffe on top of ASP.Net Core and Fable Remoting on top of all that. I hopped onto functional programming as:

  1. It seemed a better fit for building web applications and APIs.
  2. I’d grown tired with all the C# ceremony.
  3. Collectively we seem to have decided that traditional OO is not that useful – yet we’re working in languages built for that way of working. And I felt I was holding myself back / being held back.

But if you’re looking to be productive – use what you know.

Changing the App Service Plan of an Azure App Service

To allow a number of App Services to scale independently I needed to pull one of them out of an App Service Plan where it had lived with 3 others to sit in it’s own plan – experience had shown me that it’s scaling characteristics are really quite different from the other App Services.

You can do this straightforwardly and pretty much instantly either in the Portal (there’s a Change App Service Plan option in Settings) or with PowerShell (with the Set-AzureRmAppServicePlan cmdlet).

Super simple – but I did encounter one gotcha. This doesn’t move any deployment slots you might have created and so you end up in a situation with the main App Service sat in one App Service Plan and it’s deployment slots in another which probably isn’t what you want and, in any case, Azure won’t let you swap slots in different service plans.

The solution is simple: you can also move them between App Service Plans in the same way.


Azure Resource Manager and Powershell 1.0

Microsoft recently updated Azure Powershell to 1.0 in the process introducing a large number of breaking changes to the CmdLet’s. Essentially they’ve removed Switch-AzureMode and instead of that the Azure Resource Manager cmdlets have all had an Rm introduced to them so for example:

New-AzureResourceGroupDeployment

becomes

New-AzureRmResourceGroupDeployment

For the most part the errors on upgrading a Powershell script are obvious and a rename will get you going however somewhat confusingly there are now pairs of cmdlet’s that do the same thing but only effect the different cmdlet sets.

An example of one that caught me out is Select-AzureSubscription. I’ve got numerous Azure subscriptions and scripts that deploy into different subscriptions depending on what I’m doing. Previously I used Select-AzureSubscription along with Switch-AzureMode and this worked. The problem is that Select-AzureSubscription still works – but it has no effect on the cmdlets that use the Rm prefix.

This led, confusingly, to a resource group being created in a different subscription to the one I intended and resources with the same name as in my intended resource group (resources which already existed) being created, or attempted to be created, in this new resource group. They failed as they already existed with the same names elsewhere.

The fix was to use Select-AzureRmSubscription.


Add-AzureAccount and Build Servers

If you followed my previous post you might be wandering how this works on a build server as the Add-AzureAccount cmdlet that you use to gain access to Azure pops up an interactive dialog box. Not helpful in the build of an automated build pipeline.

The best way to handle this scenario with Azure Resource Manager is with a service principal account. Rather than repeat excellent work I suggest heading over to David Ebbo’s blog, he has an excellent post on using service principal accounts to do this.

How To: Publish an AngularJS Website with Azure Resource Manager Templates

I’ve recently been working on the deployment of some fairly complex micro-service projects using the new Azure Resource Manager and in the Microsoft space everything went fine, it’s all pretty self-explanatory, there’s some useful tooling in Visual Studio and some great quick-start templates.

Then I hit my UI layer. This is an AngularJS app which I prefer to work on outside of Visual Studio – I like to use the best tools for the job and while I definitely find Visual Studio is just that for C# and other Microsoft native technologies I find it often lags behind in the web space, though it’s got and continues to get a lot better.

Basically I have a folder in my project folder space (not in the .sln file) containing my AngularJS app and a bunch of typical web tools to run the build and packages: npm, bower and grunt. For various reasons although the project source is in GitHub I couldn’t (without a fair bit of hassle) deploy directly from their using the source code deployment model.

And so how do you publish a folder of files to an Azure website using Azure Resource Manager?

Below I’ll present one way using the Yeoman generated Angular template as a sample which, using grunt, builds to a folder called dist. As a prerequisite for this you’ll need Azure Powershell -I’m using 0.8 at the time of writing (1.0 contains some changes to the Azure Resource Manager cmdlets but as I write this it’s in preview, the changes are nothing earth shattering).

You can find source code for the below in GitHub.

Firstly you need to create an Azure Resource Manager template – the one we’re using is here. I’ve not going to cover every bit of this as Microsoft have plenty of documentation and samples however it’s worth looking at this bit towards the end:

"resources": [
  {
    "name": "MSDeploy",
    "type": "extensions",
    "location": "[parameters('location')]",
    "apiVersion": "2014-06-01",
    "dependsOn": [
      "[concat('Microsoft.Web/sites/', parameters('siteName'))]"
    ],
    "tags": {
      "displayName": "ContentDeploy"
    },
    "properties": {
      "packageUri": "[concat(parameters('packageUrl'), parameters('sasToken'))]",
      "dbType": "None",
      "connectionString": "",
      "setParameters": {
          "IIS Web Application Name": "[parameters('siteName')]"
      }
    }
  }
]

This invokes the deployment of a Web Deployment package at URL specified by packageUrl. I’m using an Azure Storage Account for this and so to access the package do so we need a Shared Access Signature which we’ll see how to generate later.

As I want to automate everything I’ve also got a template for creating a storage account into which the package can be uploaded and you can see this template here.

I’m going to glue these two templates together with a Powershell script using the Azure Powershell cmdlets. To get started with this launch Azure Powershell and before running any scripts add your Azure subscription:

Add-AzureAccount

You’ll be prompted to log into your account.

The Powershell script I’m using to glue all this is called deploy.ps1 and you can find it here. I’m going to break this down section by section. Firstly we just deploy a bunch of fairly (if you know Azure) self explanatory settings – the hosting plan, resource group, website and storage account to create / use and the location of those resources:

# Deployment settings
$hostingPlanName = "ArmAngularSampleHostingPlan"
$resourceGroupName = "ArmAngularSample"
$storageAccountName = "armangularsamplesa"
$location = "West Europe"
$siteName = "ArmAngularSampleWebsite"

Then we optionally select an Azure subscription (if you only have one subscription you won’t need to do this) and switch Powershell into Azure Resource Manager mode.

# Configure Azure and the Powershell shell
# Select-AzureSubscription -SubscriptionId {{your-subscription-id}}
Switch-AzureMode AzureResourceManager

Now we create the resource group within which our templates are going to run:

# Create Azure Resoure Group
New-AzureResourceGroup -Name $resourceGroupName -Location $location -Force

Next we deploy our storage resources using Azure Resource Manager and then we get hold of the access key – we’ll need that in a minute. In such a small deployment this split of storage and service might seem a little naive but in more complex scenarios it’s fairly common to do a bunch of work on storage before deploying updated services (and vice versa):

# Deploy storage
New-AzureResourceGroupDeployment -ResourceGroupName $resourceGroupName `
                                 -Name AzmSampleStorageDeployment `
                                 -TemplateFile "storagedeploy.json" `
                                 -appStorageAccountName $storageAccountName 				 
$storageAccountKey = (Get-AzureStorageAccountKey -ResourceGroupName $resourceGroupName -Name $storageAccountName).Key1

Having done that we get grunt to build a distribution version of our Angular site and then we invoke MSBuild to create a deployment package from the folder. To do this MSBuild needs a project file and nearly every example you see will use a .csproj file – which is fine if you’re using Visual Studio but what if we’re not? Well you can also use a .publishproj file which you can find here. This file is absolute boilerplate – it will work for any folder and so you can copy and use mine for your own projects. We need to move this into the dist folder that grunt has created (you can use it elsewhere but as dist is cleaned each time this is easiest).

# Build deployment package
grunt build
cp .\website.publishproj .\dist\website.publishproj
C:\"Program Files (x86)"\MSBuild\14.0\bin\msbuild.exe .\dist\website.publishproj /T:Package /P:PackageLocation="." /P:_PackageTempDir="packagetmp"
$websitePackage = ".\dist\website.zip"

The setting of /P:PackageLocation=”.” causes the package to be dropped in the dist folder and the /P:_PackageTempDir=”packagetmp” causes MSBuild to use a packagetmp subfolder of dist to be used for temporary files – this can be useful as it’s easy to run into the “classic” Windows file length issues otherwise (it will use a temp location in AppData by default).

Having generated a package (called website.zip and located in the dist folder) we need to upload it to somewhere Azure can access. I’m using the storage account we created earlier. So that the Azure Resoure Manager incarnation of Web Deploy can access the package we generate a Shared Access Signature with read privileges:

# Upload packages
$storageCtx = New-AzureStorageContext -StorageAccountName $storageAccountName -StorageAccountKey $storageAccountKey
if (-Not (Get-AzureStorageContainer -Context $storageCtx | Where-Object { $_.Name -eq "packages" }) ) {
    New-AzureStorageContainer -Name "packages" -Context $storageCtx -Permission Off
}
Set-AzureStorageBlobContent -File $websitePackage -Container "packages" -Blob website.zip -Context $storageCtx -Force
$uploadedPackage = "https://$storageAccountName.blob.core.windows.net/packages/website.zip"
$sasToken = New-AzureStorageContainerSASToken -Container "packages" -Context $storageCtx -Permission r
$sasToken = ConvertTo-SecureString $sasToken -AsPlainText -Force

And finally we deploy our services via the Azure Resource Manager template we saw earlier:

New-AzureResourceGroupDeployment -ResourceGroupName $resourceGroupName `
                                 -Name AnalyticsLiveServiceDeployment `
                                 -TemplateFile "azuredeploy.json" `
                                 -hostingPlanName $hostingPlanName `
                                 -location $location `
                                 -siteName $siteName `
                                 -packageUrl $uploadedPackage `
                                 -sasToken $sasToken

And that’s it. If you run .\deploy.ps1 (you’ll need to set your own unique storage account and website name) then as long as you have an Azure subscription this will deploy and you’ll be able to see the Yeoman template running in Azure.

Hopefully that’s helpful and will save you some of the pain that always seems to come with the territory of deployment – particularly where MSBuild is involved!

Contact

  • If you're looking for help with C#, .NET, Azure, Architecture, or would simply value an independent opinion then please get in touch here or over on Twitter.

Recent Posts

Recent Tweets

Invalid or expired token.

Recent Comments

Archives

Categories

Meta

GiottoPress by Enrique Chavez