Category: OAuth

AngularJS, IdentityServer3 and OAuth2 Plugin Sample

By popular(ish) demand I’ve published to GitHub a sample that demonstrates using my OAuth 2 Angular plugin (also hosted on GitHub) requesting tokens from IdentityServer3 and using them to access protected Web API resources.

The sample can be found on GitHub and should be pretty easy to get running as long as you have the pre-reqs (npm, git, grunt and bower primarily):

  1. Open the SLN file in Visual Studio and start both projects.
  2. Open a NodeJS command prompt and navigate to the UI folder.
  3. Type “bower install” to install the plugins.
  4. Type “grunt serve” to run the Angular app.

The identity server is prewired with a single user account details as follows:

Username: auser
Password: password

It should be noted that this is illustrative code, particularly in the C# projects, and it’s been written as such. I didn’t want to cloud the example with dependency injectors and other such components.

Thanks to everyone for their comments, questions, and feedback on the plugin both here and on GitHub.

How To: Using Facebook to Authenticate with Web API 2 in a Native Mobile Application

If you’re developing mobile applications and you’re a .Net developer there’s a fair chance you’re using Web API to present access to server side resources. I’ve already covered how to authenticate using organisational accounts with MVC 5 which is a good choice for many applications, particularly business apps, but if you’re working in the consumer space you may want to allow your users to login using social media identities such as Facebook or Twitter.

There’s a really good tutorial on the ASP.Net web site covering how to do this if you’re working in a browser but it doesn’t, directly at least, cover how to do this from a native mobile application. In this post I’m going to take you through the steps required to do this from an iOS application written using the Xamarin tools (if you’re a C# developer working on mobile they are very much worth checking out). I’m going to focus on Facebook but the same approach works for the other providers supported by Web API 2: Facebook, Twitter, Microsoft Accounts and Google Accounts are all supported straight out of the box.

The below walks through the process of configuring Azure, Facebook, a Web API project and a Xamarin mobile application, you can walk through it for the most part (there is the odd missing step – instance variable declarations for the most part) but really it’s intended as a guide to go along with the source code that is on GitHub here.

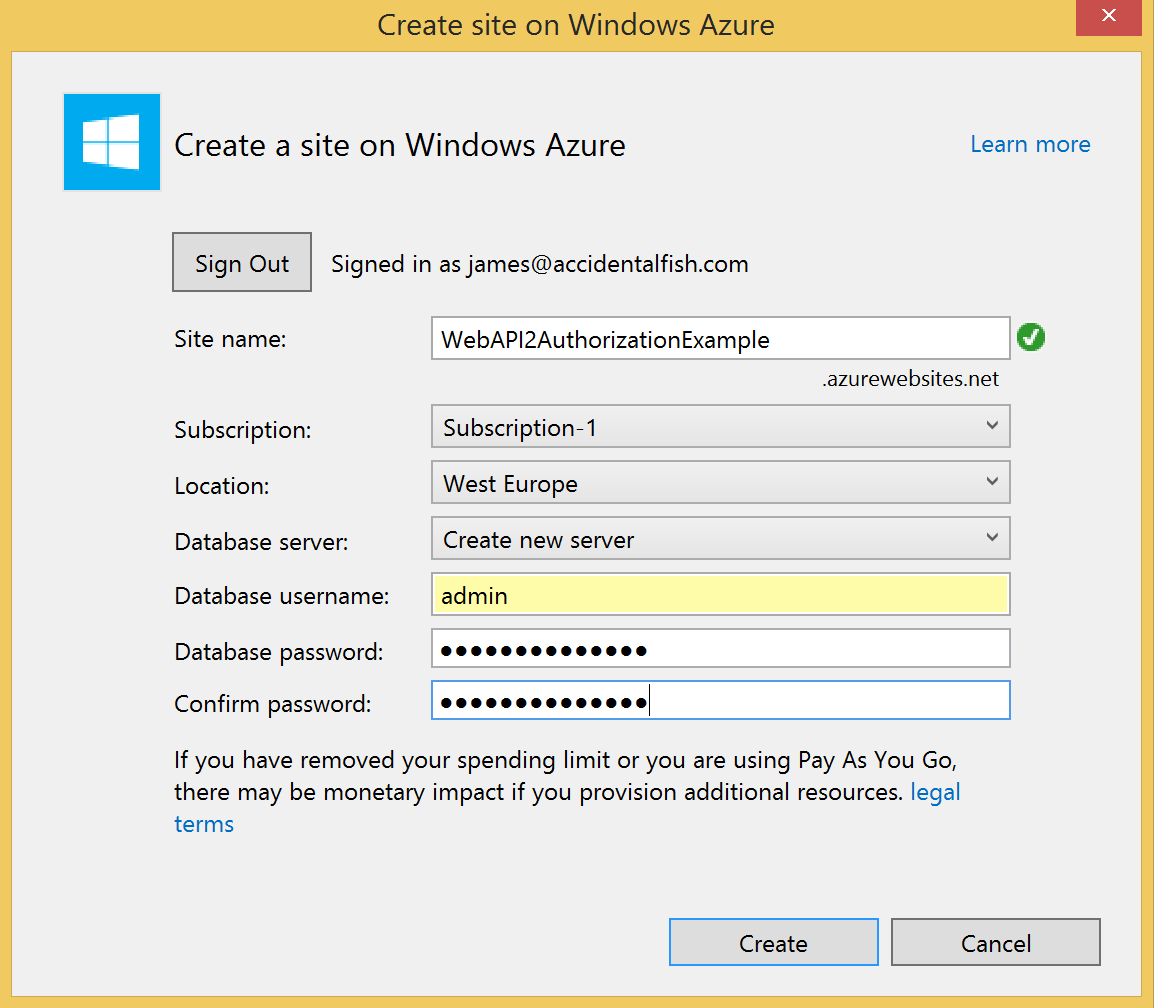
We’re going to host our Web API on Azure so begin by going to the Azure management portal and create yourself a free website. Take a note of the URL as you’ll need it later. Also create an empty SQL Database either on a new or existing server and take a note of the credentials, you’ll need this later.

Configuring Facebook

Firstly you need to create a Facebook application in the Facebook developer portal (http://developer.facebook.com). From the developer portal homepage select Apps -> Create a New App and enter the Display Name for your app and the Category applicable to your app and click Create App. At the time of writing there is a bug in the portal and after it finishes whirring away the dialog box stays on the screen, but your app has been created. Refresh the browser and select the Apps menu again and click the name of your app (that you should now see there). You should see a screen like this:

external1

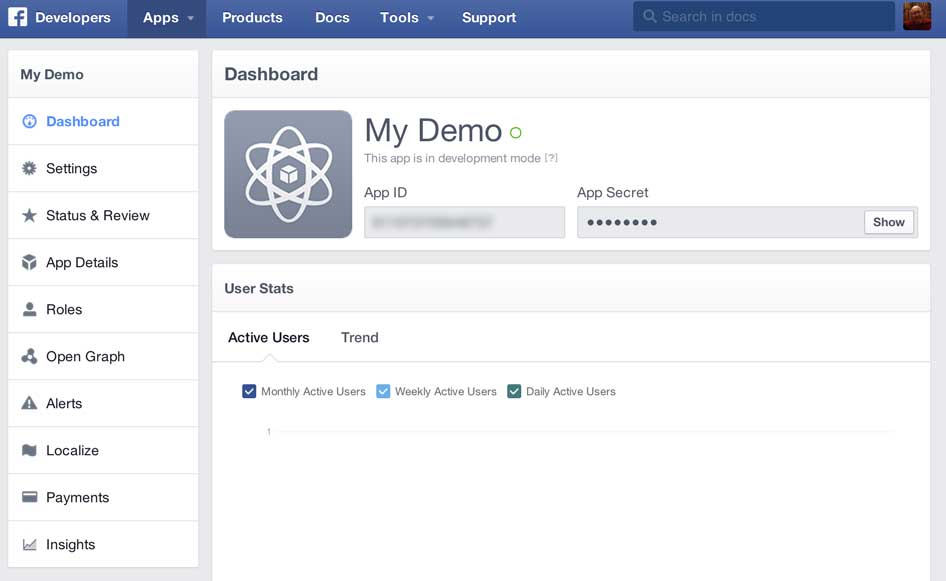
Take a note of the App ID and the App Secret as you’ll need them later (click the show button to see the App Secret) and then click the Settings option on the left to show the settings screen for your app:

external2

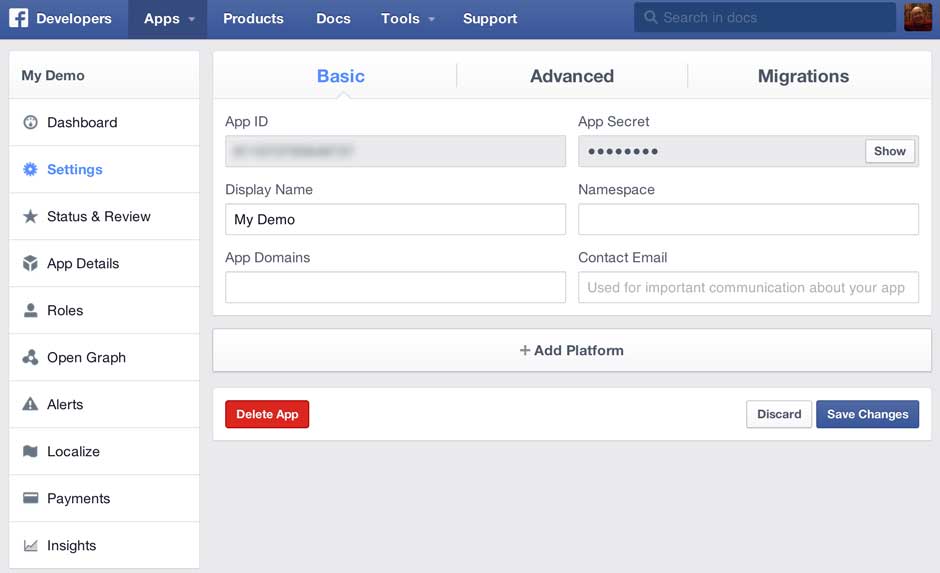
Now click the Add Platform button and choose Website. In the Site URL text box enter the URL you noted earlier from Azure and click Save Changes:

external3

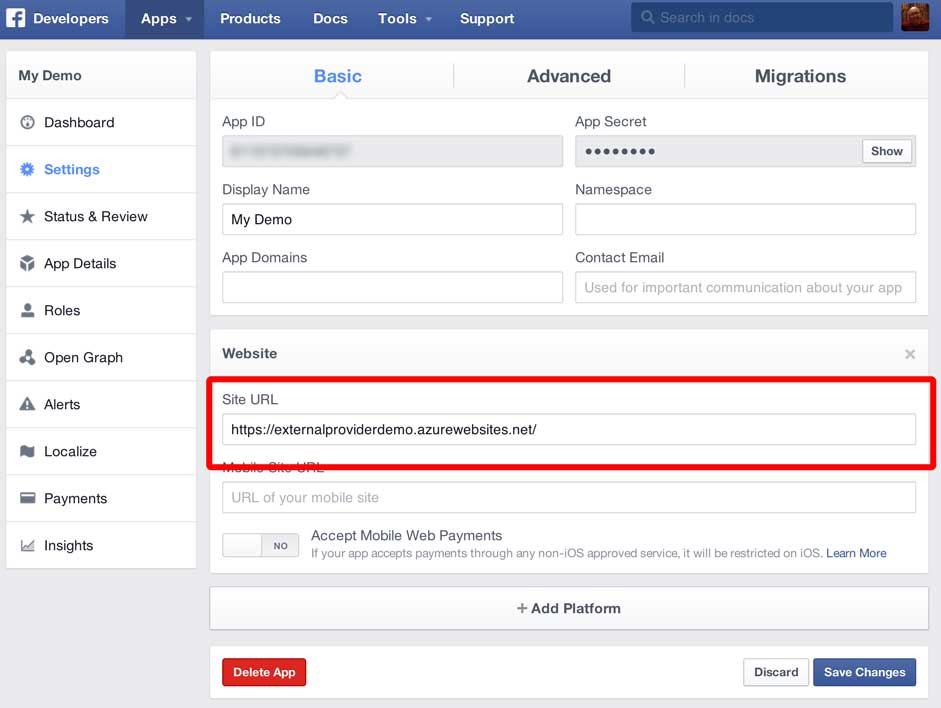
That’s Facebook configured to allow your application to logon so now we’ll go and create our Web API project and wire it up to Facebook.

Web API / Visual Studio

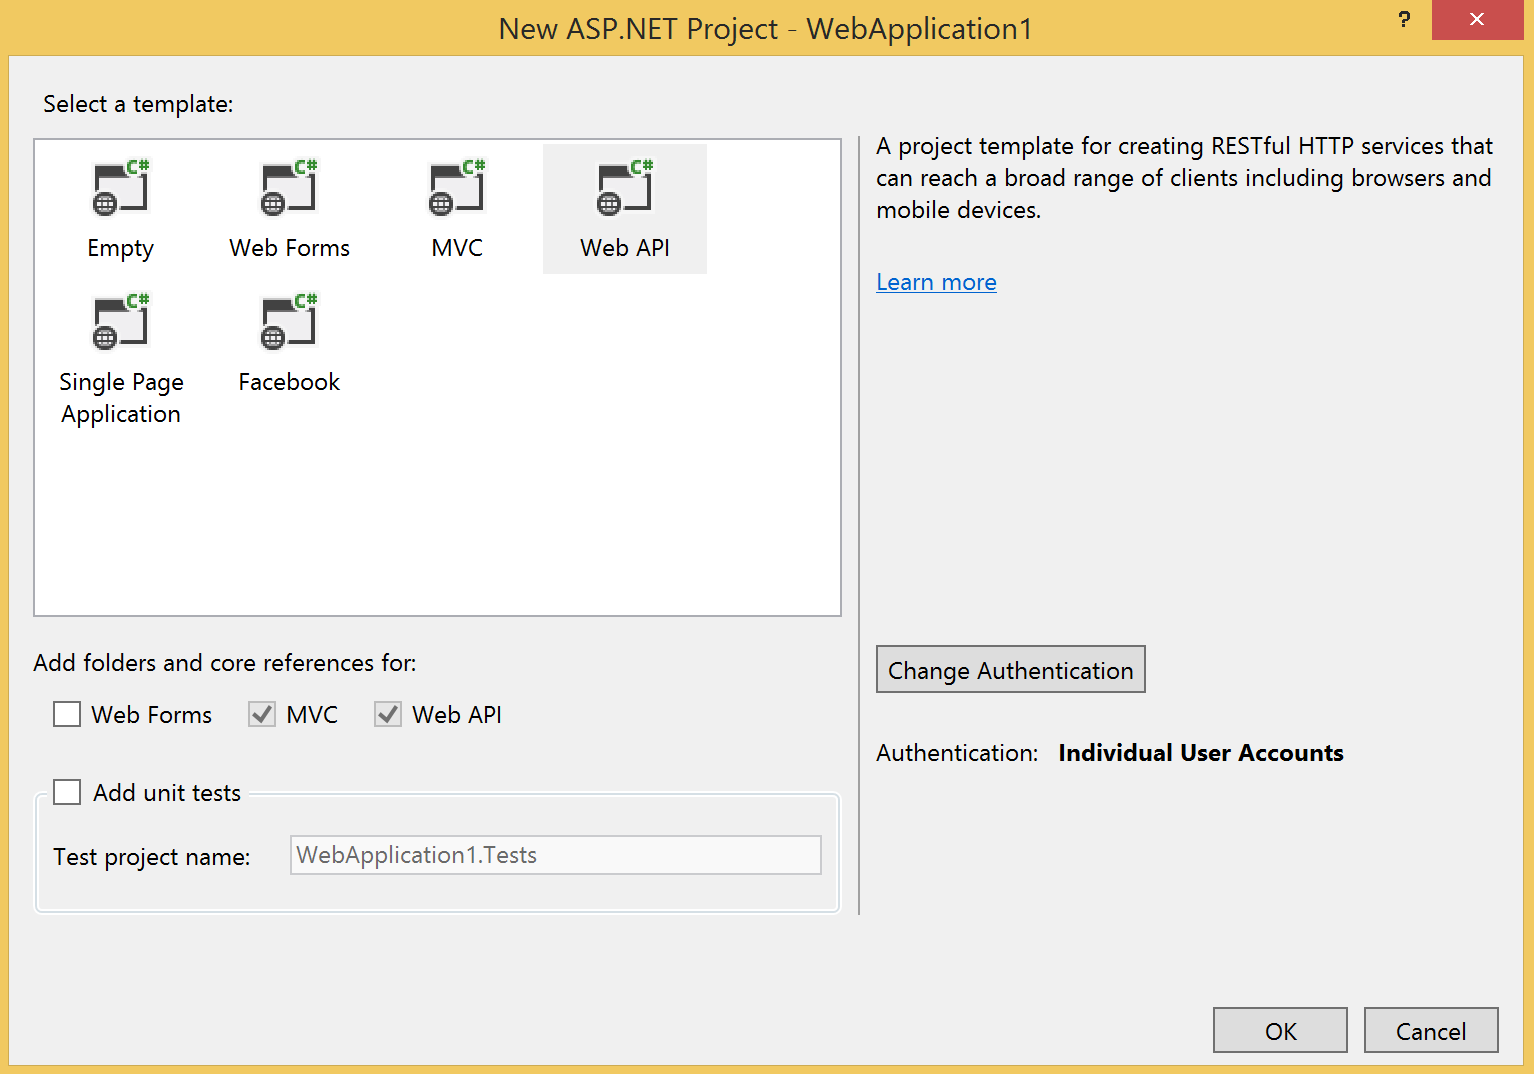
In Visual Studio 2013 create a New Solution and select a project type of ASP.Net Web Application for .Net 4.5.1. On the configuration dialog that appears select Web API and then click the Change Authentication button. Select an authentication type of Individual User Accounts. Your project configuration should now look like this:

external4

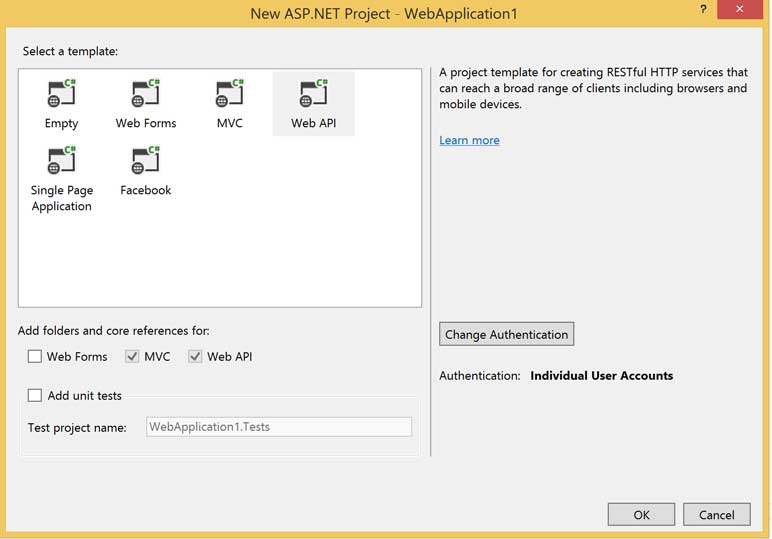
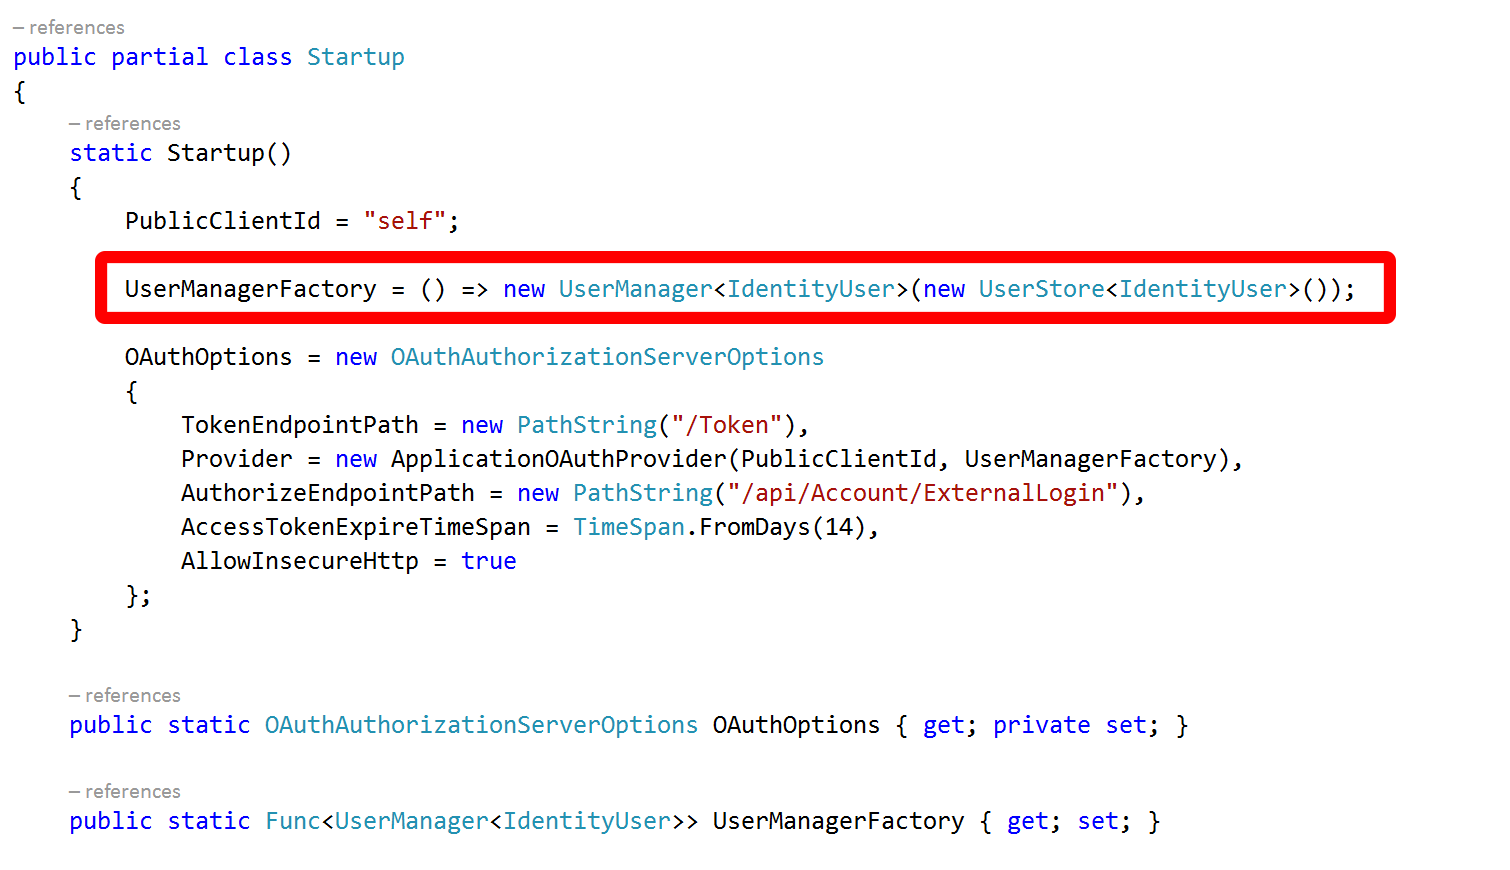
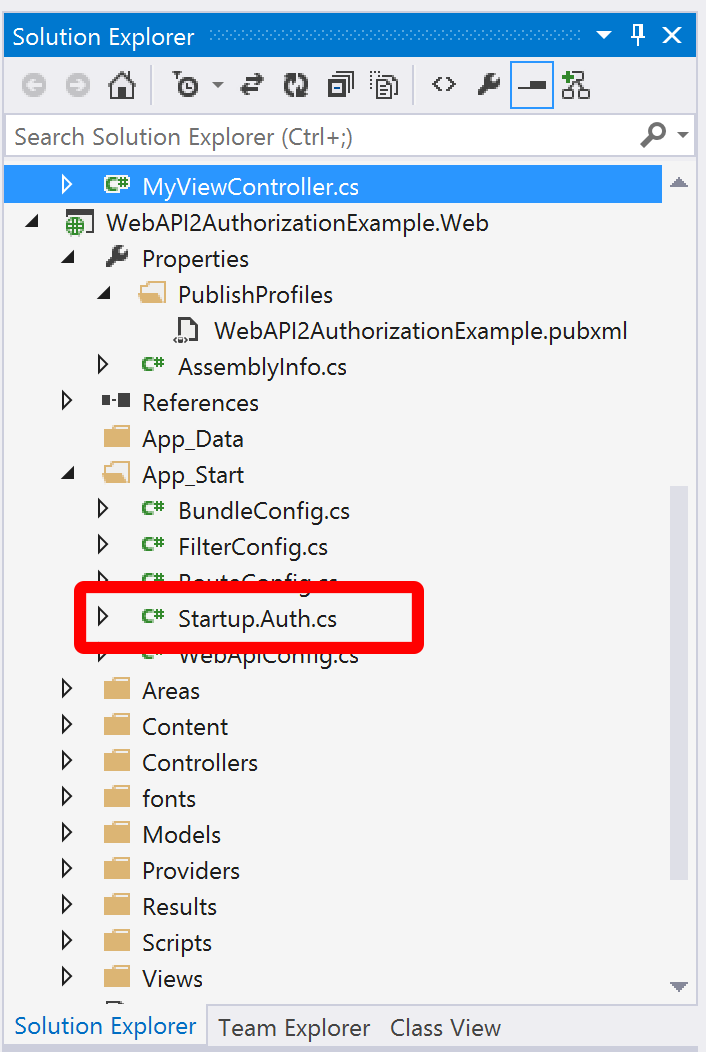
Click OK and your solution will be created with the familiar MVC structure. Open the App_Start folder and open the Startup.Auth.cs file for editing:

external5

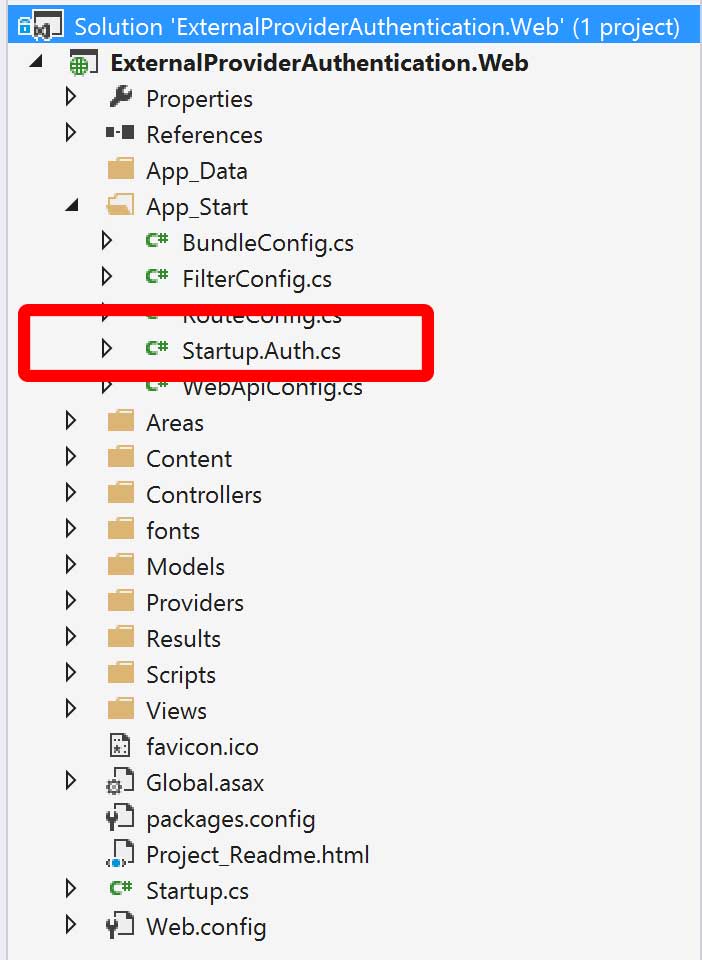
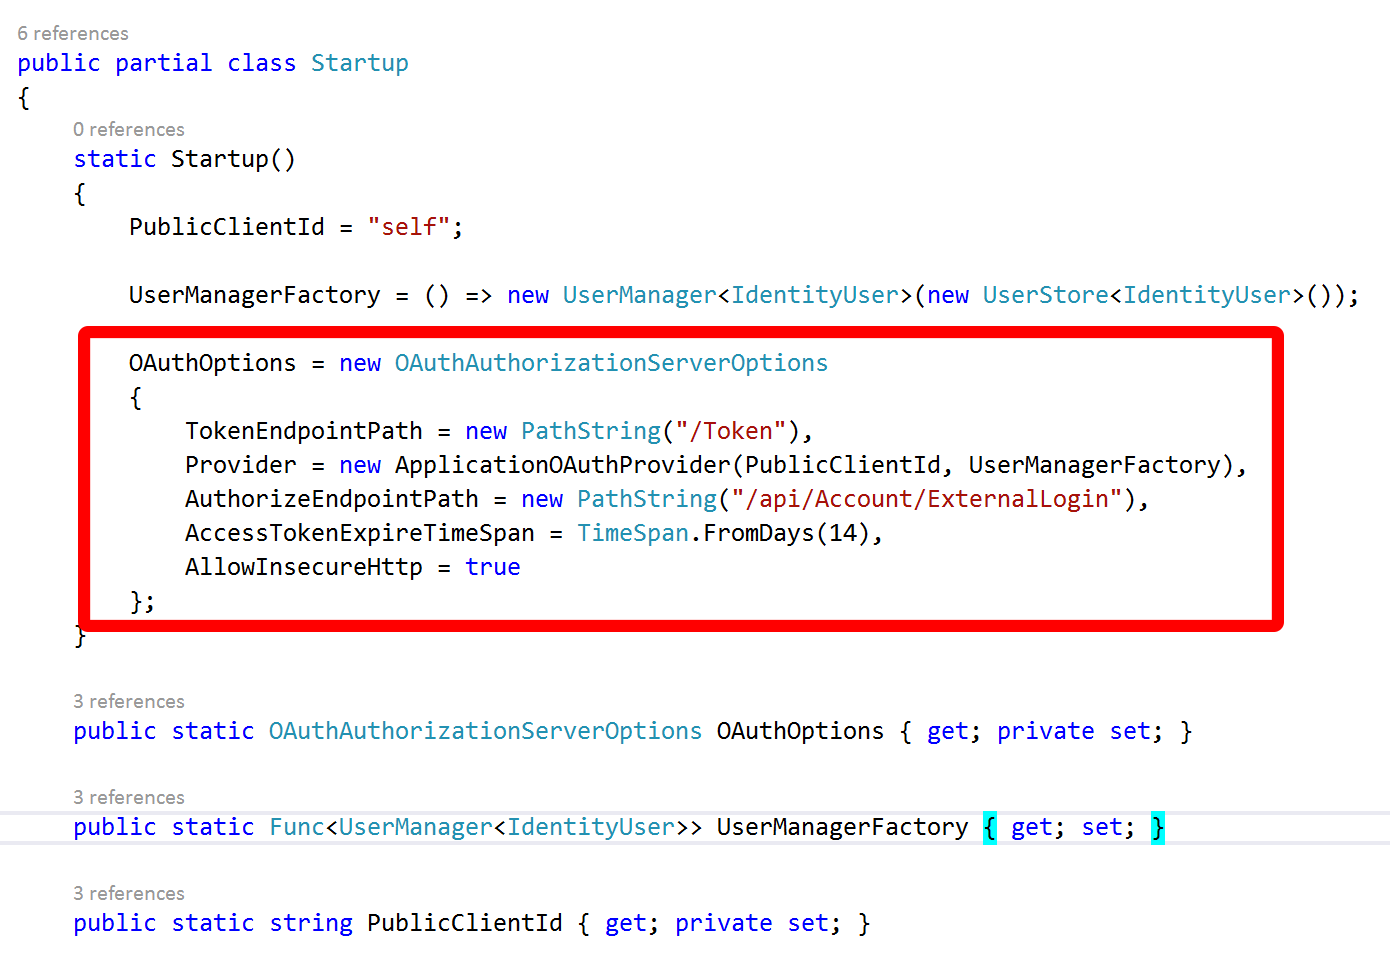
It’s the code in this class and file that configures how Web API will authenticate. By default it’s setup for local accounts – accounts and passwords that are stored in a SQL database that goes along with your app. To add an external identity provider you need to scroll to the bottom of the file and uncomment the appropriate lines for the provider you want.

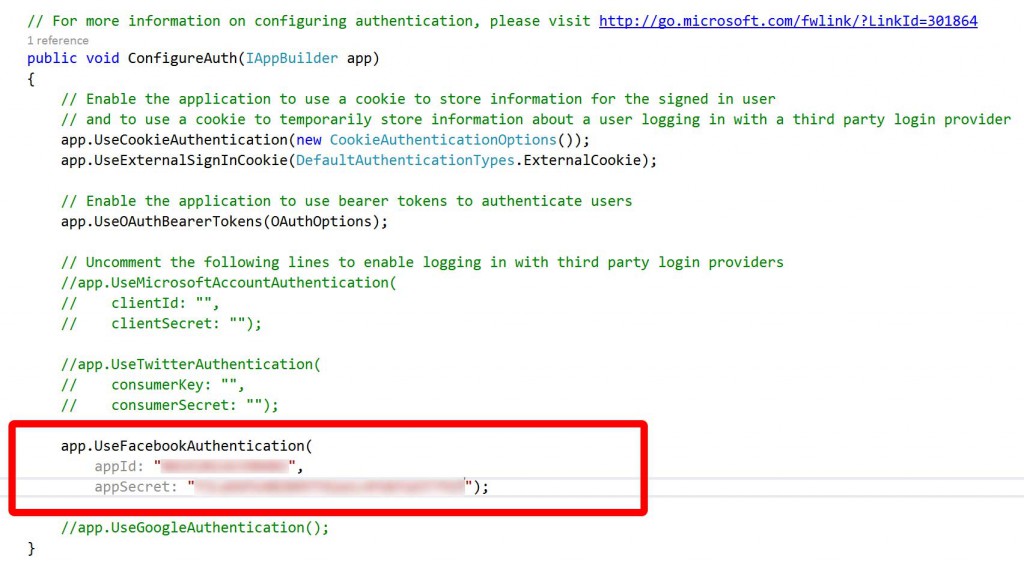
In this case as we’re authenticating with Facebook we’re going to uncomment those lines and add the App ID and App Secret that we obtained earlier from the Facebook portal:

external6

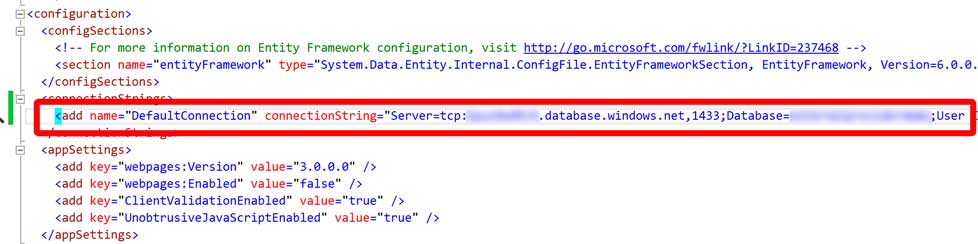
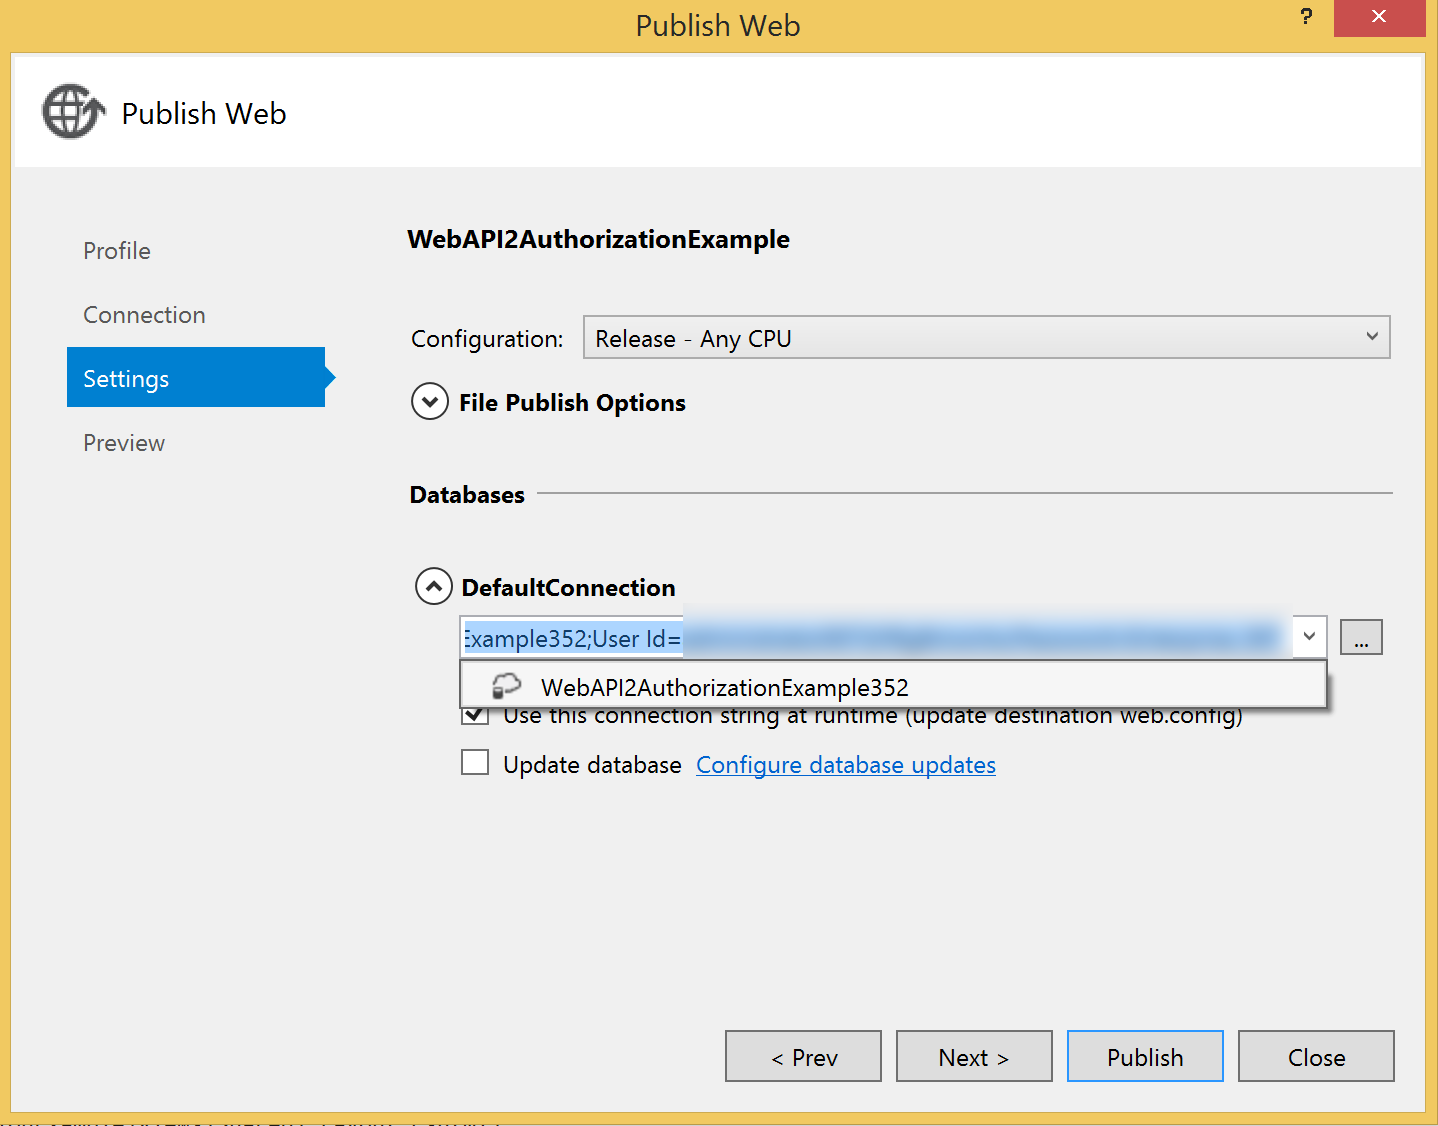
We’ve got one last step to perform – point the web site at the SQL Database we created earlier by updating the web.config file as shown below:

external8

Believe it or not in terms of code changes that’s it – we’re done. Build and publish the project to the Azure website we created earlier.

Mobile Application

This isn’t really intended as an iOS or Xamarin tutorial so I’m largely going to gloss over the steps that aren’t specifically about the authentication process – if you get stuck post a comment and I’ll reply when I get a chance. Not everybody has the Visual Studio plugin so I’m going to use Xamarin Studio to do this.

To authenticate from the mobile device we need to go through the following high level flow:

  1. Request a list of external providers and authentication end points from the server.
  2. Send a get request, from a web browser, to the end point for the provider the user wants to log in with.
  3. At the end of the process extract the access token from the URL of the page that is showing in the browser.
  4. Establish if the user is already registered with the server and if not create a user mapped to the external login and then call the authentication end point again.

In practice it’s simpler than it sounds. The key thing is that the authentication process must take place through a web browser, you can’t do this using a native approach. Although you can use something like the Facebook SDK to log in locally against Facebook and then use Facebook that doesn’t result in authentication against your server and web services.

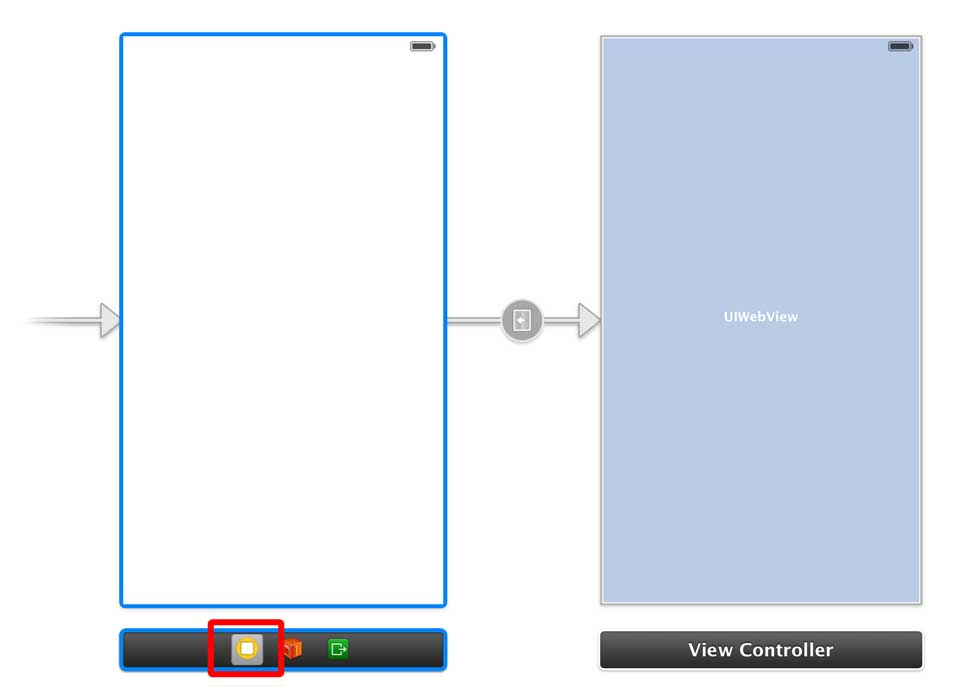
Begin by creating a new iPhone Storyboard project with an application type of Single View Application. Then open the storyboard in the created project and add a second view controller that hosts a UIWebView control. You don’t have anything to create the Segue from as we’re going to drop buttons on programattically and trigger the segue in code so we need to create an segue from the view controller and give it a name – this trips a lot of people up! Basically control click the icon I have highlighted below and drag it to the second view controller. Then click the segue and give it an identifier.

external7

To communicate with the Web API you’re going to need access to some of the models that go with the AccountController – specifcally ExternalLoginViewModel and RegisterExternalBindingModel. In a real application my preference is to extract these models from the Web API project and place them in a portable class library, that way your mobile code and your web code can all use the same models with no code duplication. For the sake of this example copy and paste these classes to your Xamarin project.

We’re going to want to process some JSON so using the Xamarin Component Store add the Json.NET component to your project.

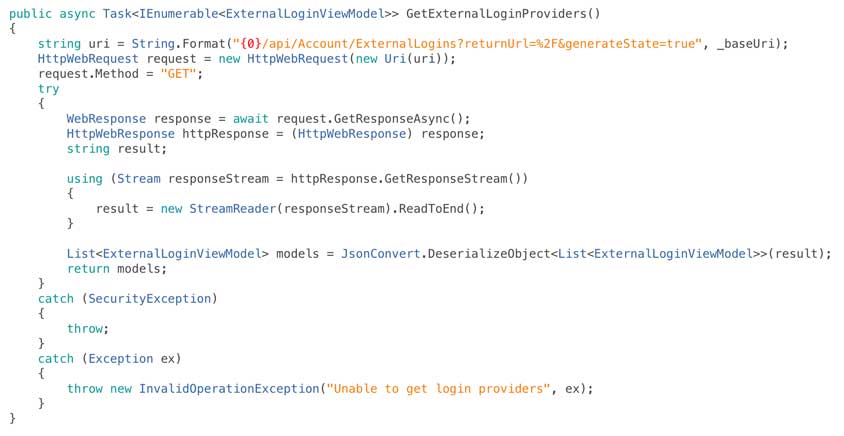
Now we’ve done all that we’re going to add a class called AuthenticationServices within which we’re going to wrap the calls we need to make to Web API directly. To begin with we need a method to let us get the external providers registered with Web API:

external10

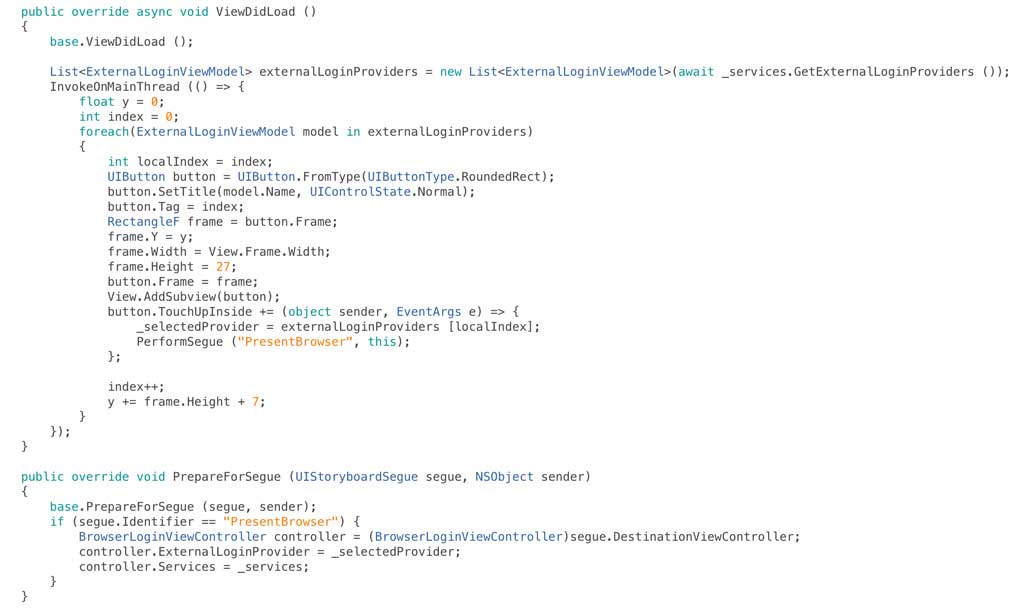
We now need to edit our root view controller so that when the view loads we retrieve the external providers and when one of the buttons is tapped we run the segue to load our second view controller and display the browser, I’ve done this in a slightly hokey way as it just leads to a simpler example than a table view or collection view:

external9

At this point we have a tremendously exciting app that is displaying a Facebook button which when tapped launches the web browser but not much more happens:

external11

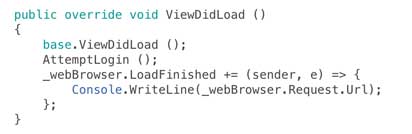
To complete the login process we need to do work on the view controller that is hosting the web browser. When the view is loaded we’ll get the URL that has been returned from the server and load it in the browser:

external12

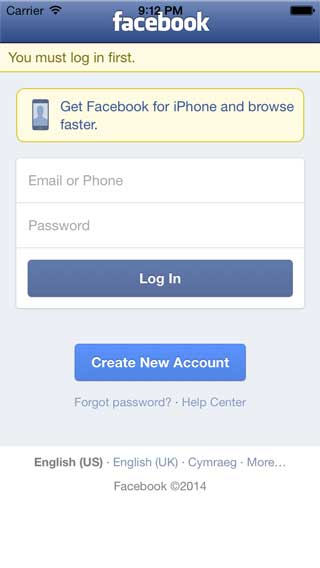
This will present the Facebook login page as shown below:

external13

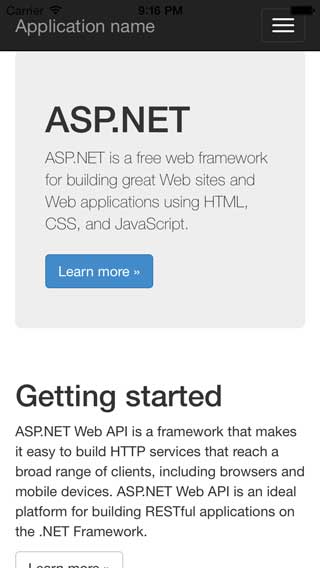
If you enter valid credentials then you’ll find that eventually you end up back at your web sites home page:

external14

If you look at the URL (which will have been output to Xamarin Studio’s Application Output window) you’ll see it includes the access_token as a parameter. This is the bearer token that I’ve discussed in a previous post and which you need to pass as a header to Web API for future authenticated requests.

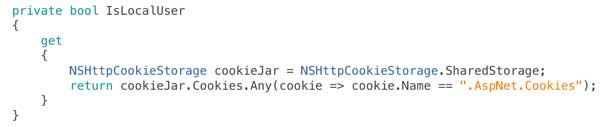
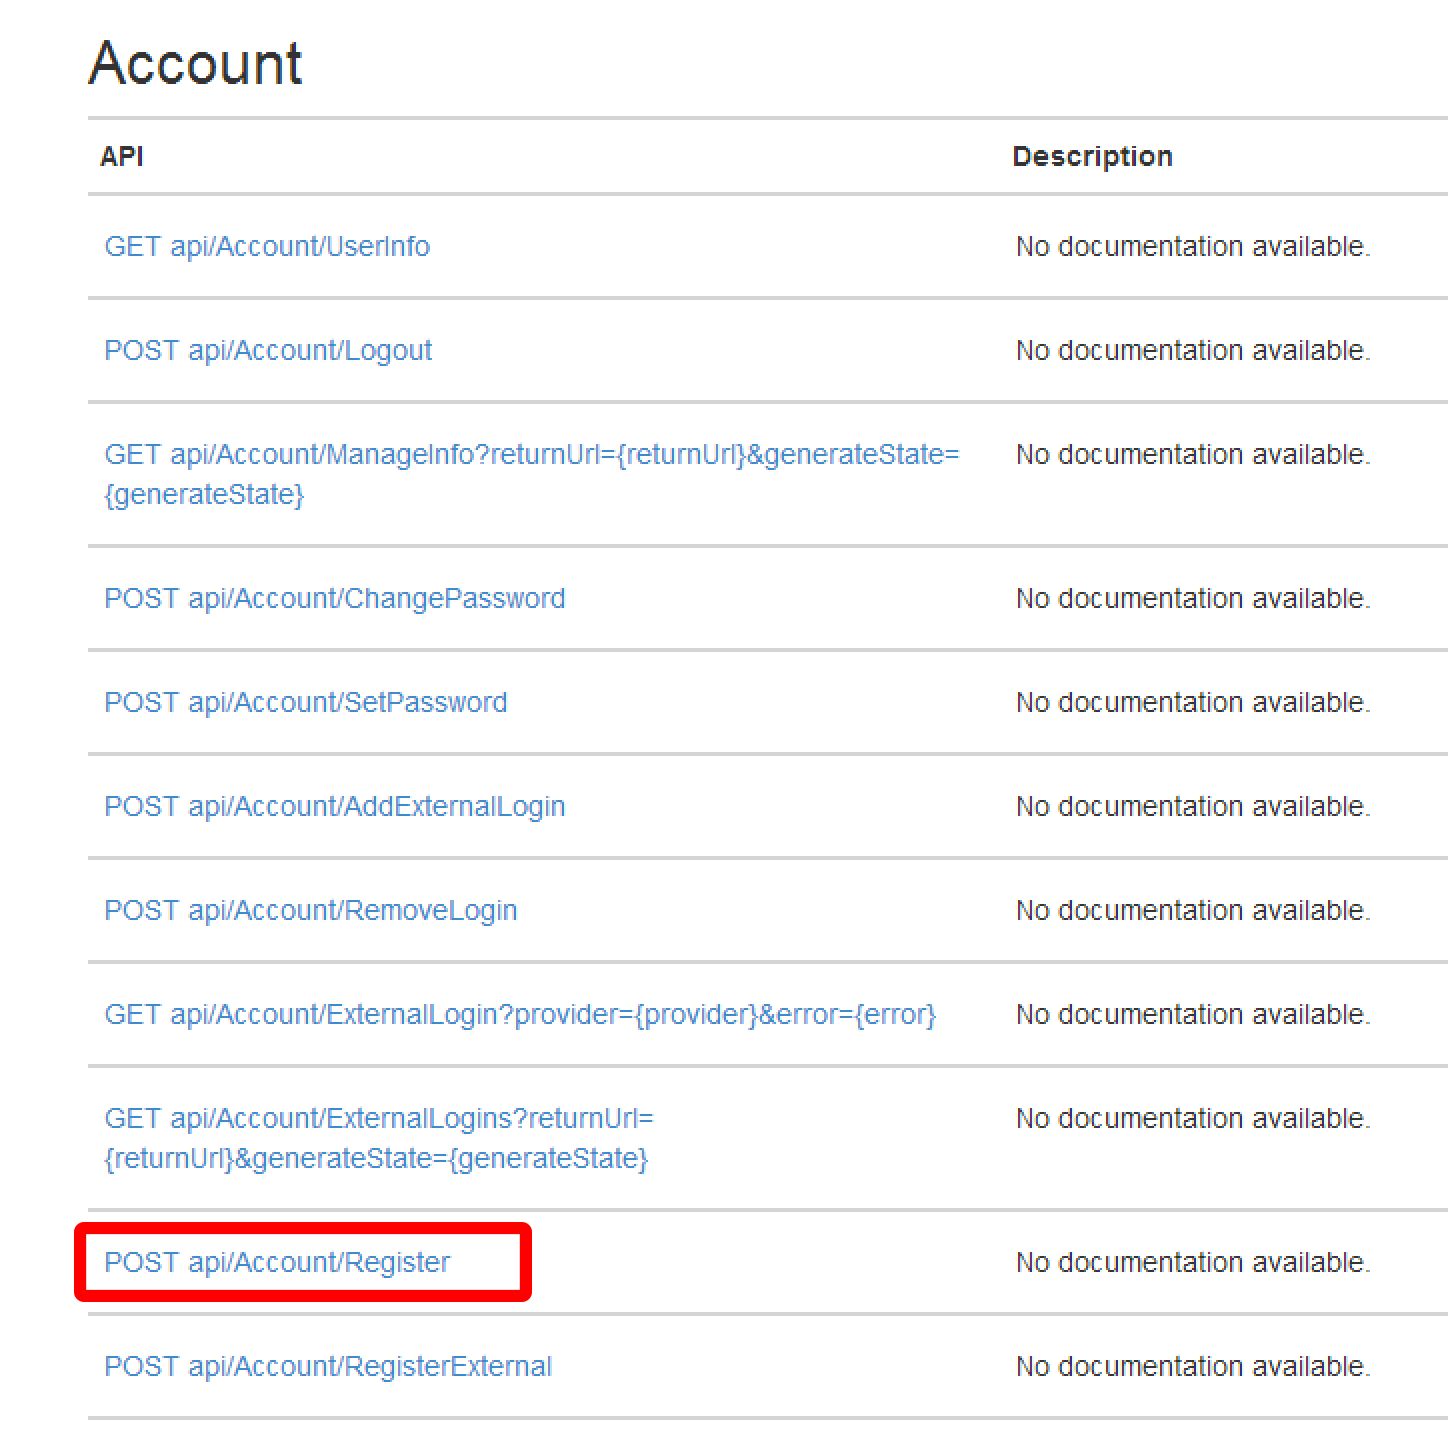
Having got this far we now need to check and see if the Facebook user has a registered account with our web services and if not create one. There are two ways you can find this out – you can either ask Web API the question on the endpoint /api/Account/UserInfo or take a shortcut and look at the cookies that have been set. In this example we’re going to do the latter.

In external identity provider scenarios ASP.Net makes use of two cookies, one is called .AspNet.ExternalCookie and the other is called .AspNet.Cookies. When a user has logged in with an external identity provider but doesn’t yet have an account with our web service then the .AspNet.Cookies cookie will not be set. So to find out if this is the case we’re going to have a look in the applications cookie store:

external15

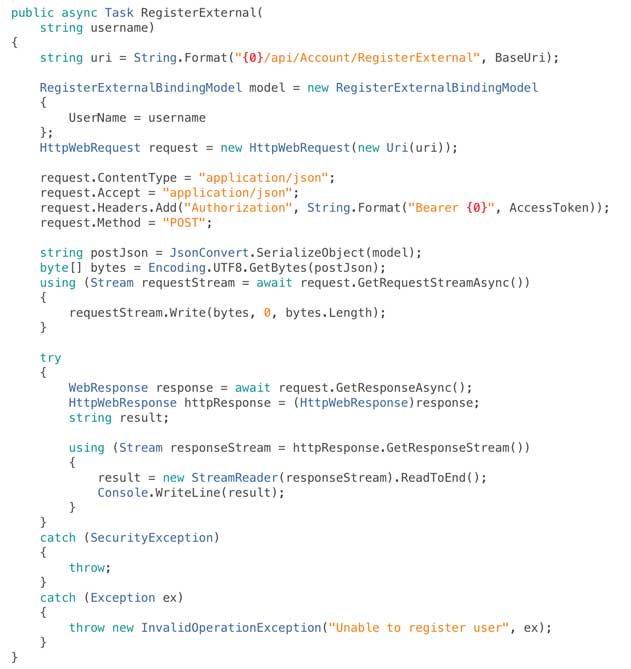
We also need to add some code to actually call Web API’s external account registration method into our AuthenticationServices class, in the example below I’m supplying a hard coded username but in reality you would collect this from the user:

external16

And finally we need to look for the access token in the URLs that appear in the web browser as the authentication process takes place and react to them appropriately (gather the access token, look for an account, register if necessary, then move on):

external17

In production code it’s definitely worth also verifying that the access token is on a URL that maps to your domain.

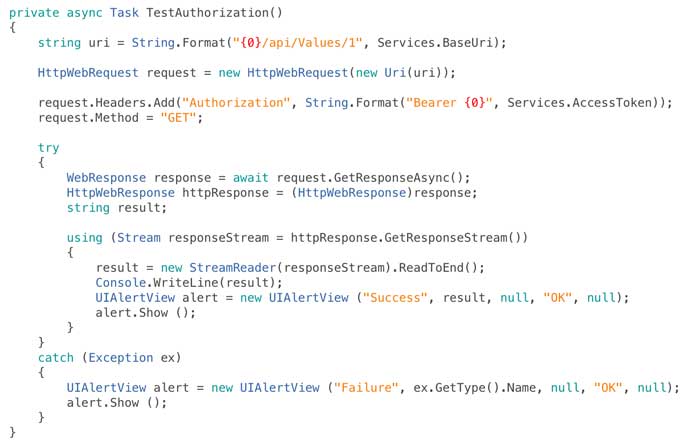
If you run the app at this point the full authentication chain will work but we’re not actually doing anything to prove that. So finally lets add a step to call the default get handler on the sample ValuesController that Visual Studio included in our Web API project and call it on a successful login / registration:

external18

At this point we’re done – we’ve secured our web services with a Facebook login and you can easily extend this to Twitter, Microsoft Accounts or Google by uncommenting the other lines of code in Startup.Auth.cs. Behind the scenes if you look into the SQL database that the ASP.Net authentication system will have created you’ll see a user in the users table and a login for the Facebook provider in the logins table.

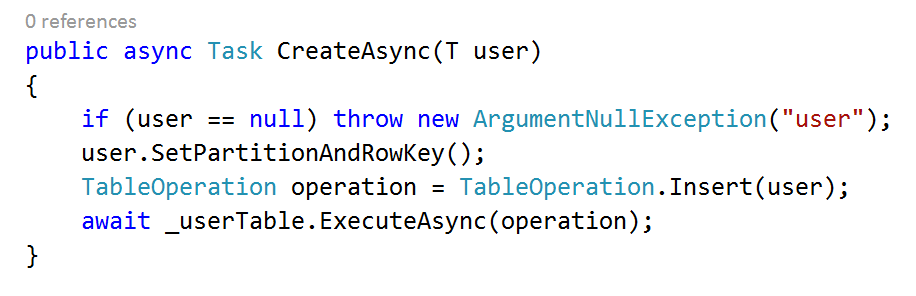
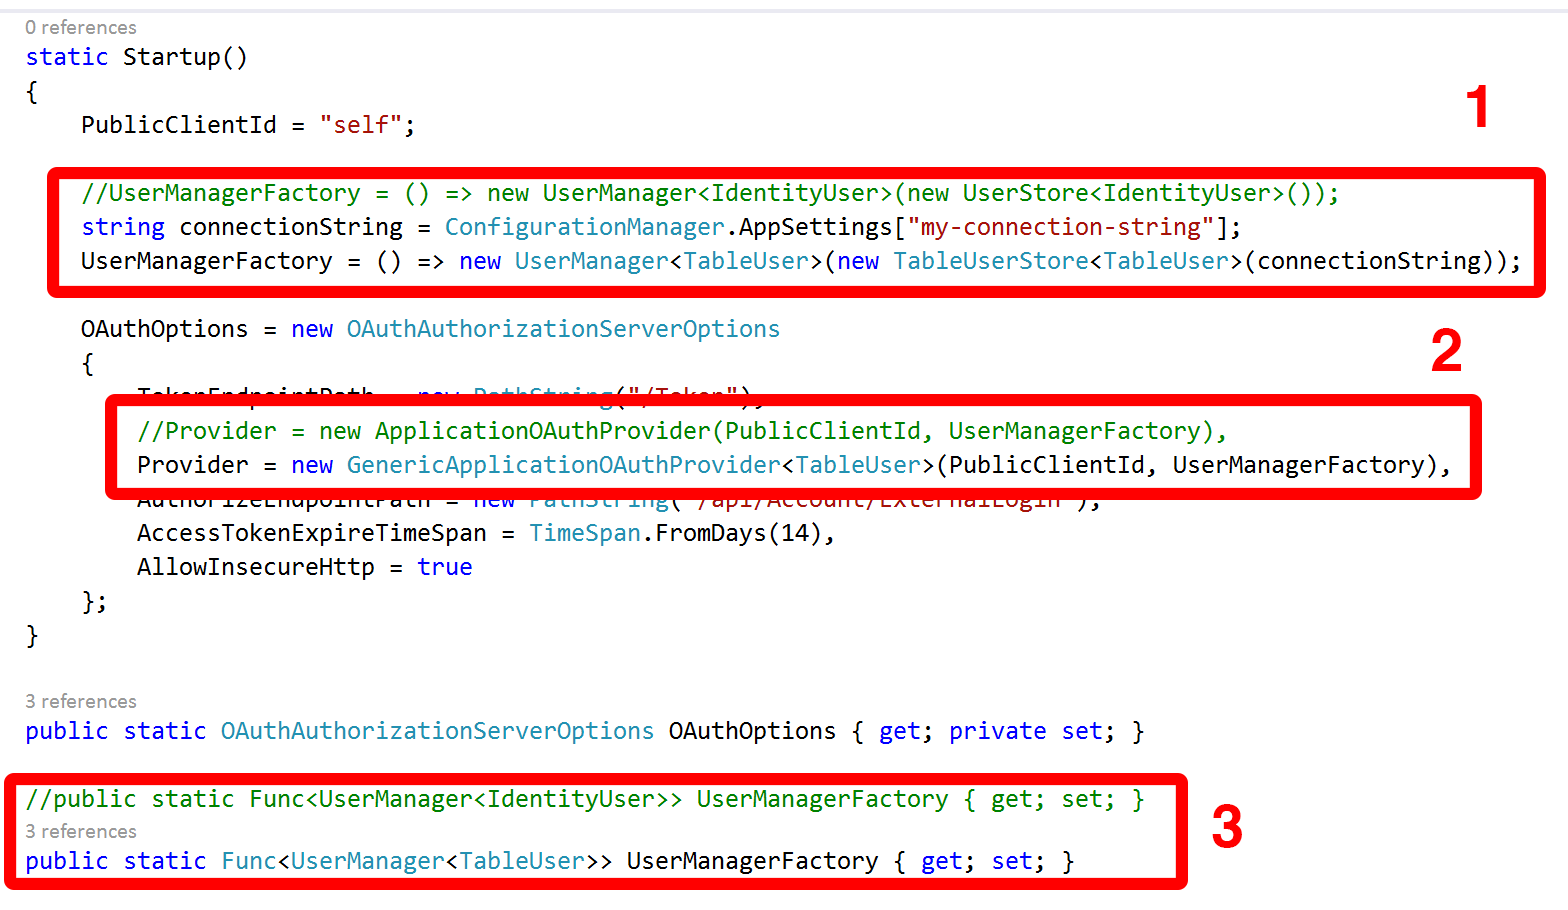
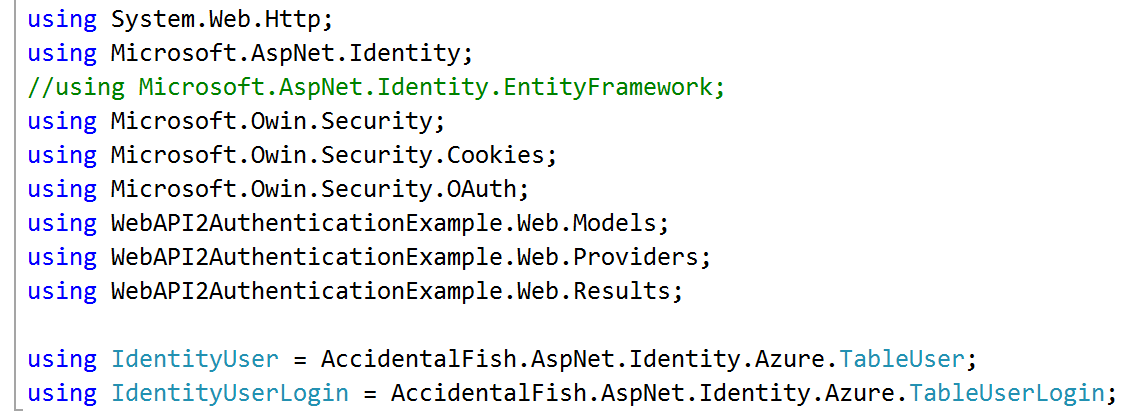
If you’d rather use table storage for your user data you can use my alternative ASP.Net user store provider that I outlined here.

The account controller contains other methods to support logout and get information about users but it’s all pretty straightforward once you understand the workflow to login and register.

Hope that’s useful, if you spot any problems let me know in the comments.

Full source code can be found on GitHub here.

How To: Use Azure Table Storage as an OAuth Identity Store with Web API 2

In my previous post I looked at how to register, login and authenticate using the new OWIN based ASP.Net architecture underpinning MVC 5 and Web API 2. The default website provided was configured to use SQL database which is why we needed to configure a SQL Database within Azure as we deployed our website.

There’s a fair chance, if you’re experienced with Azure, that you’re wondering if you can swap that out and use Table Storage, fortunately one of the improvements in this latest version of ASP.Net is to better abstract storage away from management.

There is however a fair bit of leg work to doing so. I’m going to firstly touch on how you go about this, then look at the NuGet package I’ve put online (source code in GitHub) that means you don’t have to do this leg work!, and finally we’ll look at the changes you would need to make in the Web API 2 sample project we introduced in the previous post. I’m going to make reference to that code so you can quickly grab it from GitHub if that’s useful.

1) Implementing a New Identity Store

The clue to how to go about this can, again, be found at the top of the Startup.Auth.cs file in the App_Start folder:

Step1

A factory function is assigned and asked to return a user manager and a user store.

The UserManager is a core class of the identity framework (Microsoft.AspNet.Identity.Core) and works with classes that describe users through the IUser interface (another core class) and persists them with implementations of the IUserStore interface.

The core identity framework provides no storage implementation and the UserStore class that is being instantiated here is provided by Microsoft.AspNet.Identity.EntityFramework as is the IdentityUser class.

In fact if we look at the Microsoft.AspNet.Identity.Core assembly we can see it’s really very focussed on managing abstract interfaces:

Step2

It’s not difficult to see where we’re going at this point – to implement our own store we need to provide implementations for a number of interfaces. If we want to replicate full local identity management in the same way as the Entity Framework supplied implementation then realistically we need to implement most of the interfaces shown above – IRole, IRoleStore, IUser, IUserClaimStore, IUserLoginStore, IUserPasswordStore, IUserRoleStore, IUserSecurityStampStore and IUserStore.

That’s not as daunting as it sounds as most of the interfaces are quite simple, for example IUserStore:

Step3

The remaining interfaces also follow this asynchronous CRUD pattern and are fairly simple to implement, here’s the Entity Framework implementation for CreateAsync:

Step4

And by way of contrast here’s a Table Storage implementation:

Step5

Pretty much the same I think you’ll agree, however it’s still a lot of boilerplate code to write so I’ve wrapped it into a NuGet package called AccidentalFish.AspNet.Identity.Azure which can also be found on GitHub.

2) Using AccidentalFish.AspNet.Identity.Azure

To get started either download the package from NuGet using the package manager in Visual Studio or download the source from GitHub and attach the project to your solution. The NuGet package manager console to install the package is:

Install-Package accidentalfish.aspnet.identity.azure

You can use the package in commercial or open source projects as it’s published under the permissive MIT license though as ever I do appreciate an email or GitHub star if it’s useful to you – yes I’m that vain (and I like to hear about my code being used).

Once you’ve got the package installed you’ll find there is still a little work to do to integrate it into your Web API 2 project as although the Microsoft.AspNet.Identity framework is nice and clean it seems that whoever put the Web API 2 project template didn’t think it made sense to keep a nice level of abstraction and have tied it tightly to the Entity Framework implementation in a few places.

However it’s not too onerous (just a couple of steps) and I’ve built the package with replacement in mind. To help I’ve included the Web API 2 project from my previous post and commented out the old Entity Framework code that bleeds into the MVC host site. I’ll walk through these changes below.

Firstly we need to visit the Startup.Auth.cs file and make three changes at the start:

Step6

1) Update the factory assignment to return a UserManager that manipulates users of type TableUser and users a data store of type TableUserStore. Pass it your Azure connection string. The constructor is overloaded with parameters for table names and whether or not to create them if they don’t exist – by default it will.

2) Replace the ApplicationOAuthProvider with a generic version of it contained within the package. This code is exactly the same but replaces the fixed IdentityUser types with a generic (you can see what I was referring to in regard to the template – this ought to have been this way out of the box).

3) Update the declaration for the factory to return a UserManager manipulating users of type TableUser.

At this point we’ve done the bulk of the OAuth work but unfortunately the MVC AccountController also has a, needless, hard dependency on the Entity Framework library so we need to sort that out. To do this either go through the class and replace the type declarations of IdentityUser and IdentityUserLogin with TableUser and TableUserLogin respectively. Alternatively you can “cheat” and remove the Microsoft.AspNet.Identity.EntityFramework using reference and add a pair of aliases:

Step7

That’s it you’re done. Identity information should now be persisted in Azure Table Storage.

I’ll be doing some more work on this package in the coming weeks – I want to test it at scale and I know I need to build at least one index for one of the IUserStore calls which queries in the reverse way to which the partition and row key are set up: I’ve tried to set up the partition and row keys for the most commonly used methods.

If you find any problems or have any feedback then please let me know.


How To: Register and Authenticate with Web API 2, OAuth and OWIN

The latest release of Asp.Net introduces some fundamental architectural changes that have a significant effect on frameworks such as MVC and Web API as Asp.Net now sits on top of the OWIN stack.

As part of this change Microsoft have yet again changed the authentication and authorisation model. Yes you still use the Authorize attribute within your MVC and Web API controllers but the workflow around authentication has been rejigged considerably.

If, like me, you have a penchant for writing mobile apps that consume Web API based services hosted in Azure chances are you’ll want to register and authenticate with your services from the device. This is really simple to achieve with Web API 2 and OWIN, in fact it’s all in place out of the box, but the trouble is that it’s barely documented.

Having spent a morning going through significant pain figuring this out I’ve put this How To guide together to show how to do this. For added fun I’ve built the client in Xamarin as an iOS application but the approach will work on any platform including from Windows 8, JavaScript, whatever you like. In fact the C# code that I outline below can be lifted straight from the Xamarin project and dropped into any other C# application. If you want to skip ahead to the example code it can be found on GitHub.

We’ll get started by creating a Web API project. In Visual Studio create a new solution and pick ASP.Net Web Application. On the ASP.Net project type page select the Web API template and change the authentication type to Individual User Accounts:

Step1

Inside this project will be a API controller called ValuesController – this is the normal Web API sample. You’ll notice the class has an Authorize attribute which will protect it from anonymous access. Your exact URL will vary depending on what port IIS Express has been set up with but enter the URL to get the values from the controller (in my case http://localhost:5287/api/Values) and you should see some XML (I’m using Chrome):

<Error>
<Message>Authorization has been denied for this request.</Message>
</Error>

So far so good – we need to be logged in to access the API which is what we want. In order to login first we’re going to need to register a user.

If you visit the help page for the API (for example http://localhost:5287/Help) you’ll see that there is an Account API that fronts lots of interesting methods – one of which is Register:

Step2

So if we post the right data to that action we should be able to register an account and believe it or not we’re done with the website so publish it to a free website in Azure and take note of the URL you’ve dropped it on. I recommend using VS2013 and the latest version of the Azure SDK (2.2 at the time of writing) as the tools make this really simple. The only real gotcha to watch out for is to point your website at a SQL Database rather than the local file approach that will be configured within your website. To point to a real database just make sure that you pick, or create as in the example below, a real database server:

Step4

And then make sure that the DefaultConnection is updated:

Step5

With the website deployed and ready it’s time to create an iOS application. You can use either Xamarin Studio or the Visual Studio plugin. I used the Hello World template for my application and targetted iOS 7 which I then reworked to give me the user interface below:

ReworkedUI

I’m not going to spend too much time talking about the user interface of the Xamarin application (it’s not really the focus of this How To) but all I really did was update it with the user interface above and added the Json.Net component from the Xamarin Component Store (if you’re from the .Net world – think NuGet, looking forward to a PCL version of Json.Net!). None of the connectivity code was Xamarin specific.

For the  application to register a user it needs to send the right model to the Register action we located earlier. The website contains a class called RegisterBindingModel which we’re going to replicate in our Xamarin application (in a production application I recommend pulling these models out into a Portable Class Library rather than copying and pasting code) in a class called RegisterModel:

class RegisterModel
{
    public string UserName { get; set; }
    public string Password { get; set; }
    public string ConfirmPassword { get; set; }
}

We’re going to form up a HttpWebRequest with the registration information and send it to the controller. As long as we don’t get a HTTP error then registration has been successful. I’ve wrapped this in a class called RegisterServiceClient:

class RegisterService
{
    public async Task Register(string username, string password, string confirmPassword)
    {
        RegisterModel model = new RegisterModel
        {
            ConfirmPassword = confirmPassword,
            Password = password,
            UserName = username
        };
 
        HttpWebRequest request = new HttpWebRequest(new Uri(String.Format("{0}api/Account/Register", Constants.BaseAddress)));
        request.Method = "POST";
        request.ContentType = "application/json";
        request.Accept = "application/json";
        string json = JsonConvert.SerializeObject(model);
        byte[] bytes = Encoding.UTF8.GetBytes(json);
        using(Stream stream = await request.GetRequestStreamAsync())
        {
            stream.Write(bytes, 0, bytes.Length);
        }
 
        try
        {
            await request.GetResponseAsync();
            return true;
        }
        catch (Exception ex)
        {
            return false;
        }
    }
}

That will register user but how do we log in. If we refer back to our websites API help page although there are a lot of interesting looking methods there is no Login method.

This is where OWIN comes in. If you take a look at the code that was generated for the website you’ll see that in MVC 5 / Web API 2 there is a new file in the solution (compared to MVC 4) called Startup.Auth.cs:

Step7

This is where the configuration for authentication and authorization takes place with OWIN and the real interesting bit for us is the section towards the top where OAuthOptions are set:

Step8

Essentially OWIN is running an OAuth authentication server within our website and setting up OAuth endpoints for us. I’m not going to dwell on OAuth but essentially to authenticate we need to request a token using our username and password to identify ourselves and then in subsequent service calls supply this token as a HTTP header in the request.

The token end point we need to call can be seen in the image above: it’s /Token. We need to pass it the username and password and also an additional piece of information: the grant type. We need the grant type to be password. The endpoint responds to form data and we make the call as shown below:

class LoginService
{
    public async Task Login(string username, string password)
    {
        HttpWebRequest request = new HttpWebRequest(new Uri(String.Format("{0}Token", Constants.BaseAddress)));
        request.Method = "POST";
 
        string postString = String.Format("username={0}&amp;password={1}&amp;grant_type=password", HttpUtility.HtmlEncode(username), HttpUtility.HtmlEncode(password));
        byte[] bytes = Encoding.UTF8.GetBytes(postString);
        using (Stream requestStream = await request.GetRequestStreamAsync())
        {
            requestStream.Write(bytes, 0, bytes.Length);
        }
 
        try
        {
            HttpWebResponse httpResponse =  (HttpWebResponse)(await request.GetResponseAsync());
            string json;
            using (Stream responseStream = httpResponse.GetResponseStream())
            {
                json = new StreamReader(responseStream).ReadToEnd();
            }
            TokenResponseModel tokenResponse = JsonConvert.DeserializeObject(json);
            return tokenResponse.AccessToken;
        }
        catch (Exception ex)
        {
            throw new SecurityException("Bad credentials", ex);
        }
    }
}

In response to a successful call on the Token endpoint the OAuth server will return us JSON data that includes the access token and some additional information, I’m deserializing it into a class called TokenResponseModel but the thing we’re really interested in is the access token. The full response is modelled like this:

class TokenResponseModel
{
    [JsonProperty("access_token")]
    public string AccessToken { get; set; }
 
    [JsonProperty("token_type")]
    public string TokenType { get; set; }
 
    [JsonProperty("expires_in")]
    public int ExpiresIn { get; set; }
 
    [JsonProperty("userName")]
    public string Username { get; set; }
 
    [JsonProperty(".issued")]
    public string IssuedAt { get; set; }
 
    [JsonProperty(".expires")]
    public string ExpiresAt { get; set; }
}

Now we’ve got that access token we can use it against any future requests that require authentication and authorization – so finally we can return to our attempt to access the ValuesController. We need to supply the access token in a HTTP header called Authorization and the value for the header must have the format “Bearer {token}”, the space between Bearer and the token is significant – if you miss it authorization will fail. Here’s how we use the token to retrieve the list of values from the controller:

class ValuesService
{
    public async Task&lt;IEnumerable&gt; GetValues(string accessToken)
    {
        HttpWebRequest request = new HttpWebRequest(new Uri(String.Format("{0}api/Values", Constants.BaseAddress)));
        request.Method = "GET";
        request.Accept = "application/json";
        request.Headers.Add("Authorization", String.Format("Bearer {0}", accessToken));
 
        try
        {
            HttpWebResponse httpResponse = (HttpWebResponse)(await request.GetResponseAsync());
            string json;
            using (Stream responseStream = httpResponse.GetResponseStream())
            {
                json = new StreamReader(responseStream).ReadToEnd();
            }
            List values = JsonConvert.DeserializeObject&lt;List&gt;(json);
            return values;
        }
        catch (Exception ex)
        {
            throw new SecurityException("Bad credentials", ex);
        }
    }
}

Obviously I’ve cut out a lot of error handling and have taken some short cuts to stay focussed on the topic but really it’s quite simple, just appallingly documented at the moment.

You can find the full code on GitHub.

Contact

  • If you're looking for help with C#, .NET, Azure, Architecture, or would simply value an independent opinion then please get in touch here or over on Twitter.

Recent Posts

Recent Tweets

Invalid or expired token.

Recent Comments

Archives

Categories

Meta

GiottoPress by Enrique Chavez