Category: Application Architecture

Writing and Testing Azure Functions with Function Monkey – Part 2

Part 2 in my series of writing and testing Azure Functions with Function Monkey looks at adding validation and returning appropriate status codes from HTTP requests. Part 3 will look at acceptance testing this.

(Don’t worry – we’re going to look at some additional trigger types soon!)

Lessons Learned

I made a bunch of changes following some awesome feedback on Twitter and hopefully that results in an improved viewing experience for people.

I still haven’t got the font size right – I used a mix of Windows 10 scaling and zoomed text in Visual Studio but its not quite there. I also need to start thinking of actually using zoom when I’m pointing at something.

Hopefully part 3 I can address more of these things.

Writing and Testing Azure Functions with Function Monkey – Part 1

I’ve long thought about creating some video content but forever put it off – like many people I dislike seeing and hearing myself on video (as I quipped half in jest, half in horror, on Twitter “I have a face made for radio and a voice for silent movies”). I finally convinced myself to just get on with it and so my first effort is presented below along with some lessons learned.

Hopefully video n+1 will be an improvement on video n in this series – if I can do that I’ll be happy!

The Process and Lessons Learned

This was very much a voyage of discovery – I’ve never attempted recording myself code before and I’ve never edited video before.

To capture the screen and initial audio I used the free OBS Studio which after a little bit of fiddling to persuade it to capture at 4K and user error resulting in the loss of 20 minutes of video worked really well. It was unobtrusive and did what it says on the tin.

I use a good quality 4K display with my desktop machine and so on my first experiment the text was far too smaller, I used the scaling feature in Windows 10 to bump things up to 200% and that seemed about right (but you tell me!).

I sketched out a rough application to build but left things fairly loose as I hoped the video would feel natural and I know from presentations (which I don’t mind at all – in contrast to seeing and hearing myself!) that if I plan too much I get a bit robotic. I also figured I’d be likely to make some mistakes and with a bit of luck they’d be mistakes that would be informative to others.

This mostly worked but I could have done with a little more practice up front as I took myself down a stupid route at one point as my brain struggled with coding and narrating simulatanously! Fortunately I was able to fix this later while editing but I made things harder for myself than it needed to be and there’s a slight alteration in audo tone as I cut the new voice work in.

Having captured the video I transferred it to my MacBook to process in Final Cut Pro X and at this point realised I’d captured the video in flv – a format Final Cut doesn’t import. This necessitated downloading Handbrake to convert the video into something Final Cut could import. Not a big deal but I could have saved myself some time – even a pretty fast Mac takes a while to re-encode 55 minutes of 4K video!

I’d never used Final Cut before but it turned out to be fairly easy to use and I was able to cut out my slurps of coffee and the time wasting uninformative mistake I made. I did have to recut some audio as I realised I’d mangled some names – this was fairly simple but the audio doesn’t sound exactly the same as it did when recorded earlier despite using the same microphone in the same room. Again not the end of the world (I’m not challenging for an Oscar here).

Slightly more irritating – I have a mechanical cherry switch keyboard which I find super pleasant to type on, but carries the downside of making quite a clatter which is really rather loud in the video. Hmmm. I do have an Apple bluetooth keyboard next to me, I may try connecting that to the PC for the next installment but it might impede my typing too much.

Overall that was a less fraught experience than I’d imagined – I did slowly get used to hearing myself while editing the video, though listening to it fresh again a day later some of that discomfort has returned! I’m sure I’ll get used to it in time.

Would love to hear any feedback over on Twitter.

Lean Configuration Based ASP.Net Core REST APIs

Over the last year or two, as many visitors to my blog and Twitter will know, I’ve been spending significant time and effort advocating approaches that allow a codebase and architecture to be “best fit” for its stage in the development lifecycle while being able to evolve as your product, systems and customers evolve.

As an example for early stage projects this is often about building a modular monolith that can be evolved into micro-services as market fit is achieved, the customer base grows, and both the systems and development teams need to scale.

The underlying principals with which I approach this are both organisational and technical.

On the technical side the core of the approach is to express operations as state and execute them through a mediator rather than, as in a more traditional (layered) architecture, through direct compile time interfaces and implementations. In other words I dispatch commands and queries as POCOs rather than calling methods on an interface. These operations are then executed somewhere, somehow, by a command handler.

One of the many advantages of this approach is that you can configure the mediator to behave in different ways based on the type of the command – you might choose to execute a command immediately in memory or you might dispatch it to a queue and execute it asynchronously somewhere else. And you can do this without changing any of your business logic.

It’s really what my command mediator framework is all about and at this point its getting pretty mature with a solid core and a growing number of extensions. For a broader introduction to this architectural pattern I have a series on this blog which covers moving from a, perhaps more familiar to many, “layered” approach to one based around a mediator.

However as I used this approach over a number of projects I still found myself writing very similar ASP.Net Core code time and time again to support a REST API. Nothing complicated but it was still repetitive, still onerous, and still error prone.

What I was doing, directly or otherwise, was exposing the commands on HTTP endpoints. Which makes sense – in a system built around operations expressed as commands then a subset of those commands are likely to need to be invoked via a REST API. However the payload didn’t always come exclusively from the endpoint payload (be that a  request body or route parameters) – sometimes properties were sourced from claims.

It struck me that given this I had all the information I needed to generate a REST API based on the command definitions themselves and some basic configuration and so invested some time in building a new extension package for my framework: AzureFromTheTrenches.Commanding.AspNetCore.

This allows you to take a completely “code free” (ASP.Net code) approach to exposing a command based system as a set of REST APIs simply by supplying some basic configuration. An example configuration based on a typical ASP.Net startup block  is shown below:

public void ConfigureServices(IServiceCollection services)
{
    // Configure a dependency resolver adapter around IServiceCollection and add the commanding
    // system to the service collection
    ICommandingDependencyResolverAdapter commandingAdapter =
        new CommandingDependencyResolverAdapter(
            (fromType,toInstance) => services.AddSingleton(fromType, toInstance),
            (fromType,toType) => services.AddTransient(fromType, toType),
            (resolveType) => ServiceProvider.GetService(resolveType)
        );
    // Add the core commanding framework and discover our command handlers
    commandingAdapter.AddCommanding().Discover<Startup>();

    // Add MVC to our dependencies and then configure our REST API
    services
        .AddMvc()
        .AddAspNetCoreCommanding(cfg => cfg
            // configure our controller and actions
            .Controller("Posts", controller => controller
                .Action<GetPostQuery>(HttpMethod.Get, "{Id}")
                .Action<GetPostsQuery,FromQueryAttribute>(HttpMethod.Get)
                .Action<CreatePostCommand>(HttpMethod.Post)
            )
        );                
}

If we enable Swagger too then that gives us an API that looks like this:
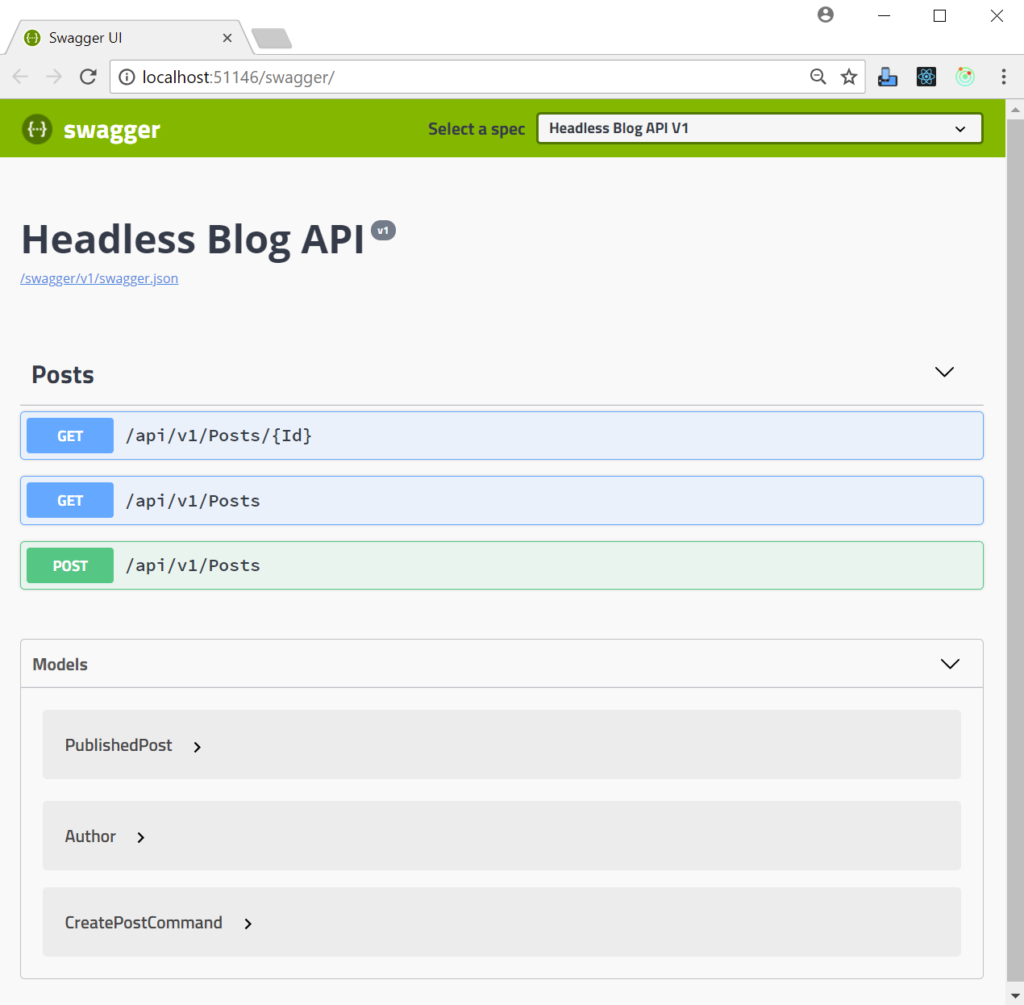
There is, quite literally, no other ASP.Net code involved – there are no controllers to write.

So how does it work? Essentially by writing and compiling the controllers for you using Roslyn and adding a couple of pieces of ASP.Net Core plumbing (but nothing that interferes with the broader running of ASP.Net – you can mix and match command based controllers with hand written controllers) as shown in the diagram below:
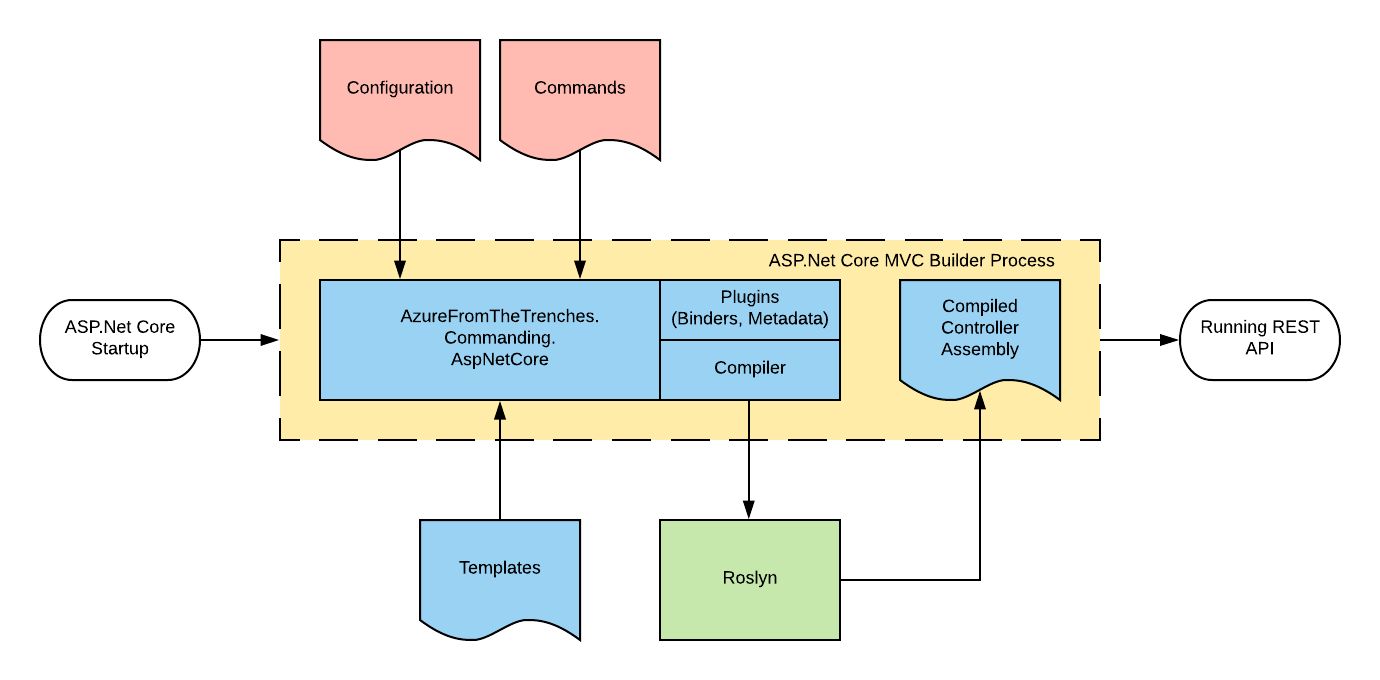
Essentially you bring along the configuration block (as shown in the code sample earlier) and your commands and the framework will do the rest.

I have a quickstart and detailed documentation available on the frameworks documentation site but I’m going to take a different perspective on this here and break down a more complex configuration block than that I showed above:

// This method gets called by the runtime. Use this method to add services to the container.
public void ConfigureServices(IServiceCollection services)
{
    ICommandingDependencyResolverAdapter commandingAdapter =
        new CommandingDependencyResolverAdapter(
            (fromType,toInstance) => services.AddSingleton(fromType, toInstance),
            (fromType,toType) => services.AddTransient(fromType, toType),
            (resolveType) => ServiceProvider.GetService(resolveType)
        );
    ICommandRegistry commandRegistry = commandingAdapter.AddCommanding().Discover<Startup>();

    services
        .Replace(new ServiceDescriptor(typeof(ICommandDispatcher), typeof(ApplicationErrorAwareCommandDispatcher), ServiceLifetime.Transient))
        .AddMvc(mvc => mvc.Filters.Add(new FakeClaimsProvider()))
        .AddAspNetCoreCommanding(cfg => cfg
            .DefaultControllerRoute("/api/v1/[controller]")
            .Controller("Posts", controller => controller
                .Action<GetPostQuery>(HttpMethod.Get, "{Id}")
                .Action<GetPostsQuery,FromQueryAttribute>(HttpMethod.Get)
                .Action<CreatePostCommand>(HttpMethod.Post)
            )
            .Claims(mapping => mapping.MapClaimToPropertyName("UserId", "AuthenticatedUserId"))
        )
        .AddFluentValidation();

    services.AddSwaggerGen(c =>
    {
        c.SwaggerDoc("v1", new Info { Title = "Headless Blog API", Version = "v1" });
        c.AddAspNetCoreCommanding();
    });

}

Firstly we register the commanding framework:

ICommandingDependencyResolverAdapter commandingAdapter =
    new CommandingDependencyResolverAdapter(
        (fromType,toInstance) => services.AddSingleton(fromType, toInstance),
        (fromType,toType) => services.AddTransient(fromType, toType),
        (resolveType) => ServiceProvider.GetService(resolveType)
    );
ICommandRegistry commandRegistry = commandingAdapter.AddCommanding().Discover<Startup>();

If you’ve used this framework below then this will be quite familiar code – we create an adapter for our IoC container (the framework itself is agnostic of IoC container and uses an adapter to work with any IoC framework of your choice) and then register the commanding infrastructure with it and finally we use the .Discover method to search for and register command handlers in the same assembly as our Startup class.

Next we begin to register our other services, including MVC, with our IoC container:

services
    .Replace(new ServiceDescriptor(typeof(ICommandDispatcher), typeof(ApplicationErrorAwareCommandDispatcher), ServiceLifetime.Transient))

The first service we register is a command dispatcher – as we’ll see shortly this is a decorator for the framework provided dispatcher. This is entirely optional but its quite common to want to apply cross cutting concerns to every operation and implementing a decorator like this is an excellent place to do so. In our example we want to translate application errors that occur during command handling into appropriate HTTP responses. The code for this decorator is shown below:

public class ApplicationErrorAwareCommandDispatcher : ICommandDispatcher
{
    private readonly IFrameworkCommandDispatcher _underlyingCommandDispatcher;

    public ApplicationErrorAwareCommandDispatcher(IFrameworkCommandDispatcher underlyingCommandDispatcher)
    {
        _underlyingCommandDispatcher = underlyingCommandDispatcher;
    }

    public async Task<CommandResult<TResult>> DispatchAsync<TResult>(ICommand<TResult> command, CancellationToken cancellationToken = new CancellationToken())
    {
        try
        {
            CommandResult<TResult> result = await _underlyingCommandDispatcher.DispatchAsync(command, cancellationToken);
            if (result.Result == null)
            {
                throw new RestApiException(HttpStatusCode.NotFound);
            }
            return result;
        }
        catch (CommandModelException ex)
        {
            ModelStateDictionary modelStateDictionary = new ModelStateDictionary();
            modelStateDictionary.AddModelError(ex.Property, ex.Message);
            throw new RestApiException(HttpStatusCode.BadRequest, modelStateDictionary);
        }
    }

    public Task<CommandResult> DispatchAsync(ICommand command, CancellationToken cancellationToken = new CancellationToken())
    {
        return _underlyingCommandDispatcher.DispatchAsync(command, cancellationToken);
    }

    public ICommandExecuter AssociatedExecuter { get; } = null;
}

Essentially this traps a specific exception raised from our handlers (CommandModelException) and translates it into model state information and rethrows that as a RestApiException. The RestApiException is an exception defined by the framework that our configuration based controllers expect to handle and will catch and translate into the appropraite HTTP result. In our case a BadRequest with the model state as the response.

This is a good example of the sort of code that, if you write controllers by hand, you tend to find yourself writing time and time again – and even if you write a base class and helpers you still need to write the code that invokes them for each action in each controller and its not uncommon to find inconsistencies creeping in over time or things being outright missed.

Returning to our configuration block the next thing we add to the service collection is ASP.Net Core MVC:

    .AddMvc(mvc => mvc.Filters.Add(new FakeClaimsProvider()))

In the example I’m basing this on I want to demonstrate the claims support without having to have everybody set up a real identity provider and so I also add a global resource filter that simply adds some fake claims to our identity model.

AddMvc returns an IMvcBuilder interface that can be used to provide additional configuration and this is what the REST commanding framework configures in order to expose commands as REST endpoints and so the next line adds our framework components to MVC and then supplies a builder of its own for configuring our endpoints and other behaviours:

    .AddAspNetCoreCommanding(cfg => cfg

On the next line we use of the configurations options exposed by the framework to replace the default controller route prefix with a versioned one:

        .DefaultControllerRoute("/api/v1/[controller]")

This is entirely optional and if not specified the framework will simply to default to the same convention used by ASP.Net Core (/api/[controller]).

Next we have a simple repition of the block we looked at earlier:

        .Controller("Posts", controller => controller
                .Action<GetPostQuery>(HttpMethod.Get, "{Id}")
                .Action<GetPostsQuery,FromQueryAttribute>(HttpMethod.Get)
                .Action<CreatePostCommand>(HttpMethod.Post)
            )

This defines a controller called Posts (the generated class name will be PostsController) and then assigns 3 actions to it to give us endpoints we saw in the Swagger definition:

  1. GET: /api/v1/Posts/{Id}
  2. GET: /api/v1/Posts
  3. POST: /api/v1/Posts

For more information on how actions can be configured take a look at this here.

Next we instruct the framework to map the claim named UserId onto any command property called AuthenticatedUserId:

        .Claims(mapping => mapping.MapClaimToPropertyName("UserId", "AuthenticatedUserId"))

Their is another variant of the claims mapper declaration that allows properties to be configured on a per command basis though if you are starting with a greenfield solution taking a consistent approach to naming can simplify things.

Data sourced from claims is generally not something you want a user to be able to supply – for example if they can supply a different user ID in our example here then that might lead to a data breach with users being able to access inappropriate data. In order to ensure this cannot happen the framework supplies an attribute, SecurityPropertyAttribute, that enables properties to be marked as sensitive. For example here’s the CreatePostCommand from the example we are looking at:

public class CreatePostCommand : ICommand<PublishedPost>
{
    // Marking this property with the SecurityProperty attribute means that the ASP.Net Core Commanding
    // framework will not allow binding to the property except by the claims mapper
    [SecurityProperty]
    public Guid AuthenticatedUserId { get; set; }

    public string Title { get; set; }

    public string Body { get; set; }
}

The framework installs extensions into ASP.Net Core that adjust model metadata and binding (including from request bodies – that ASP.Net Core behaves somewhat inconsistently with) to ensure that they cannot be written to from an endpoint and, as we’ll see shortly, are hidden from Swagger.

The final line of our MVC builder extensions replaces the built in validation with Fluent Validation:

        .AddFluentValidation();

This is optional and you can use the attribute based validation model (or any other validation model) with the command framework however if you do so you’re baking validation data into your commands and this can be limiting: for example you may want to apply different validations based on context (queue vs. REST API). It’s important to note that validation, and all other ASP.Net Core functionality, will be applied to the commands as they pass through its pipeline – their is nothing special about them at all other than what I outlined above in terms of sensitive properties. This framework really does just build on ASP.Net Core – it doesn’t subvert it or twist it in some abominable way.

Then finally we add a Swagger endpoint using Swashbuckle:

services.AddSwaggerGen(c =>
    {
        c.SwaggerDoc("v1", new Info { Title = "Headless Blog API", Version = "v1" });
        c.AddAspNetCoreCommanding();
    });

The call to AddAspNetCoreCommanding here adds schema filters into Swagger that understand how to interpret the SecurityPropertyAttribute attribute and will prevent those properties from appearing in the Swagger document.

Conclusions

By taking the approach outlined in this post we’ve greatly reduced the amount of code we need to write eliminating all the boilerplate normally associated with writing a REST API in ASP.Net Core and we’ve completely decoupled our application logic from communication protocols, runtime model and host.

Simplistically less code gives us less to test, less to review, lower maintenance, improved consistency and fewer defects.

And we’ve gained a massive amount of flexibility in our application architecture that allows us to tailor our approach to best fit our project at a given point in time / stage of development lifecycle and more easily take advantage of new technologies.

To give a flavour of the latter, support for Azure Functions is currently under development allowing for the same API and underlying implementation to be expressed in a serverless model simply by adopting a new NuGet package and changing the configuration to the below (please bear in mind this comes from the early, but functional, work in progress and so is liable to change):

public class FunctionAppConfiguration : IFunctionAppConfiguration
{
    public void Build(IFunctionHostBuilder builder)
    {
        builder
            // register services and commands
            .Setup((services, commandRegistry) => commandRegistry.Discover<FunctionAppConfiguration>())
            // register functions - by default the functions will be given the name of the command minus the postfix Command and use the GET verb
            .Functions(functions => functions
                    .HttpFunction<GetPostsQuery>()
                    .HttpFunction<GetPostQuery>()
                    .HttpFunction<CreatePostCommand>(function => function.AddVerb(HttpMethod.Post))
            );
    }
}

In addition to bringing the same benefits to Functions as the approach above does to ASP.Net Core this also provides, to my eyes, a cleaner approach for expressing Function triggers and provides structure for things like an IoC container.


C# Cloud Application Architecture – Commanding via a Mediator (Part 5)

Over the last 4 parts of this series we’ve taken a simple application built around a layered architecture and restructured it into an application based around dispatching queries and commands as state through a mediator.

We’ve seen many of the advantages this can bring to a codebase reducing repetition and allowing for a clear decomposition into business, or service, oriented modules.

In this final part I’ll demonstrate how this pattern can support an application through the various stages of it’s lifecycle. The early stages of a software development project are often susceptible to a high degree of change. If it’s a new product under development then the challenge is often around establishing market fit (be that internal or external) without burning through the entire budget. Additionally if the problem domain is new it’s likely that the first attempt at drawing out bounded contexts will contain errors and if the system is built as fully isolated components change can be expensive. In either case keeping the cost of development and change low in the early phases of the project can lead to much more effective use of a projects budget.

In the system we’ve been developing we’ve developed three sub-systems: a checkout, a shopping cart and a product store – essentially we have a modular monolith.

In this part we’re going to assume that we’re finding that our product store is coming under a lot of strain and we are going to pull it out into a micro-service so that we can scale it independently. And we’re going to make this change without altering any consuming business logic code at all.

In our system we make use of the store in two places through the dispatch of GetStoreProductQuery queries. Firstly it is represented in the primary API as an endpoint that can be called by clients in the ProductController class:

[Route("api/[controller]")]
public class ProductController : AbstractCommandController
{
    public ProductController(ICommandDispatcher dispatcher) : base(dispatcher)
    {
            
    }

    [HttpGet("{productId}")]
    [ProducesResponseType(typeof(StoreProduct), 200)]
    public async Task<IActionResult> Get([FromRoute] GetStoreProductQuery query) => await ExecuteCommand(query);
}

Secondly it is also used to provide validation of products within the handler for the AddToCartCommand in the AddToCartCommandHandler class:

public async Task<CommandResponse> ExecuteAsync(AddToCartCommand command, CommandResponse previousResult)
{
    Model.ShoppingCart cart = await _repository.GetActualOrDefaultAsync(command.AuthenticatedUserId);

    StoreProduct product = (await _dispatcher.DispatchAsync(new GetStoreProductQuery{ProductId = command.ProductId})).Result;

    if (product == null)
    {
        _logger.LogWarning("Product {0} can not be added to cart for user {1} as it does not exist", command.ProductId, command.AuthenticatedUserId);
        return CommandResponse.WithError($"Product {command.ProductId} does not exist");
    }
    List<ShoppingCartItem> cartItems = new List<ShoppingCartItem>(cart.Items);
    cartItems.Add(new ShoppingCartItem
    {
        Product = product,
        Quantity = command.Quantity
    });
    cart.Items = cartItems;
    await _repository.UpdateAsync(cart);
    return CommandResponse.Ok();
}

To make our change the first thing we need to do is to be able to execute our command inside a different host – we’ll use an Azure Function that accepts the ProductID required by ourGetStoreProductQuery query. The code for this function is shown below:

public static class GetStoreProduct
{
    private static readonly IServiceProvider ServiceProvider;
    private static readonly AsyncLocal<ILogger> Logger = new AsyncLocal<ILogger>();
        
    static GetStoreProduct()
    {
        IServiceCollection serviceCollection = new ServiceCollection();
        MicrosoftDependencyInjectionCommandingResolver resolver = new MicrosoftDependencyInjectionCommandingResolver(serviceCollection);
        ICommandRegistry registry = resolver.UseCommanding();
        serviceCollection.UseCoreCommanding(resolver);
        serviceCollection.UseStore(() => ServiceProvider, registry, ApplicationModeEnum.Server);
        serviceCollection.AddTransient((sp) => Logger.Value);
        ServiceProvider = resolver.ServiceProvider = serviceCollection.BuildServiceProvider();
    }

    [FunctionName("GetStoreProduct")]
    public static async Task<IActionResult> Run([HttpTrigger(AuthorizationLevel.Anonymous, "get", "post", Route = null)]HttpRequest req, ILogger logger)
    {
        Logger.Value = logger;
        logger.LogInformation("C# HTTP trigger function processed a request.");
            
        IDirectCommandExecuter executer = ServiceProvider.GetService<IDirectCommandExecuter>();

        GetStoreProductQuery query = new GetStoreProductQuery
        {
            ProductId = Guid.Parse(req.GetQueryParameterDictionary()["ProductId"])
        };
        CommandResponse<StoreProduct> result = await executer.ExecuteAsync(query);
        return new OkObjectResult(result);
    }
}

Our static constructor sets up our IoC container (Azure Functions actually run on app service instances and you can share state between them – though their are few guarantees and you can debate at length how “serverless” this makes things – AWS Lambda is much the same) and should be fairly familiar code by now.

Our function entry point does something different – it creates an instance of our GetStoreProductQuery from the query parameters supplied but rather than dispatch it through the ICommandDispatcher interface we’ve seen before it executes it using a reference to a IDirectCommandExecuter resolved from our IoC container. This instructs the command framework to execute the command without any dispatch semantics – that means that any logging of dispatch portions of the command flow won’t be replicated by this function and it is slightly more efficient (it’s worth noting that you can dispatch again here if you need to – though generally you would take the approach I am showing here).

To support this new approach I’ve also made a change to the IServiceCollectionsExtensions UseStore registration method inside the Store.Application project so that it can be supplied an enum that determines how our command should be handled: in process (as we’ve been doing up until now), as a client of a remote service, or as a server (as we have done above). The enum is used to register the command in one of two ways and this is the key change to the existing change that enables us to remote the command:

if (applicationMode == ApplicationModeEnum.InProcess || applicationMode == ApplicationModeEnum.Server)
{
    commandRegistry.Register<GetStoreProductQueryHandler>();
}
else if (applicationMode == ApplicationModeEnum.Client)
{
    // this configures the command dispatcher to send the command over HTTP and wait for the result
    Uri functionUri = new Uri("http://localhost:7071/api/GetStoreProduct");
    commandRegistry.Register<GetStoreProductQuery, CommandResponse<StoreProduct>>(() =>
    {
        IHttpCommandDispatcherFactory httpCommandDispatcherFactory = serviceProvider().GetService<IHttpCommandDispatcherFactory>();
        return httpCommandDispatcherFactory.Create(functionUri, HttpMethod.Get);
    });
}

Both the in-process and server mode continue to register the handler as they have done before however when the application mode is set to client the registration takes a different form. Rather than register the handler we supply the type of the command and the type of the result as generic type parameters but then we setup a lambda that will resolve an instance of a IHttpCommandDispatcherFactory and create a HTTP dispatcher with the URI of the function and the HTTP verb to use. These interfaces can be found within the NuGet package AzureFromTheTrenches.Commanding.Http which I’ve added to the Store.Application project.

Registering in this way instructs the commanding system to dispatch the command using the, in this case, HTTP dispatcher rather than attempt to execute it locally. All the other framework features around the dispatch process continue to behave as usual and as we saw earlier you can pick this up on the other side of the HTTP call with the IDirectCommandExecuter.

I have shifted some other code around inside the solution to support code sharing with the Azure Function but that is really the extent of the code change. We’ve changed no business logic or consuming application code – we’ve simply moved where the command runs and the calling semantics are seamless – and essentially split the store out as a micro-service running inside an Azure Function. As long as you build your sub-systems as isolated units as we have here this same approach can be used with queues and other forms of remote call.

I’ve found this approach to be massively powerful – in the early stages of a project you can make changes within a codebase and with an operational environment that is fairly simple and is easy to manage and supported by tooling and as long as you have the tests to go with it refactoring a solution like this is really simple and is supported by tools like Resharper. Then, as you begin to lock things down or the solution grows, you can pull out the sub-systems into fully independent micro services without significant code change – it’s largely just configuration as we’ve seen above.

I wrote the commanding framework I’ve been using specifically to enable this approach and you can find it, and documentation, on GitHub here.

I hope this series has been interesting and presented (or refreshed) a different way of thinking about C# application architecture. There’s a fair chance I’ll swing back round and talk a bit about commanding result caching and some other scenarios that this approach enables so watch this space.

In the meantime if you have any questions about the approach or my commanding framework please do get in touch over on Twitter.

Finally the code for this final part can be found on GitHub here:

https://github.com/JamesRandall/CommandMessagePatternTutorial/tree/master/Part5

Other Parts in the Series

Part 4
Part 3
Part 2
Part 1

C# Cloud Application Architecture – Commanding via a Mediator (Part 4)

In the last post we added validation to our solution. This time we’re going to clean up our command handlers so that they are focused more on business / domain concerns and we pull out the infrastructural concerns. After that we’ll add some telemetry to the system to further reinforce some of the benefits of the pattern. As the handlers currently stand they mix up logging with their business concerns, for example our add to cart command handler:

public async Task<CommandResponse> ExecuteAsync(AddToCartCommand command, CommandResponse previousResult)
{
    Model.ShoppingCart cart = await _repository.GetActualOrDefaultAsync(command.AuthenticatedUserId);

    StoreProduct product = (await _dispatcher.DispatchAsync(new GetStoreProductQuery{ProductId = command.ProductId})).Result;

    if (product == null)
    {
        _logger.LogWarning("Product {0} can not be added to cart for user {1} as it does not exist", command.ProductId, command.AuthenticatedUserId);
        return CommandResponse.WithError($"Product {command.ProductId} does not exist");
    }
    List<ShoppingCartItem> cartItems = new List<ShoppingCartItem>(cart.Items);
    cartItems.Add(new ShoppingCartItem
    {
        Product = product,
        Quantity = command.Quantity
    });
    cart.Items = cartItems;
    await _repository.UpdateAsync(cart);
    _logger.LogInformation("Updated basket for user {0}", command.AuthenticatedUserId);
    return CommandResponse.Ok();
}

There are a number of drawbacks with this:

  • As the author of a handler you have to remember to add all this logging code, with the best will and review cycle in the world people do forget these things or drop them due to time pressure. In fact, as a case in point, here I’ve missed the entry point logger.
  • It’s hard to tell what is exceptional and business as usual – for example the log of a warning is something specific to this business process while the top and tail is not.
  • It adds to unit test cost and complexity.
  • It’s more code and more code equals more bugs.
  • It makes the code more difficult to read.

This is all compounded further if we begin to add additional infrastructural work such as counters and further error handling:

public async Task<CommandResponse> ExecuteAsync(AddToCartCommand command, CommandResponse previousResult)
{
    Measure measure = _telemetry.Start<AddToCartCommandHandler>();
    try
    {
        _logger.LogInformation("Updating basket for user {0}", command.AuthenticatedUserId);
        Model.ShoppingCart cart = await _repository.GetActualOrDefaultAsync(command.AuthenticatedUserId);

        StoreProduct product =
            (await _dispatcher.DispatchAsync(new GetStoreProductQuery {ProductId = command.ProductId})).Result;

        if (product == null)
        {
            _logger.LogWarning("Product {0} can not be added to cart for user {1} as it does not exist",
                command.ProductId, command.AuthenticatedUserId);
            return CommandResponse.WithError($"Product {command.ProductId} does not exist");
        }
        List<ShoppingCartItem> cartItems = new List<ShoppingCartItem>(cart.Items);
        cartItems.Add(new ShoppingCartItem
        {
            Product = product,
            Quantity = command.Quantity
        });
        cart.Items = cartItems;
        await _repository.UpdateAsync(cart);
        _logger.LogInformation("Updated basket for user {0}", command.AuthenticatedUserId);
        return CommandResponse.Ok();
    }
    catch(Exception ex)
    {
        _logger.LogError("Error updating basket for user {0}", command.AuthenticatedUserId, ex);
    }
    finally
    {
        measure.Complete();
    }
}

This is getting messier and messier but, sadly, it’s not uncommon to see code like this in applications (we’ve all seen it right?) and while the traditional layered architecture can help with sorting this out (it’s common to see per service decorators for example) it tends to lead to code repitition. And if you wanted to add measures like that shown above to our system we have to visit every command handler or service. Essentially you are limited in the degree to which you can tidy this up because you’re dealing with operations expressed and executed using compiled calling semantics.

However now we’ve moved our operations over to being expressed as state and executed through a mediator we have a lot more flexibility in how we can approach this and I’d like to illustrate this through two approaches to the problem. Firstly by using the decorator pattern and then by using a feature of the AzureFromTheTrenches.Commanding framework.

Before we get into the meat of this it’s worth quickly noting that this isn’t the only approach to such a problem. One alternative, for example, is to take a strongly functional approach – something that I may explore in a future post.

Decorator Approach

Before we get started the code for this approach can be found here:

https://github.com/JamesRandall/CommandMessagePatternTutorial/tree/master/Part4-decorator

The decorator pattern allow us to add new behaviours to an existing implementation – in the system here all of our controllers make use of the ICommandDispatcher interface to execute commands and queries. For example our shopping cart controller looks like this:

[Route("api/[controller]")]
public class ShoppingCartController : AbstractCommandController
{
    public ShoppingCartController(ICommandDispatcher dispatcher) : base(dispatcher)
    {
            
    }

    [HttpGet]
    [ProducesResponseType(typeof(ShoppingCart.Model.ShoppingCart), 200)]
    public async Task<IActionResult> Get() => await ExecuteCommand<GetCartQuery, ShoppingCart.Model.ShoppingCart>();

    [HttpPut("{productId}/{quantity}")]
    public async Task<IActionResult> Put([FromRoute] AddToCartCommand command) => await ExecuteCommand(command);
        

    [HttpDelete]
    public async Task<IActionResult> Delete() => await ExecuteCommand<ClearCartCommand>();
}

If we can extend the ICommandDispatcher to handle our logging in a generic sense and replace it’s implementation in the IoC container then we no longer need to handle logging on a per command handler basis. Happily we can! First let’s take a look at the declaration of the interface:

public interface ICommandDispatcher : IFrameworkCommandDispatcher
{
        
}

Interestingly it doesn’t contain any declarations itself but it does derive from something called IFrameworkCommandDispatcher that does:

public interface IFrameworkCommandDispatcher
{
    Task<CommandResult<TResult>> DispatchAsync<TResult>(ICommand<TResult> command, CancellationToken cancellationToken = default(CancellationToken));

    Task<CommandResult> DispatchAsync(ICommand command, CancellationToken cancellationToken = default(CancellationToken));

    ICommandExecuter AssociatedExecuter { get; }
}

And so to decorate the default implementation of ICommandDispatcher with new behaviour we need to provide an implementation of this interface that adds the new functionality and calls down to the original dispatcher. For example a first cut of this might look like this:

internal class LoggingCommandDispatcher : ICommandDispatcher
{
    private readonly ICommandDispatcher _underlyingDispatcher;
    private readonly ILogger<LoggingCommandDispatcher> _logger;

    public LoggingCommandDispatcher(ICommandDispatcher underlyingDispatcher,
        ILoggerFactory loggerFactory)
    {
        _underlyingDispatcher = underlyingDispatcher;
        _logger = loggerFactory.CreateLogger<LoggingCommandDispatcher>();
    }

    public async Task<CommandResult<TResult>> DispatchAsync<TResult>(ICommand<TResult> command, CancellationToken cancellationToken)
    {
        try
        {
            _logger.LogInformation("Executing command {commandType}", command.GetType().Name);
            CommandResult<TResult> result = await _underlyingDispatcher.DispatchAsync(command, cancellationToken);
            _logger.LogInformation("Successfully executed command {commandType}", command.GetType().Name);
            return result;
        }
        catch (Exception ex)
        {
            LogFailedPostDispatchMessage(command, ex);
            return new CommandResult<TResult>(CommandResponse<TResult>.WithError($"Error occurred performing operation {command.GetType().Name}"), false);
        }
    }

    public Task<CommandResult> DispatchAsync(ICommand command, CancellationToken cancellationToken = new CancellationToken())
    {
        throw new NotSupportedException("All commands must return a CommandResponse");
    }

    public ICommandExecuter AssociatedExecuter => _underlyingDispatcher.AssociatedExecuter;
}

We’ve wrapped the underlying dispatch mechanism with loggers and a try catch block that deals with errors and by doing so we no longer have to implement this in each and every command handler. As our pattern and convention approach requires all our command to be declared with a CommandResponse result I’ve also updated the resultless DispatchAsync implementation to throw an exception – it should never be called but if it is we know we’ve missed something on a command.

Before updating all our handlers we need to replace the registration inside our IoC container so that a resolution of ICommandDispatcher will return an instance of our new decorated version. And so in our Startup.cs for the API project we need to add this line to the end of the ConfigureServices method:

services.Replace(
    new ServiceDescriptor(typeof(ICommandDispatcher), typeof(LoggingCommandDispatcher),
    ServiceLifetime.Transient));

This removes the previous implementation and replaces it with our implementation. However if we try to run this we’ll quickly run into exceptions being thrown as we’ve got a problem – and it’s a fairly common problem that you’ll run across when implementing decorators over interfaces who’s implementation is defined in a third party library. When the IoC container attempts to resolve the ICommandFactory it will correctly locate the LoggingCommandDispatcher class but its constructor expects to be passed, and here’s the problem, an instance of ICommandFactory which will cause the IoC container to attempt to instantiate another instance of LoggingCommandDispatcher and so on. At best this is going to be recognised as a problem by the IoC container and a specific excpetion will be thrown or at worst it’s going to result in a stack overflow exception.

The framework supplied implementation of ICommandDispatcher is an internal class and not something we can get access to and so the question is how do we solve it? We could declare a new interface type derived from ICommandDispatcher for our new class and update all our references but I prefer to keep the references somewhat generic – as the classes making references to ICommandDispatcher aren’t themselves asserting the capabilities they require ICommandDispatcher seems a better fit.

One option is to resolve an instance of ICommandDispatcher before we register our LoggingCommandDispatcher and then use a factory to instantiate our class – or take a similar approach but register the LoggingCommandDispatcher as a singleton. However in either case we’ve forced a lifecycle change on the ICommandDispatcher implementation (in the former example the underlying ICommandDispatcher has been made a singleton and in the latter the LoggingCommandDispatcher) which is a fairly significant change in behaviour. While, as things stand, that would work for now is likely to lead to issues and limitations later on.

We do however have an alternative approach and it’s the reason that the AzureFromTheTrenches.Commanding package defines the interface IFrameworkCommandDispatcher that we saw earlier. It’s not designed to be referenced directly by command disptching code instead its provided to support the exact scenario we have here – decorating an internal class with an IoC container without lifecycle change. The internal implementation of the command dispather is registered against both ICommandDispatcher and IFrameworkCommandDispatcher. We can take advantage of this by updating our decorated dispatcher to accept this interface as a constructor parameter:

internal class LoggingCommandDispatcher : ICommandDispatcher
{
    private readonly ICommandDispatcher _underlyingDispatcher;
    private readonly ILogger<LoggingCommandDispatcher> _logger;

    public LoggingCommandDispatcher(IFrameworkCommandDispatcher underlyingDispatcher,
        ILoggerFactory loggerFactory)
    {
        _underlyingDispatcher = underlyingDispatcher;
        _logger = loggerFactory.CreateLogger<LoggingCommandDispatcher>();
    }

    // ... rest of the code is the same
}

With that taken care of we can revisit our handlers and remove the logging code and so our add to cart command handler, which had become quite bloated, now looks like this:

public async Task<CommandResponse> ExecuteAsync(AddToCartCommand command, CommandResponse previousResult)
{
    Model.ShoppingCart cart = await _repository.GetActualOrDefaultAsync(command.AuthenticatedUserId);

    StoreProduct product = (await _dispatcher.DispatchAsync(new GetStoreProductQuery{ProductId = command.ProductId})).Result;

    if (product == null)
    {
        _logger.LogWarning("Product {0} can not be added to cart for user {1} as it does not exist", command.ProductId, command.AuthenticatedUserId);
        return CommandResponse.WithError($"Product {command.ProductId} does not exist");
    }
    List<ShoppingCartItem> cartItems = new List<ShoppingCartItem>(cart.Items);
    cartItems.Add(new ShoppingCartItem
    {
        Product = product,
        Quantity = command.Quantity
    });
    cart.Items = cartItems;
    await _repository.UpdateAsync(cart);
    return CommandResponse.Ok();
}

As another example the GetCartQueryHandler previously looked like this:

public async Task<CommandResponse<Model.ShoppingCart>> ExecuteAsync(GetCartQuery command, CommandResponse<Model.ShoppingCart> previousResult)
{
    _logger.LogInformation("Getting basket for user {0}", command.AuthenticatedUserId);
    try
    {
        Model.ShoppingCart cart = await _repository.GetActualOrDefaultAsync(command.AuthenticatedUserId);
        _logger.LogInformation("Retrieved cart for user {0} with {1} items", command.AuthenticatedUserId, cart.Items.Count);
        return CommandResponse<Model.ShoppingCart>.Ok(cart);
    }
    catch (Exception e)
    {
        _logger.LogError(e, "Unable to get basket for user {0}", command.AuthenticatedUserId);
        return CommandResponse<Model.ShoppingCart>.WithError("Unable to get basket");
    }
}

And now looks like this:

public async Task<CommandResponse<Model.ShoppingCart>> ExecuteAsync(GetCartQuery command, CommandResponse<Model.ShoppingCart> previousResult)
{
    Model.ShoppingCart cart = await _repository.GetActualOrDefaultAsync(command.AuthenticatedUserId);
    return CommandResponse<Model.ShoppingCart>.Ok(cart);
}

Much cleaner, less code, we can’t forget to do things and its much simpler to test!

Earlier I mentioned adding some basic telemetry in to track the execution time of our commands. Now we’ve got our decorated command dispatcher in place to add this to all our commands requires just a few lines of code:

public async Task<CommandResult<TResult>> DispatchAsync<TResult>(ICommand<TResult> command, CancellationToken cancellationToken)
{
    IMetricCollector metricCollector = _metricCollectorFactory.Create(command.GetType());
    try
    {   
        LogPreDispatchMessage(command);
        CommandResult<TResult> result = await _underlyingDispatcher.DispatchAsync(command, cancellationToken);
        LogSuccessfulPostDispatchMessage(command);
        metricCollector.Complete();
        return result;
    }
    catch (Exception ex)
    {
        LogFailedPostDispatchMessage(command, ex);
        metricCollector.CompleteWithError();
        return new CommandResult<TResult>(CommandResponse<TResult>.WithError($"Error occurred performing operation {command.GetType().Name}"), false);
    }
}

Again by taking this approach we don’t have to revisit each of our handlers, we don’t have to remember to do so in future, our code volume is kept low, and we don’t have to revisit all our handler unit tests.

The collector itself is just a simple wrapper for Application Insights and can be found in the full solution. Additionally in the final solution code I’ve further enhanced the LoggingCommandDispatcher to demonstrate how richer log syntax can still be output – there are a variety of ways this could be done, I’ve picked a simple to implement one here. The code for this approach can be found here:

https://github.com/JamesRandall/CommandMessagePatternTutorial/tree/master/Part4-decorator

The decorator approach is a powerful pattern that can be used to extend functionality of third party components but now we’ll look at using a built-in feature of the commanding framework we’re using to achieve the same results in a different way.

Framework Approach

The code for the below can be found at:

https://github.com/JamesRandall/CommandMessagePatternTutorial/tree/master/Part4-framework

The framework we are using contains functionality designed to support logging and event store type scenarios that we can make use of to record log entries similar to those we recorded using our decorator approach and collect our timing metrics. It does this by allowing us to attach auditor classes to three hook points:

  • Pre-dispatch – occurs as soon as a command is received by the framework
  • Post-dispatch – occurs once a command has been dispatched, this only really applies when execution happens on the other side of a network or process boundary (we’ll come back to this in the next part)
  • Post-execution – occurs once a command has been executed

For the moment we’re only going to make use of the pre-dispatch and post-execution hooks. Auditors need to implement the ICommandAuditor interface as shown in our pre-dispatch auditor below:

internal class LoggingCommandPreDispatchAuditor : ICommandAuditor
{
    private readonly ILogger<LoggingCommandPreDispatchAuditor> _logger;

    public LoggingCommandPreDispatchAuditor(ILogger<LoggingCommandPreDispatchAuditor> logger)
    {
        _logger = logger;
    }

    public Task Audit(AuditItem auditItem, CancellationToken cancellationToken)
    {
        if (auditItem.AdditionalProperties.ContainsKey("UserId"))
        {
            _logger.LogInformation("Executing command {commandType} for user {userId}",
                auditItem.CommandType,
                auditItem.AdditionalProperties["UserId"]);
        }
        else
        {
            _logger.LogInformation("Executing command {commandType}",
                auditItem.CommandType);
        }
        return Task.FromResult(0);
    }
}

The framework constructs them using the IoC container and so dependencies can be injected as appropriate.

The auditors don’t have direct access to commands but in the code above we can see that we are looking at the UserId as part of our logging logic. The framework also provides the ability for audit items to be enriched using an IAuditItemEnricher instance that does have access to the command and so we pull this information out and make it available as a property on the AuditItem using one of these enrichers:

public class AuditItemUserIdEnricher : IAuditItemEnricher
{
    public void Enrich(Dictionary<string, string> properties, ICommand command, ICommandDispatchContext context)
    {
        if (command is IUserContextCommand userContextCommand)
        {
            properties["UserId"] = userContextCommand.AuthenticatedUserId.ToString();
        }
    }
}

It’s also possible to use the same audit class for all three hook types and inspect a property of the AuditItem parameter to determine the stage but I find if that sort of branching is needed it’s often neater to have discrete classes and so I have separated out the logic for the post-execution logic into another auditor class:

internal class LoggingCommandExecutionAuditor : ICommandAuditor
{
    private readonly ILogger<LoggingCommandExecutionAuditor> _logger;
    private readonly IMetricCollector _metricCollector;

    public LoggingCommandExecutionAuditor(ILogger<LoggingCommandExecutionAuditor> logger,
        IMetricCollector metricCollector)
    {
        _logger = logger;
        _metricCollector = metricCollector;
    }

    public Task Audit(AuditItem auditItem, CancellationToken cancellationToken)
    {
        Debug.Assert(auditItem.ExecutedSuccessfully.HasValue);
        Debug.Assert(auditItem.ExecutionTimeMs.HasValue);

        if (auditItem.ExecutedSuccessfully.Value)
        {
            if (auditItem.AdditionalProperties.ContainsKey("UserId"))
            {
                _logger.LogInformation("Successfully executed command {commandType} for user {userId}",
                    auditItem.CommandType,
                    auditItem.AdditionalProperties["UserId"]);
            }
            else
            {
                _logger.LogInformation("Executing command {commandType}",
                    auditItem.CommandType);
            }
            _metricCollector.Record(auditItem.CommandType, auditItem.ExecutionTimeMs.Value);
        }
        else
        {
            if (auditItem.AdditionalProperties.ContainsKey("UserId"))
            {
                _logger.LogInformation("Error executing command {commandType} for user {userId}",
                    auditItem.CommandType,
                    auditItem.AdditionalProperties["UserId"]);
            }
            else
            {
                _logger.LogInformation("Error executing command {commandType}",
                    auditItem.CommandType);
            }
            _metricCollector.RecordWithError(auditItem.CommandType, auditItem.ExecutionTimeMs.Value);
        }
            
        return Task.FromResult(0);
    }
}

This class also collects the metrics based on the time to execute the command – the framework handily collects these for us as part of its own infrastructure.

At this point we’ve got all the components we need to perform our logging so all that is left is to register the components with the command system which is done in Startup.cs at the end of the ConfigureServices method:

CommandingDependencyResolver
    .UsePreDispatchCommandingAuditor<LoggingCommandPreDispatchAuditor>()
    .UseExecutionCommandingAuditor<LoggingCommandExecutionAuditor>()
    .UseAuditItemEnricher<AuditItemUserIdEnricher>();

Next Steps

With both approaches we’ve cleaned up our command handlers so that all they are concerned with is functional / business requirements and though I’ve presented the above as an either/or choice but it’s quite possible to use a combined approach if neither quite meets your requirements however we’re going to move forward with the framework auditor approach as it will support our next step quite nicely: we’re going to take our GetStoreProductQuery command and essentially turn it into a standalone microservice running as an Azure Function without changing any of the code that uses the command.

Other Parts in the Series

Part 5
Part 3
Part 2
Part 1

C# Cloud Application Architecture – Commanding via a Mediator (Part 3)

In the previous post we simplified our controllers by having them accept commands directly and configured ASP.Net Core so that consumers of our API couldn’t insert data into sensitive properties. However we’ve not yet set up any validation so, for example, it is possible for a user to add a product to a cart with a negative quantity. We’ll address that in this post and take a look at an alternative to the attribute model of validation that comes out the box with ASP.Net and ASP.Net Core.

The source code for this post can be found on GitHub:

https://github.com/JamesRandall/CommandMessagePatternTutorial/tree/master/Part3

The built in ASP.Net Core approach to validation, like previous versions, relies on a model being annotated with attributes but there are some significant drawbacks with this approach:

  1. You need access to the source code to add the attributes – sometimes this isn’t possible and so you end up maintaining multiple sets of models just to express validation rules.
  2. It requires you to tightly couple your model to a specific validation system and set of validation rules and include additional dependencies that may not be appropriate everywhere you want to use the model.
  3. It’s extensible but not particularly elegantly and complicated rules are hard to implement.

Depending on your application architecture maintaining multiple sets of model can be a good solution to some of these issues, and might be the right thing to do for your architecture in any case (for example you certainly don’t want Entity Framework models bleeding out through an API for example) but in our scenario there’s little to be gained by maintaining multiple representations of commands, at least in the general sense.

An excellent alternative framework for validation is Jeremy Skinner’s Fluent Validation package set. This allows validation rules to be expressed separately from models, hooks into the ASP.Net Core pipeline to support the standard ModelState approach, and allows validations to be run easily from anywhere.

We’re going to continue to follow our application encapsulation model for adding validations and so we will add a validator package to each domain, for example ShoppingCart.Validation. Each of these assemblies will consist of private classes for the validators that are registered in the IoC container using an installer. Below is an example of the validator for our AddToCartCommand command:

internal class AddToCartCommandValidator : AbstractValidator<AddToCartCommand>
{
    public AddToCartCommandValidator()
    {
        RuleFor(c => c.ProductId).NotEqual(Guid.Empty);
        RuleFor(c => c.Quantity).GreaterThan(0);
    }
}

This validator makes sure that we have a none-empty product ID and specify a quantity of 1 or more. We register this in our installer as follows:

public static class IServiceCollectionExtensions
{
    public static IServiceCollection RegisterValidators(this IServiceCollection serviceCollection)
    {
        serviceCollection.AddTransient<IValidator<AddToCartCommand>, AddToCartCommandValidator>();
        return serviceCollection;
    }
}

The ShoppingCart.Validation assembly is referenced only from the ShoppingCart.Application installer as shown below:

public static class IServiceCollectionExtensions
{
    public static IServiceCollection UseShoppingCart(this IServiceCollection serviceCollection,
        ICommandRegistry commandRegistry)
    {
        serviceCollection.AddSingleton<IShoppingCartRepository, ShoppingCartRepository>();

        commandRegistry.Register<GetCartQueryHandler>();
        commandRegistry.Register<AddToCartCommandHandler>();

        serviceCollection.RegisterValidators();

        return serviceCollection;
    }
}

And finally in our ASP.Net Core project, OnlineStore.Api, in the Startup class we register the Fluent Validation framework – however it doesn’t need to know anything about the specific validators:

public void ConfigureServices(IServiceCollection services)
{
    services.AddMvc(c =>
    {
        c.Filters.Add<AssignAuthenticatedUserIdActionFilter>();
        c.AddAuthenticatedUserIdAwareBodyModelBinderProvider();
    }).AddFluentValidation();

    services.AddSwaggerGen(c =>
    {
        c.SwaggerDoc("v1", new Info { Title = "Online Store API", Version = "v1" });
        c.SchemaFilter<SwaggerAuthenticatedUserIdFilter>();
        c.OperationFilter<SwaggerAuthenticatedUserIdOperationFilter>();
    });

    CommandingDependencyResolver = new MicrosoftDependencyInjectionCommandingResolver(services);
    ICommandRegistry registry = CommandingDependencyResolver.UseCommanding();

    services
        .UseShoppingCart(registry)
        .UseStore(registry)
        .UseCheckout(registry);
    services.Replace(new ServiceDescriptor(typeof(ICommandDispatcher), typeof(LoggingCommandDispatcher),
        ServiceLifetime.Transient));
}

We can roll that approach out over the rest of our commands and with the validator configured in ASP.Net can add model state checks into our AbstractCommandController, for example:

public abstract class AbstractCommandController : Controller
{
    protected AbstractCommandController(ICommandDispatcher dispatcher)
    {
        Dispatcher = dispatcher;
    }

    protected ICommandDispatcher Dispatcher { get; }

    protected async Task<IActionResult> ExecuteCommand<TResult>(ICommand<TResult> command)
    {
        if (!ModelState.IsValid)
        {
            return BadRequest(ModelState);
        }
        TResult response = await Dispatcher.DispatchAsync(command);
        return Ok(response);
    }
        
    // ...
}

At this point we can enforce simple entry point validation but what if we need to make validation decisions based on state we only know about in a handler? For example in our AddToCartCommand example we want to make sure the product really does exist before we add it and perhaps return an error if it does not (or, for example, if its not in stock).

To achieve this we’ll make some small changes to our CommandResponse class so that instead of simply returning a string it returns a collection of keys (property names) and values (error messages). This might sound like it should be a dictionary but the ModelState design of ASP.Net supports multiple error messages per key and so a dictionary won’t work, instead we’ll use an IReadOnlyCollection backed by an array. Here’s the changes made to the result-free implementation (the changes are the same for the typed variant):

public class CommandResponse
{
    protected CommandResponse()
    {
        Errors = new CommandError[0];
    }

    public bool IsSuccess => Errors.Count==0;

    public IReadOnlyCollection<CommandError> Errors { get; set; }

    public static CommandResponse Ok() {  return new CommandResponse();}

    public static CommandResponse WithError(string error)
    {
        return new CommandResponse
        {
            Errors = new []{new CommandError(error)}
        };
    }

    public static CommandResponse WithError(string key, string error)
    {
        return new CommandResponse
        {
            Errors = new[] { new CommandError(key, error) }
        };
    }

    public static CommandResponse WithErrors(IReadOnlyCollection<CommandError> errors)
    {
        return new CommandResponse
        {
            Errors = errors
        };
    }
}

We’ll add the errors from our command response into model state through an extension method in the API assembly – that way the syntax will stay clean but we won’t need to add a reference to ASP.Net in our shared assembly. We want to keep that as dependency free as possible. The extension method is pretty simple and looks like this:

public static class CommandResponseExtensions
{
    public static void AddToModelState(
        this CommandResponse commandResponse,
        ModelStateDictionary modelStateDictionary)
    {
        foreach (CommandError error in commandResponse.Errors)
        {
            modelStateDictionary.AddModelError(error.Key ?? "", error.Message);
        }
    }
}

And finally another update to the methods within our AbstractCommandController to wire up the response to the model state:

protected async Task<IActionResult> ExecuteCommand<TCommand, TResult>() where TCommand : class, ICommand<CommandResponse<TResult>>, new()
{
    if (!ModelState.IsValid)
    {
        return BadRequest(ModelState);
    }
    TCommand command = CreateCommand<TCommand>();
    CommandResponse<TResult> response = await Dispatcher.DispatchAsync(command);
    if (response.IsSuccess)
    {
        return Ok(response.Result);
    }
    response.AddToModelState(ModelState);
    return BadRequest(ModelState);
}

With that we can now return simple model level validation errors to clients and more complex validations from our business domains. An example from our AddToCartHandler that makes use of this looks as follows:

public async Task<CommandResponse> ExecuteAsync(AddToCartCommand command, CommandResponse previousResult)
{
    Model.ShoppingCart cart = await _repository.GetActualOrDefaultAsync(command.AuthenticatedUserId);

    StoreProduct product = (await _dispatcher.DispatchAsync(new GetStoreProductQuery{ProductId = command.ProductId})).Result;

    if (product == null)
    {
        _logger.LogWarning("Product {0} can not be added to cart for user {1} as it does not exist", command.ProductId, command.AuthenticatedUserId);
        return CommandResponse.WithError($"Product {command.ProductId} does not exist");
    }
    List<ShoppingCartItem> cartItems = new List<ShoppingCartItem>(cart.Items);
    cartItems.Add(new ShoppingCartItem
    {
        Product = product,
        Quantity = command.Quantity
    });
    cart.Items = cartItems;
    await _repository.UpdateAsync(cart);
    _logger.LogInformation("Updated basket for user {0}", command.AuthenticatedUserId);
    return CommandResponse.Ok();
}

Hopefully that’s a good concrete example of how this loosely coupled state and convention based approach to an architecture can reap benefits. We’ve added validation to all of our controllers and actions without having to revisit each one to add boilerplate and we don’t have to worry about unit testing each and every one to ensure validation is enforced and to be sure this worked we simply updated the unit tests for our AbstractCommandController, and our validations are clearly separated from our models and testable. And we’ve done all this through simple POCO (plain old C# object) type models that are easily serializable – something we’ll make good use of later.

In the next part we’ll move on to our handlers and clean them up so that they become purely focused on business domain concerns and at the same time improve the consistency of the logging we’ve got scattered around the handlers at the moment. We’ll also add some basic telemetry to the system using Application Insights so that we can measure how often and for how long each of our handlers take to run.

Other Parts in the Series

Part 5
Part 4
Part 2
Part 1

C# Cloud Application Architecture – Commanding via a Mediator (Part 2)

In the last post we’d converted our traditional layered architecture into one that instead organised itself around business domains and made use of command and mediator patterns to promote a more loosely coupled approach. However things were definitely still very much a work in progress with our controllers still fairly scruffy and our command handlers largely just a copy and paste of our services from the layered system.

In this post I’m going to concentrate on simplifying the controllers and undertake some minor rework on our commands to help with this. This part is going to be a bit more code heavy than the last and will involve diving into parts of ASP.Net Core. The code for the result of all these changes can be found on GitHub here:

https://github.com/JamesRandall/CommandMessagePatternTutorial/tree/master/Part2

As a reminder our aim is to move from controller with actions that look like this:

[HttpPut("{productId}/{quantity}")]
public async Task<IActionResult> Put(Guid productId, int quantity)
{
    CommandResponse response = await _dispatcher.DispatchAsync(new AddToCartCommand
    {
        UserId = this.GetUserId(),
        ProductId = productId,
        Quantity = quantity
    });
    if (response.IsSuccess)
    {
        return Ok();
    }
    return BadRequest(response.ErrorMessage);
}

To controllers with actions that look like this:

[HttpPut("{productId}/{quantity}")]
public async Task<IActionResult> Put([FromRoute] AddToCartCommand command) => await ExecuteCommand(command);

And we want to do this in a way that makes adding future controllers and commands super simple and reliable.

We can do this fairly straightforwardly as we now only have a single “service”, our dispatcher, and our commands are simple state – this being the case we can use some ASP.Net Cores model binding to take care of populating our commands along with some conventions and a base class to do the heavy lifting for each of our controllers. This focuses the complexity in a single, testable, place and means that our controllers all become simple and thin.

If we’re going to use model binding to construct our commands the first thing we need to be wary of is security: many of our commands have a UserId property that, as can be seen in the code snippet above, is set within the action from a claim. Covering claims based security and the options available in ASP.Net Core is a topic in and of itself and not massively important to the application architecture and code structure we’re focusing on for the sake of simplicty I’m going to use a hard coded GUID, however hopefully its clear from the code below where this ID would come from in a fully fledged solution:

public static class ControllerExtensions
{
    public static Guid GetUserId(this Controller controller)
    {
        // in reality this would pull the user ID from the claims e.g.
        //     return Guid.Parse(controller.User.FindFirst("userId").Value);
        return Guid.Parse("A9F7EE3A-CB0D-4056-9DB5-AD1CB07D3093");
    }
}

If we’re going to use model binding we need to be extremely careful that this ID cannot be set by a consumer as this would almost certainly lead to a security incident. In fact if we make an interim change to our controller action we can see immediately that we’ve got a problem:

[HttpPut("{productId}/{quantity}")]
public async Task<IActionResult> Put([FromRoute]AddToCartCommand command)
{
    CommandResponse response = await _dispatcher.DispatchAsync(command);
    if (response.IsSuccess)
    {
        return Ok();
    }
    return BadRequest(response.ErrorMessage);
}

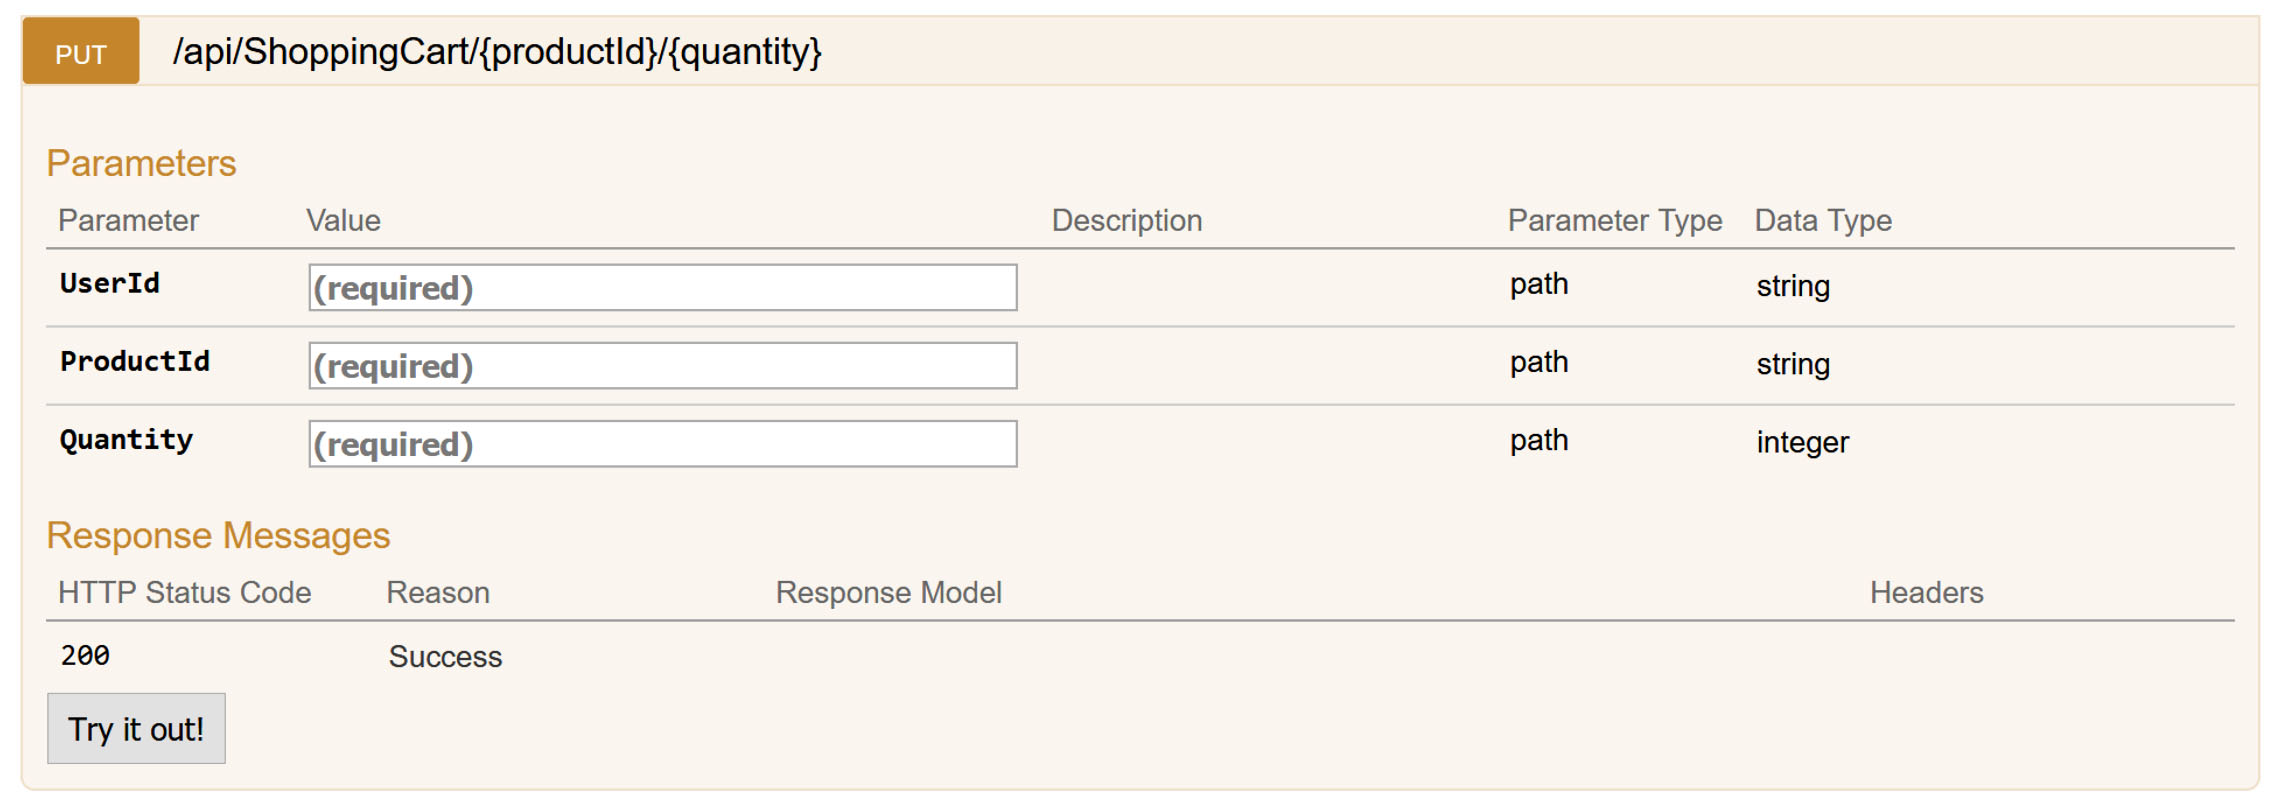
The user ID has bled through into the Swagger definition but, because of how we’ve configured the routing with no userId parameter on the route definition, the binder will ignore any value we try and supply: there is nowhere to specify it as a route parameter and a query parameter or request body will be ignored. Still – it’s not pleasant: it’s misleading to the consumer of the API and if, for example, we were reading the command from the request body the model binder would pick it up.

We’re going to take a three pronged approach to this so that we can robustly prevent this happening in all scenarios. Firstly, to support some of these changes, we’re going to rename the UserId property on our commands to AuthenticatedUserId and introduce an interface called IUserContextCommand as shown below that all our commands that require this information will implement:

public interface IUserContextCommand
{
    Guid AuthenticatedUserId { get; set; }
}

With that change made our AddToCartCommand now looks like this:

public class AddToCartCommand : ICommand<CommandResponse>, IUserContextCommand
{
    public Guid AuthenticatedUserId { get; set; }

    public Guid ProductId { get; set; }

    public int Quantity { get; set; }
}

I’m using the Swashbuckle.AspNetCore package to provide a Swagger definition and user interface and fortunately it’s quite a configurable package that will allow us to customise how it interprets actions (operations in it’s parlance) and schema through a filter system. We’re going to create and register both an operation and schema filter that ensures any reference to AuthenticatedUserId either inbound or outbound is removed. The first code snippet below will remove the property from any schema (request or response bodies) and the second snippet will remove it from any operation parameters – if you use models with the [FromRoute] attribute as we have done then Web API will correctly only bind to any parameters specified in the route but Swashbuckle will still include all the properties in the model in it’s definition.

public class SwaggerAuthenticatedUserIdFilter : ISchemaFilter
{
    private const string AuthenticatedUserIdProperty = "authenticatedUserId";
    private static readonly Type UserContextCommandType = typeof(IUserContextCommand);

    public void Apply(Schema model, SchemaFilterContext context)
    {
        if (UserContextCommandType.IsAssignableFrom(context.SystemType))
        {
            if (model.Properties.ContainsKey(AuthenticatedUserIdProperty))
            {
                model.Properties.Remove(AuthenticatedUserIdProperty);
            }
        }
    }
}
public class SwaggerAuthenticatedUserIdOperationFilter : IOperationFilter
{
    private const string AuthenticatedUserIdProperty = "authenticateduserid";

    public void Apply(Operation operation, OperationFilterContext context)
    {
        IParameter authenticatedUserIdParameter = operation.Parameters?.SingleOrDefault(x => x.Name.ToLower() == AuthenticatedUserIdProperty);
        if (authenticatedUserIdParameter != null)
        {
            operation.Parameters.Remove(authenticatedUserIdParameter);
        }
    }
}

These are registered in our Startup.cs file alongside Swagger itself:

public void ConfigureServices(IServiceCollection services)
{
    services.AddMvc();
    services.AddSwaggerGen(c =>
    {
        c.SwaggerDoc("v1", new Info { Title = "Online Store API", Version = "v1" });
        c.SchemaFilter<SwaggerAuthenticatedUserIdFilter>();
        c.OperationFilter<SwaggerAuthenticatedUserIdOperationFilter>();
    });

    CommandingDependencyResolver = new MicrosoftDependencyInjectionCommandingResolver(services);
    ICommandRegistry registry = CommandingDependencyResolver.UseCommanding();

    services
        .UseShoppingCart(registry)
        .UseStore(registry)
        .UseCheckout(registry);
}

If we try this now we can see that our action now looks as we expect:

With our Swagger work we’ve at least obfuscated our AuthenticatedUserId property and now we want to make sure ASP.Net ignores it during binding operations. A common means of doing this is to use the [BindNever] attribute on models however we want our commands to remain free of the concerns of the host environment, we don’t want to have to remember to stamp [BindNever] on all of our models, and we definetly don’t want the assemblies that contain them to need to reference ASP.Net packages – after all one of the aims of taking this approach is to promote a very loosely coupled design.

This being the case we need to find another way and other than the binding attributes possibly the easiest way to prevent user IDs being set from a request body is to decorate the default body binder with some additional functionality that forces an empty GUID. Binders consist of two parts, the binder itself and a binder provider so to add our binder we need two new classes (and we also include a helper class with an extension method). Firstly our custom binder:

public class AuthenticatedUserIdAwareBodyModelBinder : IModelBinder
{
    private readonly IModelBinder _decoratedBinder;

    public AuthenticatedUserIdAwareBodyModelBinder(IModelBinder decoratedBinder)
    {
        _decoratedBinder = decoratedBinder;
    }

    public async Task BindModelAsync(ModelBindingContext bindingContext)
    {
        await _decoratedBinder.BindModelAsync(bindingContext);
        if (bindingContext.Result.Model is IUserContextCommand command)
        {
            command.AuthenticatedUserId = Guid.Empty;
        }
    }
}

You can see from the code above that we delegate all the actual binding down to the decorated binder and then simply check to see if we are dealing with a command that implements our IUserContextCommand interface and blanks out the GUID if neecssary.

We then need a corresponding provider to supply this model binder:

internal static class AuthenticatedUserIdAwareBodyModelBinderProviderInstaller
{
    public static void AddAuthenticatedUserIdAwareBodyModelBinderProvider(this MvcOptions options)
    {
        IModelBinderProvider bodyModelBinderProvider = options.ModelBinderProviders.Single(x => x is BodyModelBinderProvider);
        int index = options.ModelBinderProviders.IndexOf(bodyModelBinderProvider);
        options.ModelBinderProviders.Remove(bodyModelBinderProvider);
        options.ModelBinderProviders.Insert(index, new AuthenticatedUserIdAwareBodyModelBinderProvider(bodyModelBinderProvider));
    }
}

internal class AuthenticatedUserIdAwareBodyModelBinderProvider : IModelBinderProvider
{
    private readonly IModelBinderProvider _decoratedProvider;

    public AuthenticatedUserIdAwareBodyModelBinderProvider(IModelBinderProvider decoratedProvider)
    {
        _decoratedProvider = decoratedProvider;
    }

    public IModelBinder GetBinder(ModelBinderProviderContext context)
    {
        IModelBinder modelBinder = _decoratedProvider.GetBinder(context);
        return modelBinder == null ? null : new AuthenticatedUserIdAwareBodyModelBinder(_decoratedProvider.GetBinder(context));
    }
}

Our installation extension method looks for the default BodyModelBinderProvider class, extracts it, constructs our decorator around it, and replaces it in the set of binders.

Again, like with our Swagger filters, we configure this in the ConfigureServices method of our Startup class:

// This method gets called by the runtime. Use this method to add services to the container.
public void ConfigureServices(IServiceCollection services)
{
    services.AddMvc(c =>
    {
        c.AddAuthenticatedUserIdAwareBodyModelBinderProvider();
    });
    services.AddSwaggerGen(c =>
    {
        c.SwaggerDoc("v1", new Info { Title = "Online Store API", Version = "v1" });
        c.SchemaFilter<SwaggerAuthenticatedUserIdFilter>();
        c.OperationFilter<SwaggerAuthenticatedUserIdOperationFilter>();
    });

    CommandingDependencyResolver = new MicrosoftDependencyInjectionCommandingResolver(services);
    ICommandRegistry registry = CommandingDependencyResolver.UseCommanding();

    services
        .UseShoppingCart(registry)
        .UseStore(registry)
        .UseCheckout(registry);
}

At this point we’ve configured ASP.Net so that consumers of the API cannot manipulate sensitive properties on our commands and so for our next step we want to ensure that the AuthenticatedUserId property on our commands is popualted with the legitimate ID of the logged in user.

While we could set this in our model binder (where currently we ensure it is blank) I’d suggest that’s a mixing of concerns and in any case will only be triggered on an action with a request body, it won’t work for a command bound from a route or query parameters for example. All that being the case I’m going to implement this through a simple action filter as below:

public class AssignAuthenticatedUserIdActionFilter : IActionFilter
{
    public void OnActionExecuting(ActionExecutingContext context)
    {
        foreach (object parameter in context.ActionArguments.Values)
        {
            if (parameter is IUserContextCommand userContextCommand)
            {
                userContextCommand.AuthenticatedUserId = ((Controller) context.Controller).GetUserId();
            }
        }
    }

    public void OnActionExecuted(ActionExecutedContext context)
    {
            
    }
}

Action filters are run after model binding and authentication and authorization has occurred and so at this point we can be sure we can access the claims for a validated user.

Before we move on it’s worth reminding ourselves what our updated controller action now looks like:

[HttpPut("{productId}/{quantity}")]
public async Task<IActionResult> Put([FromRoute]AddToCartCommand command)
{
    CommandResponse response = await _dispatcher.DispatchAsync(command);
    if (response.IsSuccess)
    {
        return Ok();
    }
    return BadRequest(response.ErrorMessage);
}

To remove this final bit of boilerplate we’re going to introduce a base class that handles the dispatch and HTTP response interpretation:

public abstract class AbstractCommandController : Controller
{
    protected AbstractCommandController(ICommandDispatcher dispatcher)
    {
        Dispatcher = dispatcher;
    }

    protected ICommandDispatcher Dispatcher { get; }

    protected async Task<IActionResult> ExecuteCommand(ICommand<CommandResponse> command)
    {
        CommandResponse response = await Dispatcher.DispatchAsync(command);
        if (response.IsSuccess)
        {
            return Ok();
        }
        return BadRequest(response.ErrorMessage);
    }
}

With that in place we can finally get our controller to our target form:

[Route("api/[controller]")]
public class ShoppingCartController : AbstractCommandController
{
    public ShoppingCartController(ICommandDispatcher dispatcher) : base(dispatcher)
    {
            
    }

    [HttpPut("{productId}/{quantity}")]
    public async Task<IActionResult> Put([FromRoute] AddToCartCommand command) => await ExecuteCommand(command);

    // ... other verbs
}

To roll this out easily over the rest of our commands we’ll need to get them into a more consistent shape – at the moment they have a mix of response types which isn’t ideal for translating the results into HTTP responses. We’ll unify them so they all return a CommandResponse object that can optionally also contain a result object:

public class CommandResponse
{
    protected CommandResponse()
    {
            
    }

    public bool IsSuccess { get; set; }

    public string ErrorMessage { get; set; }

    public static CommandResponse Ok() {  return new CommandResponse { IsSuccess = true};}

    public static CommandResponse WithError(string error) {  return new CommandResponse { IsSuccess = false, ErrorMessage = error};}
}

public class CommandResponse<T> : CommandResponse
{
    public T Result { get; set; }

    public static CommandResponse<T> Ok(T result) { return new CommandResponse<T> { IsSuccess = true, Result = result}; }

    public new static CommandResponse<T> WithError(string error) { return new CommandResponse<T> { IsSuccess = false, ErrorMessage = error }; }

    public static implicit operator T(CommandResponse<T> from)
    {
        return from.Result;
    }
}

With all that done we can complete our AbstractCommandController class and convert all of our controllers to the simpler syntax. By making these changes we’ve removed all the repetitive boilerplate code from our controllers which means less tests to write and maintain, less scope for us to make mistakes and less scope for us to introduce inconsistencies. Instead we’ve leveraged the battle hardened model binding capabilities of ASP.Net and concentrated all of the our response handling in a single class that we can test extensively. And if we want to add new capabilities all we need to do is add commands, handlers and controllers that follow our convention and all the wiring is taken care of for us.

In the next part we’ll explore how we can add validation to our commands in a way that is loosely coupled and reusable in domains other than ASP.Net and then we’ll revisit our handlers to separate out our infrastructure code (logging for example) from our business logic.

Other Parts in the Series

Part 5
Part 4
Part 3
Part 1

C# Cloud Application Architecture – Commanding via a Mediator (Part 1)

When designing cloud based systems we often think about the benefits of loosely coupling systems, for example through queues and pub/sub mechanisms, but fall back on more traditional onion or layered patterns for the application architecture when alternative approaches might provide additional benefits.

My aim over a series of posts is to show how combining the Command pattern with the Mediator pattern can yield a number of benefits including:

  • A better separation of concerns with a clear demarkation of domains
  • An internally decomposed application that is simple to work with early in it’s lifecycle yet can easily evolve into a microservice approach
  • Is able to reliably support none-transactional or distributed data storage operations
  • Less repetitive infrastructure boilerplate to write such as logging and telemetry

To illustrate this we’re going to refactor an example application, over a number of stages, from a layered onion ring style to a decoupled in-process application and finally on through to a distributed application. An up front warning, to get the most out of these posts a fair amount of code reading is encouraged. It doesn’t make sense for me to walk through each change and doing so would make the posts ridiculously long but hopefully the sample code provided is clear and concise. It really is designed to go along with the posts.

The application is a RESTful HTTP API supporting some basic, simplified, functionality for an online store. The core API operations are:

  • Shopping cart management: get the cart, add products to the cart, clear the cart
  • Checkout: convert a cart into an order, mark the order as paid
  • Product: get a product

To support the above there is also a sense of store product catalog, it’s not exposed through the API, but it is used internally.

I’m going to be making use of my own command mediation framework AzureFromTheTrenches.Commanding as it has some features that will be helpful to us as we progress towards a distributed application but alternatives are available such as the popular Mediatr and if this approach appeals to you I’d encourage you to look at those too.

Our Starting Point

The code for the onion ring application, our starting point, can be found on GitHub:

https://github.com/JamesRandall/CommandMessagePatternTutorial/tree/master/Part1a

Firstly lets define what I mean by onion ring or layered architecture. In the context of our example application it’s a series of layers built one on top of the other with calls up and down the chain never skipping a layer: the Web API talks to the application services, the application services to the data access layer, and the data access layer to the storage. Each layer drives the one below. To support this each layer is broken out into it’s own assembly and a mixture of encapsulation (at the assembly and class level) and careful reference management ensures this remains the case.

In the case of our application this looks like this:

Concrete class coupling is avoided through the use of interfaces and these are constructor injected to promote a testable approach. Normally in such an architecture each layer has its own set of models (data access models, application models etc.) with mapping taking place between them however for the sake of brevity, and as I’m just using mock data stores, I’ve ignored this and used a single set of models that can be found in the OnlineStore.Model assembly.

As this is such a common pattern, it’s certainly the pattern I’ve come across most often over the last few years (where application architecture has been considered at all – sadly the spaghetti / make it up as you go along approach is still prevalent), it’s worth looking at what’s good about it:

  1. Perhaps most importantly – it’s simple. You can draw out the architecture on a whiteboard with a set of circles or boxes in 30 seconds and it’s quite easy to explain what is going on and why
  2. It’s testable, obviously things get more complicated in the real world but above the data access layer testing is really easy: everything is mockable and the major concrete external dependencies have been isolated in our data access layer.
  3. A good example of the pattern is open for extension but closed for modification: because their are clear contractual interfaces decorators can be added to, for example, add telemetry without modifying business logic.
  4. It’s very well supported in tooling – if you’re using Visual Studio it’s built in refactoring tools or Resharper will have no problem crunching over this solution to support changes and help keep things consistent.
  5. It can be used in a variety of different operating environments, I’ve used a Web API for this example but you can find onion / layer type architectures in all manner of solutions.
  6. It’s what’s typically been done before – most engineers are familiar with the pattern and its become almost a default choice.

I’ve built many successful systems myself using this pattern and, to a point, its served me well. However I started looking for better approaches as I experienced some of the weaknesses:

  1. It’s not as loosely coupled and malleable as it seems. This might seem an odd statement to make given our example makes strong use of interfaces and composition via dependency injection, an approach often seen to promote loose coupling and flexibility. And it does to a point. However we still tend to think of operations in such an architecture in quite a tightly coupled way: this controller calls this method on this interface which is implemented by this service class and on down through the layers. It’s a very explicit invocation process.
  2. Interfaces and classes in the service layer often become “fat” – they tend to end up coupled around a specific part of the application domain (in our case, for example, the shopping basket) and used to group together functionality.
  3. As an onion ring application gets larger it’s quite common for the Application Layer to begin to resemble spaghetti – repositories are made reference to from across the code base, services refer to services, and helpers to other helpers. You can mitigate this by decomposing the application layer into further assemblies, and making use of various design patterns, but it only takes you so far. These are all sticking plaster over a fundamental problem with the onion ring approach: it’s designed to segregate at the layer level not at the domain or bounding context level (we’ll talk about DDD later). It’s also common to see concerns start to bleed across the layer with what once were discrete boundaries.
  4. In the event of fundamental change the architecture can be quite fragile and resistant to easy change. Let’s consider a situation where our online store has become wildly successful and to keep it serving the growing userbase we need to break it apart to handle the growing scale. This will probably involve breaking our API into multiple components and using patterns such as queues to asynchronously run and throttle some actions. With the onion ring architecture we’re going to have to analyse what is probably a large codebase looking for how we can safely break it apart. Almost inevitably this will be more difficult than it first seems and it will probably seem quite difficult to begin with (I may have been here myself!) and we’ll uncover all manner of implicit tight coupling points.

There are of course solutions to many of these problems, particularly the code organisation issues, but at some point it’s worth considering if the architecture is still helping you or beginning to hinder you and if perhaps there are alternative approaches.

With that in mind, and as I said earlier, I’d like to introduce an alternative. It’s by no means the alternative but its one I’ve found tremendously helpful when building applications for the cloud.

The Command Pattern with a Mediator

The classic command pattern aims to encapsulate all the information needed to perform an action typically within a class that contains properties (the data needed to perform the action) and an execute method (that undertakes the action). For example:

public class GetProductCommand : ICommand<Product>
{
    public Guid ProductId { get; set; }

    public Task<Product> Execute()
    {
         /// ... logic
    }
}

This can be a useful way of structuring an application but tightly couples state and execution and that can prove limiting if, for example, it would be helpful for the command to participate in a pub/sub approach, take part in a command chain (step 1 – store state in undo, step 2 – execute command, step 3 – log command was executed), or operate across a process boundary.

A powerful improvement can be made to the approach by decoupling the execution from the command state via the mediator pattern. In this pattern all commands, each of which consist of simple serializable state, are dispatched to the mediator and the mediator determines which handlers will execute the command:

Because the command is decoupled from execution it is possible to associate multiple handlers with a command and moving a handler to a different process space (for example splitting a Web API into multiple Web APIs) is simply a matter of changing the configuration of the mediator. And because the command is simple state we can easily serialize it into, for example, an event store (the example below illustrates a mediator that is able to serialize commands to stores directly, but this can also be accomplished through additional handlers:

It’s perhaps worth also briefly touching on the CQRS pattern – while the Command Message pattern may facilitate a CQRS approach it neither requires it or has any particular opinion on it.

With that out the way lets take a look at how this pattern impacts our applications architecture. Firstly the code for our refactored solution can be found here:

https://github.com/JamesRandall/CommandMessagePatternTutorial/tree/master/Part1b

And from our layered approach we now end up with something that looks like this:

It’s important to realise when looking at this code that we’re going to do more work to take advantage of the capabilities being introduced here. This is really just a “least work” refactor to demonstrate some high level differences – hopefully over the next few posts you’ll see how we can really use these capabilities to simplify our solution. However even at this early stage there are some clear points to note about how this effects the solution structure and code:

  1. Rather than structure our application architecture around technology we’ve restructured it around domains. Where previously we had a data access layer, an application layer and an API layer we now have a shopping cart application, a checkout application, a product application and a Web API application. Rather than the focus being about technology boundaries its more about business domain boundaries.
  2. Across boundaries (previously layers, now applications) we’ve shifted our invocation semantics from interfaces, methods and parameters to simple state that is serializable and persistable and communicated through a “black box” mediator or dispatcher. The instigator of an operation no longer has any knowledge about what will handle the operation and as we’ll see later that can even include the handler executing in a different process space such as another web application.
  3. I’ve deliberately used the term application for these business domain implementations as even though they are all operating in the same process space it really is best to think of them as self contained units. Other than a simple wiring class to allow them to be configured in the host application (via a dependency injector) they interoperate with their host (the Web API) and between themselves entirely through the dispatch of commands.
  4. The intent is that each application is fairly small in and of itself and that it can take the best approach required to solve it’s particular problem. In reality it’s quite typical that many of the applications follow the same conventions and patterns, as they do here, and when this is the case its best to establish some code organisation concentions. In fact it’s not uncommon to see a lightweight onion ring architecture used inside each of these applications (so for lovers of the onion ring – you don’t need to abandon it completely!).

Let’s start by comparing the controllers. In our traditional layered architecture our product controller looked like this:

[Route("api/[controller]")]
public class ProductController : Controller
{
    private readonly IProductService _productService;

    public ProductController(IProductService productService)
    {
        _productService = productService;
    }

    [HttpGet("{id}")]
    public async Task<StoreProduct> Get(Guid id)
    {
        return await _productService.GetAsync(id);
    }
}

As expected this accepts an instance of a service, in this case of an IProductService, and it’s get method simply passes the ID on down to it. ALthough the controller is abstracted away from the implementation of the IProductService it is clearly and directly linked to one type of service and a method on that service.

Now lets look at its replacement:

[Route("api/[controller]")]
public class ProductController : Controller
{
    private readonly ICommandDispatcher _dispatcher;

    public ProductController(ICommandDispatcher dispatcher)
    {
        _dispatcher = dispatcher;
    }

    [HttpGet("{id}")]
    public async Task Get(Guid id)
    {
        return await _dispatcher.DispatchAsync(new GetStoreProductQuery
        {
            ProductId = id
        });
    }
}

In this implementation the controller accepts an instance of ICommandDispatcher and then rather than invoke a method on a service it calls DispatchAsync on that dispatcher supplying it a command model. The controller no longer has any knowledge of what is going to handle this request and all our commands are executed by discrete handlers. In this case the GetStoreProductQuery command is handled the the GetStoreProductQueryHandler in the Store.Application assembly:

internal class GetStoreProductQueryHandler : ICommandHandler<GetStoreProductQuery, StoreProduct>
{
    private readonly IStoreProductRepository _repository;

    public GetStoreProductQueryHandler(IStoreProductRepository repository)
    {
        _repository = repository;
    }

    public Task<StoreProduct> ExecuteAsync(GetStoreProductQuery command, StoreProduct previousResult)
    {
        return _repository.GetAsync(command.ProductId);
    }
}

It really does no more than the implementation of the ProductService in our initial application but importantly derives from the ICommandHandler generic interface supplying as generic types the type of the command it is handling and the result type. Our command mediation framework takes care of routing the command to this handler and will ultimately call ExecuteAsync on it. The framework we are using here allows commands to be chained and so as well as being given the command state it is also given any previous result.

Handlers are registered against actors as follows (this can be seen in the IServiceCollectionExtenions.cs file of Store.Application):

commandRegistry.Register<GetStoreProductQueryHandler>();

The command mediation framework has all it needs from the definition of GetStoreProductQueryHandler to map the handler to the command.

I think it’s fair to say that’s all pretty loosely coupled! In fact its so loose that if we weren’t going to go on to make more of this pattern we might conclude that the loss of immediate traceability is not worth it.

In the next part we’re going to visit some of our more complicated controllers and commands, such as the Put verb on the ShoppingCartController, to look at how we can massively simplify the code below:

[HttpPut("{productId}/{quantity}")]
public async Task<IActionResult> Put(Guid productId, int quantity)
{
    CommandResponse response = await _dispatcher.DispatchAsync(new AddToCartCommand
    {
        UserId = this.GetUserId(),
        ProductId = productId,
        Quantity = quantity
    });
    if (response.IsSuccess)
    {
        return Ok();
    }
    return BadRequest(response.ErrorMessage);
}

By way of a teaser the aim is to end up with really thin controller action that, across the piece, look like this:

[HttpPut("{productId}/{quantity}")]
public async Task<IActionResult> Put([FromRoute] AddToCartCommand command) => await ExecuteCommand(command);

We’ll then roll that approach out over the rest of the API. Then get into some really cool stuff!

Other Parts in the Series

Part 5
Part 4
Part 3
Part 2

Contact

  • If you're looking for help with C#, .NET, Azure, Architecture, or would simply value an independent opinion then please get in touch here or over on Twitter.

Recent Posts

Recent Tweets

Invalid or expired token.

Recent Comments

Archives

Categories

Meta

GiottoPress by Enrique Chavez