Category: Cross Platform

Windows 8, Portable Class Libraries and ISupportIncrementalLoading

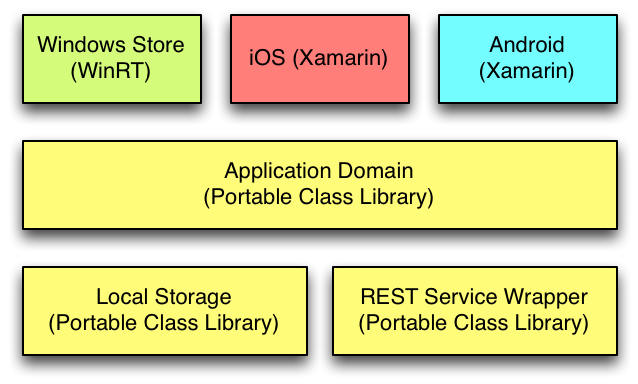
In my previous two posts (Win RT, Commanding and Cross Platform Apps Part 1 and Platform Specific Code and Portable Class Libraries) I extolled the virtues of adopting a view model approach and keeping a clean separation between your platform specific code and your view models.

For the most part it works pretty simply with a rich enough section of .Net available across most portable class library profiles however every now and then you’ll come across something that looks to be glued deeply into the platform and that isn’t immediately obvious how to best decouple.

Adopting ISupportIncrementalLoading recently caught me out like this. In Windows 8 controls such as GridView and ListView look for this interface to be defined on the collection model they are bound to. If it’s found then after the initial set of items in the collection are bound and displayed they will repeatedly call the interface (usually as you scroll towards the end) to fetch additional items asynchronously.

It’s simple to implement other than one drawback: it’s a very Windows 8 specific feature and isn’t available from a portable class library.

So how to tackle this?

I normally adopt one of two approaches: proxy classes accessed via value converters or dependency injected factories.

All of the below examples come from a side project I’ve been working on and that I’ll be releasing as open source shortly – so if you want to see this all in a real world context you will be able to soon.

The Proxy Class Approach

In this approach, and continuing to use ISupportIncrementalLoading as an example, we would implement a class within our platform specific Windows 8 UI layer that supports the necessary interfaces for ISupportIncrementalLoading (IList, INotifyCollectionChanged and ISupportIncrementalLoading itself) and routes most of the calls down to your view model in a cross-platform friendly manner.

During binding you then use a ValueConverter to wrap the underlying view model in your proxy class as in the below sample:

public class StoryCollectionValueConverter : IValueConverter
{
    public object Convert(object value, Type targetType, object parameter, string language)
    {
        StoryCollection storyCollection = value as StoryCollection;
        if (storyCollection != null)
        {
            return new IncrementalLoadingObservableCollectionProxy<StoryViewModel>(storyCollection);
        }
        throw new InvalidCastException("Value is not of type StoryCollection");
    }
 
    public object ConvertBack(object value, Type targetType, object parameter, string language)
    {
        throw new NotImplementedException();
    }
}

Using this example my view model simply declares a property of type StoryCollection and this gets replaced during binding by the proxy class IncrementalLoadingObservableCollectionProxy that implements the ISupportIncrementalLoading interface – I won’t show this latter class as it becomes quite big.

The advantage of this approach is that it keeps your view model code uncluttered. It needs to undertake no special behaviour to account for the host platform. The downside, in the case of ISupportIncrementalLoading, is that because the proxy is of a collection and an implementation of the other two interfaces it gets quite large and unwieldy.

The Factory Approach

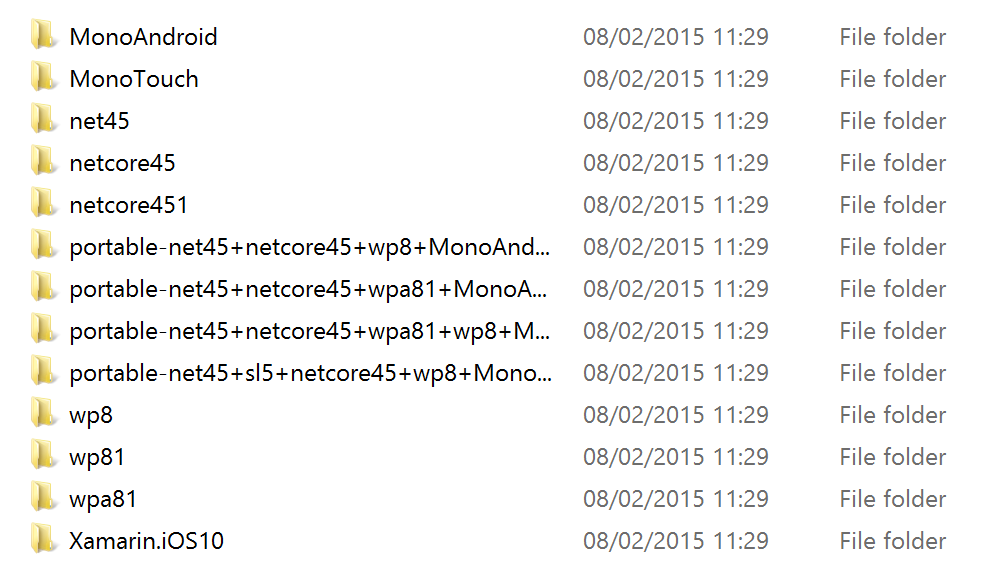
If you remember from the post on Bait and Switch PCLs a portable class library always runs within a non-portable framework and so although you can’t access the functionality of that framework directly from the code in the library you can use techniques such as dependency injection to access it.

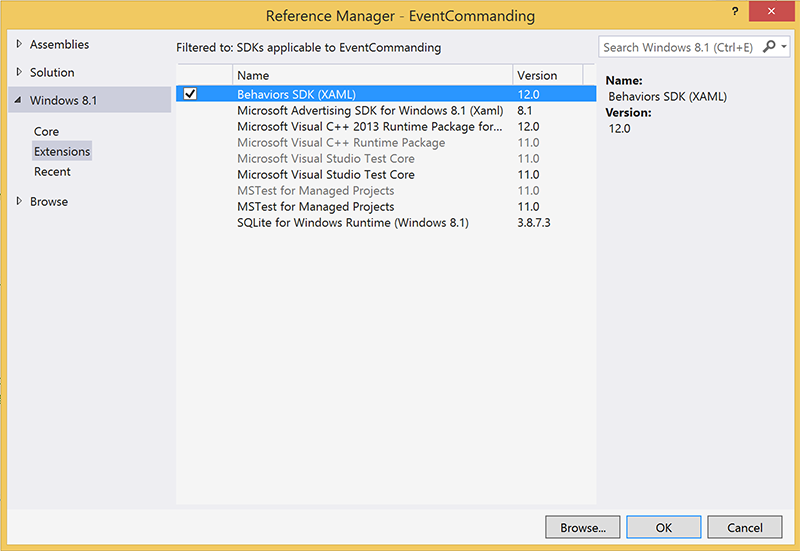
The factory approach to this problem takes advantage of this by declaring an IIncrementalLoadingCollectionFactory interface in a portable class library but providing the implementation for it in a Windows 8.1 assembly. My factory implementation looks like this:

internal class IncrementalLoadingCollectionFactory : IIncrementalLoadingCollectionFactory
{
    private readonly IUserInterfaceDispatcher _dispatcher;
 
    public IncrementalLoadingCollectionFactory(IUserInterfaceDispatcher dispatcher)
    {
        _dispatcher = dispatcher;
    }
 
    public ObservableCollection<T> GetCollection<T>(Func<ObservableCollection<T>, uint, Task<IncrementalLoadingResult<T>>> fetchMoreFunc)
    {
        return new IncrementalLoadingCollection<T>(_dispatcher, fetchMoreFunc);
    }
}

You can see that it returns a collection called IncrementalLoadingCollection that is constructed with a function that is responsible for adding items to the collection.

My IncrementalLoadingCollection looks like this:

public class IncrementalLoadingCollection<T> : ObservableCollection<T>, ISupportIncrementalLoading
{
    private readonly IUserInterfaceDispatcher _dispatcher;
    private readonly Func<ObservableCollection<T>, uint, Task<IncrementalLoadingResult<T>>> _fetchMoreFunc;
 
    public IncrementalLoadingCollection(IUserInterfaceDispatcher dispatcher, Func<ObservableCollection<T>, uint, Task<IncrementalLoadingResult<T>>> fetchMoreFunc)
    {
        _dispatcher = dispatcher;
        _fetchMoreFunc = fetchMoreFunc;
        HasMoreItems = true;
    }
 
    public IAsyncOperation<LoadMoreItemsResult> LoadMoreItemsAsync(uint count)
    {
        return Task.Run(async () =>
        {
            IncrementalLoadingResult<T> result = await _fetchMoreFunc(this, count);
            HasMoreItems = result.HasMoreItems;
 
            await _dispatcher.DispatchAsync(() =>
            {
                foreach (T item in result.ItemsLoaded)
                {
                    Add(item);
                }
 
                return Task.FromResult(0);
            });
 
            return new LoadMoreItemsResult {Count = (uint)result.ItemsLoaded.Count()};
        }).AsAsyncOperation();
    }
 
    public bool HasMoreItems { get; private set; }
}

It’s a fairly minimal class that simply calls the supplied function and adds the items to the observable collection and I use all the above from my portable class library view model layer as follows:

model.FilteredStories = _incrementalLoadingCollectionFactory.GetCollection<StoryViewModel>(async (collection, count) =>
{
    IncrementalLoadingResult<StoryViewModel> result = new IncrementalLoadingResult<StoryViewModel>();
    IncrementalStories increment = await _readerCoordinator.FetchMoreStoriesAsync(model, count);
    result.ItemsLoaded = new List<StoryViewModel>();
    result.HasMoreItems = increment.HasMoreStories;
 
    if (increment.Stories.Any())
    {
        await _userInterfaceDispatcher.DispatchAsync(() =>
        {
            model.AllStories.AddRange(increment.Stories);
            List<StoryViewModel> filteredNewStories = 
                _filterBuilder
                    .Filter(_readerCoordinator.ReaderViewModel, increment.Stories)
                    .OrderByDescending(x => x.PostedAt)
                    .ToList();
            result.ItemsLoaded = filteredNewStories;
 
            return Task.FromResult(0);
        }, true);
    }
    return result;
});

In the specific example of ISupportsIncrementalLoading I prefer the factory approach as the proxy boilerplate is lengthy and you then still need to deal with linking your view model to your proxy in order to actually get the incremental results.

Platform Specific Code and Portable Class Libraries

In my last post I looked at using view models, commands and behaviors in the user interface layer of applicatons to get a clean separation of concerns and make it easier to achieve a high level of code reuse and easy management when writing an application that targets multiple platforms by getting most of our code into portable class libraries leaving just a thin platform specific layer at the top aiming for an application architecture that looks roughly like this:

WinRT and Commanding (Architecture)

However at some point in such a project you are almost certainly going to find yourself needing to use platform specific features beyond just the user interface: perhaps the storage system, the networking system or a database. Below are my two most commonly used techniques for accessing platform specific features while maintaining a high level of code reuse and keeping a good separation of concerns. In a nutshell:

It’s important to realise that there is no such thing as a portable .net application. Portable class libraries always run within a non-portable .net target – be that Windows Store, iOS, Android or plain old Windows .Net. The two techniques presented below take advantage of this.

To go along with this blog post there is a Visual Studio solution in GitHub here containing worked examples that I’ll refer to below. The examples are stripped down to clearly illustrate specific points and so aren’t necessarily representative of production code. You can find them on GitHub here.

Dependency Injection

Perhaps the easiest way to access platform specific code from a portable class library is via dependency injection. To utilise this technique all you do is declare interfaces within your portable class libraries and provide implementations within your non-portable application targets.

To illustrate how this works I’m going to create a simple application that writes a hello world text file to the local folder of an app. The final output of the below worked example can be found in the DependencyInjection project in GitHub here.

Firstly create a new solution and into it add two projects – a Windows Store app and a Portable Class library. In my example solution they are called DependencyInjection.WindowsStore and DependencyInjection.Domain. Set the Windows Store project to reference the domain project.

In the domain project I declare an interface IFileWriter:

1
2
3
4
public interface IFileWriter
{
    Task Write(string filename, byte[] bytes);
}

And a simple domain class that outputs my message using the supplied file writer:

1
2
3
4
5
6
7
8
9
10
11
12
13
14
public class BasicDomainImplementation
{
    private readonly IFileWriter _fileWriter;
 
    public BasicDomainImplementation(IFileWriter fileWriter)
    {
        _fileWriter = fileWriter;
    }
 
    public async Task WriteBytes()
    {
        await _fileWriter.Write("somebytes.txt", Encoding.UTF8.GetBytes("Hello World"));
    }
}

In the Windows Store target add an implementation of the IFileWriter class that, you’ll note, uses decidedly non-portable API calls:

1
2
3
4
5
6
7
8
internal class FileWriterImpl : IFileWriter
{
    public async Task Write(string filename, byte[] bytes)
    {
        StorageFile file = await ApplicationData.Current.LocalFolder.CreateFileAsync(filename);
        await FileIO.WriteBytesAsync(file, bytes);
    }
}

Then add a button to the MainPage.xaml file:

1
<Button HorizontalAlignment="Center" Content="Write Some Bytes" Click="WriteSomeBytes"></Button>

And add the event handler in the code behind:

1
2
3
4
5
6
private async void WriteSomeBytes(object sender, RoutedEventArgs e)
{
    IFileWriter fileWriter = new FileWriterImpl();
    BasicDomainImplementation domainImplementation = new BasicDomainImplementation(fileWriter);
    await domainImplementation.WriteBytes();
}

If you run the project and click the button the file will be created and the bytes written. If you click the button a second time you’ll get a “file exists” exception.

So what have I done here? It’s pretty simple really: I’ve defined an interface in a portable class library for which I have supplied the implementation from a platform targetted library letting me keep the PCL blissfully unaware of the mechanics of writing bytes to a file in a Windows Store app.

It’s a very simple example but you can see how this approach can be extended to abstract away all sorts of platform specific complexity from your domain assemblies. Over time you’re likely to build up a useful set of abstractions for platform features that you’re using in your apps which leads us nicely to the next approach.

Bait and Switch PCLs

There is a “trick” you can do with portable class libraries called bait and switch that relies on the fact that NuGet will always prefer a platform specific assembly to a portable class library. You can use this to build NuGet packages that allow platform specific code to, seemingly, be mixed with portable code.

Additionally some dependencies are supplied only in platform specific binary forms – the most common example in the App world probably being SQLite, used widely across iOS and Android for structured local device storage and while perhaps newer to Windows developers it’s just as useful for the same reasons in Store apps.

However it’s supplied as a platform specific binary which begs the question – how do you use this in a portable class library?

To illustrate how this works I’m going to use Frank Krueger’s excellent SQLite client for .Net with a Windows Store app. The final output of the below worked example can be found in the BaitAndSwitch project in Github here.

Firstly create a new solution and into it add two projects – a Windows Store app and a Portable Class library. Using NuGet add Unity In my example solution they are called BaitAndSwitch.WindowsStore and BaitAndSwitch.Domain.

Add the sqlite-net-pcl package to the portable class library either using the NuGet package manager GUI or the console:

Install-Package sqlite-net-pcl

If you look at the references added to the project you’ll see that the project now contains references to SQLite-net (Frank Kreuger’s SQLite client) and something called SQLitePCL.raw. This latter assembly is the “bait and switch” assembly developed by Eric Sink and for which the source is in GitHub here. I’ll come back to it shortly.

I don’t want to get bogged down in SQLite while illustrating the bait and switch technique so all I’ll do is create a basic storage model and create a database file using it for the schema.

In my sample project I created a poco as follows:

1
2
3
4
5
6
7
8
9
public class Person
{
    [PrimaryKey]
    public int Id { get; set; }
 
    public string Name { get; set; }
 
    public int Age { get; set; }
}

And a class with a single method for creating our database:

1
2
3
4
5
6
7
8
9
10
11
public class Storage
{
    public void Initialize(string path)
    {
        string databaseFilename = Path.Combine(path, "mydatabase.sql");
        using (SQLiteConnection connection = new SQLiteConnection(databaseFilename))
        {
            connection.CreateTable<Person>();
        }
    }
}

In MainPage.xaml of the Windows Store app next add a button to the main grid:

1
<Button Content="Initialize Storage" HorizontalAlignment="Center" Click="InitializeStorage"></Button>

And in the code behind event handler (of course having read my last post you’d never do this right!):

1
2
3
4
5
private void InitializeStorage(object sender, RoutedEventArgs e)
{
    Storage storage = new Storage();
    storage.Initialize(ApplicationData.Current.LocalFolder.Path);
}

If you run the app at this point and click the button you’ll get an exception with an interesting message:

Something went wrong in the build configuration. This is the bait assembly, which is for referencing by portable libraries, and should never end up part of the app. Reference the appropriate platform assembly instead.

So what’s going on here and how do we fix it? This exception is raised by the SQLitePCL.raw assembly and to understand what’s going on we need to lift the lid on the NuGet package a little. This is the contents of the packages lib folder:

sqlitepclrawlib

You can see there are provided assemblies for a whole host of targets including portable class libraries and “real” executable targets. If you were to decompile one of portable assemblies using a tool such as dotPeek and look at the SQLite3Provider class you’d see methods like:

1
2
3
4
int ISQLite3Provider.sqlite3_open(string filename, out IntPtr db)
{
    throw new Exception("Something went wrong in the build configuration.  This is the bait assembly, which is for referencing by portable libraries, and should never end up part of the app.  Reference the appropriate platform assembly instead.");
}

The portable versions of the assemblies are never meant to actually be run. Whereas if you look at the same method in the net45 targetted assembly you’ll see the below:

1
2
3
4
int ISQLite3Provider.sqlite3_open(string filename, out IntPtr db)
{
	return SQLite3Provider.NativeMethods.sqlite3_open(util.to_utf8(filename), out db);
}

So how do we get our application to use the correct version of the assembly for our target? Well we could fiddle around with file copying and complicated build set ups but remember what I said about NuGet earlier: it will always prefer a platform specific assembly to a portable class library. To take advantage of this all we need to do is also add the SQLitePCL.raw NuGet package to our Windows Store project:

Install-Package SQLitePCL.raw_basic

Now before building and running the application pick a target – you can’t run sqlite3 under Any CPU. Change to x86 or x64 and hit run (if you don’t do this then you’ll get further than before – the correct SQLitePCL.raw assembly will be used but it won’t be able to find the sqlite3.dll C library). If you tap the Initialize button now the database will be created – the version of the assembly making it’s way into our final target is the one most appropriate for it, which is no longer the “bait” PCL version but the Windows Store version.

It’s worth noting that you can use this approach to share code yourself and this is my favoured approach for sharing my own library code across my projects. Once you understand how to use them and roughly how they work it’s fairly simple to do and I’ll cover building a Bait and Switch PCL NuGet package in an upcoming post.

WinRT, Commanding and Cross Platform Apps – Part 1

Disclaimer: this isn’t really a blog post about Azure but it is quite topical with Windows 10 around the corner and with so many mobile apps making use of Azure in some fashion. I’ve also got a pretty substantial new application almost ready for release into the wild and so in some ways this blog post is a prelude to that – the source code for that app will be available under the MIT License.

With that out the way – I’ve been doing a lot of work with Windows Store apps recently using the WinRT runtime, both converting existing iOS apps to Windows and writing new cross platform apps from the ground up. That’s involved a fair bit of Xaml and although it’s not my first brush with Microsoft’s Xaml family of user interface technologies, indeed one of my favourite roles was working, a few years ago now, as the architect on the Capita SIMS Discover product with a fantastic team. However the last few months is the first time I’ve really had to immerse myself in the Xaml itself – on Discover my hands on work was mostly in the built from scratch data analysis engine and service hosting (and I spent an awful lot of time pretending to be wise!).

Something that always seems to be glossed over by Microsoft in their documentation and developer guides is how to achieve a clean separation between your view models and your Xaml. Although Microsoft often talk about MVC and MVVM most of the patterns in their own examples and tutorials rely on lots of code behind wired up with event handlers. And it’s not clear initially, at least it never was to me, what technology I should use to move away from this mess though fortunately I had one of the UKs best WPF developers – Adam Smith – on hand to point me in the right direction. That being the case when I started working with WinRT I had a reasonable idea of where to head.

A clean separation between the user interface and a domain layer promotes a more testable code base and also allows for a separation of developer and design disciplines (if needed) but if you’re a cross platform app developer using Xamarin to target iOS and Android in addition to Windows then, perhaps even more importantly, getting this separation right is absolutely essential if you want to achieve a high level of code reuse. Which presumably is why you’re using Xamarin in the first place – you’ve been sold on the dream!

In the Xaml WinRT space the key to achieving this are commands and behaviors – and these concepts translate nicely onto the other platforms. I’m going to look at command basics in this post and then follow up with some more advanced concepts and finally I’ll discuss some strategies for dealing with platform specific code.

For the remainder of this post I’m going to assume you have a working knowledge of Xaml, C# and the binding system. The Windows Store Developer site is a good place to start if you’re not. To go along with this post I’ve added a solution to GitHub that contains working examples of everything I’ll discuss. You can find it here.

If you’re reading this then like myself at the same stage in this journey you’ve noticed the word “command” used around the Windows Store developer website, at the time of writing the MSDN developer guide to commanding has this to say on the subject:

A small number of UI elements provide built-in support for commanding. Commanding uses input-related routed events in its underlying implementation. It enables processing of related UI input, such as a certain pointer action or a specific accelerator key, by invoking a single command handler.

If commanding is available for a UI element, consider using its commanding APIs instead of any discrete input events. For more info, see ButtonBase.Command.

You can also implement ICommand to encapsulate command functionality that you invoke from ordinary event handlers. This enables you to use commanding even when there is no Command property available.

Well it’s a start I guess but then the rest of the document proceeds to gloss over this sage wisdom, pushing it to one side like a mouldy sock. I guess it doesn’t look quite so good in a drag and drop coding demo. That’s the final bit of snark – I promise. And it is, to be fair, snark born of well intentioned frustration – Microsoft have a pretty decent UI framework in Xaml but it’s best practice usage is buried away while poor practice usage is pushed massively to the fore and this is a great frustration for me.

Anyway, back on track, what does this boil down to in code? How do we attach a command to a button and have it do something. There is an example of this in the GitHub repository in the BasicCommanding project. This puts a text box and a button on the screen and when you press the button the message changes without an OnClick event handler in sight. First off I start with a view model that looks like this:

1
2
3
4
5
6
7
8
9
10
11
public class BasicViewModel : BindableBase
{
    public ICommand UpdateMessageCommand { get; set; }
 
    private string _message;
    public string Message
    {
        get {  return _message;}
        set { SetProperty(ref _message, value); }
    }
}

You can see that we have a property for our update command of type ICommand (the key interface for commands) and a simple message. This derives from a class called BindableBase that deals with the binding notifications for us.

Then our command looks like this:

1
2
3
4
5
6
7
8
9
10
11
12
13
14
15
16
17
18
19
20
21
public class UpdateMessageCommand : ICommand
{
    private readonly BasicViewModel _model;
 
    public UpdateMessageCommand(BasicViewModel model)
    {
        _model = model;
    }
 
    public bool CanExecute(object parameter)
    {
        return true;
    }
 
    public void Execute(object parameter)
    {
        _model.Message = "Goodbye!";
    }
 
    public event EventHandler CanExecuteChanged;
}

This implements the ICommand methods and properties (CanExecute, Execute and CanExecuteChanged) but importantly the constructor takes a reference to an instance of our model and the Execute method updates the message.

Finally we have a few lines of Xaml for bringing this together:

<TextBlock VerticalAlignment="Center" Grid.Column="0" Grid.Row="1" Text="Message"></TextBlock>
<TextBox Grid.Column="1" Grid.Row="1" Text="{Binding Message}" IsReadOnly="True"></TextBox>
<Button Grid.Column="2" Grid.Row="1" Content="Update message" Command="{Binding UpdateMessageCommand}"></Button>

You can see that the text of the textbox is bound to our view models message property and the Command property on the button to our command. If you run the sample and click the button you’ll find that, yes, our command is invoked and the message updated and other than associating the view model with the pages data context we have no “code behind” at all.

Furthermore by combining the command with the binding system we don’t get involved in manipulating the user interface directly in our applications domain layer – there is no MyTextBox.Text = “New Value” type code going on and as each such piece of code is a nail in the coffin of cross platform portability that’s rather neat.

That’s the second time I’ve mentioned a domain layer. In the context of a cross platform application by this I mean a layer that implements all your applications state and business logic via view models, commands, and (where appropriate) interactions with service and storage layers. For a typical cross platform app, and in fact the app I’m working on now looks just like this, you end up with something like this:

WinRT and Commanding (Architecture)

Essentially you’re aiming for the thinnest possible layer of platform specific code targetting each platform, below that a domain layer as a portable class library, and it co-ordinating activity between other components of your system such as data access or remote service calls – again with the latter being portable class libraries. Dependencies sometimes means it’s not possible or practical to use portable class libraries end to end without significant work, for example perhaps a significant NuGet package you rely on is only available in native WinRT, iOS and Android form, but in that case you still want to maintain the same kind of structure with different targets but the code staying the same. I’ll cover some of these strategies some other time – the important thing to realise is that commands, view models, and behaviors are key enables of this strategy as they are what allow you to pull your platform specific UI layer away from the rest of your code.

All sounds great so far but the problem you’ll quickly run into is that not all of the controls available to you have a command property and on those that do, such as the Button, how do you handle other events. You can do this by adding the Behaviors SDK in your project. One way to do this is to use the Blend visual design tool but I want to focus on code in this post so staying in Visual Studio add a reference to your project and in the Reference Manager select Windows 8.1 Extensions and then tick Behaviors SDK (XAML) as in the screenshot below:

ReferenceManager

Amongst other thngs this adds a set of what are known as Behaviors to your project and perhaps the most immediately useful of these is the EventTriggerBehavior. You can attach one or more of these to any control and they will allow you to capture events and handle them through bound commands as in our previous example.

To demonstrate this I have a second example (EventCommanding in the GitHub repository) that changes the text of a TextBlock as you move the pointer over it and out. Without commanding you’d add code to the PointerEntered and PointerExited events. With commands…. well let’s take a look. Here’s the view model for this example, as you can see it’s very similar to the previous view model except there are two commands this time.

1
2
3
4
5
6
7
8
9
10
11
12
public class BasicViewModel : BindableBase
{
    public ICommand StartCommand { get; set; }
    public ICommand EndCommand { get; set; }
 
    private string _message;
    public string Message
    {
        get { return _message; }
        set { SetProperty(ref _message, value); }
    }
}

Our commands look just like our previous command, below is the StartCommand:

1
2
3
4
5
6
7
8
9
10
11
12
13
14
15
16
17
18
19
20
21
public class StartCommand : ICommand
{
    private readonly BasicViewModel _model;
 
    public StartCommand(BasicViewModel model)
    {
        _model = model;
    }
 
    public bool CanExecute(object parameter)
    {
        return true;
    }
 
    public void Execute(object parameter)
    {
        _model.Message = "Move pointer out";
    }
 
    public event EventHandler CanExecuteChanged;
}

Finally the Xaml below shows how you use the EventTriggerBehavior from the Behaviors SDK to use these commands instead of event handlers in code behind:

1
2
3
4
5
6
7
8
9
10
<TextBlock ManipulationMode="All" HorizontalAlignment="Center" VerticalAlignment="Center" Foreground="Red" Text="{Binding Message}" FontSize="18">
    <Interactivity:Interaction.Behaviors>
        <Core:EventTriggerBehavior EventName="PointerEntered">
            <Core:InvokeCommandAction Command="{Binding StartCommand}"/>
        </Core:EventTriggerBehavior>
        <Core:EventTriggerBehavior EventName="PointerExited">
            <Core:InvokeCommandAction Command="{Binding EndCommand}"/>
        </Core:EventTriggerBehavior>
    </Interactivity:Interaction.Behaviors>
</TextBlock>

Again in this example we’ve been able to use commands and binding to update our user interface based on user input without any need to reference UI controls directly. It’s easy to see how this approach leads to a clean separation of concerns, better testability, and how we might use these techniques to help us build high code reuse cross platform apps.

In part 2 of this post I’ll cover some more advanced topics about commands and behaviors, for example capturing additional information from events such as in our earlier example the position of the pointer, look at some of the other behaviors in the SDK and take a look at how we can combine them with value converters to further improve our cross platform friendliness.

Contact

  • If you're looking for help with C#, .NET, Azure, Architecture, or would simply value an independent opinion then please get in touch here or over on Twitter.

Recent Posts

Recent Tweets

Invalid or expired token.

Recent Comments

Archives

Categories

Meta

GiottoPress by Enrique Chavez