If you're looking for help with C#, .NET, Azure, Architecture, or would simply value an independent opinion then please get in touch here or over on Twitter.
With solutions such as Azure AD and Office 365 becoming more common as a source of an organisations identity on the Internet it can be useful to have an application offer authentication against them. As a typical scenario let’s imagine you’ve developed a time tracking SaaS solution and you have a number of customers who wants to use it but logon with their Office 365 identities.
It’s a bit of a lengthy process but not difficult to do when you know how and hopefully by way of this worked example I can show you how to add this functionality yourself.
As it’s fairly commonplace to want to offer other external identities alongside Office 365 I’m going to integrate this into the excellent IdentityServer3 OpenID Connect Provider however nothing here really depends on IdentityServer3 and if you’ve got a basic familiarity with OWIN it should be fairly obvious how to decouple what I’ve done here.
The source code for all the below can be found in GitHub.
Setup the Visual Studio Project
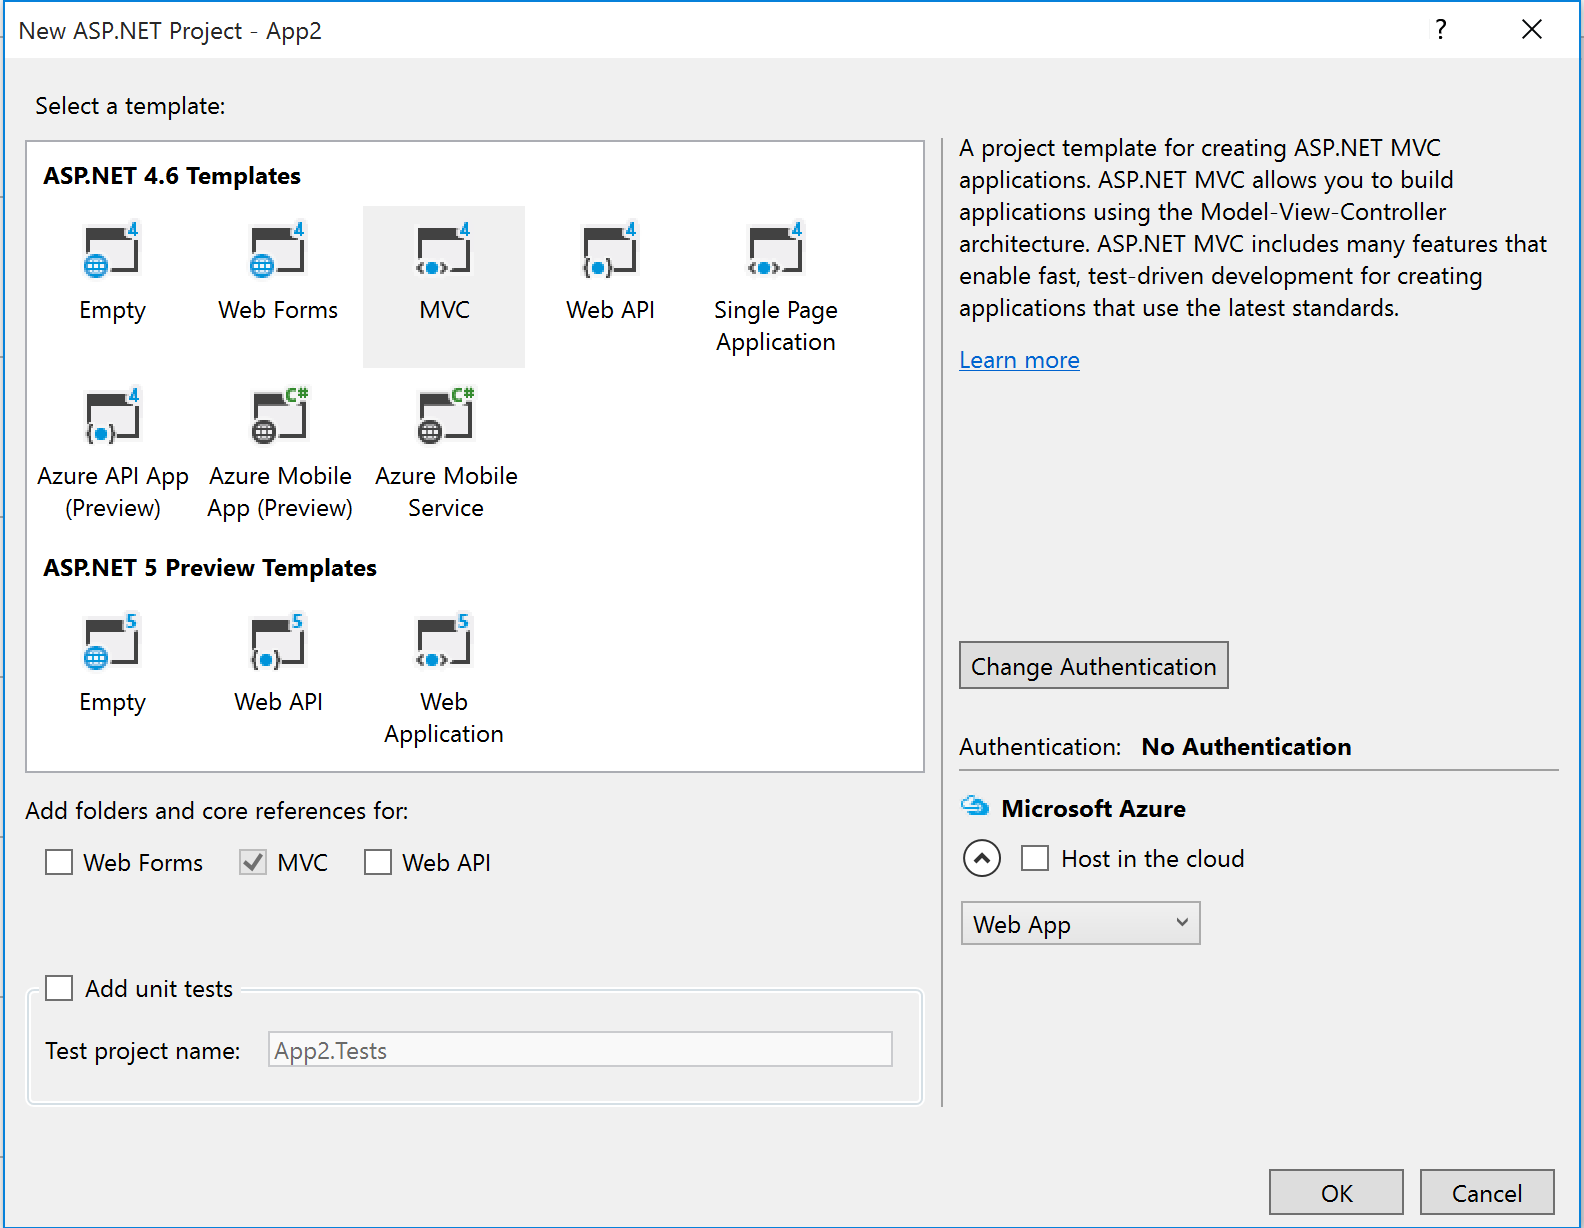
Firstly open up Visual Studio (I’m using 2015) and create a new ASP.Net Web Application. In the New ASP.Net Project dialog select to build an MVC application and ensure that the authentication method is set to No Authentication:
Now you need to add a set of NuGet packages to the project:
Install-Package Thinktecture.IdentityServer3
Install-Package Microsoft.Owin.Host.SystemWeb
Install-Package Microsoft.Owin.Security.Cookies
Install-Package Microsoft.Owin.Security.OpenIdConnect
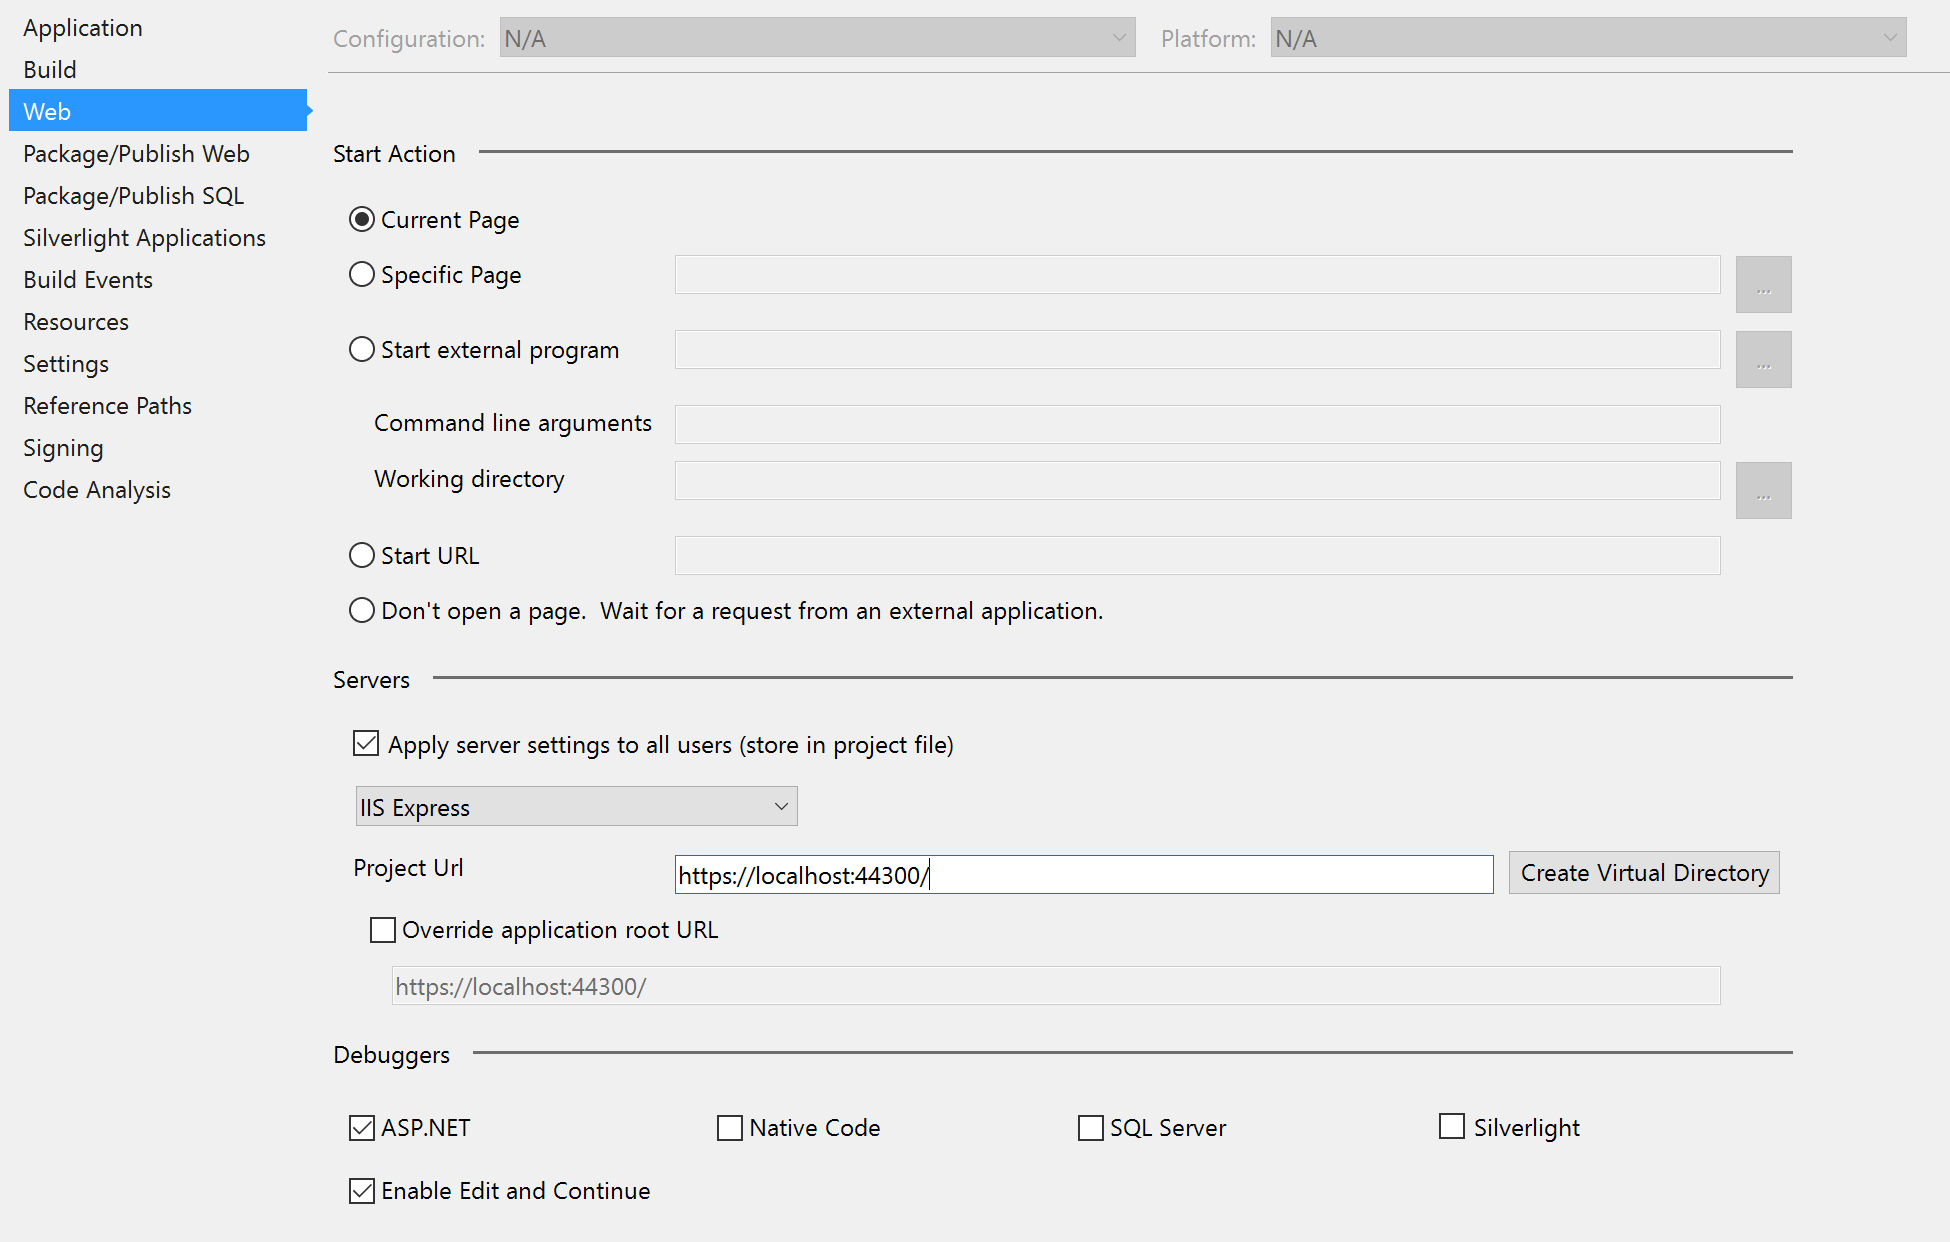
Now in the properties pane for the project enable SSL and note the port number:

And in the project properties (I love how this is spread liberally about the place!) set the start page to be the https site:
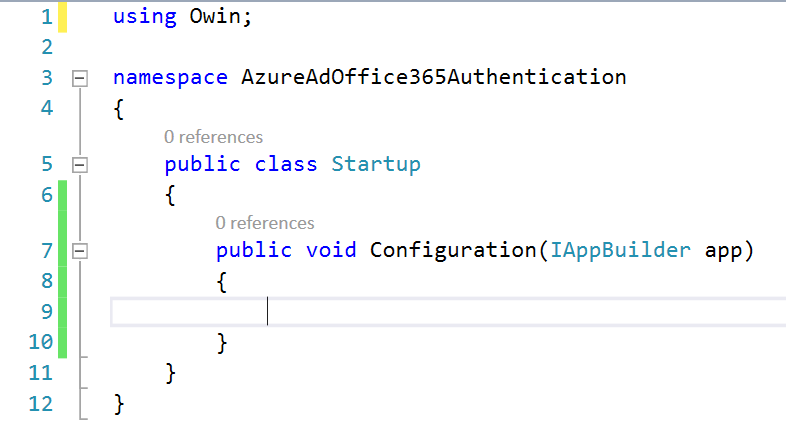
Now add a class called Startup to the root of the project as below. As we’ve added the Microsoft.Owin.Host.SystemWeb package it’s going to look for this on startup and will throw an exception if it can’t find it – we’ll fill it in later.
Now add the following to your web.config file:

At this point you should be able to run your solution and the boilerplate MVC website should appear secured with a self signed SSL certificate generated by Visual Studio.
Setup an Azure AD
We’re going to use two domains for the following – one for our application to authenticate against and federate against other directories and a second domain that we’re going to use to login with.
If you’ve got an Azure subscription you should already have a default domain so we’ll use that for logging in.
To enable the multi-tenanted scenario create a second Azure AD in the (old) management portal. This AD is used to host an Azure AD Application and handles the federation between the other domains.
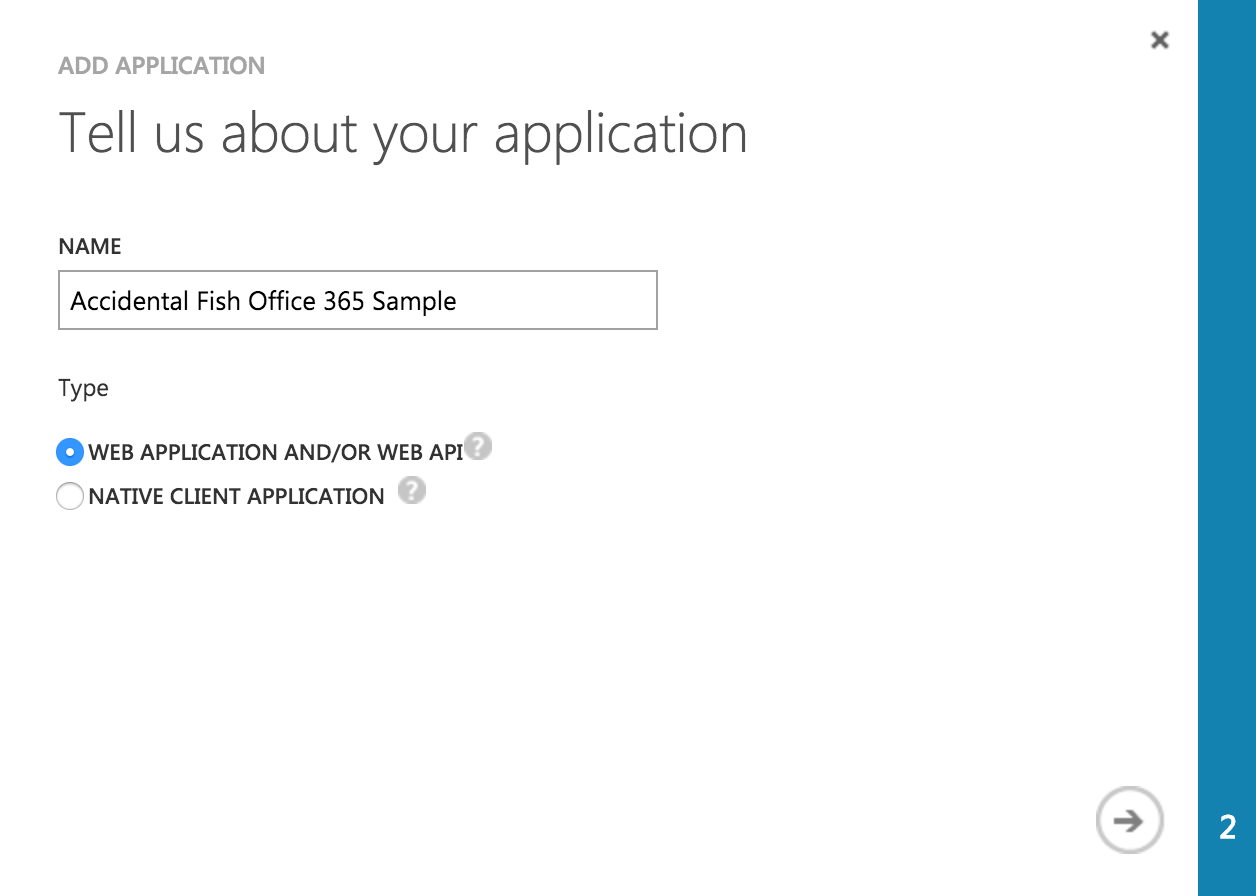
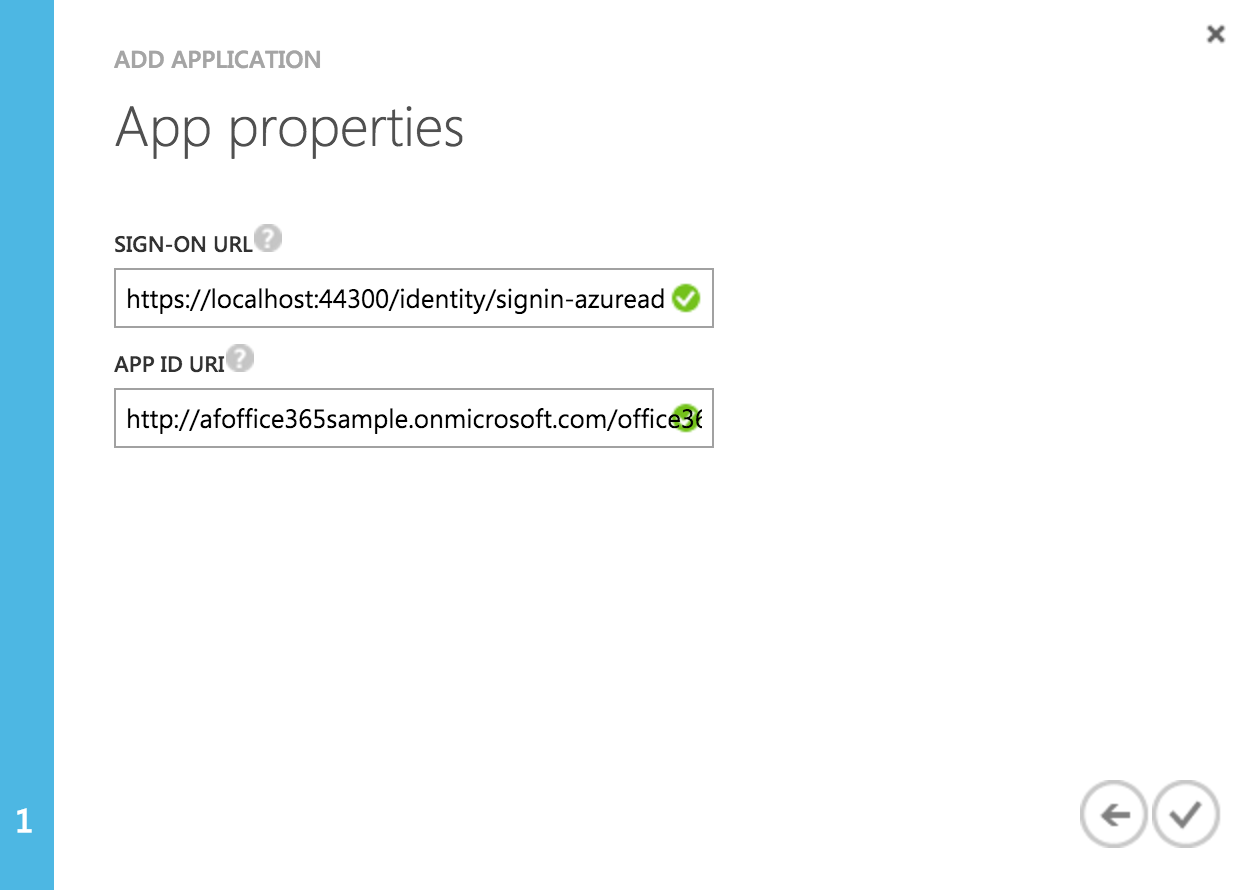
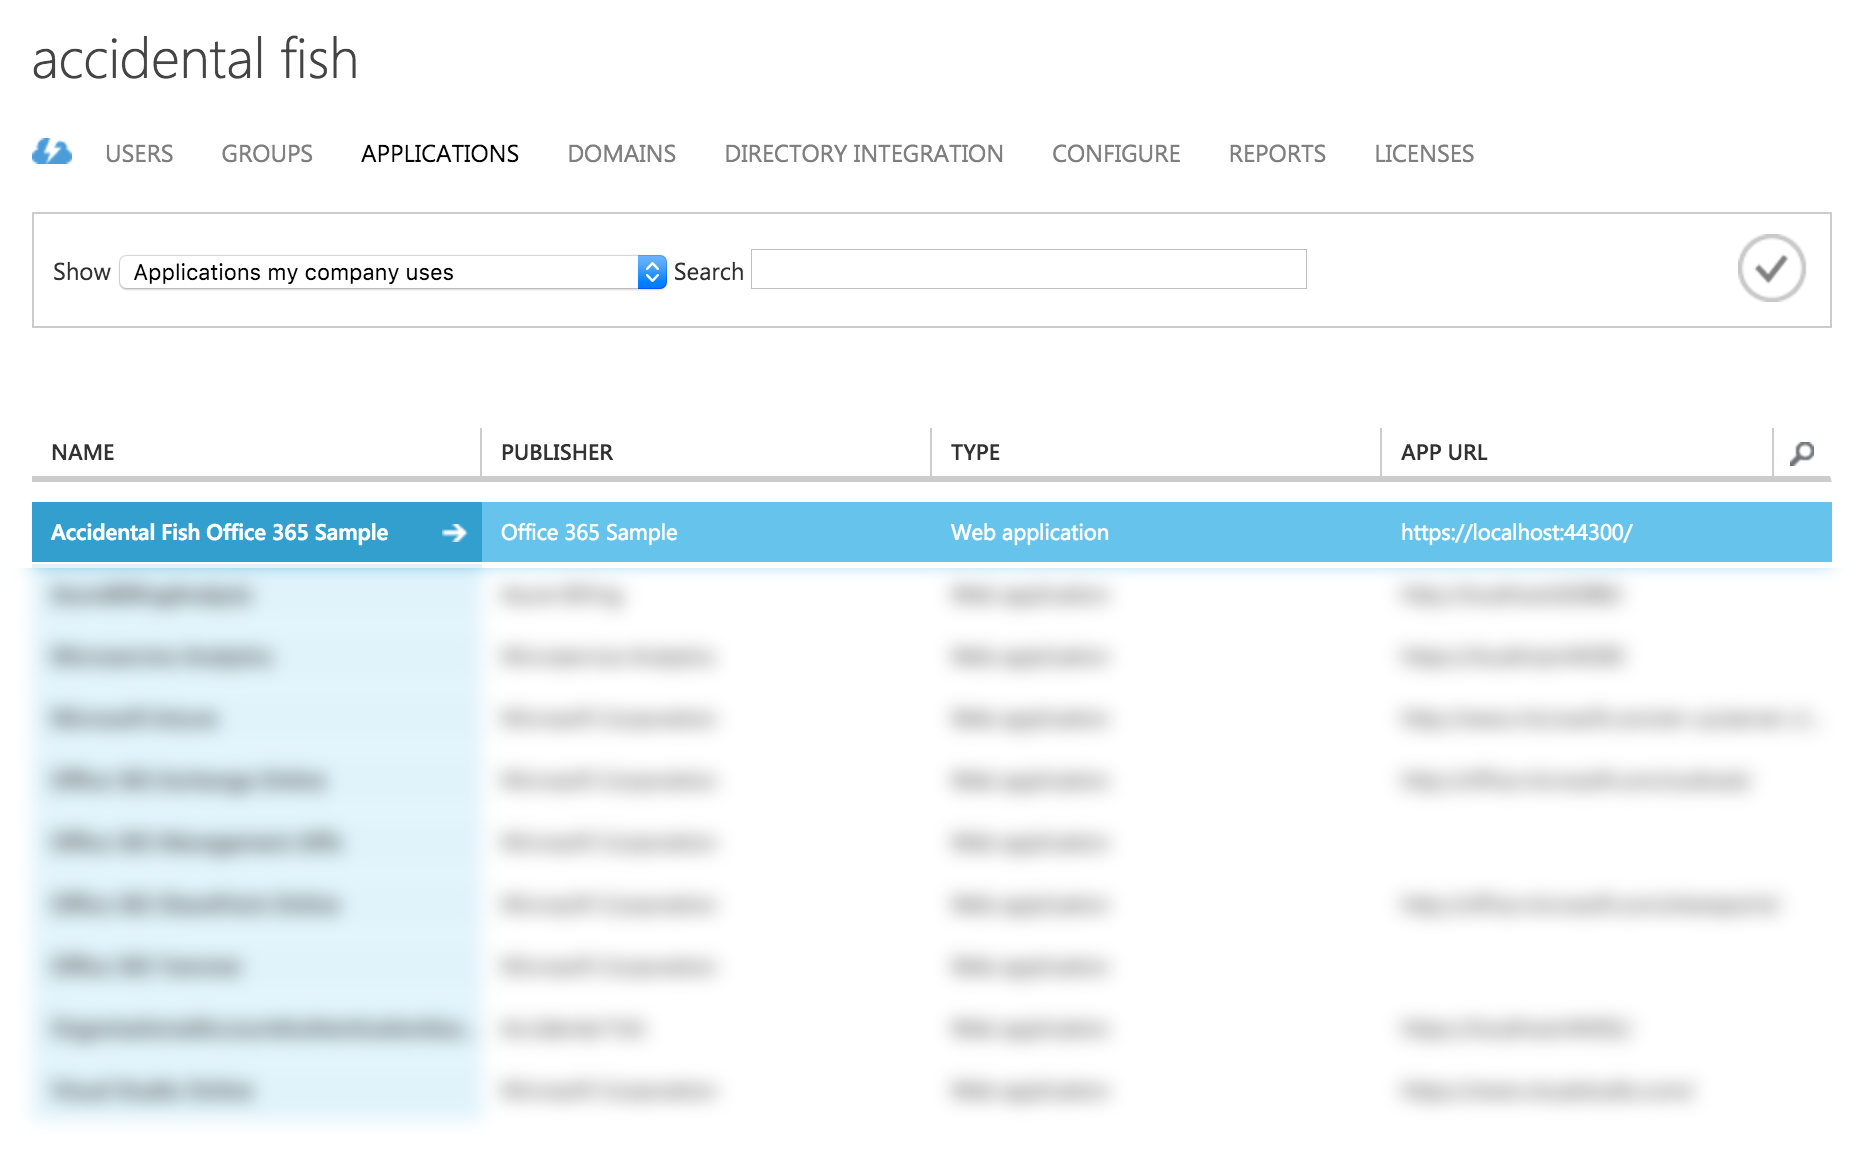
Go to the Applications tab for your directory and add an application, select “Add an application my organisation is developing”. Give the application and appropriate customer facing name (they will be able to see this in their own domain configuration and during sign up) and set this to be a web application:
In the next page set the sign on URL to be based on the the root of your web project (as you noted earlier) extended with the path /identity/signin-azuread giving you a URL such as:
https://localhost:44300/identity/signin-azuread
In the second box you need to set a unique URI for your application. The best way to do this is based on your own domain in the form http://mydomain.onmicrosoft.com/myapplication:
Azure will now whirr away for a second or two before showing you the application dashboard. Click the configure tab. Move down to the middle of the page and set Application is Multi-Tenant to on and create a new key. Then hit save. The key will display after you’ve hit save. Note down both the key and the client ID as you will need them later.

Configure IdentityServer3 and Azure AD / Office 365 as an Identity Provider
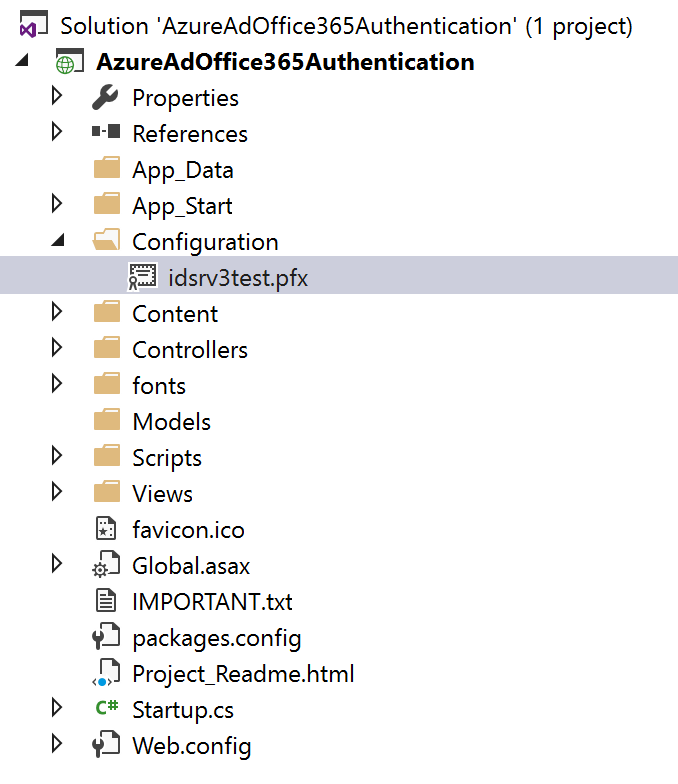
Back in Visual Studio edit the Startup class we created earlier. Firstly add a folder to the root of the project called Configuration, download the IdentityServer3 test certificate, and add it to this folder setting it to Copy if Newer in the properties panel:
IdentityServer3 will use this certificate (when configured below) to sign the tokens it issues however it’s important to be clear that in a production environment this certificate needs to be generated and kept securely. The certificate used here is a certificate used in the IdentityServer3 tests and stored / loaded in a manner designed for brevity in the source code rather than security. In a production environment you’d keep this in your certificate store.
Now configure IdentityServer3 as an endpoint within this solution by adding the following to the Startup class:
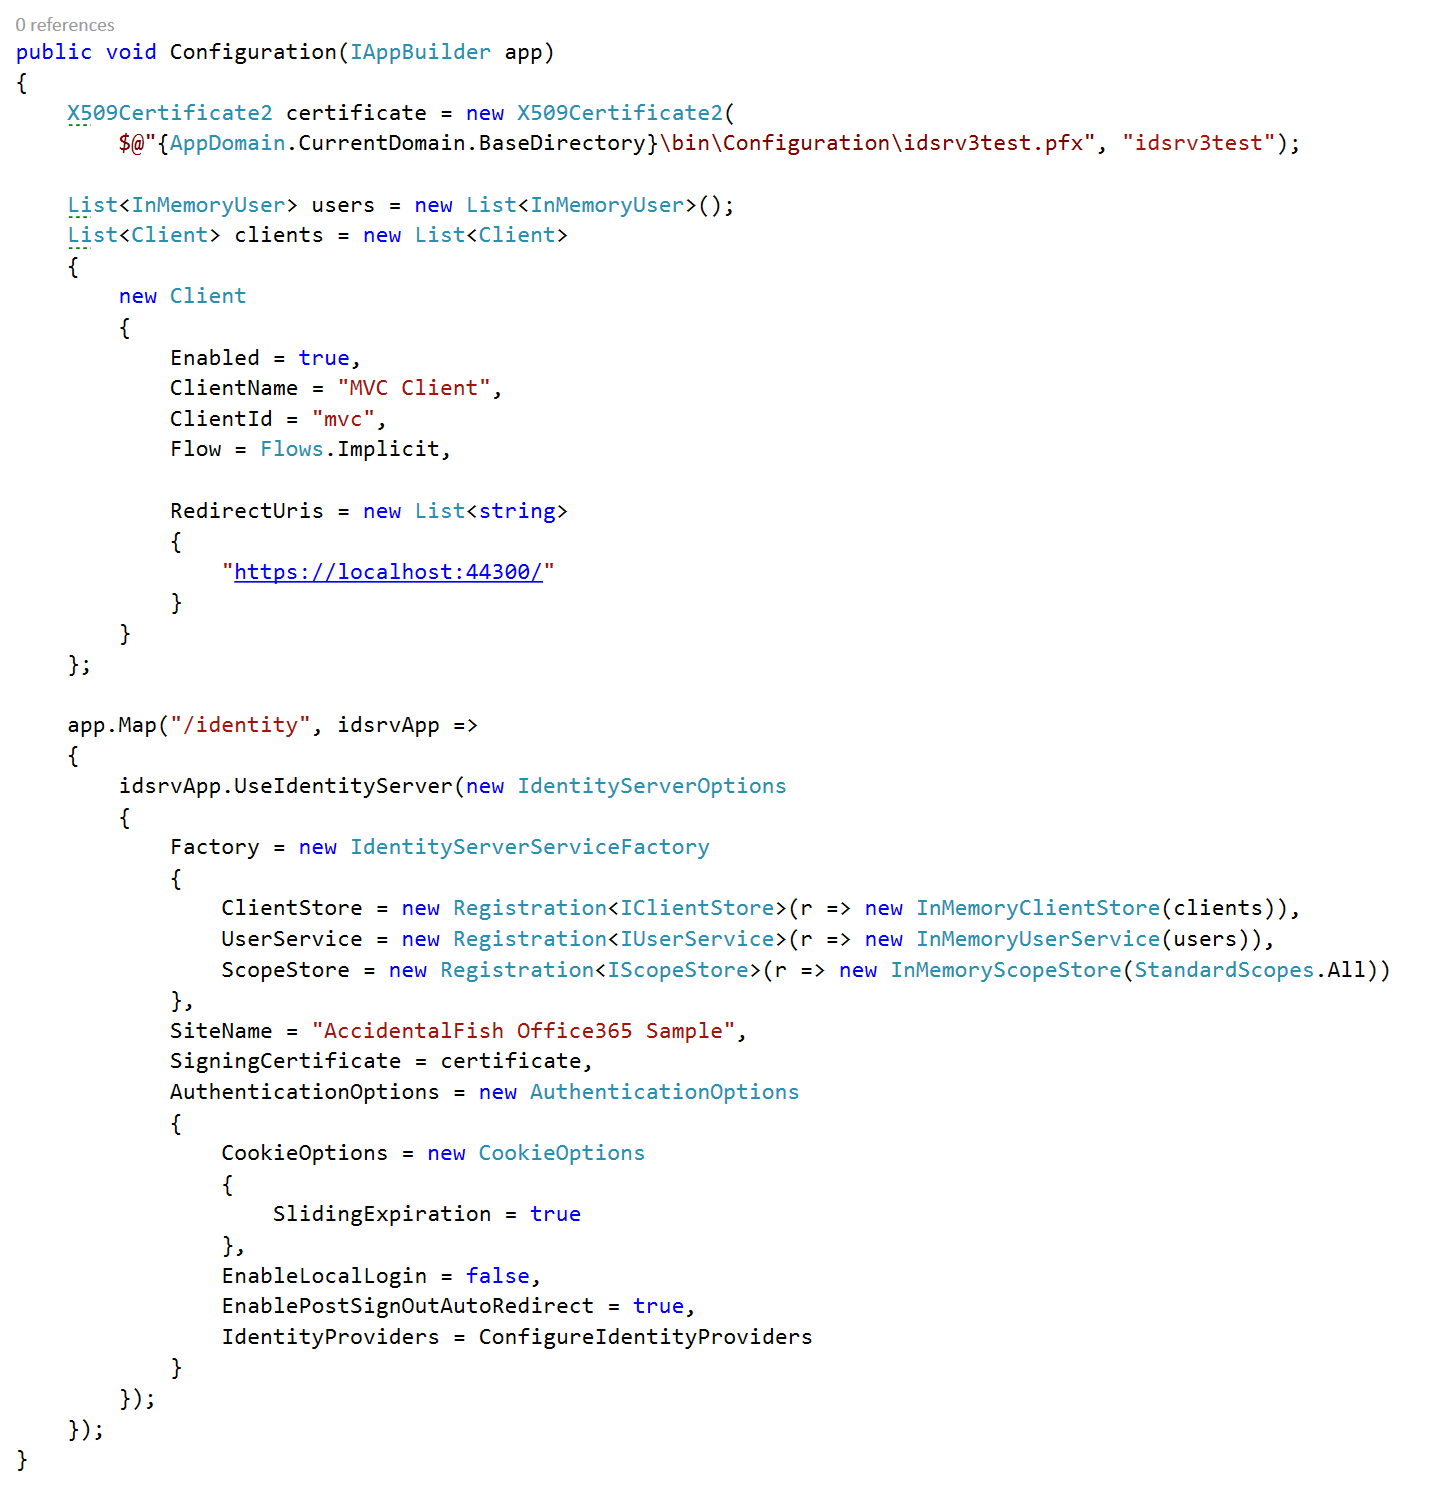
We’ve set IdentityServer3 up to use it’s in memory stores and created a client that we’ll later authenticate against (see the IdentityServer3 docs for more details on this).
We now need to configure Azure AD / Office 365 as an identity provider by filling in the ConfigureIdentityProviders method:
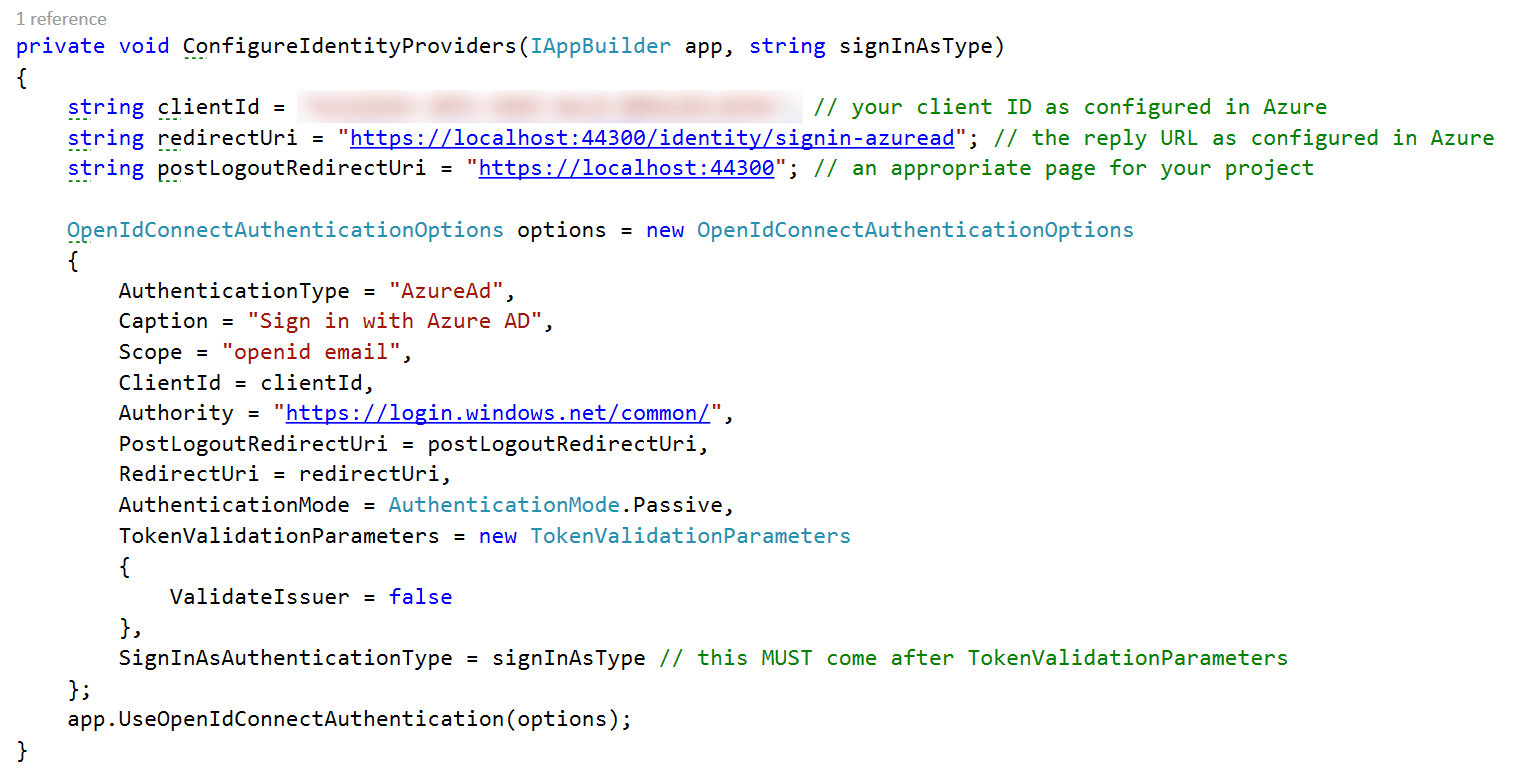
It’s vital that the client ID and redirect URI supplied to the Open ID Connect options exactly match those in the Azure AD application you created earlier and the Authority string must look exactly as written here including the trailing /.
As this point things will build but there’s nothing in our solution requiring authorization however you can navigate to the published configuration endpoint and should see some json describing our service. My endpoint is at:
https://localhost:44300/identity/.well-known/openid-configuration
Authorizing and Viewing Claims
We’re going to use an Authorize attribute on an MVC action to test our work so far. To begin with we need to get our MVC project to use the token end point we’ve created above. We need to add the following to the bottom of our Configuration method:
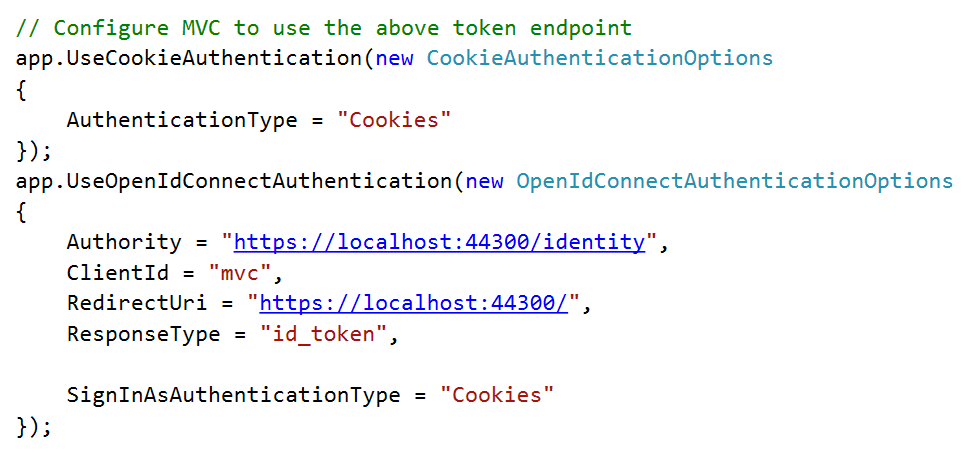
You need to ensure you use the port your website is running on on your development machine. Mine is on 44300.
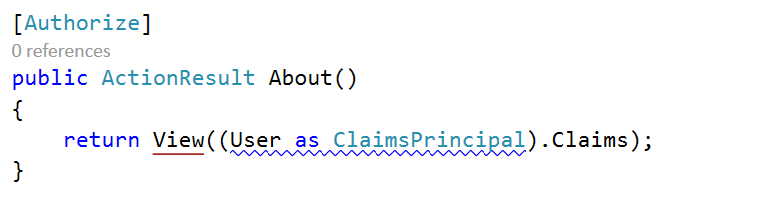
Modify the About action in HomeController.cs to look like the following:
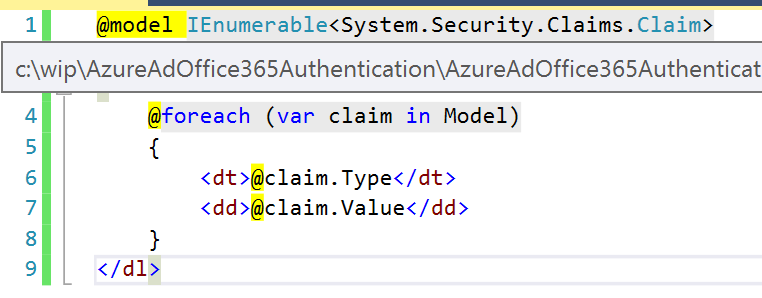
And the corresponding View to:
Now run the project and if you’ve got all the magic numbers and URLs right you should be navigated to the Azure AD logon page:

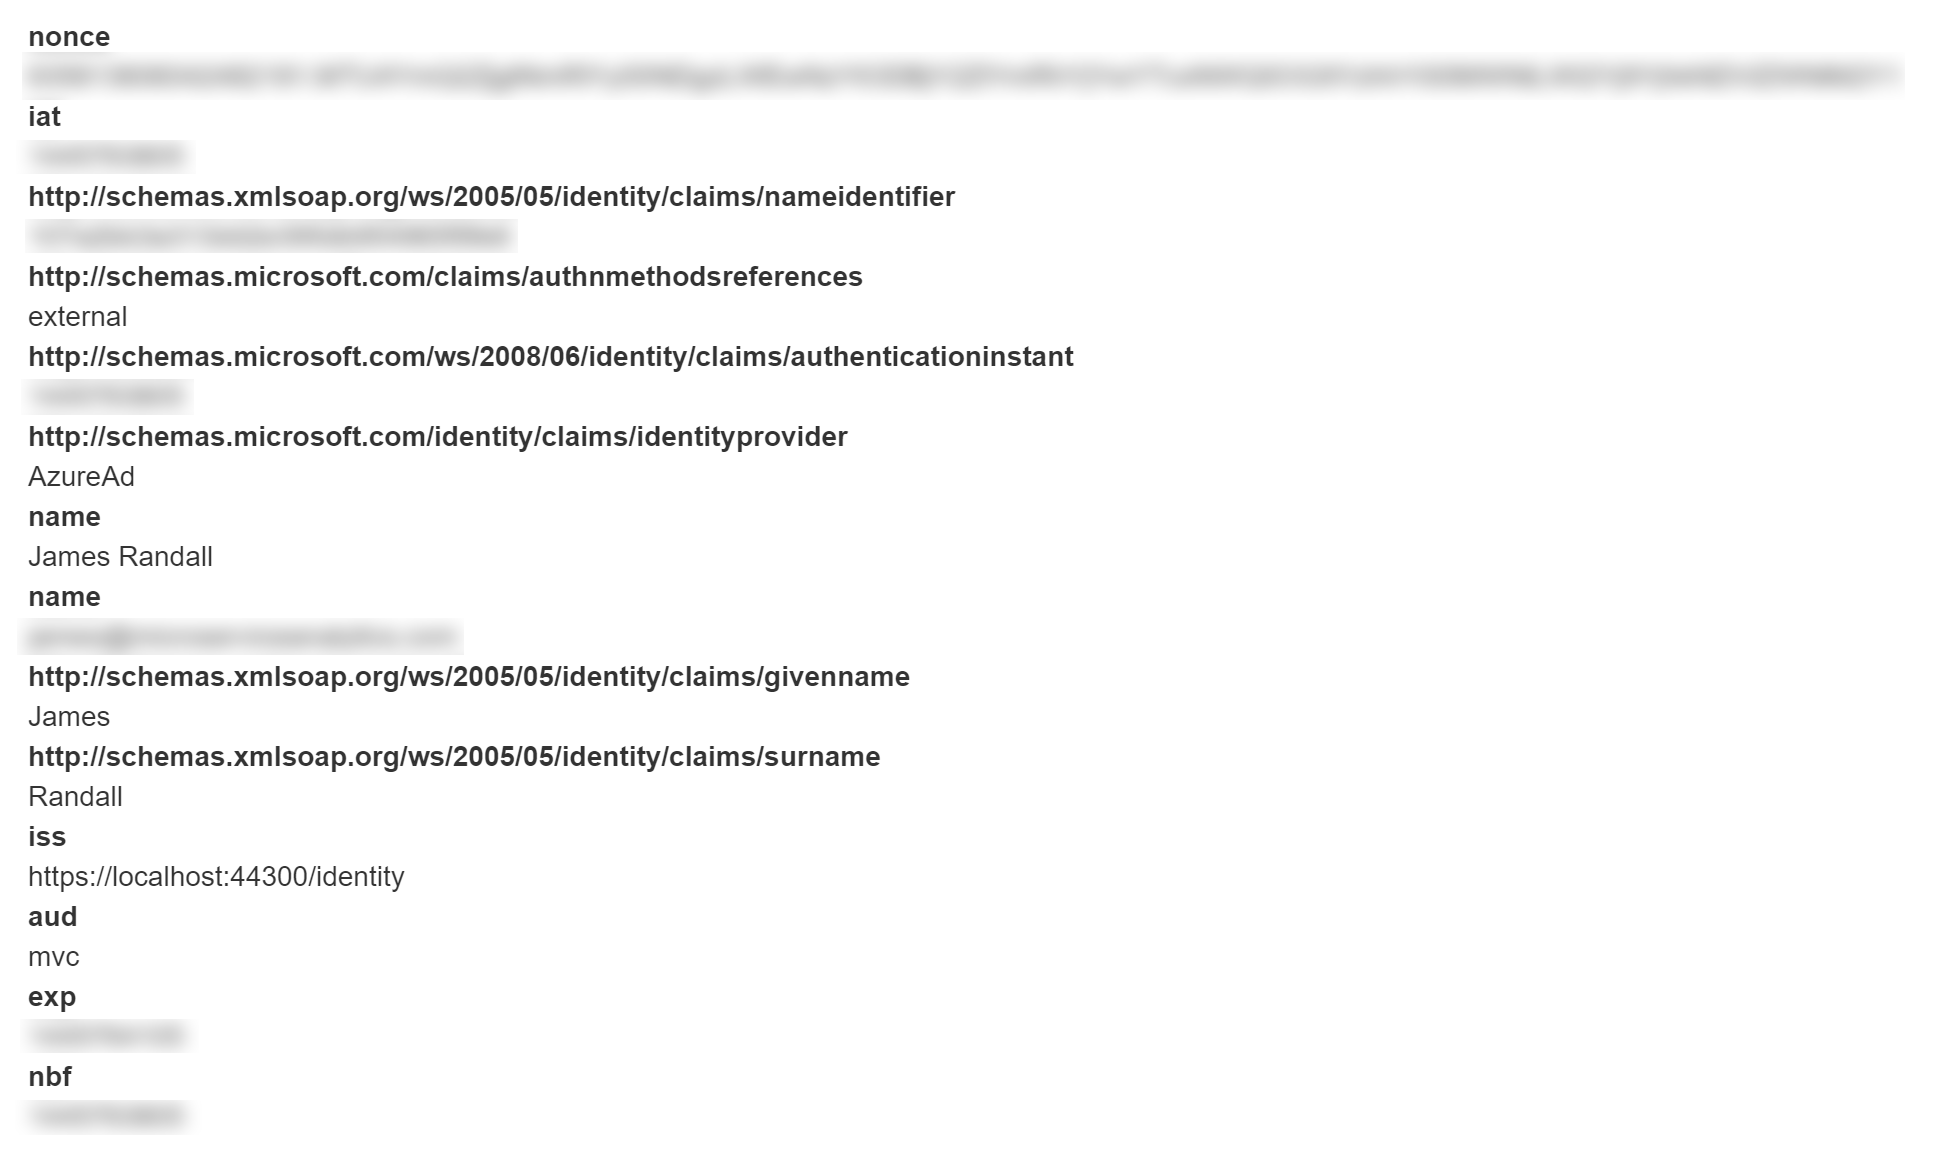
Login using a different AD to the one we set up earlier and if you now login you should end up back at the about page with a set of claims showing:
If you now head back into the Azure Management Portal and inspect the Applications tab for the Azure AD you used to login with you should find that the application we created earlier has been added here:
If all that worked then great – that’s the happy, easy, path dealt with! If not I suggest checking out my number one tip for dealing with IdentityServer3 issues.
The Administrator Consent Workflow
Depending on your domain configuration (the one you logged in with) then you might have hit the error page shown below:

Many domains, particularly of larger organisations, will have enabled Administrator Consent. This prevents users from being able to use their domain account to access resources they are not authorized to – unfortunately the error above isn’t very useful to end users.
To allow users in a domain configured this way to be able to access your application you need to implement a workflow that allows the Administrator to grant consent for users. Before continuing, if you’ve followed the steps above, then in Azure delete the application from your login domain – select it in the management portal and click Manage Access, then click Remove Access.
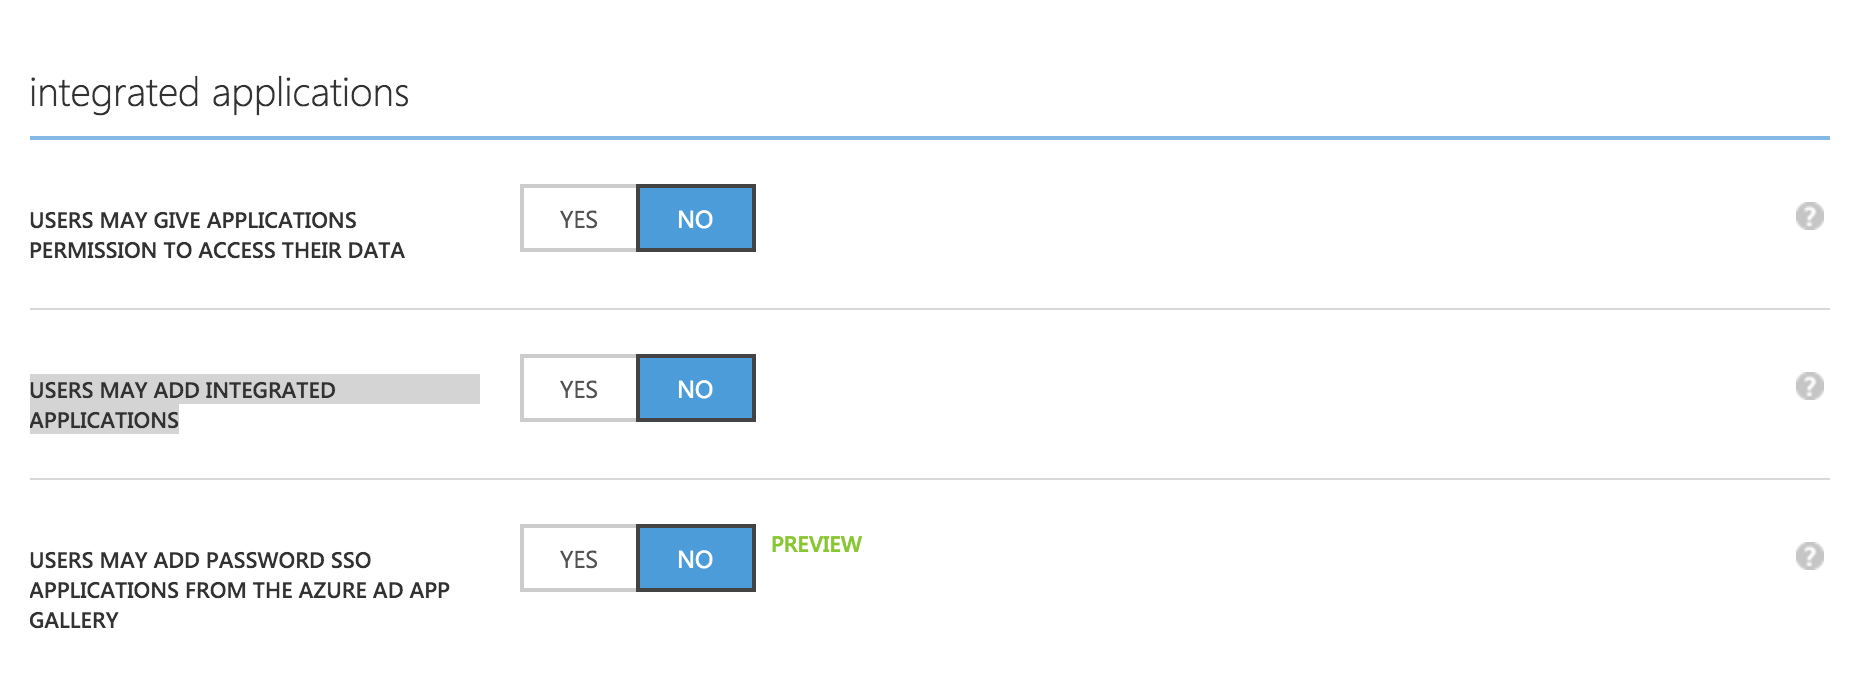
Firstly let’s turn on Administrator Consent in our login domain – select the domain in the management portal and click the Configure tab. When Azure has finished whirring away scroll down to the Integrated Applications section and set “USERS MAY GIVE APPLICATIONS PERMISSION TO ACCESS THEIR DATA” and “USERS MAY ADD INTEGRATED APPLICATIONS” to no. Then press save.
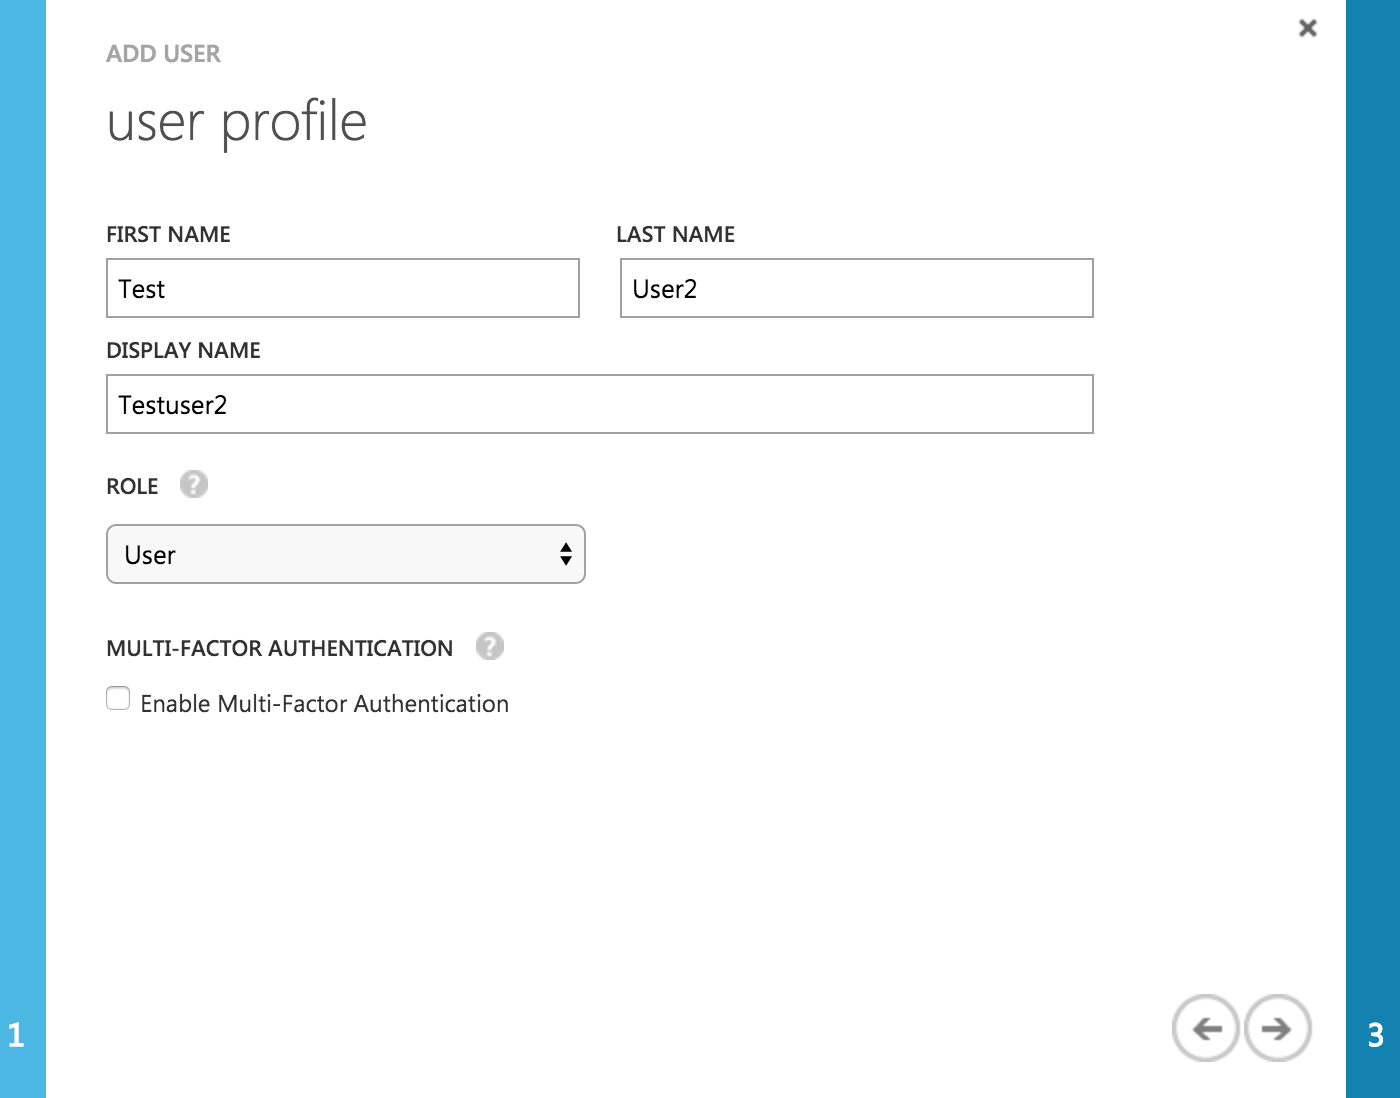
Now in the users section of your domain add a new user and give them only the User role:
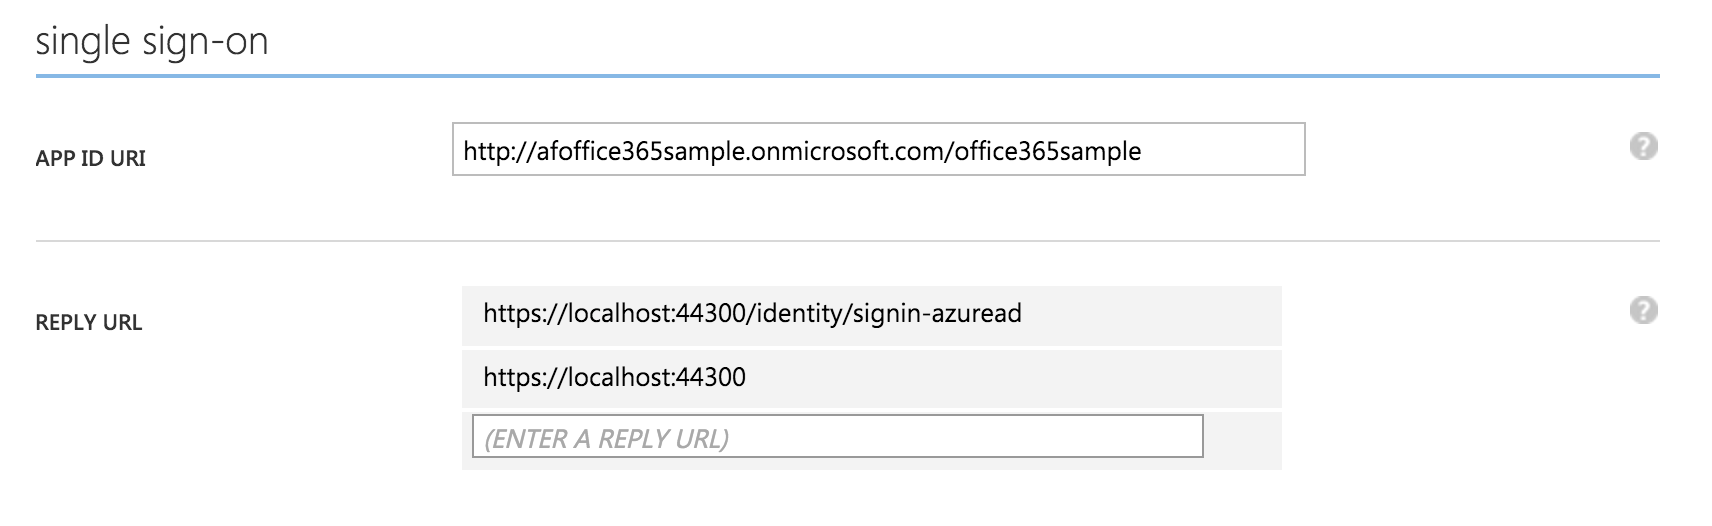
Next head back to the Azure AD application we created at the start of this post, click the Configure tab and scroll down to the single sign on section. Enter a URL for the root of your website and click save:
Ensure the browser is closed and if you now run the Visual Studio solution again and attempt to login with this new user then you should see the error message shown earlier. If not check the configuration in Azure once more.
At this point we’ve got a domain that requires administrator consent for users to attach to our application. Begin by adding a new Nuget package:
Install-Package Microsoft.IdentityModel.Clients.ActiveDirectory
Then add a class called AzureTenant as shown below:
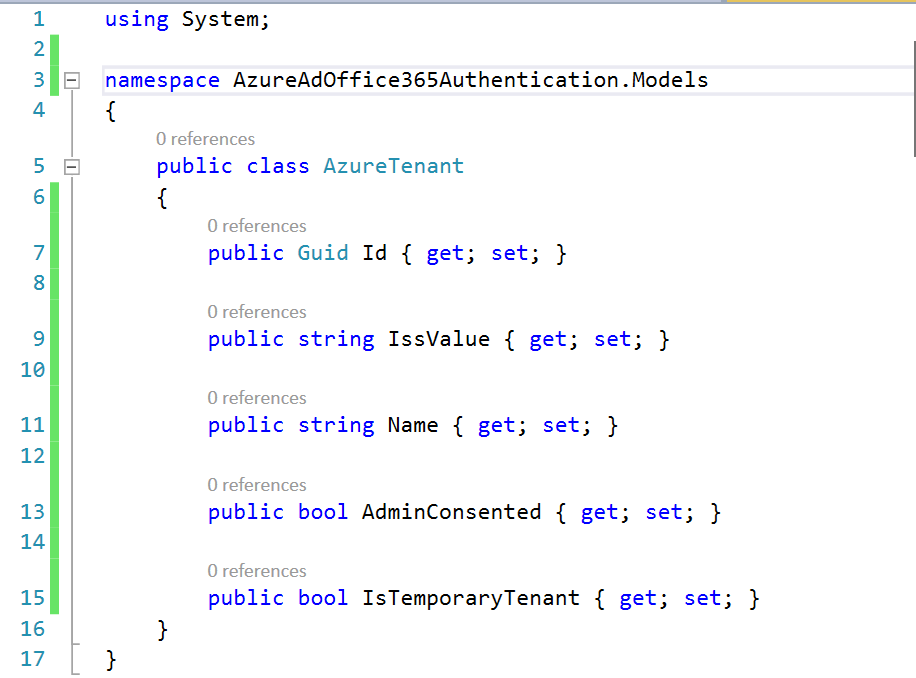
We now need to be able to manage our tenants. Normally you’d use some form of persistent store for this but I’m going to use a very basic in memory service by way of an example. The full service code is in GitHub here however there are two important sections. Firstly our controller (which we’ll work on later) will create a temporary tenant before handing off to Azure and later on after association is complete we convert this to a permanent tenant. This two stage process can be useful as in a more realistic example you may want to track some additional state across this request however all you need is someway of attaching data to a persistent unique ID – reusing the tenant like this keeps the example simple. However this code can be seen below:
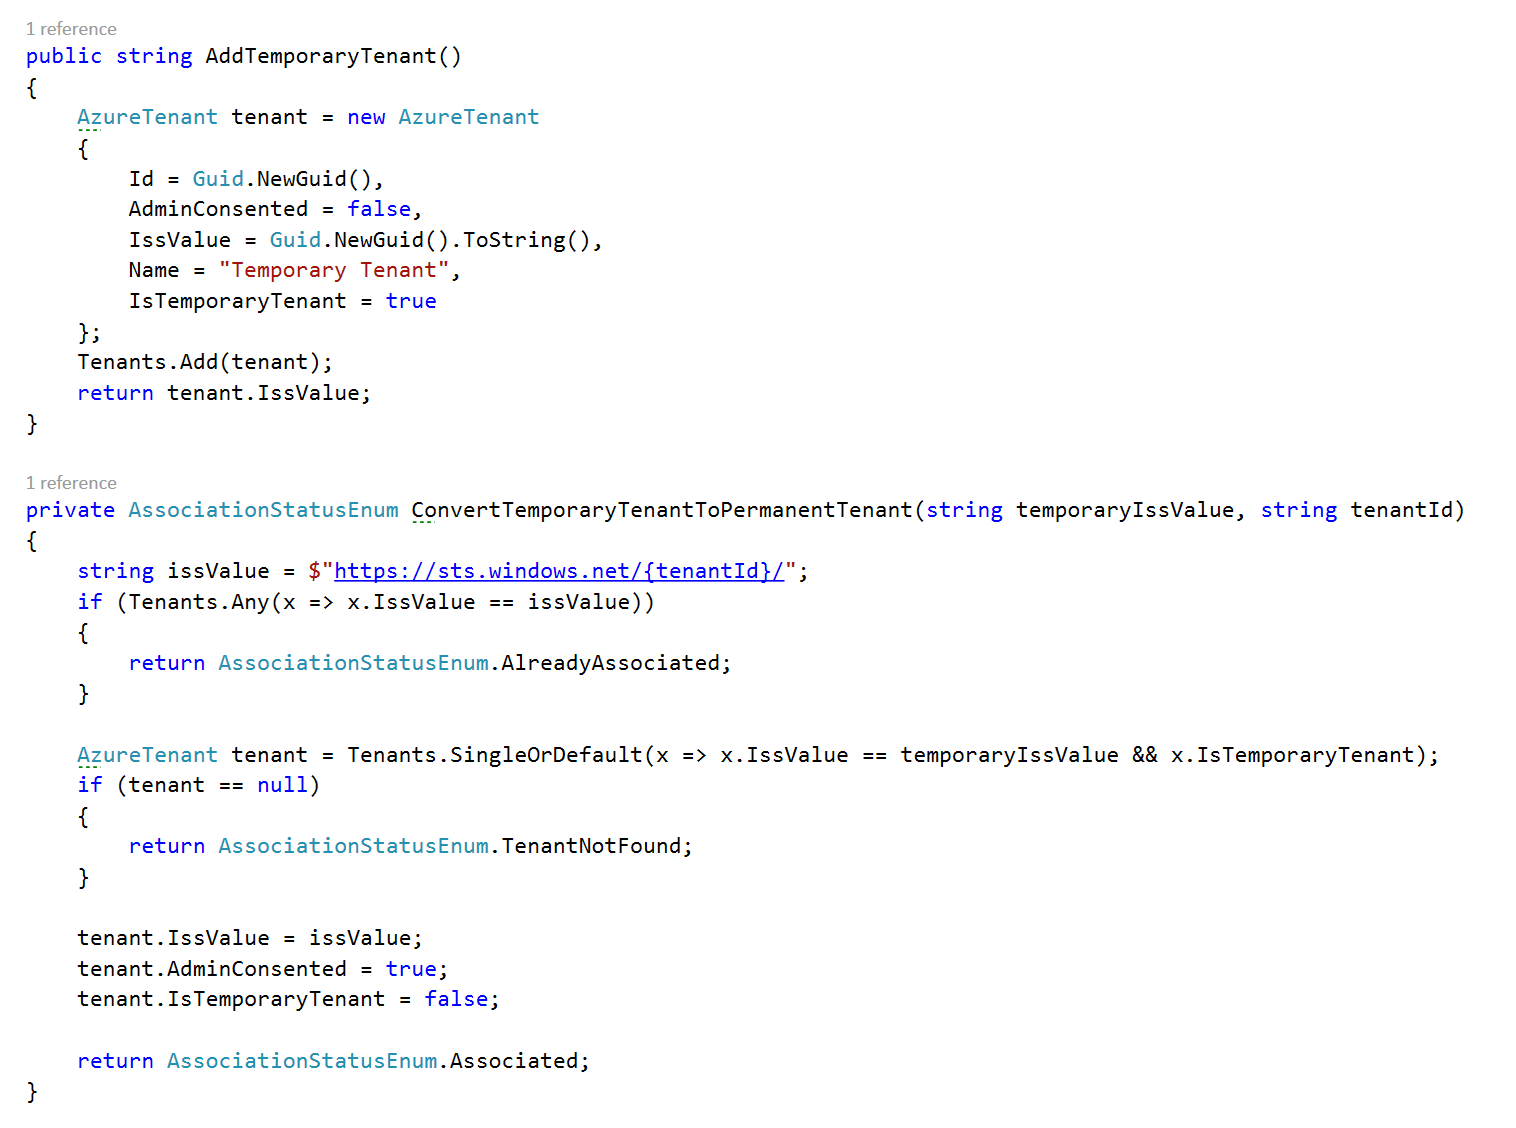
When our controller hands off to Azure to handle the domain association we need to do so by forming up a URL and doing this can be seen below:

And finally following the association we need to retrieve the tenant ID for the newly associated tenant (and this is where your client key created at the beginning of this piece is required):
Now we need to add an MVC controller that is going to present this functionality to the user. There is some boilerplate at the bottom but I want to focus here on the AdminConsent and Associate methods as shown below:
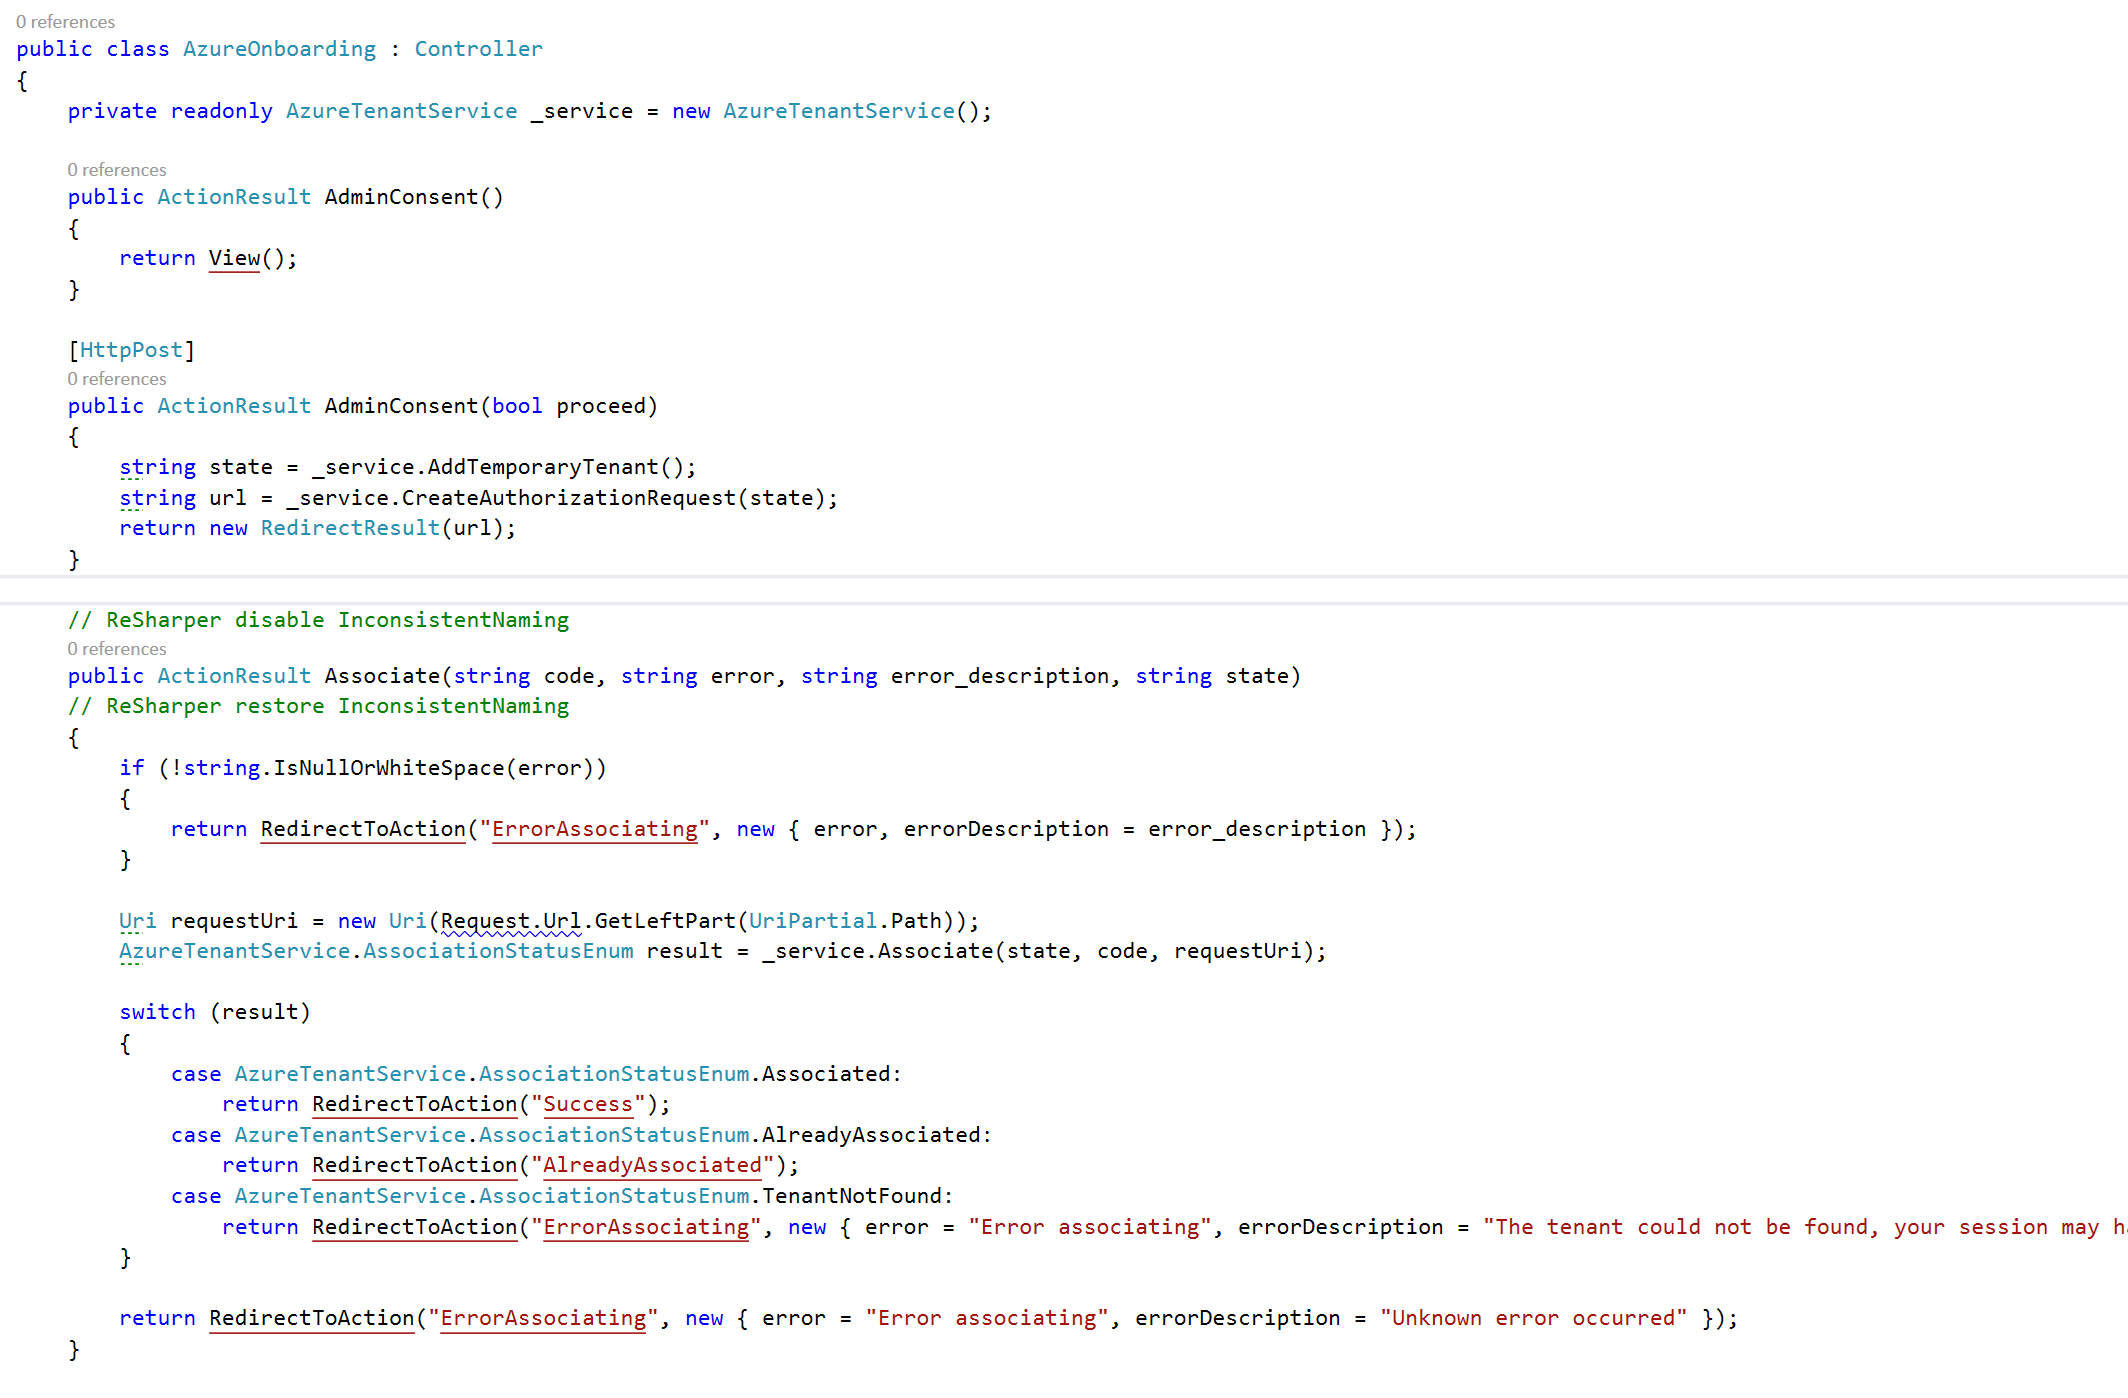
The default admin consent view presents a button to the user and a paragraph confirming what they are about to do – when the post back hits the controller it does two things. Firstly it creates a temporary tenant in our data store and then redirects to the Azure authorization endpoint using the temporary ID of the tenant as the state.
When the user confirms the association in the Azure AD management page presented during the redirect then it will call back to the Associate action passing in the temporary tenant ID as the state. In more complex examples tracking the state in this way allows us to track back the Azure request to any information we’ve gathered before confirmation. The Associate action then uses our in memory service to confirm the association and handles the routing off to the appropriate page based on success or failure.
Finally having done all of the above we’re going to put a link to our admin consent page on the home page. I modified the Jumbotron to point at the AdminConsent view.
At this point you should be able to run the solution (and this is the complete solution in GitHub) and if things are wired up correctly then you should be able to click your admin consent link. Try this with your test user and it will fail but if you then try it with your admin user you should see a screen like this:
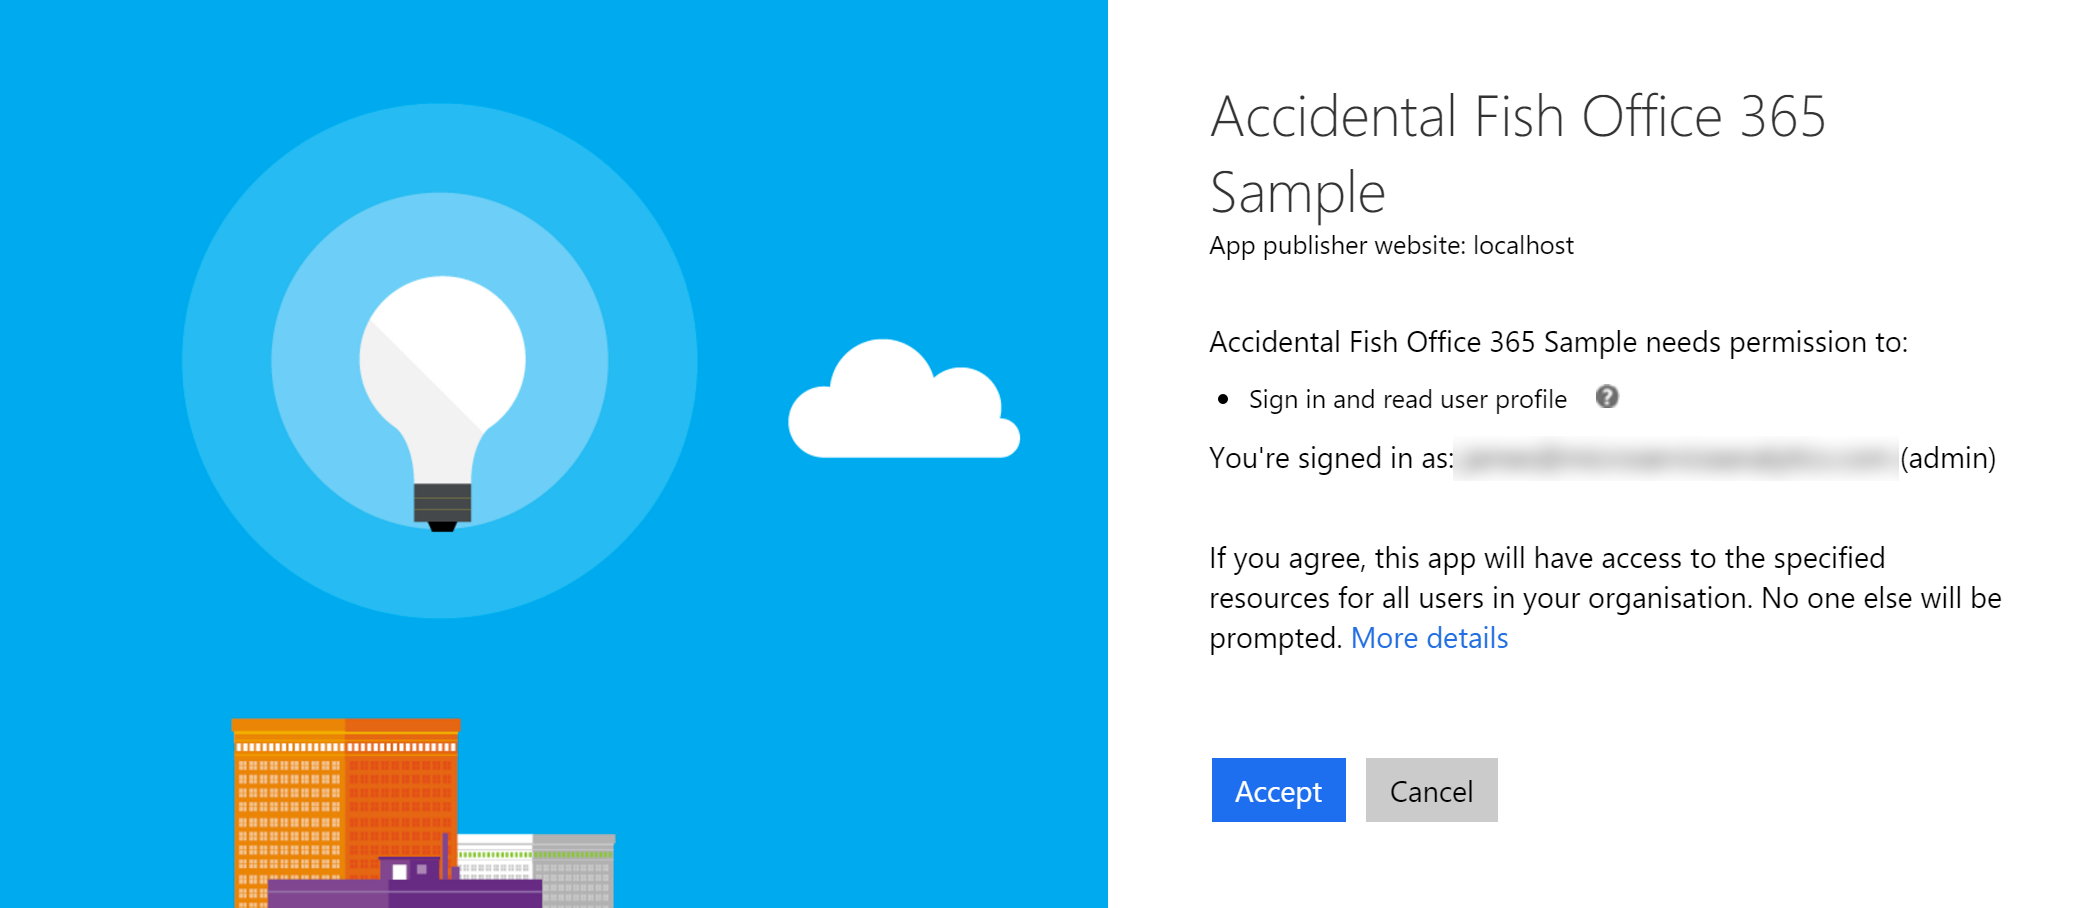
However if you’ve got everything right you should end up back at the success screen on your website and can now navigate into the About section.
Hopefully that helps anyone trying to figure out how to do this themselves and feel free to ask me questions in the comments or on Twitter.
Finally, worth repeating – the code is all available on GitHub.

Hi there, so does this mean that the user (not the admin), when they visit your app, they will not need to be prompted to login using thier username and password?
cheers
Hi, it really depends how they sign into Azure AD / Office and your app first time. If they tick the remember me button then when your app redirects to the STS it will have a cookie persisted and as long as that hasn’t expired it won’t need to redirect them to the AD login page. The same goes on the AD end.