Category: Azure

Signalling API Unavailability

When doing upgrades of websites it’s often useful to be able to signal to users that your service is offline for maintenance either in part or in entirety which is quite straightforward to implement unless you’ve got something like an AngularJS or React app, that could well be cached in the browser, and that actually wants to respond to 503 status calls returned from a web based API. Then CORS has a habit of getting in the way.

To help with that I’ve just pushed this super simple and lightweight ASP.Net website to GitHub that will respond with a 503 status code to any request made of it while ensuring that the CORS protocol will succeed meaning that the 503 status code will make its way through to your own error handling.

It’s ideal for hosting in an Azure deployment slot during upgrades that swap slots.

Note: an alternative approach would be to use the URL rewriter in web.config. It’s not particularly intuitive or, to my taste, readable but I believe can be configured to perform the same task.

Azure Resource Manager and Powershell 1.0

Microsoft recently updated Azure Powershell to 1.0 in the process introducing a large number of breaking changes to the CmdLet’s. Essentially they’ve removed Switch-AzureMode and instead of that the Azure Resource Manager cmdlets have all had an Rm introduced to them so for example:

New-AzureResourceGroupDeployment

becomes

New-AzureRmResourceGroupDeployment

For the most part the errors on upgrading a Powershell script are obvious and a rename will get you going however somewhat confusingly there are now pairs of cmdlet’s that do the same thing but only effect the different cmdlet sets.

An example of one that caught me out is Select-AzureSubscription. I’ve got numerous Azure subscriptions and scripts that deploy into different subscriptions depending on what I’m doing. Previously I used Select-AzureSubscription along with Switch-AzureMode and this worked. The problem is that Select-AzureSubscription still works – but it has no effect on the cmdlets that use the Rm prefix.

This led, confusingly, to a resource group being created in a different subscription to the one I intended and resources with the same name as in my intended resource group (resources which already existed) being created, or attempted to be created, in this new resource group. They failed as they already existed with the same names elsewhere.

The fix was to use Select-AzureRmSubscription.


Multi-Tenanted Authentication with Azure AD and Office 365 (and IdentityServer3)

With solutions such as Azure AD and Office 365 becoming more common as a source of an organisations identity on the Internet it can be useful to have an application offer authentication against them. As a typical scenario let’s imagine you’ve developed a time tracking SaaS solution and you have a number of customers who wants to use it but logon with their Office 365 identities.

It’s a bit of a lengthy process but not difficult to do when you know how and hopefully by way of this worked example I can show you how to add this functionality yourself.

As it’s fairly commonplace to want to offer other external identities alongside Office 365 I’m going to integrate this into the excellent IdentityServer3 OpenID Connect Provider however nothing here really depends on IdentityServer3 and if you’ve got a basic familiarity with OWIN it should be fairly obvious how to decouple what I’ve done here.

The source code for all the below can be found in GitHub.

Setup the Visual Studio Project

Firstly open up Visual Studio (I’m using 2015) and create a new ASP.Net Web Application. In the New ASP.Net Project dialog select to build an MVC application and ensure that the authentication method is set to No Authentication:
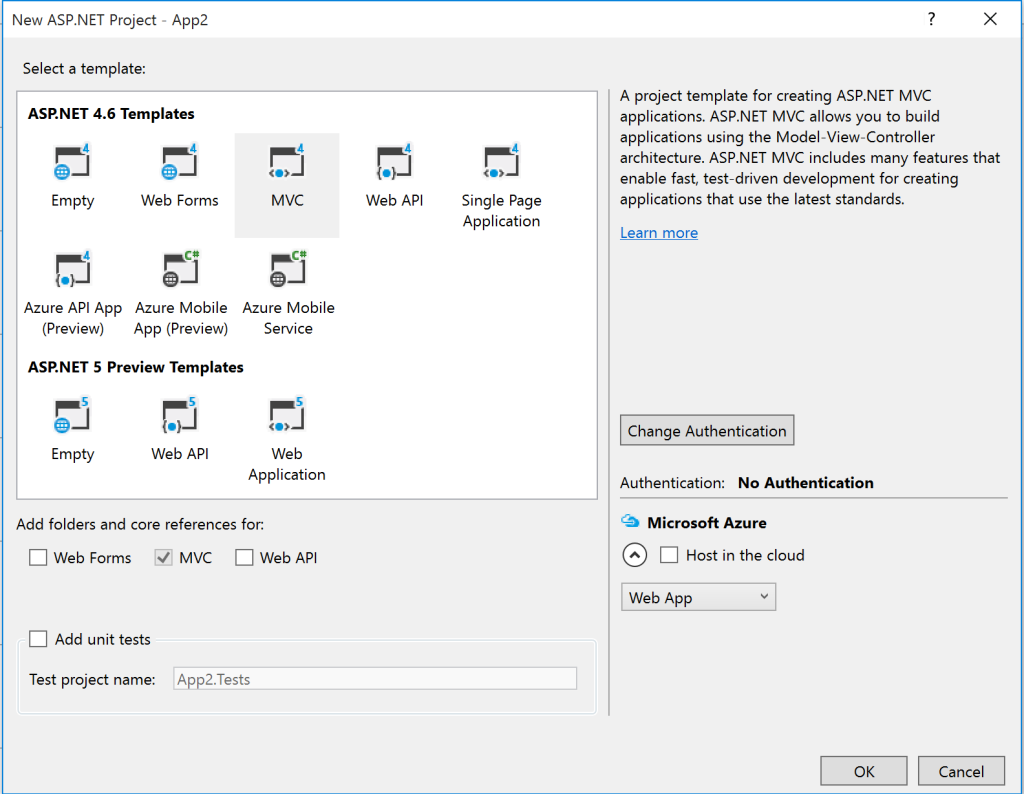
1

Now you need to add a set of NuGet packages to the project:

Install-Package Thinktecture.IdentityServer3
Install-Package Microsoft.Owin.Host.SystemWeb
Install-Package Microsoft.Owin.Security.Cookies
Install-Package Microsoft.Owin.Security.OpenIdConnect

Now in the properties pane for the project enable SSL and note the port number:
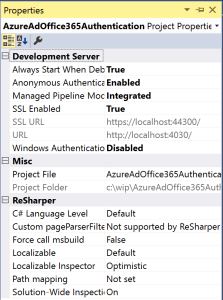
2

And in the project properties (I love how this is spread liberally about the place!) set the start page to be the https site:
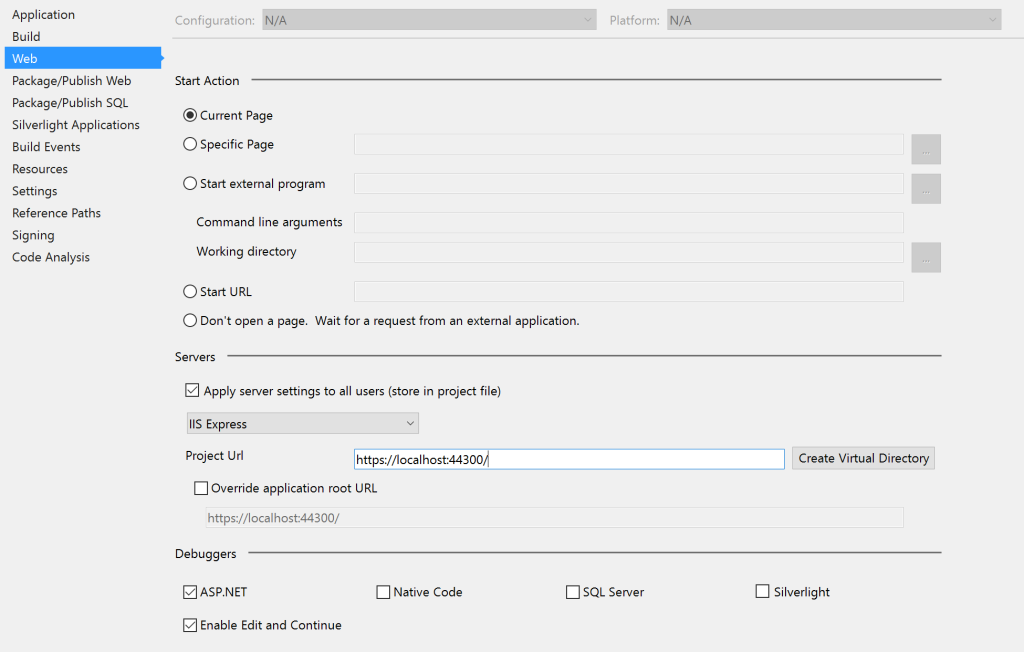
3

Now add a class called Startup to the root of the project as below. As we’ve added the Microsoft.Owin.Host.SystemWeb package it’s going to look for this on startup and will throw an exception if it can’t find it – we’ll fill it in later.

4


Now add the following to your web.config file:

15


At this point you should be able to run your solution and the boilerplate MVC website should appear secured with a self signed SSL certificate generated by Visual Studio.

Setup an Azure AD

We’re going to use two domains for the following – one for our application to authenticate against and federate against other directories and a second domain that we’re going to use to login with.

If you’ve got an Azure subscription you should already have a default domain so we’ll use that for logging in.

To enable the multi-tenanted scenario create a second Azure AD in the (old) management portal. This AD is used to host an Azure AD Application and handles the federation between the other domains.

Go to the Applications tab for your directory and add an application, select “Add an application my organisation is developing”. Give the application and appropriate customer facing name (they will be able to see this in their own domain configuration and during sign up) and set this to be a web application:
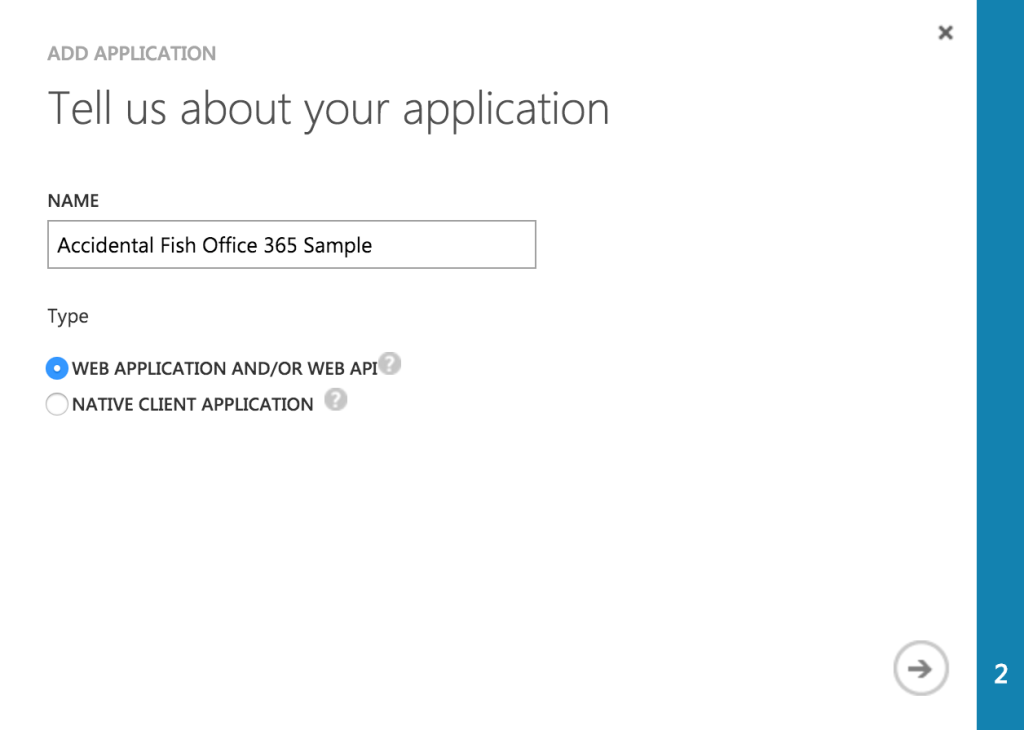
5

In the next page set the sign on URL to be based on the the root of your web project (as you noted earlier) extended with the path /identity/signin-azuread giving you a URL such as:

https://localhost:44300/identity/signin-azuread

In the second box you need to set a unique URI for your application. The best way to do this is based on your own domain in the form http://mydomain.onmicrosoft.com/myapplication:
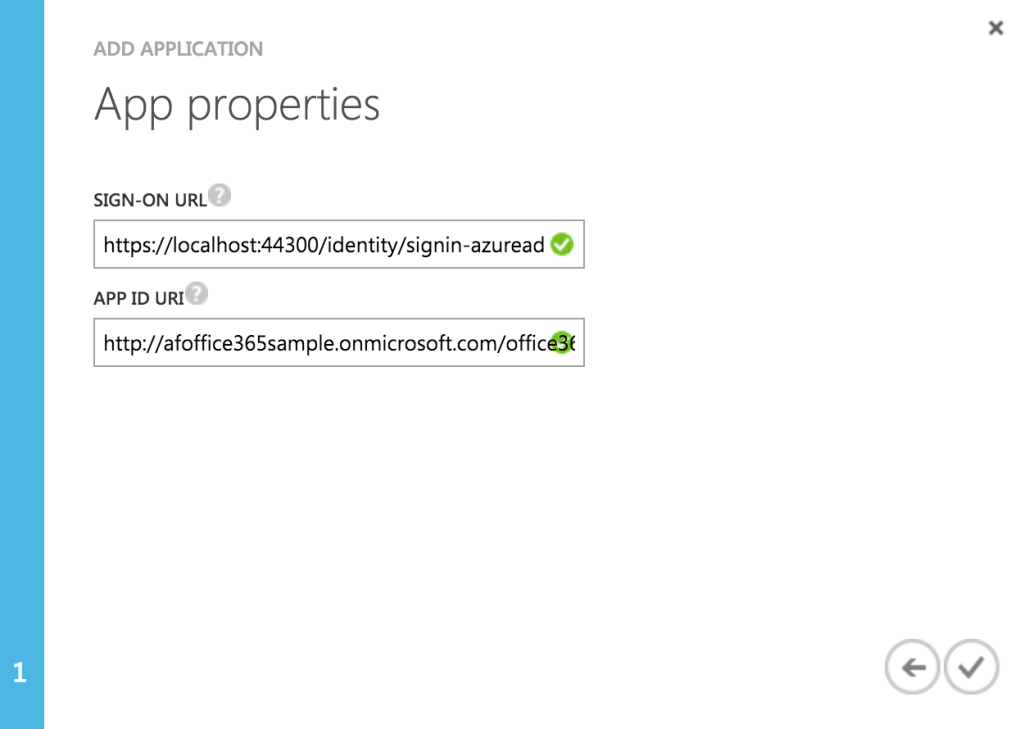
6

Azure will now whirr away for a second or two before showing you the application dashboard. Click the configure tab. Move down to the middle of the page and set Application is Multi-Tenant to on and create a new key. Then hit save. The key will display after you’ve hit save. Note down both the key and the client ID as you will need them later.
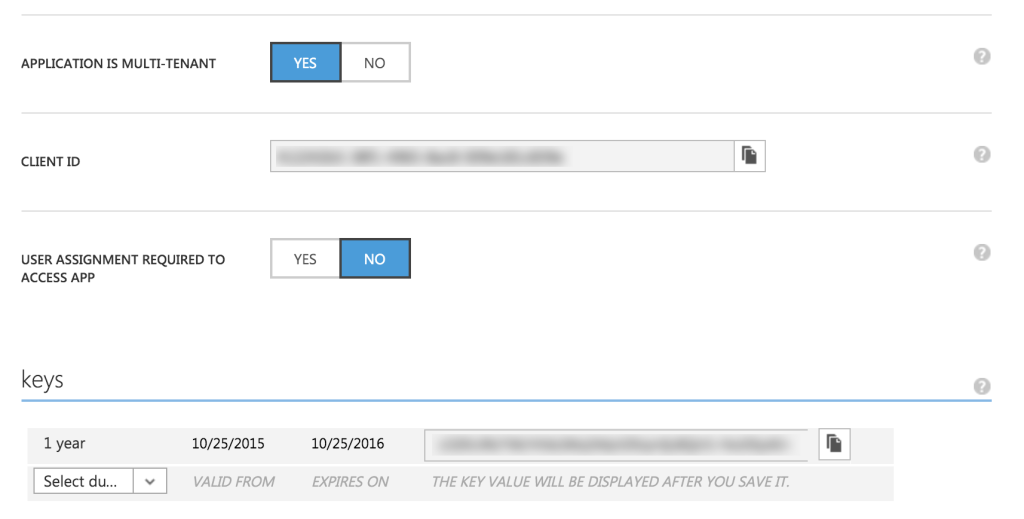
7

Configure IdentityServer3 and Azure AD / Office 365 as an Identity Provider

Back in Visual Studio edit the Startup class we created earlier. Firstly add a folder to the root of the project called Configuration, download the IdentityServer3 test certificate, and add it to this folder setting it to Copy if Newer in the properties panel:
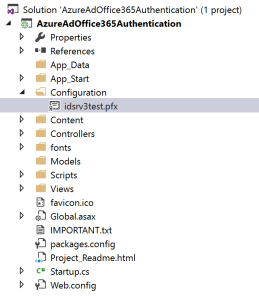
8

IdentityServer3 will use this certificate (when configured below) to sign the tokens it issues however it’s important to be clear that in a production environment this certificate needs to be generated and kept securely. The certificate used here is a certificate used in the IdentityServer3 tests and stored / loaded in a manner designed for brevity in the source code rather than security. In a production environment you’d keep this in your certificate store.

Now configure IdentityServer3 as an endpoint within this solution by adding the following to the Startup class:
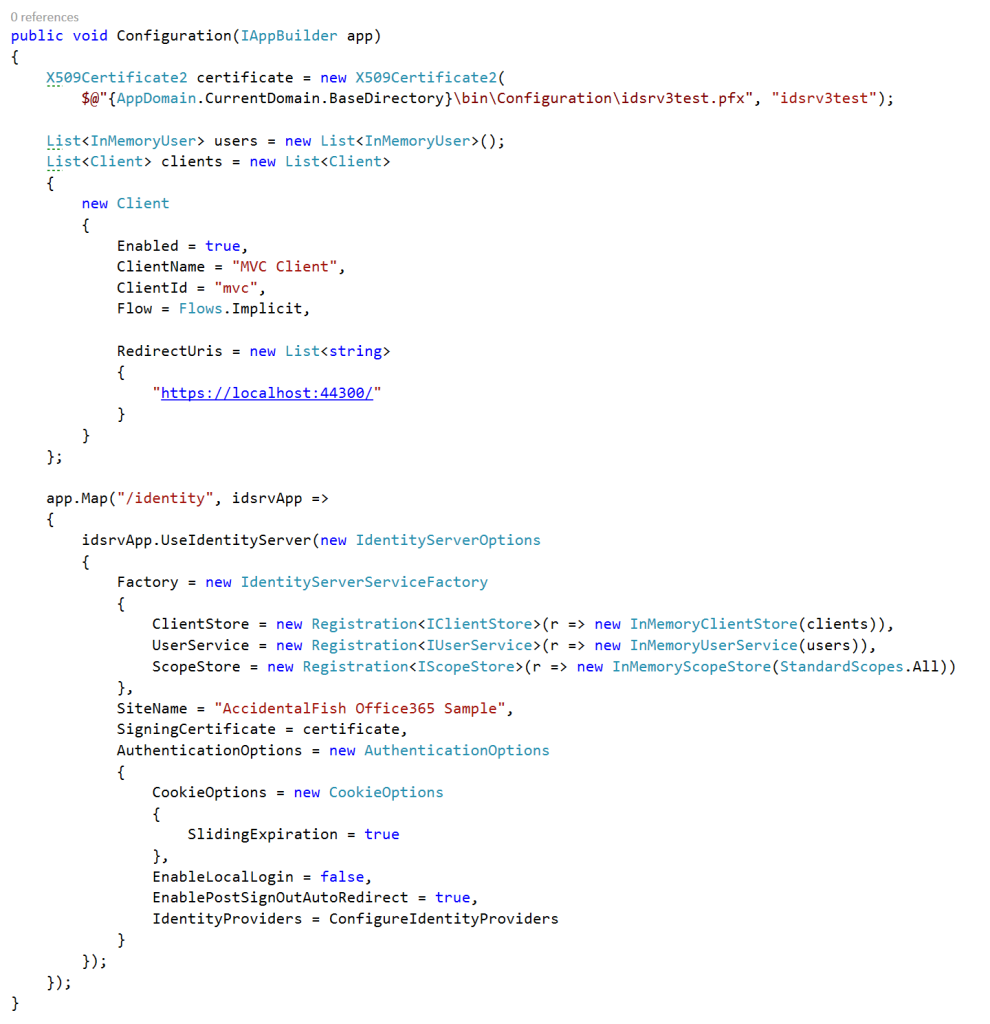
9

We’ve set IdentityServer3 up to use it’s in memory stores and created a client that we’ll later authenticate against (see the IdentityServer3 docs for more details on this).

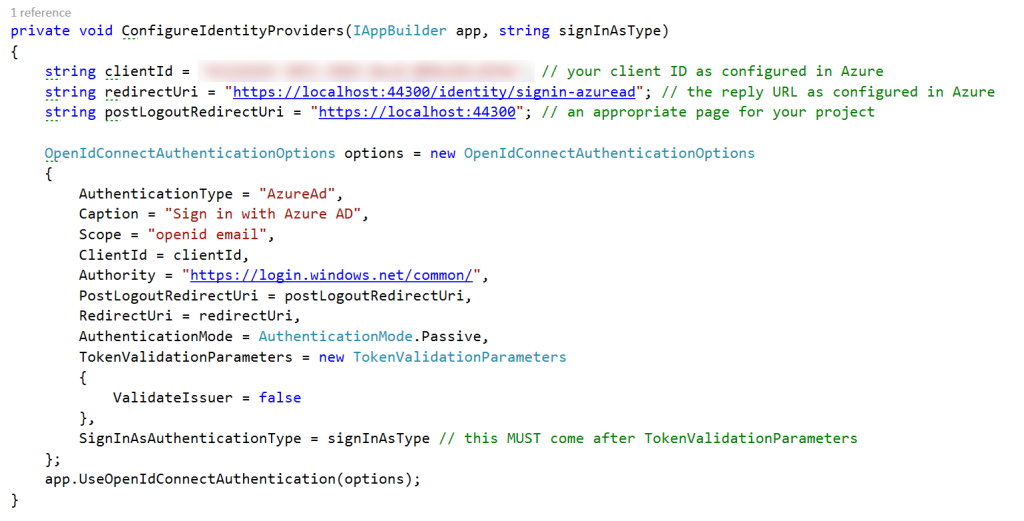
We now need to configure Azure AD / Office 365 as an identity provider by filling in the ConfigureIdentityProviders method:
10

It’s vital that the client ID and redirect URI supplied to the Open ID Connect options exactly match those in the Azure AD application you created earlier and the Authority string must look exactly as written here including the trailing /.

As this point things will build but there’s nothing in our solution requiring authorization however you can navigate to the published configuration endpoint and should see some json describing our service. My endpoint is at:

https://localhost:44300/identity/.well-known/openid-configuration

Authorizing and Viewing Claims

We’re going to use an Authorize attribute on an MVC action to test our work so far. To begin with we need to get our MVC project to use the token end point we’ve created above. We need to add the following to the bottom of our Configuration method:

11

You need to ensure you use the port your website is running on on your development machine. Mine is on 44300.

Modify the About action in HomeController.cs to look like the following:

12

And the corresponding View to:

13

Now run the project and if you’ve got all the magic numbers and URLs right you should be navigated to the Azure AD logon page:
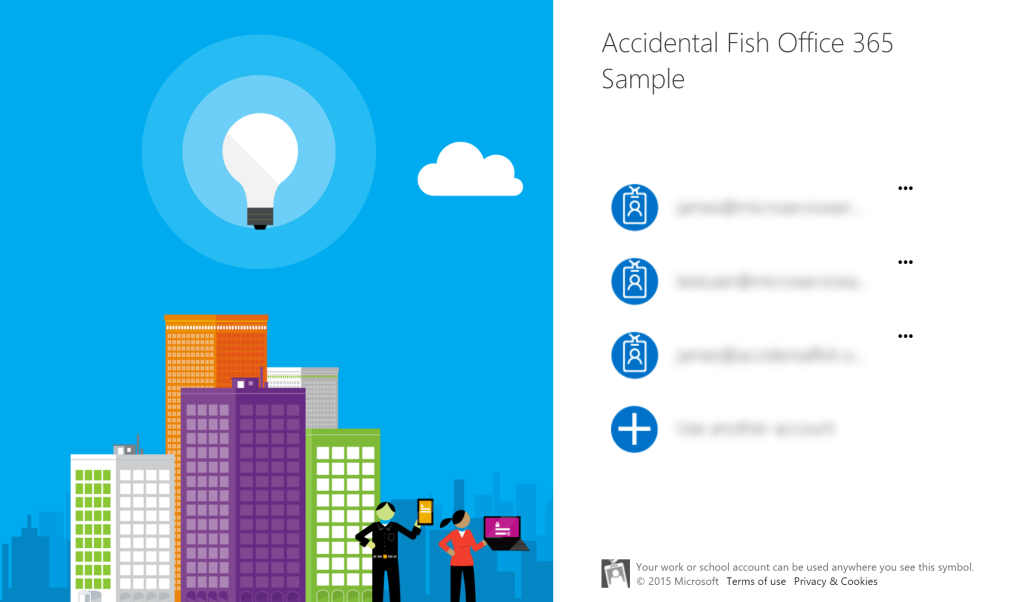
14

Login using a different AD to the one we set up earlier and if you now login you should end up back at the about page with a set of claims showing:
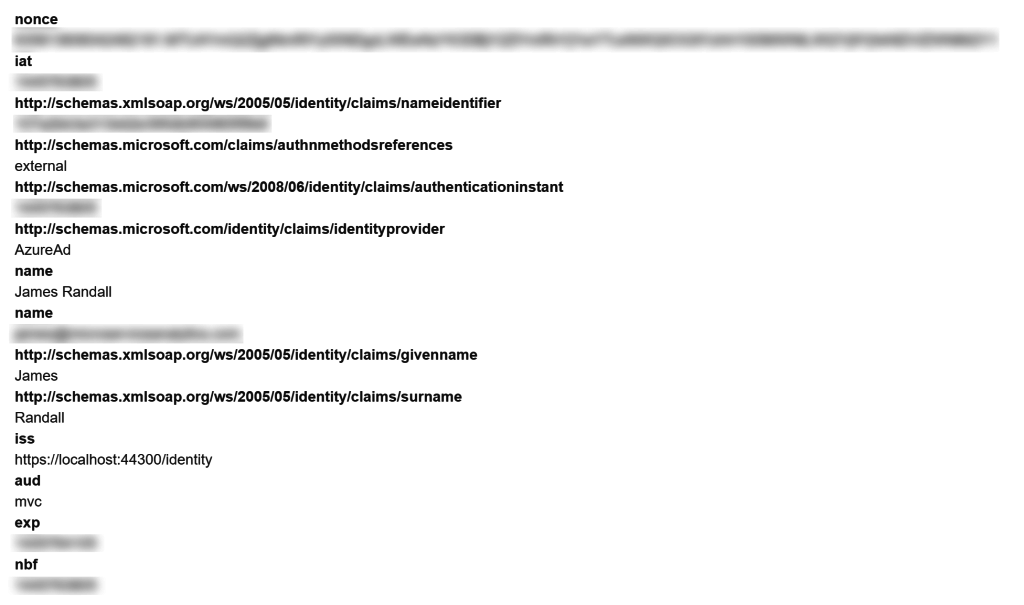
16

If you now head back into the Azure Management Portal and inspect the Applications tab for the Azure AD you used to login with you should find that the application we created earlier has been added here:
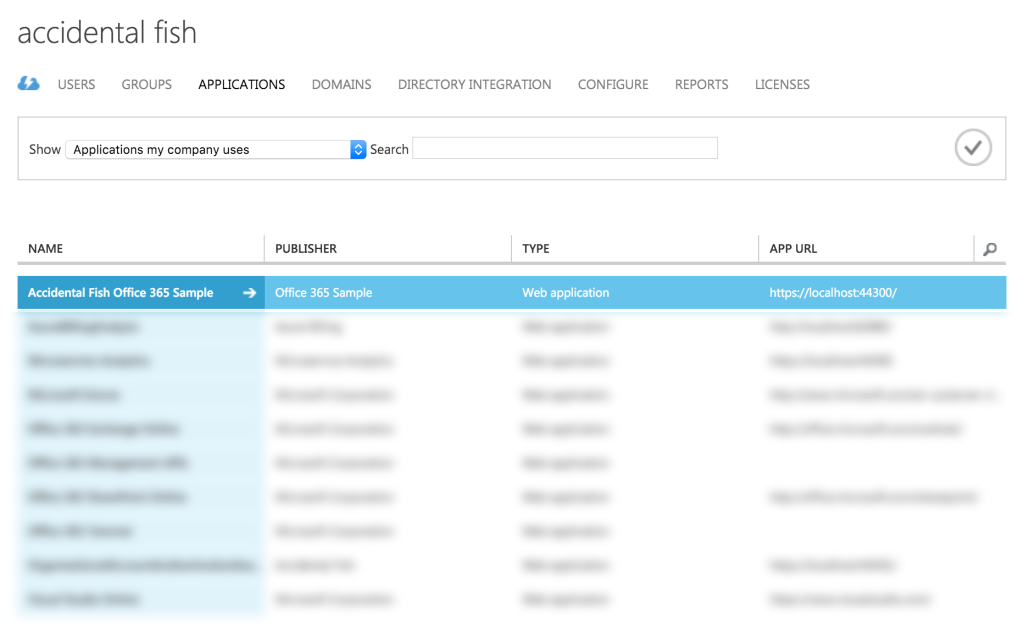
17

If all that worked then great – that’s the happy, easy, path dealt with! If not I suggest checking out my number one tip for dealing with IdentityServer3 issues.

The Administrator Consent Workflow

Depending on your domain configuration (the one you logged in with) then you might have hit the error page shown below:

18

Many domains, particularly of larger organisations, will have enabled Administrator Consent. This prevents users from being able to use their domain account to access resources they are not authorized to – unfortunately the error above isn’t very useful to end users.

To allow users in a domain configured this way to be able to access your application you need to implement a workflow that allows the Administrator to grant consent for users. Before continuing, if you’ve followed the steps above, then in Azure delete the application from your login domain – select it in the management portal and click Manage Access, then click Remove Access.

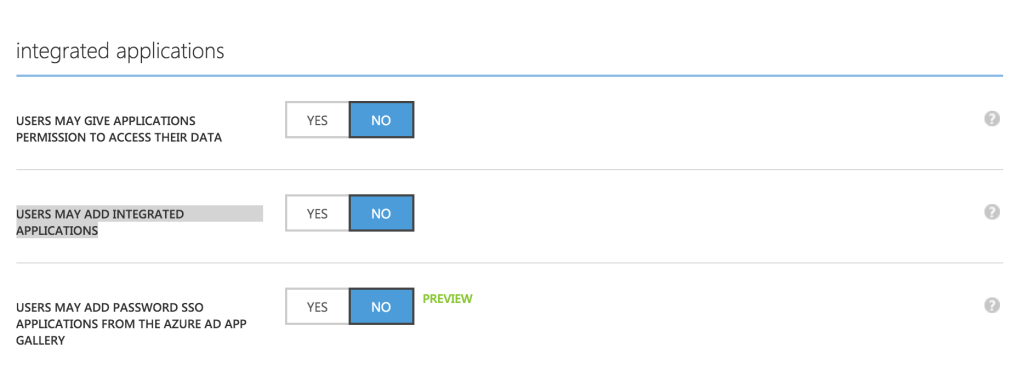
Firstly let’s turn on Administrator Consent in our login domain – select the domain in the management portal and click the Configure tab. When Azure has finished whirring away scroll down to the Integrated Applications section and set “USERS MAY GIVE APPLICATIONS PERMISSION TO ACCESS THEIR DATA” and “USERS MAY ADD INTEGRATED APPLICATIONS” to no. Then press save.
19

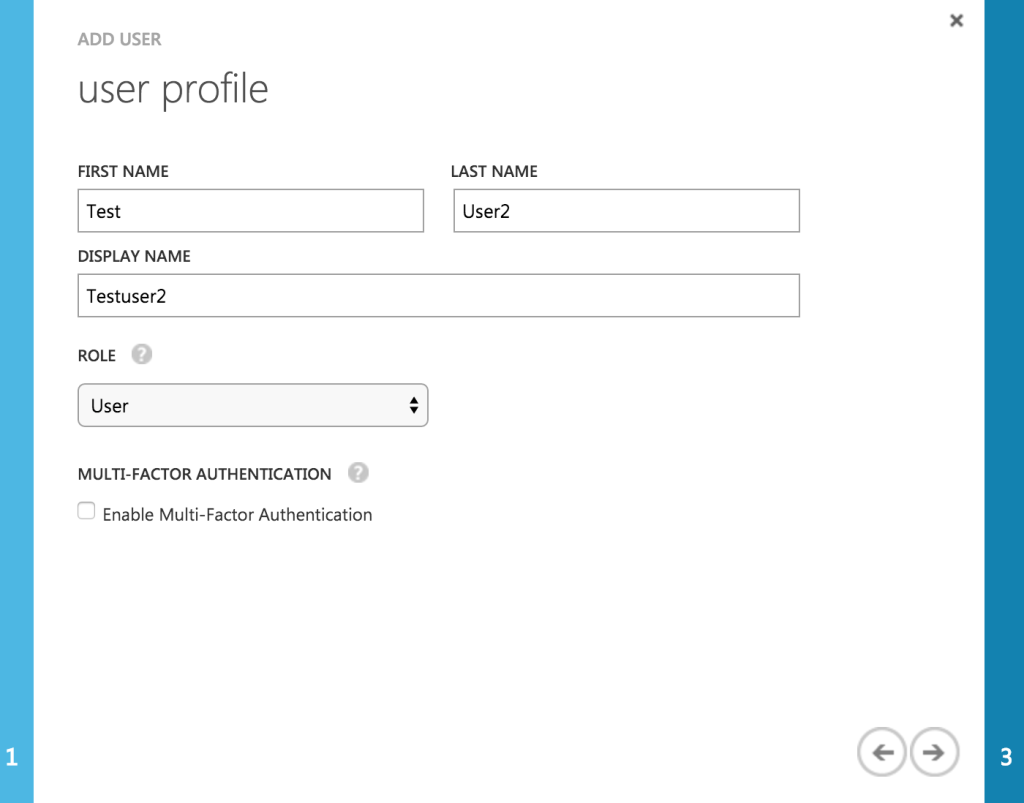
Now in the users section of your domain add a new user and give them only the User role:
20

Next head back to the Azure AD application we created at the start of this post, click the Configure tab and scroll down to the single sign on section. Enter a URL for the root of your website and click save:

24

Ensure the browser is closed and if you now run the Visual Studio solution again and attempt to login with this new user then you should see the error message shown earlier. If not check the configuration in Azure once more.

At this point we’ve got a domain that requires administrator consent for users to attach to our application. Begin by adding a new Nuget package:

Install-Package Microsoft.IdentityModel.Clients.ActiveDirectory

Then add a class called AzureTenant as shown below:

21

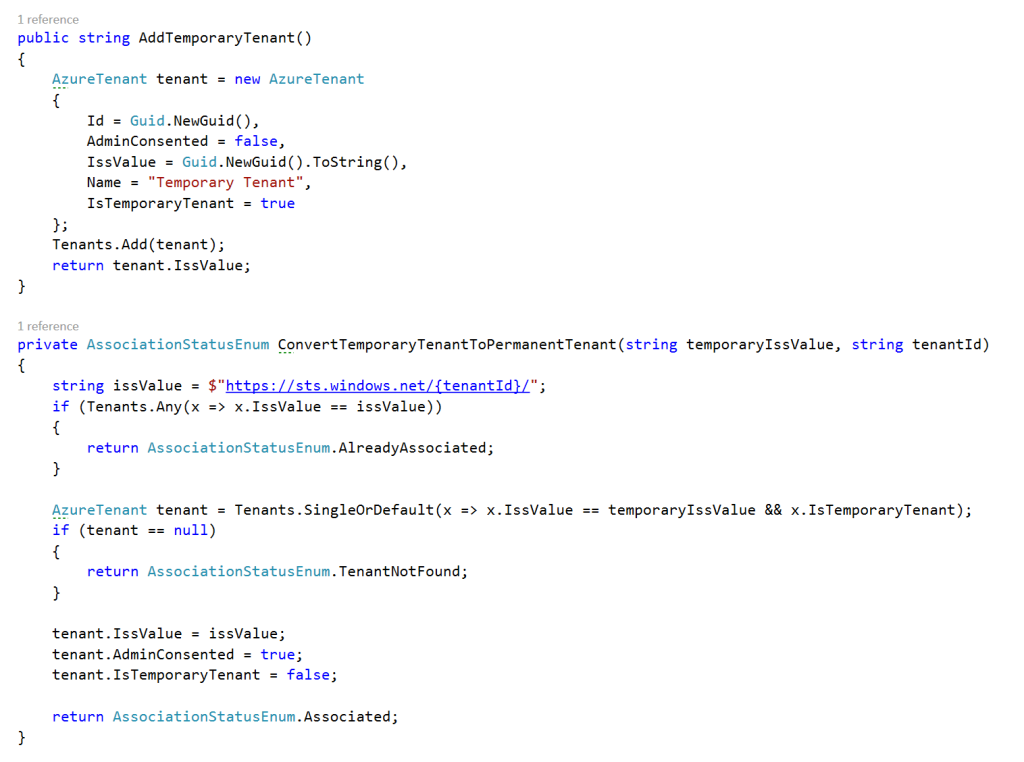
We now need to be able to manage our tenants. Normally you’d use some form of persistent store for this but I’m going to use a very basic in memory service by way of an example. The full service code is in GitHub here however there are two important sections. Firstly our controller (which we’ll work on later) will create a temporary tenant before handing off to Azure and later on after association is complete we convert this to a permanent tenant. This two stage process can be useful as in a more realistic example you may want to track some additional state across this request however all you need is someway of attaching data to a persistent unique ID – reusing the tenant like this keeps the example simple. However this code can be seen below:
25

When our controller hands off to Azure to handle the domain association we need to do so by forming up a URL and doing this can be seen below:

26

And finally following the association we need to retrieve the tenant ID for the newly associated tenant (and this is where your client key created at the beginning of this piece is required):

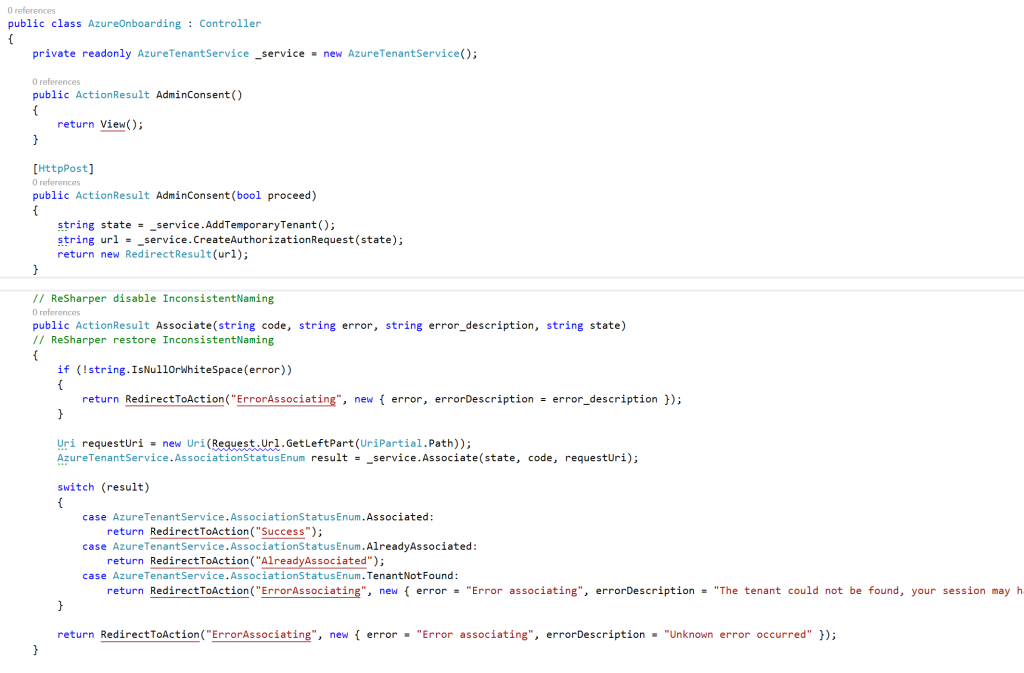
Now we need to add an MVC controller that is going to present this functionality to the user. There is some boilerplate at the bottom but I want to focus here on the AdminConsent and Associate methods as shown below:
22

The default admin consent view presents a button to the user and a paragraph confirming what they are about to do – when the post back hits the controller it does two things. Firstly it creates a temporary tenant in our data store and then redirects to the Azure authorization endpoint using the temporary ID of the tenant as the state.

When the user confirms the association in the Azure AD management page presented during the redirect then it will call back to the Associate action passing in the temporary tenant ID as the state. In more complex examples tracking the state in this way allows us to track back the Azure request to any information we’ve gathered before confirmation. The Associate action then uses our in memory service to confirm the association and handles the routing off to the appropriate page based on success or failure.

Finally having done all of the above we’re going to put a link to our admin consent page on the home page. I modified the Jumbotron to point at the AdminConsent view.

At this point you should be able to run the solution (and this is the complete solution in GitHub) and if things are wired up correctly then you should be able to click your admin consent link. Try this with your test user and it will fail but if you then try it with your admin user you should see a screen like this:
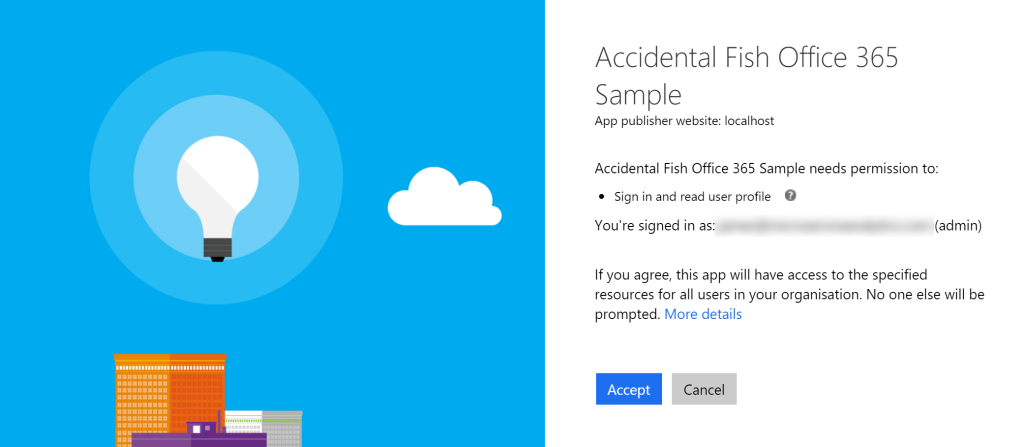
23

However if you’ve got everything right you should end up back at the success screen on your website and can now navigate into the About section.

Hopefully that helps anyone trying to figure out how to do this themselves and feel free to ask me questions in the comments or on Twitter.

Finally, worth repeating – the code is all available on GitHub.

Powershell and External IP Addresses

While doing work with Powershell and Azure Resource Manager templates today I wanted to configure the Azure SQL Database firewall to allow my build machine access to configure schema and stored procedures. To reliably know what your Internet facing IP one fairly reliable method is to bounce it back from a remote server and so I stood up a super simple website on Azure with a REST API to return to you your IP. You can find it’s swagger endpoint here. All that’s really behind the get action is a simple return of a request header:

public string Get()
{
    return HttpContext.Current.Request.UserHostAddress;
}

Getting hold of it from Powershell is pretty simple, you can use the Invoke-WebRequest cmdlet as follows (and I’m also removing the double quotes surrounding the returned json string):

$ipAddress = (Invoke-WebRequest https://afwhatsmyip.azurewebsites.net/ip).Content
$ipAddress = $ipAddress.Substring(1,$ipAddress.Length-2)

Feel free to use the endpoint yourself, I’m not planning on taking it down.

Azure Notification Hub – Double Message Gotcha

I recently worked on a piece of Azure hosted software that was required to send a large volume of push notifications to mobile devices and so decided to give Azure Notification Hubs a whirl.

On the whole I found it to be pretty easy to set up and get going with and very well documented with walkthroughs for most scenarios (both server side and device) across all the major platforms.

But, and you knew there was a but coming didn’t you?, I did come across one major gotcha while building an implementation based off the tutorial on sending notifications from your server.

After implementing this and doing a bit of debugging I was finding that every time I sent a message from the server to the device my device was responding to it multiple times. Due to how devices and the registration process work you do have to be careful to ensure that your device isn’t already registered with the notification hub and Microsoft themselves show you how to do this in this code snippet:

public class DeviceRegistration
{
    public string Platform { get; set; }
    public string Handle { get; set; }
    public string[] Tags { get; set; }
}
 
// POST api/register
// This creates a registration id
public async Task<string> Post(string handle = null)
{
    string newRegistrationId = null;
 
    // make sure there are no existing registrations for this push handle (used for iOS and Android)
    if (handle != null)
    {
        var registrations = await hub.GetRegistrationsByChannelAsync(handle, 100);
 
        foreach (RegistrationDescription registration in registrations)
        {
            if (newRegistrationId == null)
            {
                newRegistrationId = registration.RegistrationId;
            }
            else
            {
                await hub.DeleteRegistrationAsync(registration);
            }
        }
    }
 
    if (newRegistrationId == null) 
        newRegistrationId = await hub.CreateRegistrationIdAsync();
 
    return newRegistrationId;
}
 
// PUT api/register/5
// This creates or updates a registration (with provided channelURI) at the specified id
public async Task<HttpResponseMessage> Put(string id, DeviceRegistration deviceUpdate)
{
    RegistrationDescription registration = null;
    switch (deviceUpdate.Platform)
    {
        case "mpns":
            registration = new MpnsRegistrationDescription(deviceUpdate.Handle);
            break;
        case "wns":
            registration = new WindowsRegistrationDescription(deviceUpdate.Handle);
            break;
        case "apns":
            registration = new AppleRegistrationDescription(deviceUpdate.Handle);
            break;
        case "gcm":
            registration = new GcmRegistrationDescription(deviceUpdate.Handle);
            break;
        default:
            throw new HttpResponseException(HttpStatusCode.BadRequest);
    }
 
    registration.RegistrationId = id;
    var username = HttpContext.Current.User.Identity.Name;
 
    // add check if user is allowed to add these tags
    registration.Tags = new HashSet<string>(deviceUpdate.Tags);
    registration.Tags.Add("username:" + username);
 
    try
    {
        await hub.CreateOrUpdateRegistrationAsync(registration);
    }
    catch (MessagingException e)
    {
        ReturnGoneIfHubResponseIsGone(e);
    }
 
    return Request.CreateResponse(HttpStatusCode.OK);
}

You’ll notice the comment in the built of the Post action about making sure their are no existing registrations for the push handle. The handle is a token you obtain from the device and use as illustrated as part of the registration process.

The problem is – this code sample doesn’t work.

I learned the hard way that when the registration is created (in the Put action) the notification hub converts the handle to all upper case text. The handle from my device (which I obtained using the Cordova PushPlugin – I was working in Ionic) contained a mix of lower case letters and numbers.

When you subsequently search for registrations that match the handle (var registrations = await hub.GetRegistrationsByChannelAsync(handle, 100)) it performs a case sensitive search and none of your previous registrations will be found.

The result is that you can find yourself registering the same device token multiple times against different registration IDs and when you do a message send it is sent multiple times – multiple registrations == multiple sends.

If you suspect you might have a similar problem you can enumerate all registrations with the GetAllRegistrationsAsync method on the NotificationHubClient.

Other than that, and as I said earlier, my experience with the Notification Hub was really very smooth.

Azure Cloud Roles with .Net 4.5.2 and .Net 4.6

If, like me, you’ve been quietly tearing your hair out about the lack of support for .Net 4.5.2 in Azure Cloud Roles (and now .Net 4.6) for the last year or so then tear your hair out no longer!

I’d missed it but support for this shipped in the Azure SDK 2.6. You still have to install the .Net framework yourself as a startup task but there are some pretty clear instructions provided for doing that here that at the time of writing uses .Net 4.5.2 as an example.

According to the release notes 4.6 is also supported but I’ve not yet had an opportunity to try that.

Requiring the use of https on an AngularJS application hosted in an Azure Website

As I was reaching the tail end of my AngularJS coding challenge one of the tasks I had outstanding was to enforce the use of https across the site, even if a visitor accessed it via a http prefixed link.

For the last few years I’ve mostly been working in MVC and have done this selectively at the filter level (RequireHttps) but my Angular site was just a collection of client side files with no server component – that was hosted off in a second site that fronted up only a restful web API.

I’m familiar with the concept of URL rewriting from ages back but hadn’t used it (ever? or at least for as long as I can remember) on IIS / ASP.Net. Turns out it’s pretty simple to do, all I had to do was drop the block below into my sites web.config file:

1
2
3
4
5
6
7
8
9
10
11
12
13
14
15
16
17
18
19
20
<configuration>
  <system.web>
    <compilation debug="true" targetFramework="4.5.1" />
    <httpRuntime targetFramework="4.5.1" />
  </system.web>
  <system.webServer>
    <rewrite>
      <rules>
        <clear />
        <rule name="Redirect to https" stopProcessing="true">
          <match url="(.*)" />
          <conditions>
            <add input="{HTTPS}" pattern="off" ignoreCase="true" />
          </conditions>
          <action type="Redirect" url="https://{HTTP_HOST}{REQUEST_URI}" redirectType="Permanent" appendQueryString="false" />
        </rule>
      </rules>
    </rewrite>
  </system.webServer>
</configuration>

Handy to know if you’re deploying an AngularJS site to an Azure website or IIS.

12 Hour Coding Challenge – AngularJS and Azure

This last weekend I set myself a challenge to build and ship a web application in under 12 hours and in the process learn something about AngularJS – a framework I’ve been itching to try for some time. I also wanted to build something that would serve as a basis for a small iOS application written in Swift (to learn a little about that) and that might allow for extension opportunities in iOS8.

The good news is I succeeded in my challenge and you can find the website here and the source code on GitHub. I’ll post more details on how to build, configure and deploy this application shortly.

Without further ado – this is how my day went.

Hour 1 – Idea, Technology Choices, System Architecture

With only 12 hours and some learning to do I needed something I could pair back to a useful absolute minimum but that I could evolve additional features on top of easily in the future. I used to be a big user of delicious but gave up on it while it was under Yahoo’s tenure. I have tonnes of different devices, on different platforms (so for example iCloud syncing of bookmarks isn’t enough for me iPhone and iPad yes but what about my Surface?) so thought I’d have a bash at a simple online bookmark site. I paired things back to a handful of requirements I thought I could achieve:

  • Signup and sign-in (in a way that I could expand to include social account sign in in a later version)
  • View links in descending order they were saved
  • Save links in the website
  • Save links from a bookmarklet (button on your browsers toolbar)
  • Tag links
  • View links in tags in descending order they were saved

As both AngularJS is new to me, and Swift also when I get rount to that, I wanted to build everything else on a solid well understood foundation and so for the backend picked:

  • C# and .Net 4.5.1 – I’m hankering to experiment with Go but if I added that to everything else there’s no way I’d finish in 12 hours so I stuck to C#.·
  • Azure – table storage, web sites and a worker role. I plumped for table storage rather than SQL as I want this to scale easily and be super cheap to run – I’m paying for it myself and am willing to sacrifice features and some development complexity for a lower monthly bill.
  • Asp.Net Web API – I know this really well now so an obvious choice for the web service layer given I was using C#.
  • My open source Azure application framework, it wraps up most common operations you’d undertake against the core of Azure in a testable fashion and makes deployment and configuration easy.
  • My open source ASP.Net Identity 2.0 table storage provider.
  • The Bootstrap CSS template for the UI. Looks ok out the box and I can apply an off the shelf theme easily later (or tinker with it myself).

Most of the above took place in my head with a handful of notes.

Hour 2 – AngularJS Research

I didn’t expect this to hold too many surprises in terms of the overall system architecture as I’m pretty familiar with rich browser application development in jQuery and have some experience in backbone and Knockout but I didn’t know how to structure an application properly in AngularJS.

All I’d done with this previously was really an equivalent of the sample on the home page tucked away inside another website but it looked to be a super useful and comprehensive single page application framework that could provide a really clean MVC structure for a JavaScript client. I basically went through the developer guide at quite a clip and looked at the structure of a couple of non-trivial apps.

I was no expert after an hour, and didn’t expect to be, but I felt I could build the backend and not get surprised by the front end to a degree that would cause me to uproot the system architecture. Importantly I learned how I could integrate the client with the authentication endpoint via a helpful blog post (thank you!) which also introduced me to interceptors – most handy.

Hours 3 to 6 – Build the Backend

The storage model fell pretty trivially out of the requirements and came together quickly. I used the Chrome plugin Postman to test my REST interface without needing to write further code. I used my standard approach to this sort of thing in terms of project structure.

Nothing really new at all so largely just predictable legwork and at the end of the period I had a clean back end following a fairly pure REST model that I was fairly sure would work for the UI and I could deploy into Azure. So I did just that.

Hours 6 to 12

Best summarised as grappling with AngularJS with lots of Googling and referring to the documentation!

Actually to be fair other than a couple of pain points it was rather simple and I’m pretty sold on AngularJS as a framework for single page applications, I will certainly be using it on future projects.

I basically copied the application folder structure I would use if I was building a traditional server page request website in ASP.Net MVC and that I’d seen used in a couple of other apps that worked out really well with controllers, views and services separated by folders. I added a service layer that used the $http angular module to talk to my Web API and kept the http grub out of the controllers.

I managed to avoid the temptation to fall back to old patterns and stuck as far as I could to straight AngularJS, for example it was tempting to start inserting jQuery all over the place to show and hide things whereas I really wanted to do this in a clean and declarative fashion using Angular.

I had to refactor things a couple of times but nothing major – it came together quite easily. The last hour was putting a front page on it and dealing with something I hadn’t considered – as a new user when I went to the bookmark feed there is no real clue as to what to do next so I added a quick “if there are no links welcome page”. By the time I’d begun the UI work my own test account was littered with links!

The things that caused me most pain:

  • CORS support. My client website was running in a different domain (localhost in development) to my Web API and would in production (it’s static HTML so why waste expensive Asp.Net server resource!) and this meant I needed to use the CORS protocol (Cross Origin Resource Sharing) to access the Web API from JavaScript. Except…. it didn’t work. After much teeth gnashing it turned out that there were issues with the Web API 2.0 binaries and accompanying Web API 2.0 CORS package and I would need to upgrade to 2.2. I did this but in Microsoft’s recent “fun” fashion that included breaking changes on a point release. Fortunately simple to fix and then everything worked fine.
  • Infinite scrolling. I wanted to take an infinite scrolling approach to the bookmark list. You’ll have seen this if you’ve use things like Facebook or Twitter in a web browser – there are no “next page” and “previous page” buttons you simply scroll towards the end of the page and the next page is fetched in the background and added to the bottom. There is an AngularJS module that purports to assist with this however it had a number of bugs (must do a pull request) and so I spent 30 minutes learning the code and fixing them. Fortunately it was only 100 lines of code to deal with and still was a net win in terms of time. Maybe I’ve just missed something in terms of library dependencies.

Lessons Learned

  • AngularJS is pretty cool! Easy to use, well considered, and provides excellent structure. My only concern is that while digging around for answers to common problems it seems to be evolving very quickly with not a lot of consideration given to backwards compatibility. Maybe I’m wrong – I’m utterly new to it.
  • By keeping things tightly focussed I had something in the hands of a customer (me!) in 12 hours from start to finish. It doesn’t let me do things I’d eventually want to do (edit links and tags, delete links for example) and has some rough edges but I can already use it and “pilot” it myself in a beta fashion. I shipped as early as I absolutely possibly could.
  • The aggressive timescale meant I couldn’t go off on architectural / development flights of fancy, not that that’s really my thing – see below. I think every line of code I wrote in this system is specific to the business problem in hand. No custom UI components, no custom architecture, no funky “time saving” code / model / blah blah blah generators that are often the symptom of over architected solutions put together by people with too much time on their hands! My first choice was always to go find something off the shelf (hence my infinite scrolling bug fixes – and even factoring that in it was quicker than writing it myself).
  • There are lots of things I’d like a site like this to do (social sharing, editing as above, public / private feeds and links, trending URLs) and while I had those in mind and have rough views of how to build them I did not allow myself to get distracted by them. If I had my 12 hours would have become a week, would have become 2 weeks and so on. Just because they are not in v1 (or v0.1 if you prefer) doesn’t mean they can’t be put into v1.1.
  • You really do need to stand on the shoulders of giants – I can’t emphasise enough how strong my belief is that if the code you are writing is not specific to your particular problem then you’re going wrong: you’re hovering around the ankle while someone else starts at head height!

Next Steps

  • Understand the best way to unit test AngularJS and, errr, write the unit tests.
  • Present a tag list in the UI.
  • Deal with error conditions, particularly http errors, in a consistent way.
  • Beef up validations on both the server and the client.

Contact

  • If you're looking for help with C#, .NET, Azure, Architecture, or would simply value an independent opinion then please get in touch here or over on Twitter.

Recent Posts

Recent Tweets

Invalid or expired token.

Recent Comments

Archives

Categories

Meta

GiottoPress by Enrique Chavez