Function Monkey 2.1.0

I’ve just pushed out a new version of Function Monkey with one fairly minor but potentially important change – the ability to create functions without routes.

You can now use the .HttpRoute() method without specifying an actual route. If you then also specify no path on the .HttpFunction<TCommand>() method that will result in an Azure Function with no route specified – it will then be named in the usual way based on the function name, which in the case of Function Monkey is the command name.

I’m not entirely comfortable with the approach I’ve taken to this at an API level but didn’t want to break anything – next time I plan a set of breaking changes I’ll probably look to clean this up a bit.

The reason for this is to support Logic Apps. Logic Apps only support routes with an accompanying Swagger / OpenAPI doc and you don’t necessarily want the latter for your functions.

While I was using proxies HTTP functions had no route and so they could be called from Logic Apps using the underlying function (while the outside world would use the shaped endpoint exposed through the proxy).

Having moved to a proxy-less world I’d managed to break a production Logic App of my own because the Logic App couldn’t find the function (404 error). Redeployment then generated a more meaningful error – that routed functions aren’t supported. Jeff Hollan gives some background on why here.

I had planned a bunch of improvements for 2.1.0 (which I’ve started) which will now move to 2.2.0.

Writing and Testing Azure Functions with Function Monkey – Part 3

Part 3 of my series on writing Azure Functions with Function Monkey focuses on writing tests using the newly released testing package – while this is by no means required it does make writing high value acceptance tests that use your applications full runtime easy and quick.

Lessons Learned

It really is amazing how quickly time passes when you’re talking and coding – I really hadn’t realised I’d recorded over an hours footage until I came to edit the video. I thought about splitting it in two but the contents really belonged together so I’ve left it as is.

Writing and Testing Azure Functions with Function Monkey – Part 2

Part 2 in my series of writing and testing Azure Functions with Function Monkey looks at adding validation and returning appropriate status codes from HTTP requests. Part 3 will look at acceptance testing this.

(Don’t worry – we’re going to look at some additional trigger types soon!)

Lessons Learned

I made a bunch of changes following some awesome feedback on Twitter and hopefully that results in an improved viewing experience for people.

I still haven’t got the font size right – I used a mix of Windows 10 scaling and zoomed text in Visual Studio but its not quite there. I also need to start thinking of actually using zoom when I’m pointing at something.

Hopefully part 3 I can address more of these things.

Writing and Testing Azure Functions with Function Monkey – Part 1

I’ve long thought about creating some video content but forever put it off – like many people I dislike seeing and hearing myself on video (as I quipped half in jest, half in horror, on Twitter “I have a face made for radio and a voice for silent movies”). I finally convinced myself to just get on with it and so my first effort is presented below along with some lessons learned.

Hopefully video n+1 will be an improvement on video n in this series – if I can do that I’ll be happy!

The Process and Lessons Learned

This was very much a voyage of discovery – I’ve never attempted recording myself code before and I’ve never edited video before.

To capture the screen and initial audio I used the free OBS Studio which after a little bit of fiddling to persuade it to capture at 4K and user error resulting in the loss of 20 minutes of video worked really well. It was unobtrusive and did what it says on the tin.

I use a good quality 4K display with my desktop machine and so on my first experiment the text was far too smaller, I used the scaling feature in Windows 10 to bump things up to 200% and that seemed about right (but you tell me!).

I sketched out a rough application to build but left things fairly loose as I hoped the video would feel natural and I know from presentations (which I don’t mind at all – in contrast to seeing and hearing myself!) that if I plan too much I get a bit robotic. I also figured I’d be likely to make some mistakes and with a bit of luck they’d be mistakes that would be informative to others.

This mostly worked but I could have done with a little more practice up front as I took myself down a stupid route at one point as my brain struggled with coding and narrating simulatanously! Fortunately I was able to fix this later while editing but I made things harder for myself than it needed to be and there’s a slight alteration in audo tone as I cut the new voice work in.

Having captured the video I transferred it to my MacBook to process in Final Cut Pro X and at this point realised I’d captured the video in flv – a format Final Cut doesn’t import. This necessitated downloading Handbrake to convert the video into something Final Cut could import. Not a big deal but I could have saved myself some time – even a pretty fast Mac takes a while to re-encode 55 minutes of 4K video!

I’d never used Final Cut before but it turned out to be fairly easy to use and I was able to cut out my slurps of coffee and the time wasting uninformative mistake I made. I did have to recut some audio as I realised I’d mangled some names – this was fairly simple but the audio doesn’t sound exactly the same as it did when recorded earlier despite using the same microphone in the same room. Again not the end of the world (I’m not challenging for an Oscar here).

Slightly more irritating – I have a mechanical cherry switch keyboard which I find super pleasant to type on, but carries the downside of making quite a clatter which is really rather loud in the video. Hmmm. I do have an Apple bluetooth keyboard next to me, I may try connecting that to the PC for the next installment but it might impede my typing too much.

Overall that was a less fraught experience than I’d imagined – I did slowly get used to hearing myself while editing the video, though listening to it fresh again a day later some of that discomfort has returned! I’m sure I’ll get used to it in time.

Would love to hear any feedback over on Twitter.

Acceptance Testing with Function Monkey

I’ve been so busy the last few months that finding time to write technical articles has been difficult and I’ve not even managed to cover Function Monkey – the framework I put together for, according to its own strapline, writing testable more elegant Azure Functions with less boilerplate, more consistency, and support for REST APIs with C# / .Net.

I’m not proposing to start retro-covering 9 months of development as there is some fairly comprehensive documentation available on its own website but I thought it might be quite interesting to talk briefly about testing.

Function Monkey and the pattern it promotes (commanding / mediation) makes it very easy to unit test functions: command handlers can be constructed using dependency injection (either through an IServiceCollection approach or “poor mans” injection) and as the function trigger handlers themselves are written and compiled by the Function Monkey build tool there is by definition a clean separation of infrastructure / host and business logic (though of course you can always muddy this water!).

Perhaps less obvious is how to handle acceptance / integration type tests. One option, like with the out the box approach to writing Azure Functions, is to test the Functions by actually triggering them with an event. This works fine but it can quickly become fairly complex – you need to run the Functions and outcomes can be asynchronous and so, again, awkward to validate.

Function Monkey allows for another approach which often provides a high level of test coverage and high value tests while eliminating the complexity associated with a full end to end test that includes the triggers and that’s to run the tests at the command level – essentially run everything accept the pre-tested boilerplate generated by the Function Monkey framework. This also makes it easy to decouple from external dependencies such as storage if you so wish.

Within the generated Function Monkey boilerplate after all the busy work of deserializing, logging, and dealing with cross cutting concerns the heart of the function is a simple dispatch through a mediator of the command associated with the function. This look something like this:

var result = await dispatcher.DispatchAsync(deserializedCommand);

This will invoke all the implementation in your handlers and below and so we can get massive test coverage of the integrated system without having to actually stand up a Function App and deal with its triggers and dependencies quite easily simply by providing an environment in our tests that lets us run those commands.

The key to this is the implementation of a custom IFunctionHostBuilder for testing – this is the interface that is passed to your Function Monkey configuration class (based on IFunctionAppConfiguration). Function Monkey uses an internal “real” implementation of this as part of its runtime setup process but by making use of a custom one built for testing you can set up your test scenario using the exact same code as your production system but then modify its configuration, if required, for test.

It’s not a lot of work to build one of these but as its fairly generic and requires a small amount of Function Monkey implementation knowledge and a little knowledge of how the mediator works in a multi-threaded environment and so I’ve created a FunctionMonkey.Testing NuGet package that contains two important classes:

AbstractAcceptanceTest – a base class for your acceptance tests that will create an environment in which you can dispatch and test commands. This is useful for test frameworks that take a constructor approach to test setup such as xUnit.

AcceptanceTestScaffold – a class that can be used with frameworks that take a method based approach to test setup such as nUnit. Internally AbstractAcceptanceTest makes use of this class.

To see how they are used consider the below simple example function app:

public class FunctionAppConfiguration : IFunctionAppConfiguration
{
    public void Build(IFunctionHostBuilder builder)
    {
        builder
            .Setup((serviceCollection, commandRegistry) =>
            {
                // register our dependencies
                serviceCollection.AddTransient<ICalculator, Calculator>();

                // register our commands and handlers
                commandRegistry.Discover<FunctionAppConfiguration>();
            })
            .Functions(functions => functions
                .HttpRoute("/calculator", route => route
                    .HttpFunction<AdditionCommand>("/add")
                )
            )
            ;
    }
}

This creates a function app with a single HTTP route that takes two values and adds them together. The handler itself makes use of a dependency that is injected:

internal class AdditionCommandHandler : ICommandHandler<AdditionCommand, int>
{
    private readonly ICalculator _calculator;

    public AdditionCommandHandler(ICalculator calculator)
    {
        _calculator = calculator;
    }

    public Task<int> ExecuteAsync(AdditionCommand command, int previousResult)
    {
        return Task.FromResult(_calculator.Add(command.ValueOne, command.ValueTwo));
    }
}

We could run the Function App and write our tests against the exposed HTTP endpoint simply by calling the URL (for example http://localhost:7071/calculator/add?valueOne=2&valueTwo=3) and reading the result and there’s certainly value in that but there’s a fair amount of orchestration involved. You can make use of some Azure Function test code (based on the teams own integration tests) to run the Functions in process but at the time of writing its complex and not well documented (its also been a bit of a moving target).

However we can use the classes I mentioned earlier to invoke our commands without doing this. Here’s an example of an xUnit test that demonstrates this (to use these classes add the FunctionMonkey.Testing package to your test project):

public class AdditionFunctionShould : AbstractAcceptanceTest
{
    [Fact]
    public async Task ReturnTheSumOfTwoValues()
    {
        int result = await Dispatcher.DispatchAsync(new AdditionCommand
        {
            ValueOne = 5,
            ValueTwo = 4
        });

        Assert.Equal(9, result);
    }
}

That’s an awful lot easier than the alternatives and, importantly, the test is running in the exact same runtime that Function Monkey and your FunctionAppConfiguration class set up for the real functions.

For comparison the MS Test version using the AcceptanceTestScaffold looks like this:

[TestClass]
public class AdditionFunctionShould
{
    private AcceptanceTestScaffold _acceptanceTestScaffold;

    [TestInitialize]
    public void Setup()
    {
        _acceptanceTestScaffold = new AcceptanceTestScaffold();
        _acceptanceTestScaffold.Setup(typeof(FunctionAppConfiguration).Assembly);
    }

    [TestMethod]
    public async Task ReturnTheSumOfTwoValues()
    {
        int result = await _acceptanceTestScaffold.Dispatcher.DispatchAsync(new AdditionCommand
        {
            ValueOne = 5,
            ValueTwo = 4
        });

        Assert.AreEqual(9, result);
    }
}

I’m going to focus on the xUnit version and AbstractAcceptanceTest for the remainder of this blog post but the same functionality exists on AcceptanceTestScaffold but as methods rather than overrides.

Its common in tests, even integration or acceptance tests, to want to mock out part of the system. For example you might depend on a third party system that isn’t really a comfortable fit for test scenarios. You can accomplish this kind of modification to your normal execution runtime by using the AfterBuild and BeforeBuild support. The AfterBuild method is invoked immediately after the Setup method of the function app builder has been called and can be used, for example, to replace dependencies. The example below, though a little contrived, replaces the ICalculator with an NSubstitute substitute:

public class AdditionCommandShouldIncludingDependencyReplacement : AbstractAcceptanceTest
{
    public override void AfterBuild(IServiceCollection serviceCollection, ICommandRegistry commandRegistry)
    {
        base.AfterBuild(serviceCollection, commandRegistry);
        ICalculator calculator = Substitute.For<ICalculator>();
        calculator.Add(Arg.Any<int>(), Arg.Any<int>()).Returns(8);
        serviceCollection.Replace(new ServiceDescriptor(typeof(ICalculator), calculator));
    }

    [Fact]
    public async Task ReturnSubstitutedDependencyResult()
    {
        int result = await Dispatcher.DispatchAsync(new AdditionCommand
        {
            ValueOne = 2,
            ValueTwo = 2
        });

        Assert.Equal(8, result);
    }
}

Finally if you require environment variables to be set for configuration you can use a normal Azure Functions *.settings.json file and add it where you require. The below example introduces an additional base class that ensures the environment variables are always added for each test – because environment variables are global by default the Function Monkey test harness will only add them once (though you can override this with optional boolean flag on the AddEnvironmentVariables method):

public abstract class CommonAcceptanceTest : AbstractAcceptanceTest
{
    protected CommonAcceptanceTest()
    {
        AddEnvironmentVariables("./test.settings.json");
    }
}

public class AdditionCommandShouldWithEnvironmentVariables : CommonAcceptanceTest
{
    [Fact]
    public async Task ReturnTheSumOfTwoValues()
    {
        int result = await Dispatcher.DispatchAsync(new AdditionCommand
        {
            ValueOne = 5,
            ValueTwo = 4
        });

        Assert.Equal(9, result);
    }
}

And thats it – hope that’s useful! The source code for the examples can be found here on GitHub.
Bike Reminders – A breakdown of a real Azure application (Part 1)

I’ve been meaning to write about a real cloud based project for some time but the criteria a good candidate project needs to fit are challenging:

  • Significant enough to illustrate numerous design and implementation decisions
  • Not so large that the time investment for a reader to get into it is prohibitive
  • I need to own, or have free access to, the intellectual property
  • It needs to be something I want, or am contracted, to build for reasons beyond writing about it

To expand upon that last point a little – I don’t have the time to build something just for a series of blog posts and if I did I suspect it would be too artificial and essentially would end up a strawman.

The real world and real development is constrained messy, you come across things that you can’t economically solve in an ivory towered fashion. You can’t always predict everything in advance, you get things wrong and don’t always have the time available to start again and so have to do the best that you can with what you have.

In the case of this project I hadn’t really thought about it as a candidate for writing about until I neared the end of building the MVP and so it comes, rather handily, with warts and all. For sure I’ve refactored things but no more than you’d expect to on any time and budget constrained project.

My intention is, over the course of a series of posts, to explore this application in an end to end fashion: the requirements, the architecture, the code, testing, deployment – pretty much its end to end lifecycle. Hopefully this will contain useful nuggets of information that can be applied on other projects and help those new to Azure get up and running.

About the project

So what does the project do?

If you’re a keen cyclist you’ll know that you need to check various components on your bike at regular intervals. You’ll also know that some of the components last just long enough that you’ll forget about them – my personal nemesis is chain wear, more than once I’ve taken that to the point where it is likely to start damaging the rear cassette having completely forgotten about it.

I’m fortunate enough to have a rather nice bike and so there is nothing cheap about replacing anything so really not a mistake you want to be making. Many bikes also now contain components that need charging – Di2 and eTap are increasingly common and though I’ve yet to get caught out on a ride I’ve definitely run it closer than I realised.

After the last time I made this mistake I decided to do something about it and thus was born Bike Reminders: a website that links up with Strava to send you reminders as you accrue mileage on each of your bikes. While not a substitute for regularly checking your bike I’m hopeful it will at least give me a prod over chain wear! I contemplated going direct to Garmin but they seem to want circa $5000 for API access and thats a lot of component damage before I break even – ouch.

In terms of an MVP that distilled out into a handful of high level requirements:

  • Authenticate with Strava
  • Access a users bikes in Strava
  • Allow a mileage based maintenance schedule to be set up against a bike
  • Allow email reminders to be dismissed / reset
  • Allow email reminders to be snoozed
  • Update the progress towards each reminder based on rider activity in Strava

There were also some requirements I wanted to keep in mind for the future:

  • Time based reminders
  • “First ride of the week” type reminders
  • Allow reminders to be sent via push notifications
  • Predictive information – based on a riders history when is a reminder likely to be triggered, this is useful if you’re going away on a training camp for example and want to get maintenance done before you go

Setting off on the project I set a number of overarching goals / none functional requirements for it:

  • Keep it small enough that it could be built alongside a two (expanded to three!) week cycling training block in Mallorca
  • To have a very low cost to run both in terms of minimum footprint (cost to run 1 user) and per user cost as the system scales up
  • To require little to no maintenance and a fully automated delivery mechanism
  • To support multiple client types (initially web but to be followed up with a Flutter app)
  • Keep personal data out of it as far as possible
  • As far as possible spin out any work that isn’t specific to the problem domain as open source (I’m fairly likely to reuse it myself if nothing else)

And although I try not to jump ahead of myself that mapped nicely onto using Azure as a cloud provider with Azure Functions for compute and Azure DevOps and Application Insights for the operational side of things.

Architecture

The next step was to figure out what I’d need to build – initially I worked this through on a “mental beermat” while out cycling but I like to use the C4 Model to describe software systems. It gives a basic structure and just enough tools to think about and describe systems at different levels of architecture without disappearing up its own backside in complexity and becoming an end in and of itself.

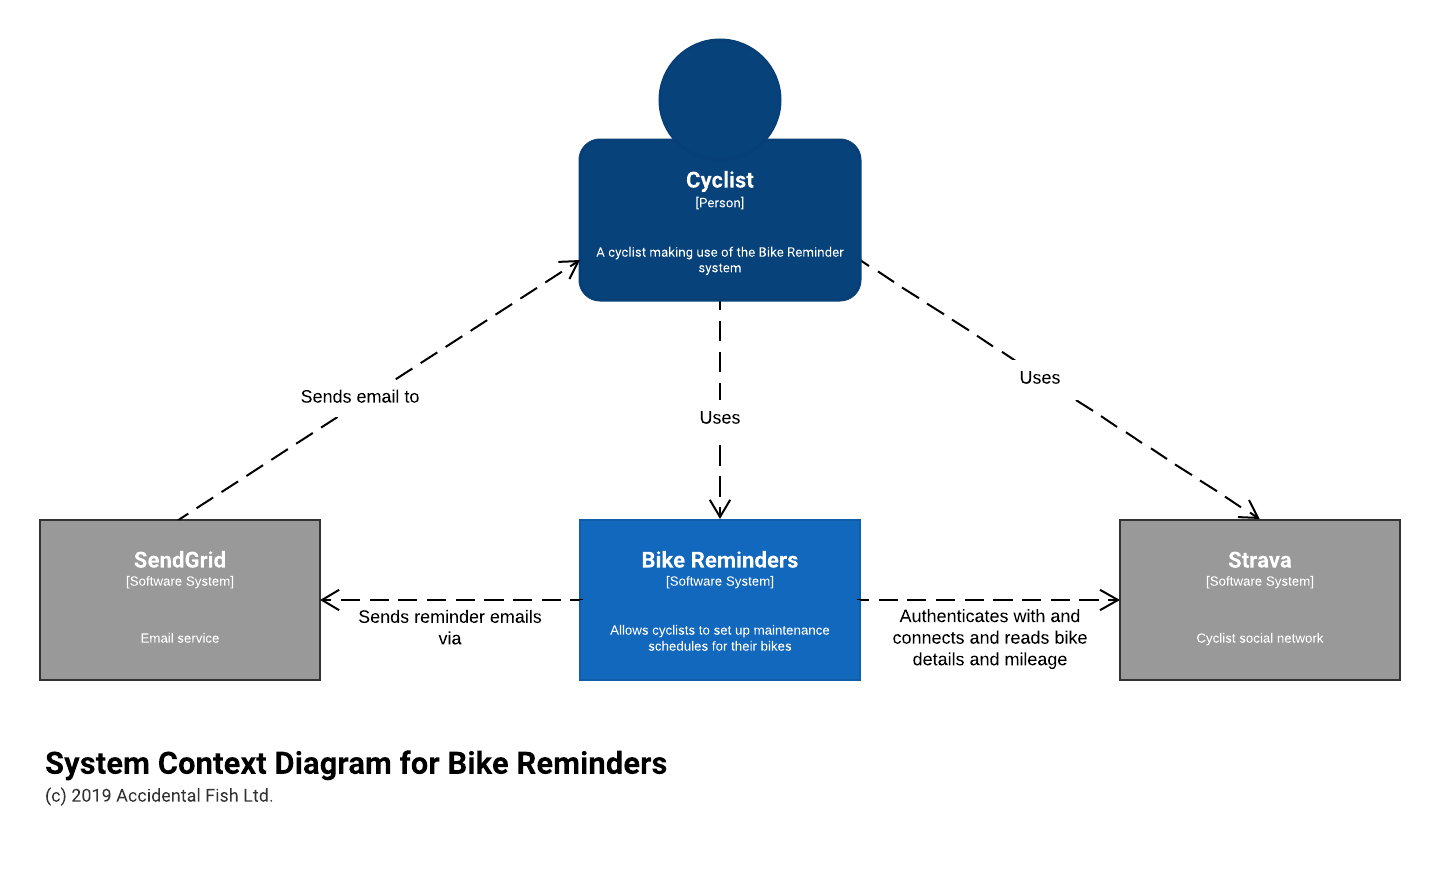
System Context

For this fairly simple and greenfield system establishing the big picture was fairly straight forward. It’s initially going to comprise of a website accessed by cyclists with their Strava logins, connecting to Strava for tracking mileage, and sending emails for which I chose SendGrid due to existing familiarity with it.

Containers

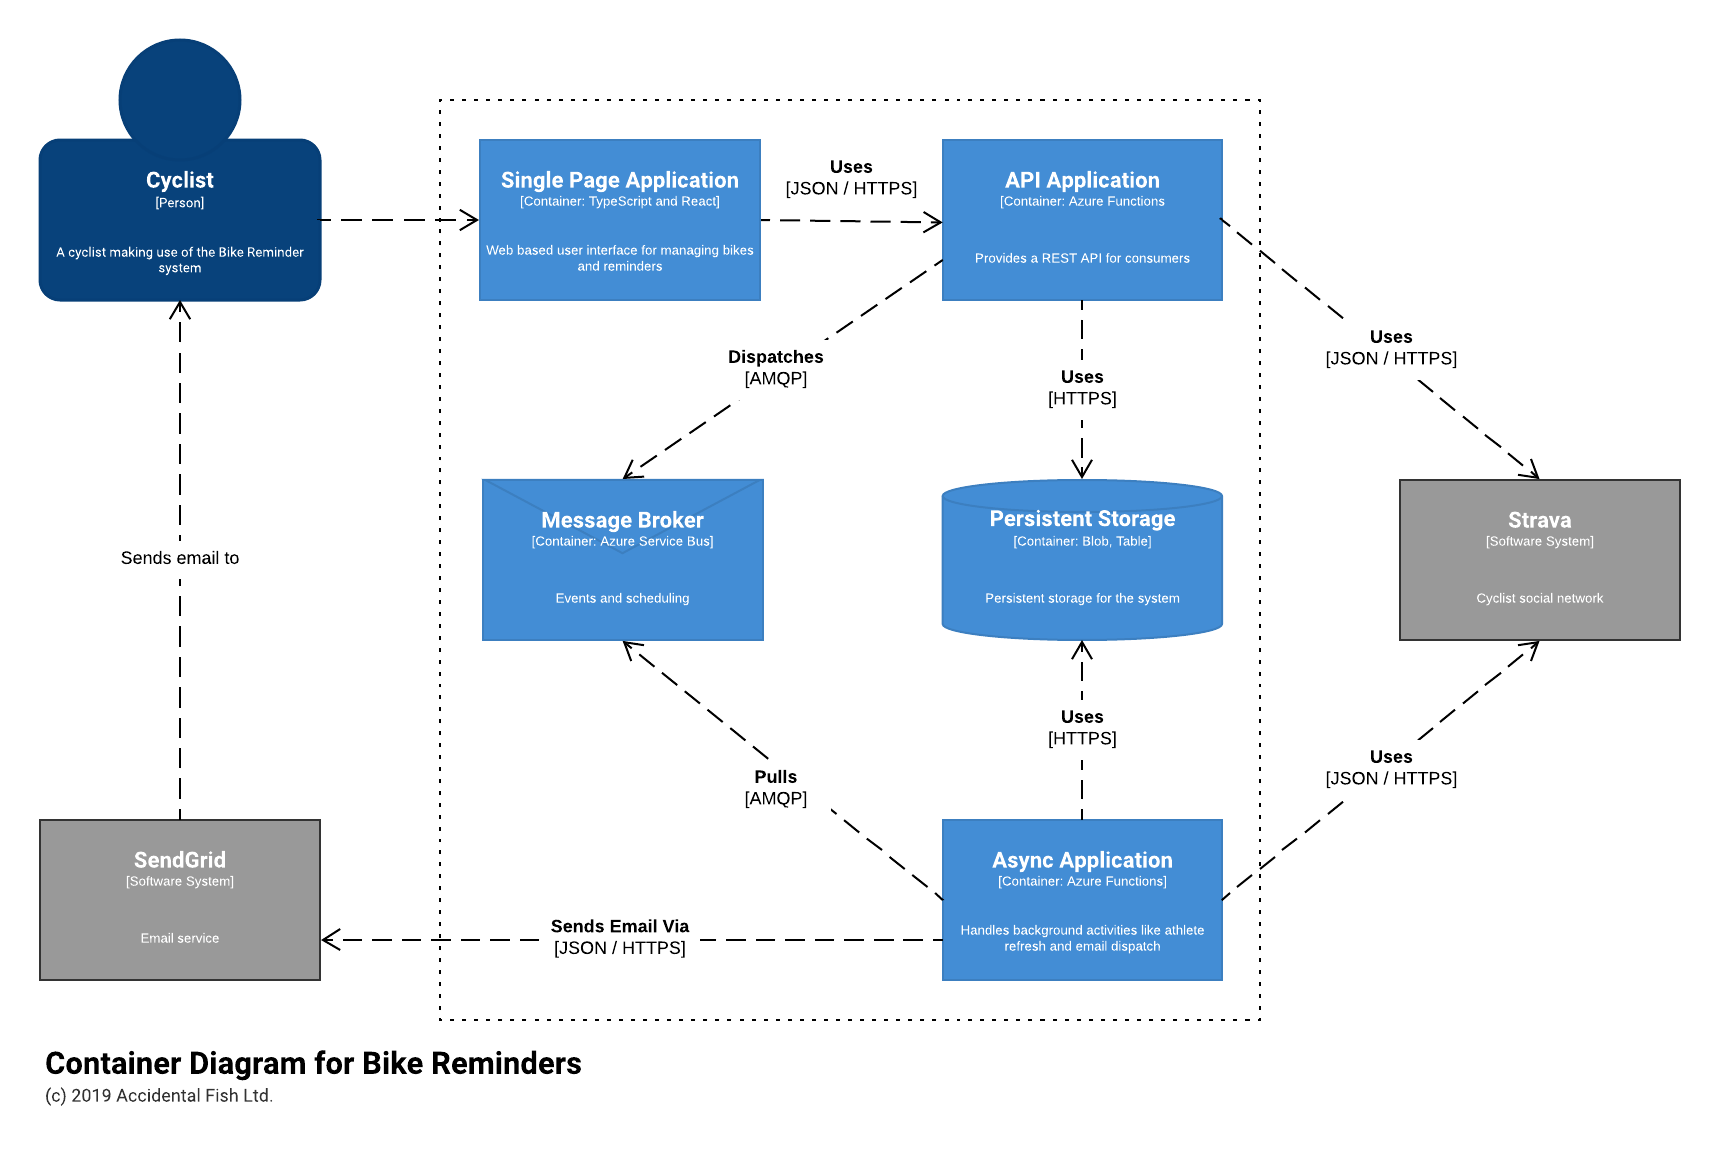
Breaking this down into more detail forced me to start making some additional decisions. If I was going to build an interactive website / app I’d need some kind of API for which I decided to use Azure Functions. I’ve done a lot of work with them, have a pretty good library for building REST APIs with them (Function Monkey) and they come with a generous free usage allowance which would help me meet my low cost to operate criterion. The event based programming model would also lend itself to handling things like processing queues which is how I envisaged sending emails (hence a message broker – the Azure Service Bus).

For storage I wanted something simple – although at an early stage it seemed to me that I’d be able to store all the key details about cyclists, their bikes and reminders in a JSON document keyed off the cyclists ID. And if something more complex emerged I reasoned it would be easy to convert this kind of format into another. Again cost was a factor and as I couldn’t see, based on my simple requirements, any need for complex queries I decided to at least start with plain old Azure Storage Blob Containers and a filename based on the ID. This would have the advantage of being really simple and really cheap!

The user interface was a simple decision: I’ve done a lot of work with React and I saw no reason it wouldn’t work for this project. Over the last few months I’ve been experimenting with TypeScript and I’ve found it of help with the maintainability of JavaScript projects and so decided to use that from the start on this project.

Finally I needed to figure out how I’d most likely interact with the Strava API to track changes in mileage. They do have a push API that is available by email request but I wanted to start quickly (and this was Christmas and I had no idea how soon I’d hear back from them) and I’d probably have to do some buffering around the ingestion – when you upload a route its not necessarily associated with the right bike (for example my Zwift rides always end up on my main road bike, not my turbo trainer mounted bike) to prevent confusing short term adjustments.

So to begin with I decided to poll Strava once a day for updates which would require some form of scheduling. While I wasn’t expecting huge amounts of overnight for the website Strava do rate limit APIs and so I couldn’t use a timer function with Azure as that would run the risk of overloading the API quite easily. Instead I figured I could use enqueue visibility on the Service Bus and spread out athletes so that the API would never be overloaded. I’ve faced a similar issue before and so I figured this might also make for a useful piece of open source (it did).

All this is summarised in the diagram below:

Azure Topology

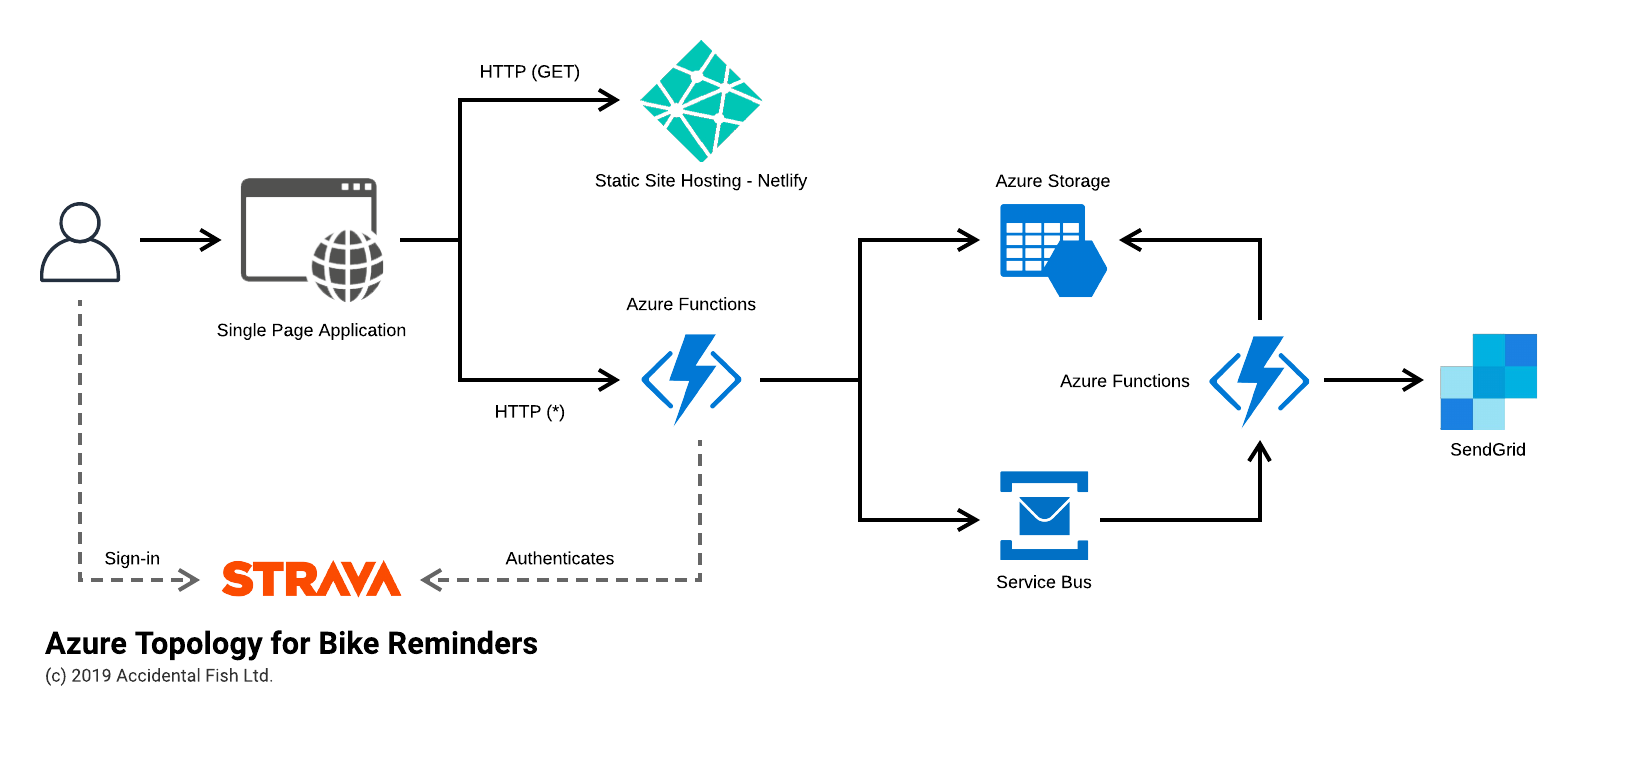
Mapped (largely) onto Azure I expected the system to look something like the below:

The notable exception is the introduction of Netlify for my static site hosting. While you can host static sites on Azure it is inelegant at best (and the Azure Storage SPA support is useless as you can’t use SSL and a custom domain) and so a few months back I went searching for an alternative and came across Netlify. It makes building, deploying and hosting sites ridiculously easy and so I’ve been gradually switching my work over to here.

I also, currently, don’t have API Management in front of the Azure Functions that present the REST API – the provisioned approach is simply too expensive for this system at the moment and the consumption model, at least at the time of writing, has a horrific cold start time. I do plan to revisit this.

Next Steps

In the next part we’ll break out the code and begin by taking a look at how I structured the Azure Function app.

Don’t Be Spock

As I write this its three years to the day that Leonard Nimoy passed away.

I remember it clearly – it was the first, and so far only, occasion that the death of a celebrity deeply affected me. I’d had a rough time over the preceding months where a number of things I’d been repressing and dealing with poorly came to a head and so on the day of his death I found myself in my therapist’s office in floods of tears. I don’t mean the occasional tear drop – I mean body racking sobs.

I’d been seeing my therapist, Brad, for a few months at that point and made a lot of progress and in fact I was nearing the end of my time with him, we got to a point a little later where we mutually decided it made sense to end the sessions and I’m relieved to be able to say I’ve been much happier since and had no need to revisit – though having gone through the experience I see it very much as like having a Personal Trainer for your emotional mind and so wouldn’t hesitate to go back if I felt I needed to.

But back to Leonard Nimoy and, of course, Spock.

As the sobbing subsided, interspersed with me saying things like “this is ridiculous” and almost laughing, Brad said to me:

“Have you considered that perhaps the reason this has upset you so is that you identify so strongly with him, or rather the character he played”.

This was something that, strange as it may seem despite me being an avid fan of the Original Series, had never occurred to me and it hit me like a lightning bolt. There is a famous scene from the episode The Naked Time where Mr Spock is infected with a virus and loses control of his emotions, something he deeply struggles with and finds himself repeating to himself “I am in control of my emotions” and repeating a short numeric sequence. And I realised I actually did that – exactly that – several times a day in my head and frequently out loud.


I also realised I’d been doing that for many years – as long as I could clearly remember. Brad then described to me what it had been like working with me when I first went to see him – that I would sit like a stone, deny basic human feelings to myself and him, and generally do my best to avoid discussing things in terms of feelings. All despite the fact I had sought him out. I’m incredibly grateful he stuck with me and eventually found a way “in”.

What’s funny is that looking back into my childhood all my “heroes” were emotionless. By far the most prominent was Spock, but also Data from The Next Generation and the robots from the Isaac Asimov novels. I never wanted to be one of the more freewheeling characters such as Riker or Kirk (though I did want to be first officer of the Enterprise!) it was always one of the emotionless characters. Looking back now at some of my childhood and teenage experiences (nothing massively traumatic but they still left an impact as those years do on everyone) its easy to see why those characters would appeal to me particularly when combined with an early interest in computers (which can give a powerful illusion of control which doesn’t hold up in the real world – I occasionally worry about code camps and the impact on young minds but that’s a conversation for another post).

But the problem is we humans are not Vulcans, nor are we androids, or robots and it’s, as I found, deeply damaging to repress your feelings. Attempting to do so results, at best, is them mutating into something else, most likely a more damaging and extreme emotion. In my case that was often anger – which again I would repress, right up until something went snap (and it was at that point I sought out Brad – fortunately my snap harmed no one, myself included).

What I learned through this process, and it’s something I still work on, is that it’s healthier to allow yourself to feel the emotions, no matter what they are, acknowledge them and then consciously decide how to respond. It can be hard, particularly if like me your first instinct is to push them away. If I don’t feel able to respond proportionately in the moment I’ve learned a good technique is to take myself aside, experience the feelings and allow them to pass, then reflect.

I learned an awful lot about myself and people through the process of therapy – I think it was one of the most intense learning experiences of my life and since then I have tried to be open about these things, to me its a way to turn a painful experience into something perhaps positive. I guess many of us in the tech industry had heroes such as Spock as we were growing up and so I guess my ultimate message is: Don’t Be Spock.

He’s awesome – but he’s not a great template for being a human. If you have a tendency to bottle things up and hide from feelings  – find a way to talk, find a way to feel these things and perhaps seek professional help.

I promise you – if nothing else you’ll learn something.


Multi-Model Azure Cosmos DB – Running SQL (Geospatial) Queries On a Graph

One of the major selling points for Microsoft’s Azure Cosmos DB is that its a multi-model database – you can use it as a:

  • Simple key/value pair store through the Table API
  • Document database through the SQL API
  • Graph database through the Graph (Gremlin) API
  • MongoDB database
  • Cassandra database

Underneath these APIs Cosmos uses it’s Atom-Record-Sequence (ARS) type system to manage and store the data which has the less well publicized benefit of allowing you to use different APIs to access the same data.

While I’ve not explored all the possibilities I’d like to demonstrate the potential that this approach opens up by running geo-spatial queries (longitude and latitude based) against a Graph database that is primarily used to model social network relationships.

Lets assume you’re building a social network to connect individuals in local communities and you’re using a graph database to connect people together. In this graph you have vertexes of type ‘person’ and edges of type ‘follows’ and when someone new joins your network you want to suggest people to them who live within a certain radius of their location (a longitude and latitude derived from a GPS or geocoded address). In this example we’re going to do this by constructing the graph based around social connections using Gremlin .NET and using the geospatial queries available to the SQL API (we’ll use SP_DISTANCE) to interrogate it based on location.

Given a person ID, longitude and latitude firstly lets look at how we add someone into the graph (this assumes you’ve added the Gremlin .NET package to your solution):

public Task CreateNode(string personId)
{
    const string cosmosEndpoint = "yourcosmosdb.gremlin.cosmosdb.azure.com";
    string username = $"/dbs/yoursocialnetwork/colls/relationshipcollection"; // the form of /dbs/DATABASE/colls/COLLECTION
    const string cosmosAuthKey = "yourauthkey";

    GremlinServer gremlinServer = new GremlinServer(cosmosEndpoint, 443, true, username, cosmosAuthKey);
    using (GremlinClient client = new GremlinClient(gremlinServer, new GraphSON2Reader(),
        new GraphSON2Writer(), GremlinClient.GraphSON2MimeType))
    {
        Dictionary<string, object> arguments = new Dictionary<string, object>
        {
            {"personId", personId}
        };

        await client.SubmitAsync("g.addV('person').property('id', personId)", arguments);
    }
}

If you run this code against a Cosmos DB Graph collection it will create a vertex with the label of person and assign it the specified id.

We’ve not yet got any location data attached to this vertex and that’s because Gremlin.NET and Cosmos do not (to the best of my knowledge) allow us to set a property with the specific structure required by the geospatial queries supported by SQL API. That being the case we’re going to use the SQL API to load this vertex as a document and attach a longitude and latitude. The key to this is to use the document endpoint. If you look in the code above you can see we have a Gremlin endpoint of:

yourcosmosdb.gremlin.cosmosdb.azure.com

If you attempt to run SQL API queries against that endpoint you’ll encounter errors, the endpoint we need to use is:

yourcosmosdb.documents.azure.com

To keep things simple we’ll use the LINQ support provided by the DocumentDB client but rather than define a class that represents the document we’ll use a dictionary of strings and objects. In the multi-model world we have to be very careful not to lose properties required by the other model and by taking this approach we don’t need to inspect and carefully account for each property (and ongoing change!). If we don’t do this we are liable to lose data at some point.

All that being the case we can attach our location property using code like the below:

public static async Task AddLocationToDocument(this DocumentClient documentClient, Uri documentCollectionUri, string id, double longitude, double latitude)
{
    DocumentClient documentClient = new DocumentClient(new Uri("https://yourcosmosdb.documents.azure.com"));
    Uri collectionUri = UriFactory.CreateDocumentCollectionUri("db","coll");
    IQueryable<Dictionary<string,object>> documentQuery = documentClient.CreateDocumentQuery<Dictionary<string,object>>(
            collectionUri ,
            new FeedOptions { MaxItemCount = 1 })
        .Where(x => (string)x["id"] == id);
    PersonDocument document = documentQuery.ToArray().SingleOrDefault();
    document["location"] = new Point(longitude, latitude);
    Uri documentUri = UriFactory.CreateDocumentUri(
        Constants.Storage.Cosmos.Database,
        Constants.Storage.Cosmos.RelationshipsCollection,
        id);
    await documentClient.ReplaceDocumentAsync(documentUri, document);
}

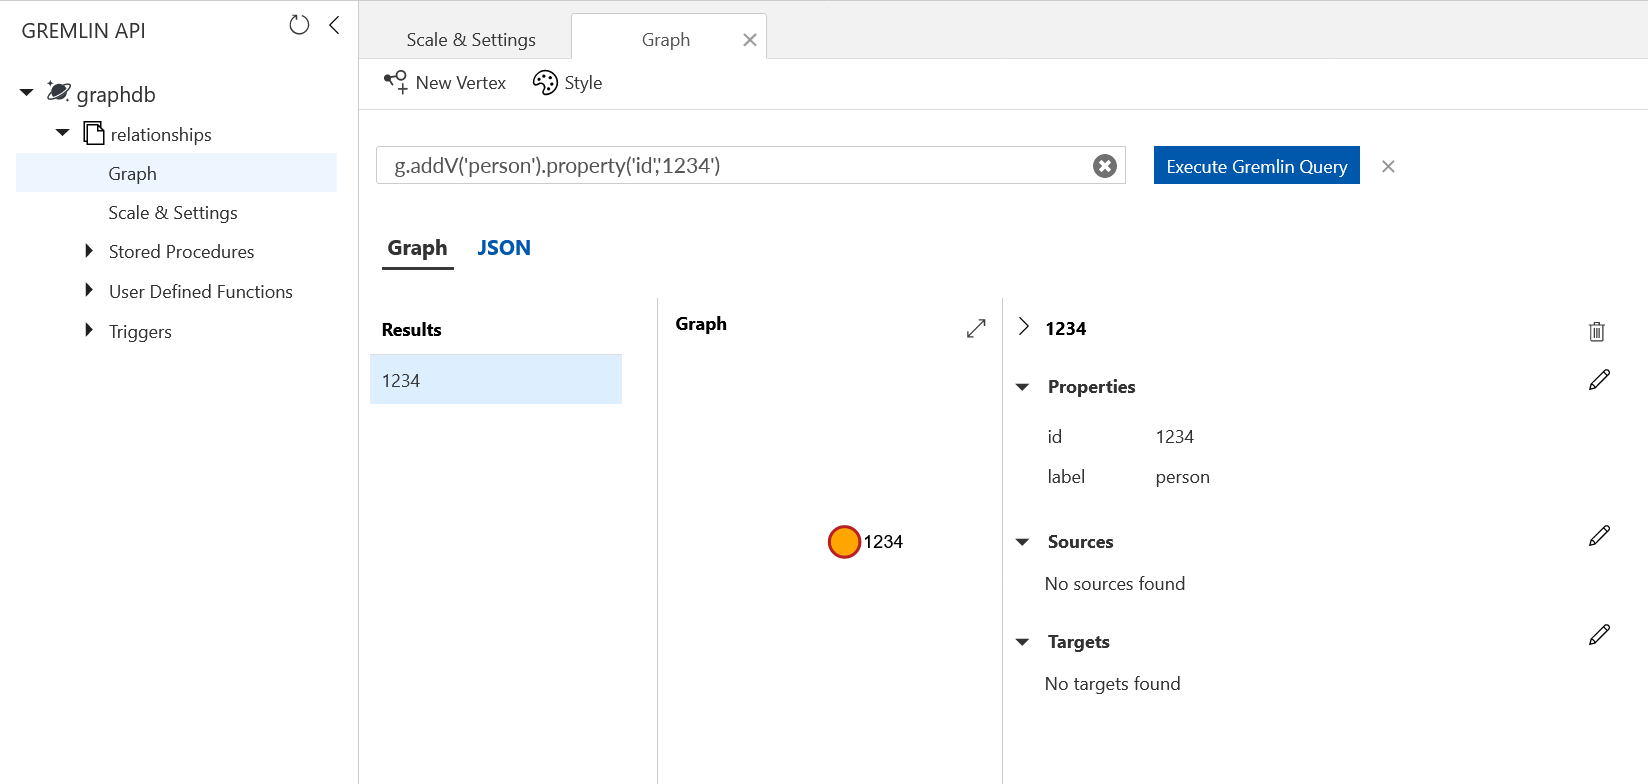
If you were now to inspect this vertex in the Azure portal you won’t see the Location property in the graph explorer – its property format is not one known to Gremlin:

However if you open the collection in Azure Storage Explorer (another example of multi-model usage) you will see the vertexes (and edges) exposed as documents and will see the location attached in the JSON:

{
    "location": {
        "type": "Point",
        "coordinates": [
            -6.45436,
            49.12892
        ]
    },
    "id": "1234",
    "label": "person",
    "_rid": "...",
    "_self": "...",
    "_etag": "\"...\"",
    "_attachments": "attachments/",
    "_ts": ...
}

Ok. So at this point we’ve got a person in our social network graph. Lets imagine we’re about to add another person and we want to search for nearby people. We’ll do this using a SQL API query to find people within 30km of a given location (I’ve stripped out some of the boilerplate from this):

const double rangeInMeters = 30000;
IQueryable<Dictionary<string,object>> query = _documentClient.Value.CreateDocumentQuery<Dictionary<string, object>>(
    collectionUri,
    new FeedOptions { MaxItemCount = 1000 })
    .Where(x => (string)x["label"] == "person" &&
                ((Point)x["location"]).Distance(new Point(location.Longitude, location.Latitude)) < rangeInMeters);
var inRange = query.ToArray();

From here we can iterate our inRange array and build a Gremlin query to attach our edges roughly of the form:

g.V('1234').addE('follows').to(g.V('5678'))

Closing Thoughts

Being able to use multiple models to query the same data brings a lot of expressive power to Cosmos DB though it’s still important to choose the model that best represents the primary workload for your data and understand how the different queries behave in respect to RUs and data volumes.

It’s also a little clunky working in the two models and its quite easy, particularly if performing updates, to break things. I expect as Cosmos becomes more mature that this is going to be cleaned up and I think Microsoft will talk about these capabilities more.

Finally – its worth opening up a graph database with Azure Storage Explorer and inspecting the documents, you can see how Cosmos manages vertexes and edges and it gives a more informed view as to how graph queries consume RUs.


Avoiding Gremlin Injection Attacks with Azure Cosmos DB

I’ve written previously about some of the issues with using Cosmos DB as a graph database from .NET. One of the more serious issues, I think, is that the documentation doesn’t really demonstrate how to avoid an injection attack when using Gremlin as it presents examples using hard coded strings which are then just picked up and run through the Gremlin.NET library:

// Gremlin queries that will be executed.
private static Dictionary<string, string> gremlinQueries = new Dictionary<string, string>
{
    { "Cleanup",        "g.V().drop()" },
    { "AddVertex 1",    "g.addV('person').property('id', 'thomas').property('firstName', 'Thomas').property('age', 44)" },
    { "AddVertex 2",    "g.addV('person').property('id', 'mary').property('firstName', 'Mary').property('lastName', 'Andersen').property('age', 39)" },
    { "AddVertex 3",    "g.addV('person').property('id', 'ben').property('firstName', 'Ben').property('lastName', 'Miller')" },
    { "AddVertex 4",    "g.addV('person').property('id', 'robin').property('firstName', 'Robin').property('lastName', 'Wakefield')" },
    { "AddEdge 1",      "g.V('thomas').addE('knows').to(g.V('mary'))" },
    { "AddEdge 2",      "g.V('thomas').addE('knows').to(g.V('ben'))" },
    { "AddEdge 3",      "g.V('ben').addE('knows').to(g.V('robin'))" },
    { "UpdateVertex",   "g.V('thomas').property('age', 44)" },
    { "CountVertices",  "g.V().count()" },
    { "Filter Range",   "g.V().hasLabel('person').has('age', gt(40))" },
    { "Project",        "g.V().hasLabel('person').values('firstName')" },
    { "Sort",           "g.V().hasLabel('person').order().by('firstName', decr)" },
    { "Traverse",       "g.V('thomas').out('knows').hasLabel('person')" },
    { "Traverse 2x",    "g.V('thomas').out('knows').hasLabel('person').out('knows').hasLabel('person')" },
    { "Loop",           "g.V('thomas').repeat(out()).until(has('id', 'robin')).path()" },
    { "DropEdge",       "g.V('thomas').outE('knows').where(inV().has('id', 'mary')).drop()" },
    { "CountEdges",     "g.E().count()" },
    { "DropVertex",     "g.V('thomas').drop()" },
};

Focusing in on one of the add vertex examples and how it might be executed with the Gremlin.NET library:

private async Task BadExample()
{
    using (GremlinClient client = new GremlinClient(_gremlinServer, new GraphSON2Reader(),
        new GraphSON2Writer(), GremlinClient.GraphSON2MimeType))
    {
        await client.SubmitAsync(
            "g.addV('person').property('id', 'thomas').property('firstName', 'Thomas').property('age', 44)");
    }
}

We know from years of SQL that examples like this quickly become widespread injection prone pieces of code like the below, particularly if people are new to working with a new database (and in the case of graph databases and Gremlin – that’s most people):

private async Task BadExample(string firstName, int age)
{
    using (GremlinClient client = new GremlinClient(_gremlinServer, new GraphSON2Reader(),
        new GraphSON2Writer(), GremlinClient.GraphSON2MimeType))
    {
        await client.SubmitAsync(
            $"g.addV('person').property('id', '{firstName.ToLower()}').property('firstName', '{firstName}').property('age', {age})");
    }
}

The issue, if you’re not familiar with injection attacks, is that as a user I can enter a ‘ character in the input and break out to add my own code through a user interface that executes on the server – for example I could supply a firstName of:

James').property('myinjectedproperty','hahaha got ya

And I’ve managed to attach some data of my own choosing. Obviously I could do more nefarious things too.

Fortunately Gremlin does support parameterised queries and we can rewrite the code above more safely to look like this and leave the libraries and database to take care of this:

private async Task BetterExample(string firstName, int age)
{
    using (GremlinClient client = new GremlinClient(_gremlinServer, new GraphSON2Reader(),
        new GraphSON2Writer(), GremlinClient.GraphSON2MimeType))
    {
        Dictionary<string, object> arguments = new Dictionary<string, object>
        {
            { "firstNameAsId", firstName.ToLower() },
            { "firstName", firstName },
            { "age", age }
        };
        await client.SubmitAsync(
            $"g.addV('person').property('id', firstNameAsId).property('firstName', firstName).property('age', age)", arguments);
    }
}

With the uptake of Cosmos and Graph databases being new to most people I really wish the Cosmos team would update these docs with a security first mindset and its something I’ve fed back to them previously. Leaving the documentation as it stands is almost certainly going to lead to more insecure code being written than would otherwise be the case.

I’ll probably drop out a few short Cosmos posts over the next few days – I’m doing a lot of (quite interesting!) work with it at the moment.

SPA Hosting on Azure / Can We Have More Boring Stuff Please

Microsoft announced the long awaited SPA hosting support for Azure yesterday. Before rushing in and adopting it make sure to read the small print – there is no support for custom domain names and SSL. Which given SSL is becoming almost mandatory (and about to become super-prominent as a warning in Chrome) makes it pretty useless for public facing websites in 2018.

Its based on Azure Storage which has outstanding user voice requests from 2012 asking for SSL support with custom domains so it may also not be something that appears soon. I would love to be wrong on that.

The options for resolving it are much like they were before this feature was introduced: proxies of one form or another (CDN, Functions, CloudFlare etc.).

If you’re happy with an Azure storage based domain name, so probably working on an internal facing system I guess, it may still work for you.

As someone who does a lot of work with SPAs I must admit I’m really disappointed in this – it seems pretty ridiculous to me that in 2018 amidst all the “big” Azure announcements (machine learning on the edge, globally distributed planet scale data etc.) that hosting  a single page app, essentially static files, cheaply and easily is still awkward on the platform and requires multiple services to deliver.

I’d love to see the Azure teams really focus on, and really finish, some of the “boring stuff” like this – it might not get marketing column inches, and might not make for a snazzy new “you can do this in 5 minutes” video to impress purchasing CTOs but it would save time and effort amongst hundreds of thousands of engineers and development shops and would deliver real value to those people. I’m often reminded of the Saving Lives story that Andy Hertzfeld tells.

Contact

  • If you're looking for help with C#, .NET, Azure, Architecture, or would simply value an independent opinion then please get in touch here or over on Twitter.

Recent Posts

Recent Tweets

Invalid or expired token.

Recent Comments

Archives

Categories

Meta

GiottoPress by Enrique Chavez